1. مقدمه
This manual provides essential instructions for the setup, operation, maintenance, and troubleshooting of your Shuttle XPC Slim DH610 Barebone PC. The DH610 is a compact and versatile barebone system designed to support Intel 12th and 13th Generation LGA1700 processors, offering robust performance for various applications including office, digital signage, and kiosks.
2. اطلاعات ایمنی
لطفاً برای جلوگیری از آسیب دیدن دستگاه یا آسیب دیدن خودتان، این دستورالعملهای ایمنی را مطالعه و رعایت کنید:
- Always disconnect the power cord before performing any installation or maintenance.
- Ensure the system is placed on a stable, flat surface with adequate ventilation.
- دستگاه را در معرض رطوبت، دمای شدید یا نور مستقیم خورشید قرار ندهید.
- Only use the power adapter provided or an approved equivalent.
- Refer to qualified service personnel for any repairs not covered in this manual.
3. محتویات بسته
بررسی کنید که همه اقلام در بسته شما موجود باشد:
- Shuttle XPC Slim DH610 Barebone PC Unit
- کیت نصب VESA
- آداپتور برق و سیم
- Accessory Pack (screws, cables, etc.)
- راهنمای شروع سریع (در صورت وجود)
4. راه اندازی و نصب
The Shuttle DH610 is a barebone system, requiring the installation of a CPU, RAM, and storage devices before operation.
4.1. Opening the Chassis
Carefully remove the chassis cover to access the internal components. Typically, this involves unscrewing a few screws on the rear or sides of the unit and sliding the cover off.

Image: The Shuttle XPC Slim DH610 with its top cover removed, showing the internal layout including cooling fans and the motherboard.
۴.۲ نصب پردازنده
The DH610 supports Intel 12th/13th Generation Alder Lake-S LGA1700 processors with a maximum TDP of 65W. Ensure your chosen CPU has integrated graphics, as the system does not support F-series processors without integrated graphics or K-series processors.
- اهرم سوکت CPU را باز کنید و پوشش محافظ را بردارید.
- Carefully align the CPU with the socket, matching the triangular markers.
- CPU را به آرامی و بدون فشار وارد کردن، داخل سوکت قرار دهید.
- اهرم سوکت را ببندید تا CPU محکم شود.
- خنککننده پردازنده را طبق دستورالعمل سازنده نصب کنید.
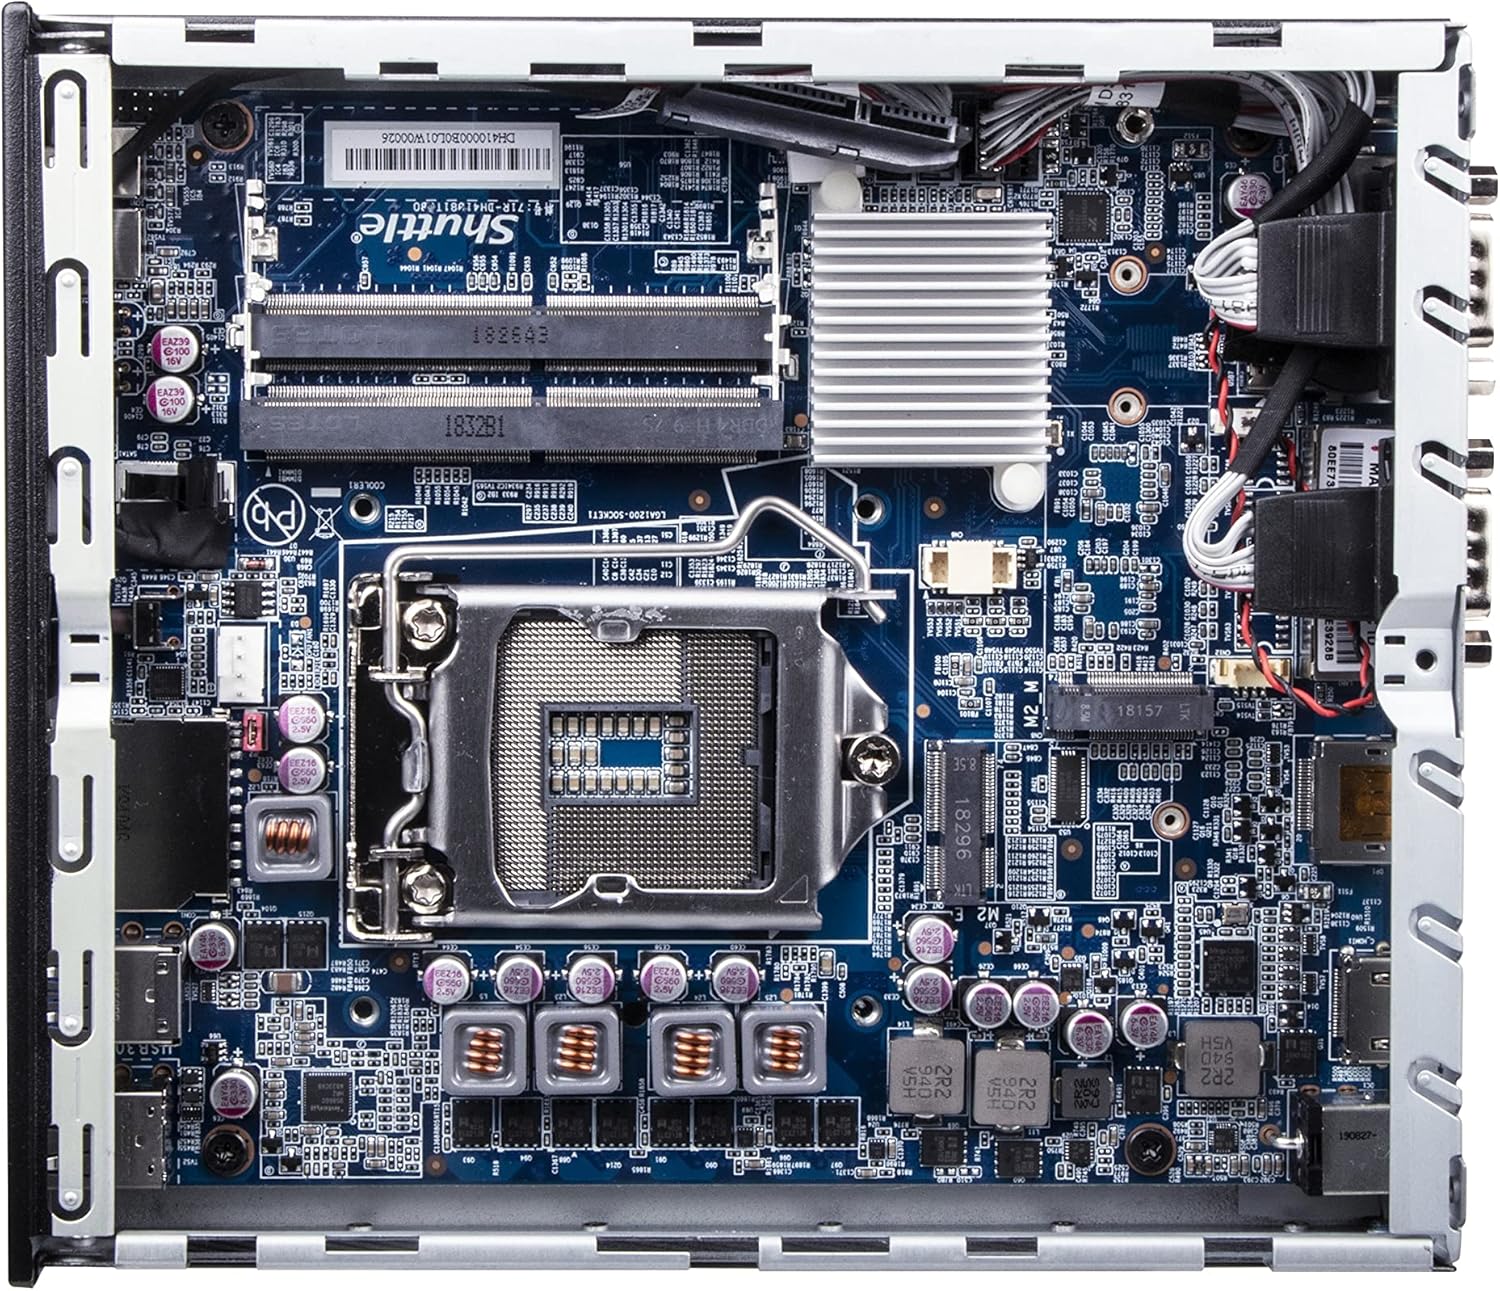
تصویر: جزئیات view of the Shuttle DH610 motherboard, highlighting the LGA1700 CPU socket, RAM slots, and other integrated circuits.
Note: For 13th Gen Intel Processors, BIOS Version DH610000.202 or newer is required. Update BIOS if necessary after initial setup with a 12th Gen CPU or via a compatible method.
۳.۳ نصب رم
The system features two 260-pin dual-channel DDR4 SODIMM slots, supporting up to 64GB (2x 32GB) at 3200MHz. Dual-channel memory is recommended for optimal performance.
- Locate the SODIMM slots on the motherboard.
- شیار روی ماژول رم را با کلید داخل شیار همتراز کنید.
- Insert the module at a 45-degree angle and push down until the clips on both sides snap into place.
۴.۳ نصب و راه اندازی فضای ذخیره سازی
The DH610 supports one 2.5-inch HDD/SSD and one M.2 2280 SSD.
- 2.5" Drive: Mount the 2.5" HDD/SSD into the designated bay using the provided screws and connect the SATA data and power cables.
- M.2 SSD: Insert the M.2 2280 SSD into its slot, securing it with the provided screw.
4.5. اتصال لوازم جانبی
After installing internal components, reattach the chassis cover. Connect your peripherals to the available ports:
- نمایش: Connect your monitor(s) to the HDMI 2.0b port or one of the two DisplayPort outputs. The system supports up to three 4K UHD displays.
- دستگاه های USB: Use the four USB 3.2 Gen1 ports (including one Type-C) and four USB 2.0 ports for keyboard, mouse, and other USB devices.
- شبکه: Connect to your network using either of the two Gigabit Ethernet LAN ports (Intel 2.5GbE + Intel 1GbE).
- دستگاههای سریال: Utilize the two RS232 COM ports for compatible devices.
- صوتی: Connect headphones or a microphone to the front audio jacks.

Image: The front panel of the Shuttle DH610, featuring the power button, USB 3.2 Gen1 ports (one Type-C), and audio input/output jacks.

Image: The rear panel of the Shuttle DH610, displaying the DC-IN power input, HDMI, two DisplayPort outputs, two LAN ports, USB ports, and two COM ports.
4.6. اتصال برق
Connect the power adapter to the DC-IN port on the rear of the unit, then plug the power cord into an electrical outlet.
5. دستورالعمل های عملیاتی
5.1. روشن/خاموش کردن
- روشن کردن: دکمه پاور واقع در پنل جلویی را فشار دهید.
- خاموش: Perform a graceful shutdown through your operating system. Alternatively, press and hold the power button for 4-5 seconds for a forced shutdown (use only when necessary).
۵.۴ نصب سیستم عامل
The DH610 is compatible with Windows 11/10 (64-bit) and Linux (64-bit) operating systems. Follow the standard installation procedures for your chosen OS. Ensure all necessary drivers are installed for optimal performance, which can typically be found on the Shuttle support webسایت
۵.۱ دسترسی به بایوس/UEFI
برای دسترسی به ابزار تنظیم BIOS/UEFI، دکمه را فشار دهید. حذف کنید or F2 key repeatedly during system startup. This allows configuration of boot options, system settings, and hardware parameters.
6. تعمیر و نگهداری
6.1. تمیز کردن
Regularly clean the exterior of the unit with a soft, dry cloth. Use compressed air to clear dust from ventilation openings to ensure proper airflow and prevent overheating. Do not use liquid cleaners directly on the device.
۶.۲. بهروزرسانیهای بایوس
Periodically check the Shuttle website for BIOS updates. BIOS updates can improve system stability, add support for new hardware (like 13th Gen Intel CPUs), and fix bugs. Follow the instructions provided with the BIOS update package carefully.
7 عیب یابی
If you encounter issues with your DH610, refer to the following common problems and solutions:
- خروجی نمایشگر ندارد:
- Ensure the monitor is powered on and correctly connected to the HDMI or DisplayPort.
- Verify that the CPU has integrated graphics and that the display cable is connected to the motherboard's video output, not a discrete graphics card (if applicable).
- کابل نمایشگر یا مانیتور دیگری را امتحان کنید.
- روشن نشدن سیستم:
- Check that the power adapter is securely connected to both the unit and the electrical outlet.
- Ensure the CPU and RAM are correctly installed and seated.
- پریز برق را با دستگاه دیگری تست کنید.
- 13th Gen CPU Not Recognized:
- The system requires BIOS Version DH610000.202 or newer for 13th Gen Intel processors. If you have an older BIOS, you may need to install a 12th Gen CPU first to update the BIOS.
- داغ شدن بیش از حد سیستم:
- Ensure the chassis ventilation holes are not obstructed.
- Clean any dust accumulation from the internal fans and heatsinks.
- مطمئن شوید که خنککننده پردازنده به درستی نصب شده و تماس خوبی با پردازنده برقرار میکند.
8. مشخصات
| ویژگی | مشخصات |
|---|---|
| نام تجاری | شاتل |
| نام مدل | DH610 |
| سوکت CPU | LGA 1700 |
| پردازنده های پشتیبانی شده | Intel 12th/13th Gen Alder Lake-S (65W max, with integrated graphics) |
| چیپست | اینتل H610 |
| نوع رم | DDR4 SODIMM (2x slots) |
| حداکثر ظرفیت رم | 64 GB (2x 32GB) |
| سرعت حافظه | تا 3200 مگاهرتز |
| گرافیک | Integrated Intel UHD Graphics (CPU dependent) |
| خروجی ویدیو | 1x HDMI 2.0b, 2x DisplayPort (Supports triple 4K UHD displays) |
| ذخیره سازی | 1x 2.5" HDD/SSD bay, 1x M.2 2280 slot |
| پورت های USB | 4x USB 3.2 Gen1 (1x Type-C), 4x USB 2.0 (Total 8) |
| LAN | 1x Intel 2.5GbE, 1x Intel 1GbE |
| پورت های سریال | 2x RS232 (COM) |
| سازگاری سیستم عامل | Windows 11/10 (64-bit), Linux (64-bit) |
| مصرف برق | 65 Watts (CPU) |
| اجزای شامل | کوه VESA |
9. گارانتی و پشتیبانی
۱۰.۱ ضمانت سازنده
The Shuttle XPC Slim DH610 Barebone PC comes with a 3-Year Manufacturer's Warranty. This warranty covers defects in materials and workmanship under normal use. Please retain your proof of purchase for warranty claims.
9.2. پشتیبانی فنی
For technical assistance, driver downloads, BIOS updates, or further troubleshooting not covered in this manual, please visit the official Shuttle website or contact Shuttle customer support. Free lifetime technical support is typically provided by the manufacturer.
برای اطلاعات بیشتر به آدرس زیر مراجعه کنید: www.shuttle.com