مقدمه
This manual provides essential information for the safe and effective use of your YATO Angle Grinder Dust Shroud, model YT-82988. This accessory is designed to collect dust and debris generated during grinding and cutting operations with compatible angle grinders, improving workplace safety and cleanliness. Please read these instructions carefully before assembly, operation, or maintenance.
دستورالعمل های ایمنی
Always observe general power tool safety rules when using this dust shroud. Failure to follow these instructions may result in serious injury or property damage.
- تجهیزات حفاظت فردی (PPE): Always wear appropriate PPE, including safety glasses, hearing protection, dust mask, and gloves.
- حوزه کاری: Ensure your work area is clean, well-lit, and free from obstructions. Keep bystanders and children away.
- سازگاری ابزار: Only use this dust shroud with angle grinders that meet the specified compatibility requirements (M14 spindle thread, 28-36mm collar diameter, max 125mm disc diameter).
- پیوست ایمن: قبل از شروع کار، مطمئن شوید که محفظه گرد و غبار محکم به فرز زاویهای متصل شده است.
- استخراج گرد و غبار: Connect the dust shroud to a suitable vacuum cleaner or dust extractor for optimal dust collection.
- بازرسی: Before each use, inspect the dust shroud for any damage or wear. Do not use if damaged.
- تعمیر و نگهداری: Keep the dust shroud clean and free of debris to ensure proper function.
محصول تمام شده استview
The YATO YT-82988 dust shroud is designed for efficient dust extraction during angle grinding tasks. It features a robust construction and adjustable components for versatile use.
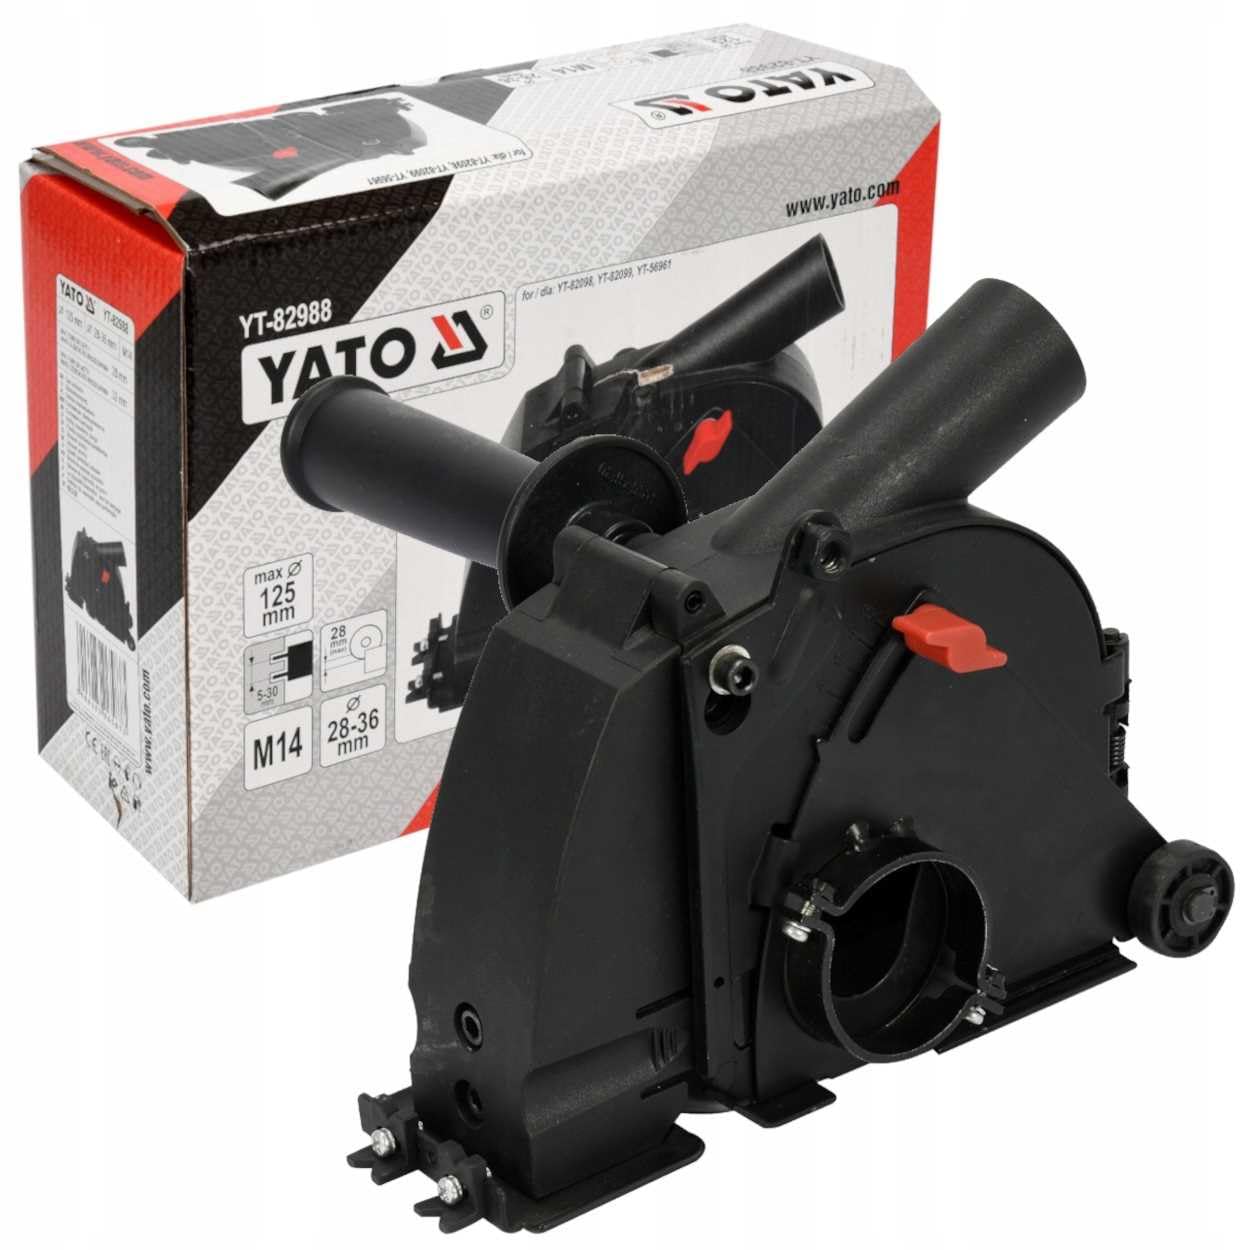
شکل 1: به طور کلی view of the YATO Angle Grinder Dust Shroud YT-82988, showing the main body and auxiliary handle attachment point.

شکل 2: سمت view of the dust shroud, highlighting the integrated wheels for smooth operation and the dust extraction port.
اجزای کلیدی:
- بدنه اصلی: Encloses the grinding disc to contain dust.
- پورت استخراج گرد و غبار: Connects to a vacuum cleaner or dust extractor.
- مکانیزم عمق قابل تنظیم: Allows setting the cutting/grinding depth.
- دسته کمکی قابل اتصال: Provides a secure grip during operation.
- چرخ ها: Facilitate smooth movement across the work surface.
راه اندازی
Follow these steps to properly attach the dust shroud to your angle grinder.
- Prepare Angle Grinder: Ensure your angle grinder is unplugged and the grinding disc is removed. The angle grinder must have an M14 spindle thread and a collar diameter between 28-36mm.
- Attach Shroud: cl را شل کنیدamping mechanism on the dust shroud. Carefully slide the dust shroud over the angle grinder's gear housing until it sits firmly. Tighten the clampمکانیزم به طور ایمن
- Install Grinding Disc: Install the appropriate grinding or cutting disc (maximum 125mm diameter) onto the angle grinder spindle, ensuring it is correctly seated and tightened.
- دسته کمکی را وصل کنید: Screw the auxiliary handle into the designated attachment point on the dust shroud. Ensure it is tightened firmly for safe operation.

Figure 3: Auxiliary handle securely attached to the dust shroud.
- تنظیم عمق برش: Use the red lever and scale on the side of the shroud to adjust the desired cutting or grinding depth. Ensure the adjustment is locked in place before use.

Figure 4: Detail of the red lever and scale for adjusting cutting depth.
- اتصال دستگاه مکنده گرد و غبار: Connect a suitable vacuum cleaner hose to the dust extraction port on the shroud. Ensure a tight connection for effective dust collection.
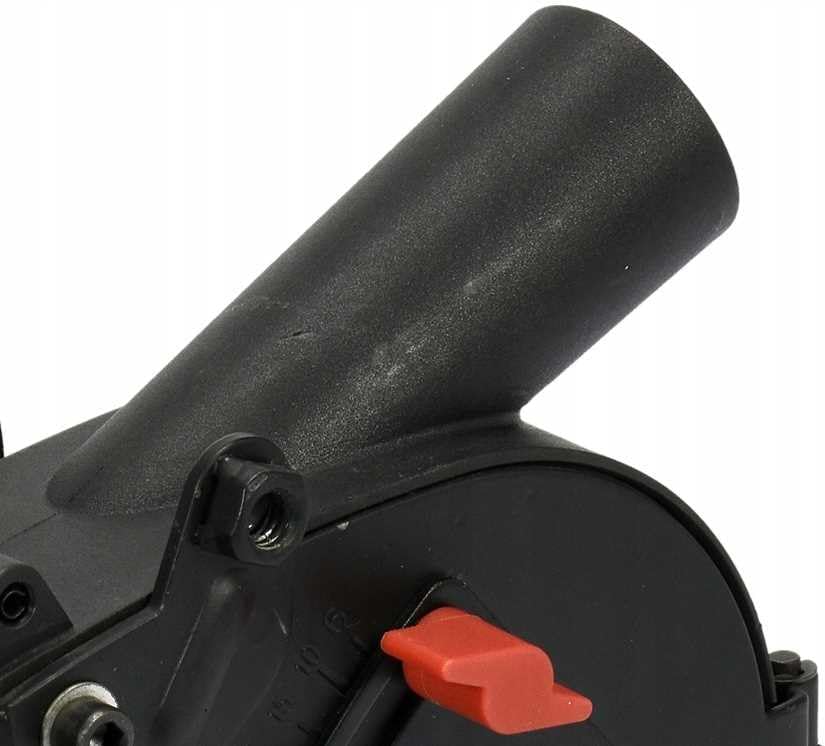
Figure 5: Dust extraction port for connecting a vacuum cleaner.
دستورالعمل های عملیاتی
Once the dust shroud is securely attached and the dust extractor is connected, you can begin operation.
- روشن کردن: Turn on the vacuum cleaner/dust extractor first, then switch on the angle grinder.
- شروع کار: Gently place the dust shroud onto the workpiece. The integrated wheels will help guide the tool smoothly. Apply even pressure and move the angle grinder steadily across the material.
- حفظ کنترل: Always maintain a firm grip on the angle grinder and auxiliary handle.
- نظارت بر جمعآوری گرد و غبار: Periodically check the dust extractor to ensure it is functioning correctly and collecting debris.
- پایان کار: Once the task is complete, lift the angle grinder from the workpiece, then switch off the angle grinder, followed by the vacuum cleaner/dust extractor.
توجه: For edge grinding or cutting close to walls, the front segment of the shroud can be opened or removed (if applicable to your model) to allow closer access.

Figure 6: Front segment of the dust shroud opened for edge work.
تعمیر و نگهداری
نگهداری منظم، طول عمر و عملکرد بهینهی پوشش گرد و غبار شما را تضمین میکند.
- تمیز کردن: After each use, disconnect the dust shroud from the angle grinder and clean it thoroughly. Remove any accumulated dust or debris from the interior, dust port, and adjustable mechanisms. Use a brush or compressed air if necessary.
- بازرسی: Periodically inspect the shroud for cracks, damage, or excessive wear, especially on the wheels and clamping mechanism. Replace any damaged parts immediately.
- ذخیره سازی: Store the dust shroud in a clean, dry place, away from direct sunlight and extreme temperatures.
عیب یابی
| مشکل | علت احتمالی | راه حل |
|---|---|---|
| جمعآوری ضعیف گرد و غبار | Dust port clogged; vacuum cleaner not powerful enough; hose connection loose; shroud not sealed properly. | Clean dust port and shroud interior; use a more powerful vacuum; ensure hose is tightly connected; check shroud attachment for gaps. |
| Shroud difficult to attach/remove | Clamping mechanism too tight/loose; angle grinder collar diameter incompatible; debris in clampمنطقه ing | تنظیم clamping mechanism; verify angle grinder compatibility (28-36mm collar); clean clampمنطقه ing |
| Uneven cutting depth | Depth adjustment not locked; wheels worn or damaged; uneven pressure during operation. | Ensure depth adjustment is securely locked; inspect and replace worn wheels; apply consistent pressure. |
مشخصات
| ویژگی | مشخصات |
|---|---|
| شماره مدل | YT-82988 |
| نام تجاری | یاتو |
| Compatible Disc Diameter (Max) | 125 میلی متر |
| Compatible Angle Grinder Spindle Thread | M14 |
| Compatible Angle Grinder Collar Diameter | 28-36 میلی متر |
| وزن مورد | 1.82 کیلوگرم |
| سبک | منحنی |
گارانتی و پشتیبانی
For warranty information or technical support regarding your YATO Angle Grinder Dust Shroud YT-82988, please refer to the documentation provided with your purchase or contact YATO customer service directly. Keep your proof of purchase for warranty claims.