GVDA GD128
GVDA GD128 Digital Multimeter User Manual
مدل: GD128
Brand: GVDA
1. مقدمه
The GVDA GD128 SMART Digital Multimeter is a professional testing instrument designed for accurate and reliable measurements. It is an ideal choice for professional electricians, engineers, electronics enthusiasts, and for general household use. This manual provides detailed instructions on the safe and effective operation of your GD128 multimeter.
قابلیت های کلیدی عبارتند از:
- AC and DC Voltage اندازه گیری
- اندازهگیری جریان AC و DC
- اندازه گیری مقاومت
- اندازه گیری ظرفیت
- اندازه گیری تداوم
- اندازه گیری دیود
- NCV (جلد غیر تماسیtagه) اندازهگیری
- True RMS for accurate readings of non-sinusoidal signals
- Large VA color HD LCD screen with 9999 counts display
- خودکار و دستی
- Flashlight and Input Connector LED Indication

Figure 1.1: GVDA GD128 Digital Multimeter with test probes.
2. اطلاعات ایمنی
WARNING: To avoid electrical shock or personal injury, please read and understand all instructions and safety information before using this multimeter.
- قبل از انجام اندازهگیریها، همیشه مطمئن شوید که مولتیمتر در عملکرد و محدوده صحیح قرار دارد.
- از حداکثر مقادیر ورودی برای هر محدوده تجاوز نکنید.
- هنگام کار با voltagولتاژهای بالاتر از 30 ولت AC RMS، 42 ولت پیک یا 60 ولت DC. این ولتاژهاtagاین یک خطر شوک است.
- قبل از استفاده، سیمهای تست را از نظر عایق آسیبدیده یا فلز در معرض دید بررسی کنید. در صورت آسیبدیدگی، آنها را تعویض کنید.
- Do not operate the multimeter if it appears damaged or if it is not operating properly.
- همیشه برق مدار را قطع کرده و تمام بارهای ولتاژ بالا را تخلیه کنید.tagخازن های الکترونیکی قبل از آزمایش مقاومت، تداوم، دیودها یا ظرفیت.
- قبل از شروع کار، از بسته بودن محکم درب باتری اطمینان حاصل کنید.
- This device meets safety standards EN61010-1,-2-030, EN61010-2-033, EN61326-1 CAT III 1000V, CAT IV 600V.
3. محصول تمام شدview و اجزاء
Familiarize yourself with the different parts of your GVDA GD128 Digital Multimeter.

شکل 3.1: جلو و کنار view of the GD128 Multimeter with labeled components.
- ناحیه سنسور NCV
- کلید برق
- کلید چراغ قوه
- نشانگر هشدار
- چراغ قوه
- نشانگر جک ورودی
- Jack other than current and NCV
- COM jack (Common)
- mA (<600mA) jack
- جک 10 آمپری
- Auto power off key
- کلید عملکرد
- نمایش

شکل 3.2: عقب view of the GD128 Multimeter highlighting the integrated LED flashlight.
4. راه اندازی
4.1 نصب باتری
The GVDA GD128 Multimeter requires 3 x 1.5V AAA batteries (not included) for operation.
- مطمئن شوید که مولتیمتر خاموش است.
- محفظه باتری را در پشت دستگاه قرار دهید.
- با استفاده از یک پیچگوشتی، پوشش محفظه باتری را باز کنید.
- دو باتری AAA را با رعایت قطبیت صحیح (+ و -) همانطور که در داخل محفظه نشان داده شده است، وارد کنید.
- درپوش محفظه باتری را تعویض کرده و آن را با پیچ محکم کنید.

Figure 4.1: Battery compartment for 3 AAA batteries.
۶.۲ اتصال سیمهای تست
Connect the test leads to the appropriate input jacks for the desired measurement function. Always connect the black test lead to the COM (Common) jack. Connect the red test lead to the jack corresponding to the measurement type (e.g., VΩHz for voltage/resistance/frequency, mA for milliampere current, 10A for ampere current).
5. دستورالعمل های عملیاتی
The GD128 features both auto-ranging and manual-ranging capabilities. The "SMART" function automatically identifies AC/DC voltage، مقاومت، و تداوم.
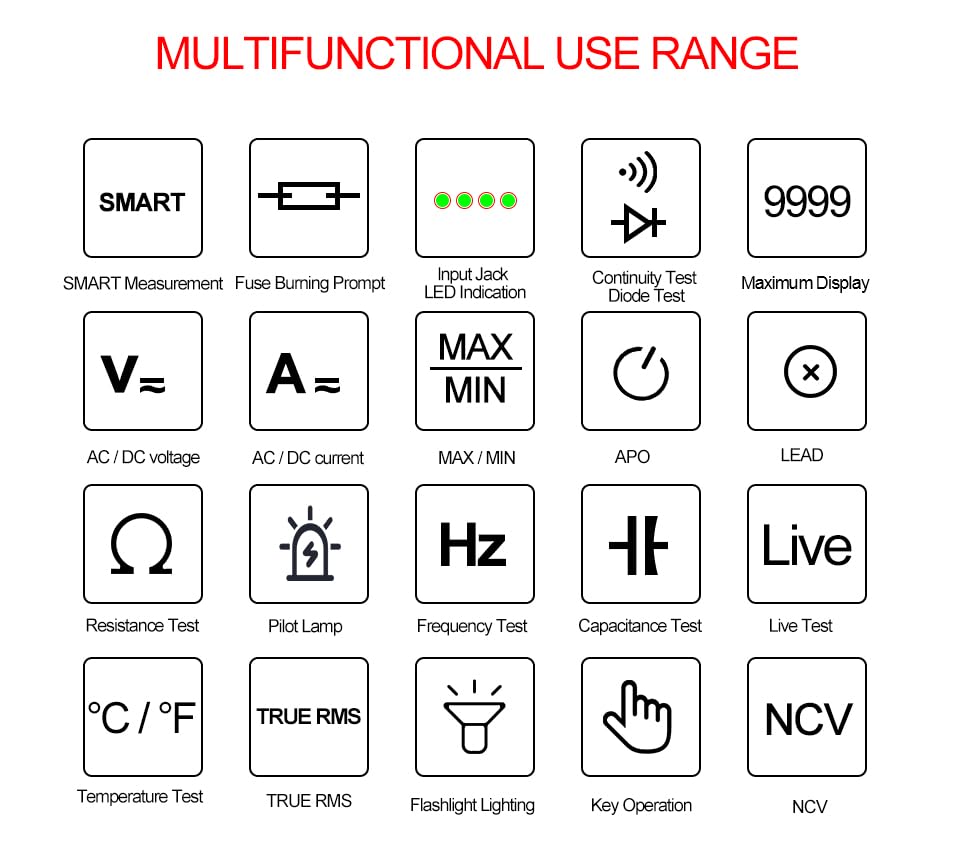
Figure 5.1: Multifunctional Use Range icons.
5.1 روشن/خاموش
را فشار دهید کلید برق (2) to turn the multimeter on or off.
5.2 انتخاب تابع
The multimeter typically starts in SMART mode. Press the FUNC (Function) key (12) or SEL key to cycle through different measurement modes within a category (e.g., AC/DC voltage, resistance/continuity/diode).
5.3 Common Measurement Functions
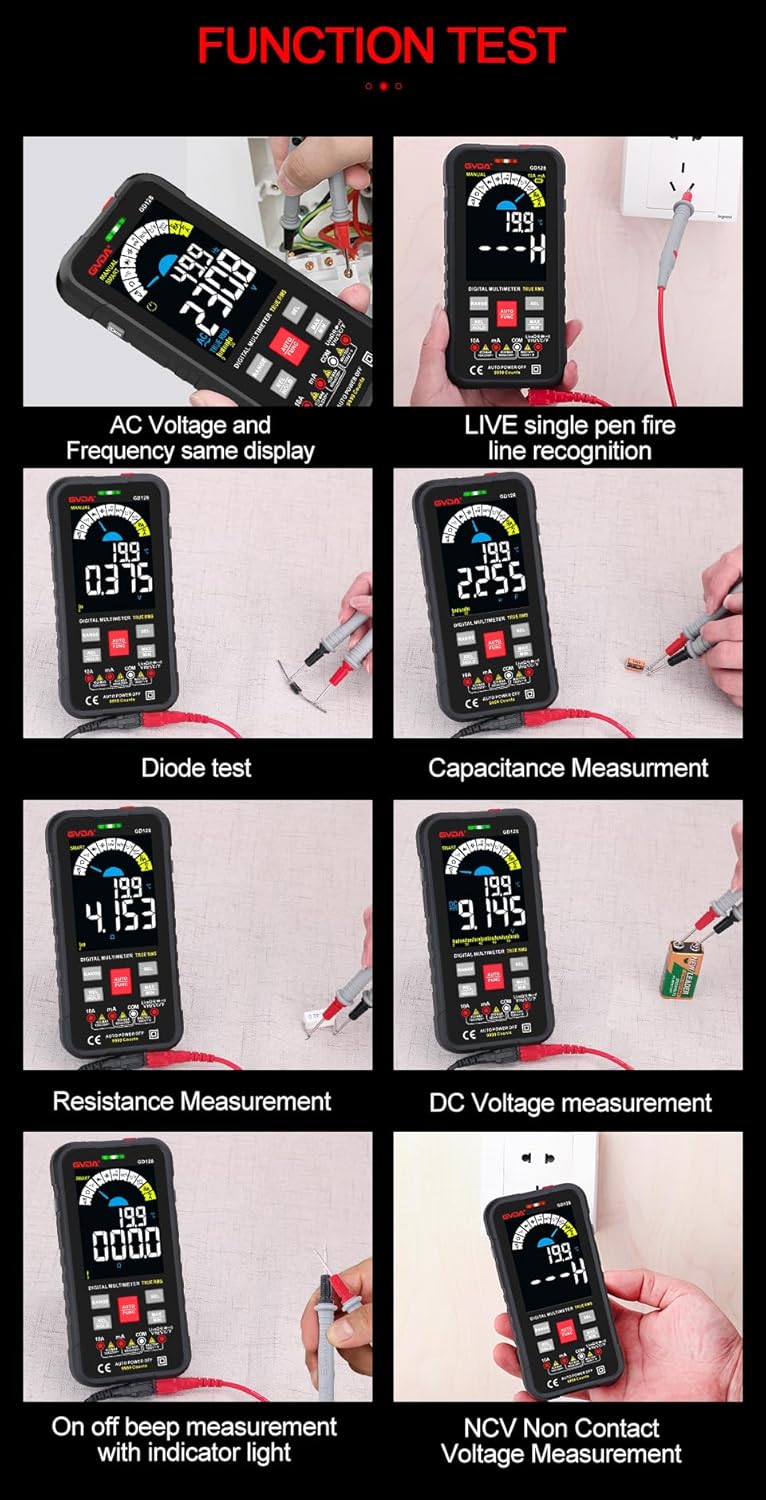
شکل 5.2: مثالamples of various function tests.
5.3.1 جلدtagاندازهگیری الکترونیکی (AC/DC)
- سیم تست مشکی را به جک COM و سیم تست قرمز را به جک VΩHz وصل کنید.
- Select the appropriate AC (~) or DC (---) voltagحالت e
- Connect the test leads in parallel to the circuit or component to be measured.
- صفحه نمایش جلد را نشان می دهدtage خواندن
۵.۹ اندازهگیری جریان (AC/DC)
- سیم تست مشکی را به جک COM وصل کنید.
- For current up to 600mA, connect the red test lead to the mA jack. For current up to 10A, connect the red test lead to the 10A jack.
- Select the appropriate AC (~) or DC (---) current mode.
- مولتی متر را به صورت سری به مدار مورد نظر برای اندازه گیری وصل کنید.
- صفحه نمایش، مقدار فعلی را نشان خواهد داد.
۵.۴ اندازهگیری مقاومت (Ω)
- سیم تست مشکی را به جک COM و سیم تست قرمز را به جک VΩHz وصل کنید.
- Select the Resistance (Ω) mode.
- قبل از اندازهگیری مقاومت، مطمئن شوید که مدار بدون برق است.
- سیمهای تست را به قطعهای که قرار است اندازهگیری شود، وصل کنید.
- صفحه نمایش، مقدار مقاومت را نشان خواهد داد.
۵.۴ اندازهگیری ظرفیت خازنی (F)
- سیم تست مشکی را به جک COM و سیم تست قرمز را به جک VΩHz وصل کنید.
- Select the Capacitance (F) mode.
- Ensure the capacitor is fully discharged before measurement to avoid damage to the multimeter.
- سیمهای تست را به ترمینالهای خازن وصل کنید.
- صفحه نمایش، ظرفیت خازنی را نشان خواهد داد.
۵.۶ آزمون پیوستگی (Ω)
- سیم تست مشکی را به جک COM و سیم تست قرمز را به جک VΩHz وصل کنید.
- Select the Continuity mode.
- Touch the test leads to the points you want to check for continuity. A continuous beep indicates a complete circuit.
۵.۷ تست دیود (→|)
- سیم تست مشکی را به جک COM و سیم تست قرمز را به جک VΩHz وصل کنید.
- Select the Diode Test mode.
- سیم تست قرمز را به آند و سیم تست سیاه را به کاتد دیود وصل کنید. صفحه نمایش ولتاژ مستقیم را نشان میدهد.tage drop. Reverse the leads; an open circuit (OL) reading indicates a good diode.
۵.۱۰ NCV (جلد غیرتماسی)tagه) اندازهگیری
- حالت NCV را انتخاب کنید.
- Move the NCV sensor area (1) near the conductor. The multimeter will beep and the warning indicator (4) will light up with increasing frequency as it detects AC voltage.
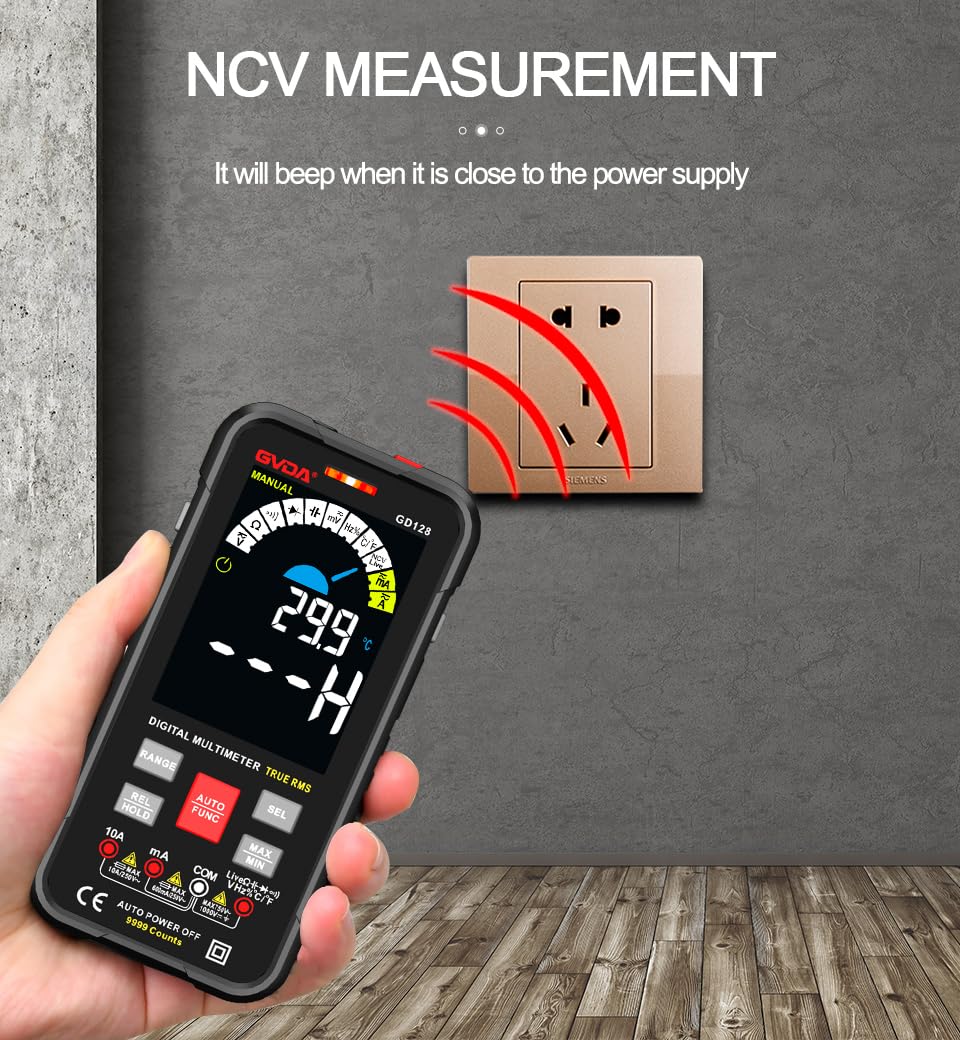
Figure 5.3: NCV (Non-Contact Voltage) measurement in progress.
5.3.8 توابع دیگر
- RMS واقعی: قرائتهای دقیقی را برای شکل موجهای AC سینوسی و غیر سینوسی ارائه میدهد.
- MAX/MIN/AVG: را فشار دهید MAX/MIN key to record maximum, minimum, and average readings.
- REL (اندازهگیری نسبی): را فشار دهید REL/HOLD key briefly to set the current reading as a reference for subsequent measurements.
- نگهداری داده ها: را فشار دهید REL/HOLD key briefly to freeze the current reading on the display.
- چراغ قوه: را فشار دهید کلید چراغ قوه (3) to turn the built-in flashlight on/off.
- خاموش شدن خودکار (APO): The multimeter will automatically power off after a period of inactivity to save battery life.
6. برنامه های کاربردی
The GVDA GD128 Digital Multimeter is versatile and suitable for a wide range of applications, including but not limited to:

Figure 6.1: Diverse applications of the GD128 Multimeter.
- Electronic beginners and hobbyists
- Electronic circuit installation and testing
- Electronic maintenance and repair
- Electromechanical maintenance
- Vehicle inspection and automotive electrical work
- Maintenance of household appliances
- General electrical troubleshooting
7. مشخصات
Detailed technical specifications for the GVDA GD128 Digital Multimeter:
| ویژگی | محدوده | دقت |
|---|---|---|
| DC جلدtage | 99.99mV/999.9mV; 9.999V/99.9V/1000V | ±(0.5%+3) |
| AC جلدtage | 99.9mV/999.9/mV; 9.999V/99.9V/750V | ±(0.8%+3) |
| جریان DC | 9.999mA/99.99mA/999.9mA; 9.99A | ±(0.8%+3) for mA, ±(1.2%+3) for A |
| جریان برق | 9.999mA/99.99mA/999.9mA; 9.99A | ±(1.0%+3) for mA, ±(1.5%+3) for A |
| مقاومت | 99.99/999.9 ohms/9.999k/99.99k/999.9kohm; 9.999 m/99.99 m ohms | ±(0.8%+3) برای kΩ، ±(1.2%+3) برای MΩ |
| ظرفیت | 9.999/99.99/999.9nF/9.999/99.99/999.9uF; 9.999mF/99.99mF | ±(4.0%+3) for nF/uF, ±(5.0%+5) for mF |
| فرکانس | 99.99/999.9/9.999k/99.99k/999.9kHz/9.999mHz | ±(1.0%+3) |
| چرخه وظیفه | 0.1 تا 99.99 درصد | ±(1.0%+2) |
| دما | -40~1000°C; -40-1832°F | ± 2 درجه سانتیگراد |
| تعداد نمایش | 9999 عدد | |
| نوع نمایشگر | VA color screen | |
| Sampنرخ لینگ | تقریبا 3 بار در ثانیه | |
| نمایش بیش از محدوده | "او ال" | |
| حجم کمtage نشانگر | نشانگر کم بودن باتری | |
| منبع تغذیه | 3 عدد باتری قلمی 1.5 ولتی (شامل نمی شود) | |
| وزن محصول | تقریبا 230 گرم | |
| اندازه محصول | 83x23x165mm | |
| رتبه بندی ایمنی | EN61010-1,-2-030 EN61010-2-033, EN61326-1 CAT III 1000 V CAT IV 600 V |
8. تعمیر و نگهداری
نگهداری مناسب، طول عمر و دقت مولتیمتر شما را تضمین میکند.
- تمیز کردن: پاک کردن مورد با آگهیamp پارچه و مواد شوینده ملایم از مواد ساینده یا حلال استفاده نکنید.
- تعویض باتری: برای اطمینان از خوانش دقیق، به محض ظاهر شدن نشانگر باتری کم، باتریها را فوراً تعویض کنید.
- تعویض فیوز: If the current measurement function fails, the fuse may be blown. Refer to the warning label inside the battery compartment for fuse specifications (e.g., F600mA/250V, F10A/250V). Ensure the multimeter is off and test leads are disconnected before replacing fuses.
- ذخیره سازی: If the multimeter is not used for a long period, remove the batteries to prevent leakage. Store in a cool, dry place away from direct sunlight.
9 عیب یابی
If you encounter issues with your GVDA GD128 Multimeter, try the following:
- صفحه نمایش/روشن نیست: نصب باتری را بررسی کنید و مطمئن شوید که باتریها خالی نشدهاند. در صورت لزوم آنها را تعویض کنید.
- قرائت های نادرست: Verify test lead connections, ensure the correct function and range are selected, and check if the circuit is de-energized for resistance/continuity/capacitance tests.
- نمایشگر "OL": Indicates an over-range condition or an open circuit (e.g., when measuring resistance on an open wire).
- بوق عدم اتصال: Check if the circuit is truly continuous. If not, the circuit is open.
- Fuse Blown Warning: If the current measurement function is not working, the fuse might be blown. Replace the fuse as per maintenance instructions.
برای مشکلات مداوم، با پشتیبانی مشتری تماس بگیرید.
10. گارانتی و پشتیبانی
Your GVDA GD128 Digital Multimeter comes with a 30 روز گارانتی for system failures or factory problems. Please retain your proof of purchase for warranty claims.
For technical support, warranty claims, or further assistance, please refer to the contact information provided with your product packaging or visit the official GVDA webسایت
11. محتویات بسته
Upon opening your GVDA GD128 Digital Multimeter package, you should find the following items:

Figure 11.1: Contents included in the GD128 Multimeter package.
- 1 x GVDA GD128 Digital Multimeter
- 1 x Test Lead Set (Original pen cable)
- 1 عدد کیف پارچه ای
- 1 x Thermocouple Probe
- 1 x دفترچه راهنمای کاربر
- 1 x Gift Box (Packaging)
Ask a question about this manual
Ask about setup, troubleshooting, compatibility, parts, safety, or missing instructions. Manuals+ will review the question and use this page’s manual context to help answer it.