1. اطلاعات ایمنی مهم
Read all instructions carefully before beginning installation. Failure to follow these instructions could result in electric shock, fire, or personal injury.
- Always disconnect power at the main circuit breaker before working on the fan.
- Ensure all electrical connections are made in accordance with local codes and ordinances, and the National Electrical Code.
- The fan must be mounted to a structurally sound ceiling joist or outlet box capable of supporting the fan's weight (8.1 kg / 17.86 lbs).
- Do not bend the blade brackets during installation or cleaning.
- هنگام کار کردن فن، دستهایتان را از پرههای فن دور نگه دارید.
- این فن فقط برای استفاده در محیط داخلی طراحی شده است.
2. محتویات بسته
قبل از شروع مونتاژ، از وجود تمام قطعات اطمینان حاصل کنید.
- مونتاژ موتور فن سقفی
- 5 Reversible Fan Blades
- براکت های تیغه
- Light Kit Assembly with Tulip-shaped Lamps
- Pull Chains for Fan Speed and Light Control
- Mounting Hardware and Canopy
- داونرود
3. راه اندازی و نصب
Assembly is required for this ceiling fan. Follow these steps for proper installation.
۵.۲ نصب فن
The Hunter Classic Plus fan is designed for ceiling mount installation. Ensure the electrical box is securely fastened to the building structure and can support the fan's weight.
- برق را در قطع کننده مدار قطع کنید.
- براکت نصب را به جعبه برق سقفی وصل کنید.
- Feed the electrical wires through the center hole of the mounting bracket.
- Secure the downrod to the motor assembly, ensuring the set screw is tightened.
- Carefully lift the fan assembly and hang it from the mounting bracket using the provided hook or ball-and-socket system.
3.2 اتصالات سیم کشی
Connect the fan's electrical wires to the household wiring according to the wiring diagram provided in the full installation guide. Typically, this involves connecting:
- Green or bare copper wire (ground) from the fan to the household ground wire.
- White wire (neutral) from the fan to the household neutral wire.
- Black wire (hot) from the fan to the household hot wire.
- Blue wire (light kit hot) from the fan to the household hot wire (if separate light control is desired).
۴.۳ اتصال تیغهها و کیت چراغ
- Attach each blade to a blade bracket using the provided screws.
- Secure the blade assemblies to the motor housing.
- Connect the light kit wiring to the fan motor's light kit wires.
- Attach the light kit housing and install the tulip-shaped lamps.
- سایه های شیشه ای را نصب کنید.
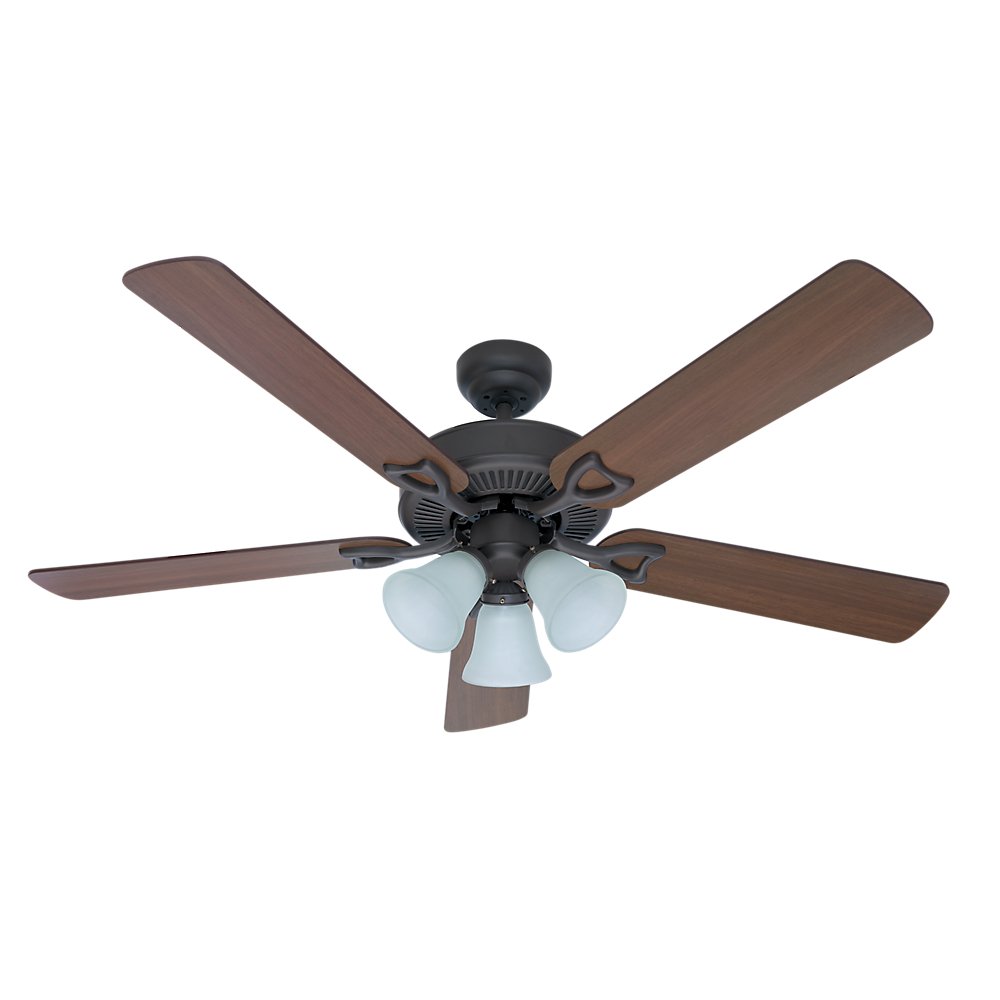
Figure 1: Hunter Classic Plus 52-inch Ceiling Fan (Model 21913) with bronze finish and integrated light kit. This image shows the fan fully assembled, highlighting its traditional style and reversible blades.
4. دستورالعمل های عملیاتی
The Hunter Classic Plus ceiling fan is operated using pull chains.
4.1 کنترل سرعت فن
One pull chain controls the fan speed. Pull the chain repeatedly to cycle through the available speeds:
- 1st Pull: سرعت بالا
- 2nd Pull: سرعت متوسط
- 3rd Pull: سرعت کم
- 4th Pull: خاموش
4.2 کنترل نور
The second pull chain controls the integrated light kit. Pull the chain to turn the light On or Off.
۶.۲ عملکرد موتور برگشتپذیر
The fan features a reversible Whisperwind motor for year-round comfort. A small switch on the fan motor housing (usually located above the light kit) controls the direction of blade rotation.
- حالت تابستانی (چرخش خلاف جهت عقربههای ساعت): هوا را به سمت پایین هل میدهد و نسیم خنکی ایجاد میکند.
- حالت زمستانی (چرخش در جهت عقربههای ساعت): هوا را به سمت بالا میکشد و هوای گرم محبوس شده در نزدیکی سقف را به گردش در میآورد.
Always turn off the fan and wait for the blades to stop completely before changing the direction of rotation.
5. تعمیر و نگهداری
نگهداری منظم، عملکرد بهینه را تضمین میکند و عمر پنکه سقفی شما را افزایش میدهد.
- تمیز کردن: پرههای فن و محفظه موتور را به صورت دورهای با یک پارچه نرم و لطیف پاک کنید.amp پارچه. از پاککنندههای ساینده یا حلالها استفاده نکنید، زیرا ممکن است به روکش آسیب برسانند.
- پیچ های سفت کننده: Check all screws, especially those on the blade attachments and mounting hardware, at least twice a year. Tighten any loose screws to prevent wobbling and noise.
- لامپ ها: Replace light bulbs as needed. Ensure the power is off before replacing bulbs. Refer to the light kit's specifications for the correct bulb type and wattage.
- بدون نیاز به روغن کاری: The Whisperwind motor is permanently lubricated and does not require oiling.
6 عیب یابی
قبل از انجام هرگونه تعمیر، مطمئن شوید که برق از طریق قطع کننده مدار قطع شده است.
6.1 Fan Does Not Start
- Check that the circuit breaker is on.
- اطمینان حاصل کنید که تمام اتصالات سیم ایمن هستند.
- Verify the pull chain is in the 'On' position.
6.2 Fan Wobbles
- Ensure all blade screws are tight.
- Check that the mounting bracket and downrod are securely fastened.
- Verify that the blades are balanced. A blade balancing kit (often sold separately) can help correct wobbling.
6.3 Light Kit Does Not Work
- Check that the light pull chain is in the 'On' position.
- Ensure light kit wire connections are secure.
- Replace any burnt-out light bulbs.
7. مشخصات
| ویژگی | مشخصات |
|---|---|
| شماره مدل | 21913 |
| نام تجاری | شکارچی |
| قطر فن | 52 اینچ (132 سانتی متر) |
| تعداد تیغه ها | 5 |
| نوع تیغه | برگشت پذیر |
| نوع موتور | Whisperwind Reversible Motor |
| نوع کنترل | زنجیر بکشید |
| کیت نور یکپارچه | Yes, with Tulip-shaped Lamps |
| منبع تغذیه | کابل برق |
| واتtage | 120 وات |
| مواد | فولاد آلیاژی |
| رنگ | برنز |
| وزن مورد | 8.1 کیلوگرم (17.86 پوند) |
| مونتاژ مورد نیاز است | بله |
| باتری های مورد نیاز | خیر |
8. گارانتی و پشتیبانی
8.1 اطلاعات گارانتی
The Hunter Classic Plus ceiling fan (Model 21913) comes with the following warranty:
- موتور: 5 سال گارانتی.
- قسمت های دیگر: 1-year warranty on all other components of the Hunter fan.
لطفاً مدرک خرید خود را برای ادعاهای گارانتی نگه دارید.
8.2 پشتیبانی مشتری
For technical assistance, replacement parts, or warranty inquiries, please contact Hunter Customer Service:
- Webسایت: Visit the official Hunter Fan webسایتی برای منابع پشتیبانی و اطلاعات تماس.
- تلفن: Refer to your product packaging or the Hunter Fan website for the most current customer service phone numbers in your region.