1. مقدمه
This manual provides detailed instructions for the proper setup, operation, maintenance, and troubleshooting of your JVC HR-VP58U 4 Head Hi-Fi Stereo VCR. Please read this manual thoroughly before using the unit to ensure optimal performance and safety. Keep this manual for future reference.
2. اطلاعات ایمنی مهم
هشدار: To reduce the risk of fire or electric shock, do not expose this appliance to rain or moisture. Do not remove the cover. Refer servicing to qualified personnel only.
- از حجم منبع تغذیه اطمینان حاصل کنیدtage با رتبهبندی روی دستگاه مطابقت دارد.
- دهانه های تهویه را مسدود نکنید.
- از قرار دادن دستگاه در نزدیکی منابع گرما یا در معرض نور مستقیم خورشید خودداری کنید.
- دستگاه را در معرض چکه یا پاشیدن مایعات قرار ندهید.
- در هنگام طوفان های رعد و برق یا زمانی که برای مدت طولانی از آن استفاده نمی کنید، دستگاه را از برق بکشید.
3. محتویات بسته
بررسی کنید که بسته شما حاوی موارد زیر باشد:
- JVC HR-VP58U VCR Unit
- کنترل از راه دور
- سیم برق (ضمیمه شده)
- Audio/Video Cables (RCA type, typically red, white, yellow)
- راهنمای دستورالعمل (این سند)
4. محصول تمام شدview
4.1 صفحه جلو

شکل 1: جلو view of the JVC HR-VP58U VCR with its remote control. The VCR features a power button, tape slot, and front audio/video input jacks.

شکل 2: به تفصیل view of the JVC HR-VP58U VCR's front panel, showing playback controls (Play, Rewind, Fast Forward, Stop/Eject, Pause) and the remote control.
The front panel provides access to essential controls and input jacks for convenient operation. Key features include:
- دکمه POWER: VCR را روشن یا خاموش می کند.
- شیار نوار: Insert VHS tapes for playback or recording.
- VIDEO (MONO) L-AUDIO-R Jacks: Front panel audio/video input for temporary connections (e.g., camcorder).
- کنترل های پخش: Buttons for Play, Stop/Eject, Rewind, Fast Forward, and Pause.
- نمایش: Shows current channel, time, and operational status.
4.2 پنل عقب

شکل 3: Rear panel of the JVC HR-VP58U VCR, displaying the power cord, serial number, and various audio/video input/output ports.
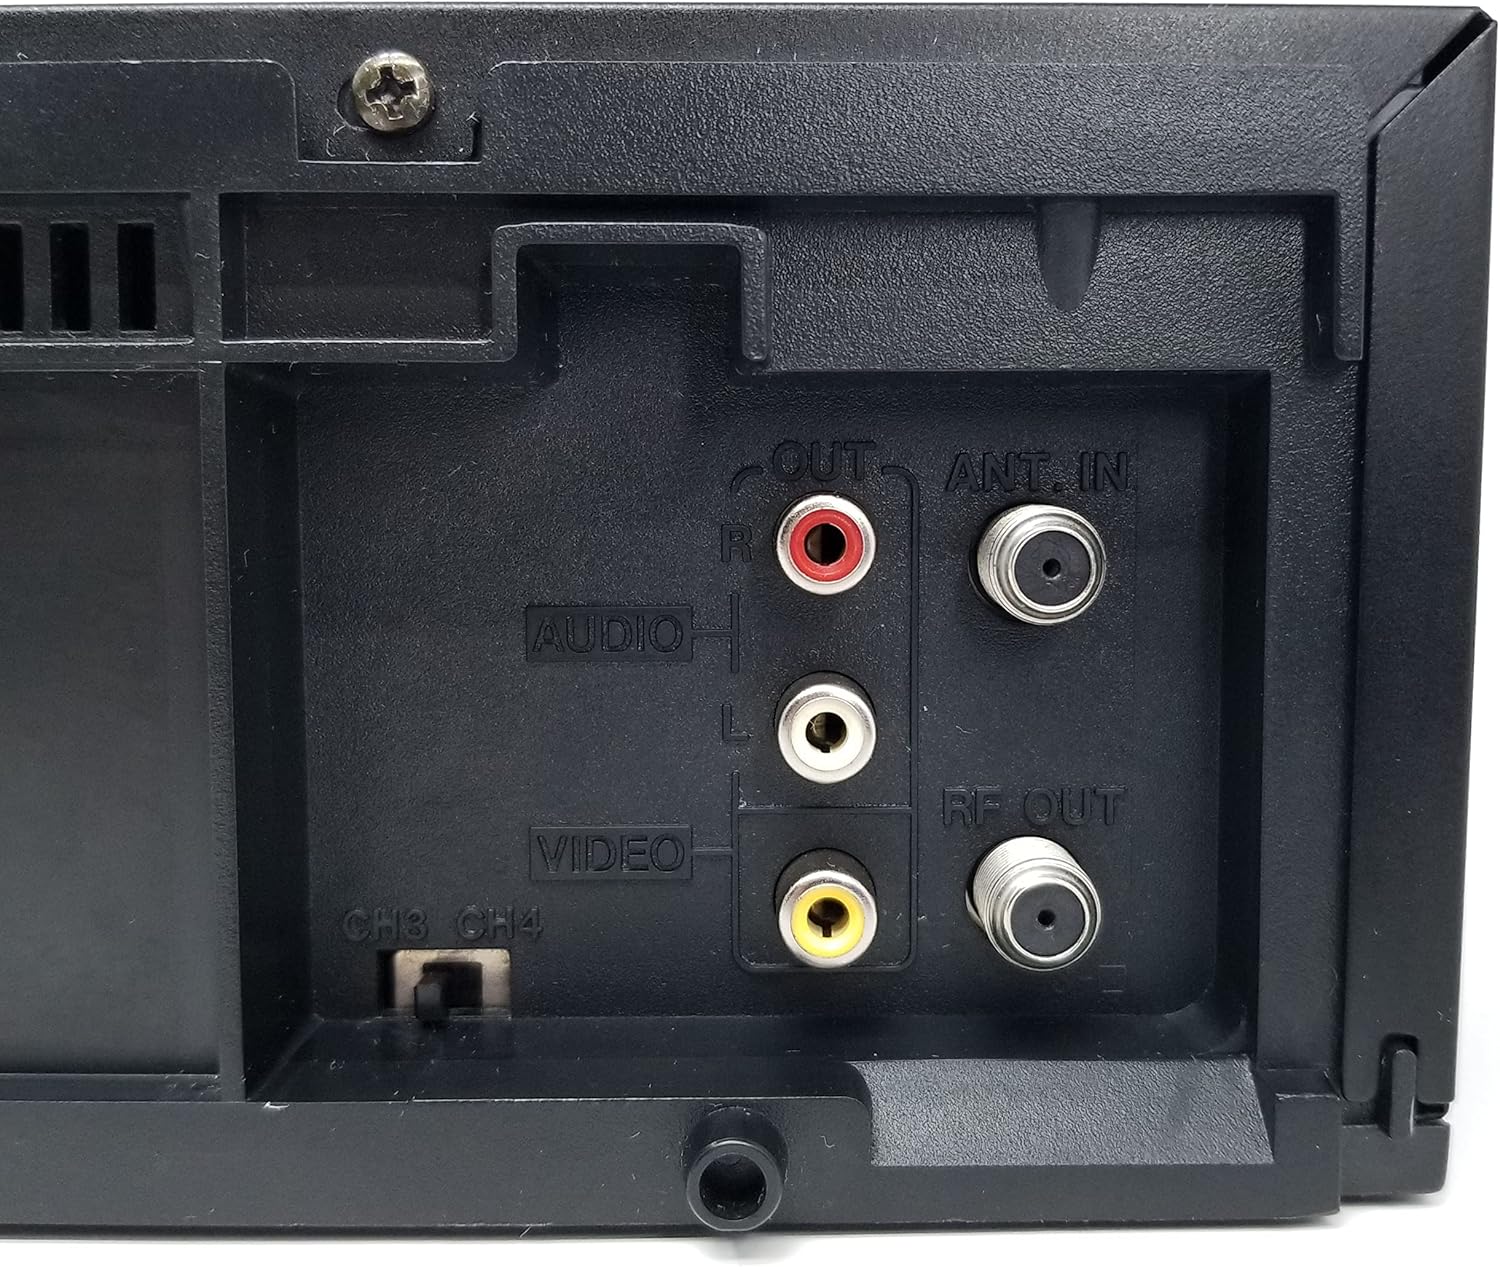
شکل 4: Close-up of the rear audio (red/white RCA), video (yellow RCA), RF OUT, and ANT. IN connections on the JVC HR-VP58U VCR.
The rear panel houses all necessary connections for integrating the VCR into your home entertainment system.
- ANT. IN: Connects to your antenna or cable TV signal.
- خروجی RF: Connects to your TV's antenna input (typically for older TVs).
- AUDIO OUT (L/R) & VIDEO OUT: RCA jacks (red, white, yellow) for connecting to your TV or audio receiver.
- AUDIO IN (L/R) & VIDEO IN: RCA jacks (red, white, yellow) for connecting external devices for recording.
- CH3/CH4 Switch: Selects the RF output channel for your TV.
5. راه اندازی
۵.۲ اتصال به تلویزیون
دو روش اصلی برای اتصال VCR به تلویزیون وجود دارد:
- Using RCA Audio/Video Cables (Recommended for best quality):
- Connect the yellow VIDEO OUT jack on the VCR to the yellow VIDEO IN jack on your TV.
- Connect the white AUDIO OUT (L) jack on the VCR to the white AUDIO IN (L) jack on your TV.
- Connect the red AUDIO OUT (R) jack on the VCR to the red AUDIO IN (R) jack on your TV.
- Select the corresponding Video Input (e.g., Video 1, AV1) on your TV.
- Using an RF Coaxial Cable (for older TVs or limited inputs):
- Connect your antenna or cable TV signal to the ANT. IN jack on the VCR.
- Connect an RF coaxial cable from the RF OUT jack on the VCR to the ANT. IN jack on your TV.
- Set the CH3/CH4 switch on the VCR's rear panel to either 3 or 4.
- Tune your TV to the corresponding channel (3 or 4) to receive the VCR's signal.
5.2 اتصال برق
Plug the attached power cord into a standard AC wall outlet (120V, 60Hz).
6. دستورالعمل های عملیاتی
۵.۱ پخش اولیه
- Turn on your TV and select the correct input source (AV input or Channel 3/4).
- را فشار دهید قدرت button on the VCR or remote control to turn on the unit.
- Insert a VHS tape into the tape slot. The VCR will automatically load the tape.
- را فشار دهید بازی کنید button on the VCR or remote control to begin playback.
- استفاده کنید REW (به عقب برگردید) و FF دکمههای (سریع به جلو) برای حرکت در نوار.
- را فشار دهید مکث برای توقف موقت پخش، دکمه را فشار دهید. برای ادامه، دوباره فشار دهید.
- را فشار دهید STOP/EJECT button to stop playback and eject the tape.
6.2 ضبط
The JVC HR-VP58U allows for recording from various sources.
- Insert a recordable VHS tape with the erase protection tab intact.
- To record from TV: Select the desired TV channel on the VCR.
- To record from external device (e.g., camcorder): Connect the device to the front or rear AUDIO IN/VIDEO IN jacks. Select the appropriate input source on the VCR (e.g., Line 1, L1).
- را فشار دهید ضبط (Record) button. Recording will begin immediately.
- را فشار دهید توقف دکمه برای پایان دادن به ضبط.
Refer to the remote control section for advanced recording features like timer recording.
6.3 عملکردهای کنترل از راه دور
The included remote control provides full functionality for your VCR. Familiarize yourself with its buttons for convenient operation.
- قدرت: Turns the VCR on/off.
- SHUTTLE PLUS: For variable speed playback and search.
- MENU/OK: به انتخابهای منو دسترسی پیدا کرده و آنها را تأیید میکند.
- CH +/-: کانالها را تغییر میدهد یا در منوها حرکت میکند.
- TV/VCR: بین حالت های تلویزیون و VCR سوئیچ می کند.
- REC/STOP/PLAY/PAUSE/FF/REW: Standard transport controls.
- تایمر: Accesses timer recording settings.
- نمایش دادن: اطلاعات نمایش داده شده روی صفحه را نشان میدهد.
7. تعمیر و نگهداری
7.1 تمیز کردن واحد
- قسمت بیرونی VCR را با یک پارچه نرم و خشک پاک کنید.
- از پاککنندههای مایع یا آئروسل استفاده نکنید، زیرا ممکن است به روکش یا اجزای داخلی آسیب برسانند.
- برای کثیفیهای سرسخت، کمی dampپارچه را با آب خیس کنید، سپس بلافاصله خشک کنید.
۵.۲ تمیز کردن سر نوار
Over time, tape heads can accumulate dirt, leading to poor picture or sound quality. Use a dry-type VHS head cleaning cassette periodically (e.g., every 50-100 hours of use) according to the cleaning cassette's instructions. Avoid wet-type cleaners unless specifically recommended, as they can cause damage if used improperly.
8 عیب یابی
| مشکل | علت احتمالی | راه حل |
|---|---|---|
| بدون قدرت | سیم برق از برق کشیده شده است؛ پریز برق فعال نیست. | اتصال سیم برق را بررسی کنید؛ پریز را با دستگاه دیگری آزمایش کنید. |
| No picture/sound during playback | Incorrect TV input selected; A/V cables loose or incorrect; dirty tape heads. | Select correct TV input; check all cable connections; use a head cleaning cassette. |
| Tape will not play or eject | Tape jammed; VCR malfunction. | Do not force the tape. Power cycle the VCR. If issue persists, seek professional service. |
| کیفیت تصویر پایین (برفکی، اعوجاجدار) | Dirty tape heads; worn-out tape; weak signal. | Clean tape heads; try a different tape; check antenna/cable connection. |
| کنترل از راه دور کار نمی کند | Dead batteries; obstruction; remote sensor blocked. | Replace batteries; remove obstructions; ensure clear line of sight to VCR sensor. |
9. مشخصات
- مدل: HR-VP58U
- سرها: استریوی های-فای چهار سر
- سیستم تصویری: NTSC
- منبع تغذیه: AC 120V ، 60Hz
- ابعاد (W x H x D): Approximately 19.72 x 8.82 x 13.82 inches (based on package dimensions, actual unit may vary slightly)
- وزن: تقریبا 8.98 پوند
- صوتی: استریو Hi-Fi
- ورودی ها: Front A/V (RCA), Rear A/V (RCA), RF (Coaxial)
- خروجی ها: Rear A/V (RCA), RF (Coaxial)
10. گارانتی و پشتیبانی
For warranty information or technical support, please refer to the documentation provided at the time of purchase or contact your retailer. If you encounter any issues with the product, it is recommended to contact the seller directly for assistance before attempting repairs.
Note: This product is a JVC HR-VP58U VCR. For specific support related to this model, please have your model number and serial number ready when contacting support.


