1. مقدمه
The SPL 2Control is a compact and user-friendly stereo monitor controller designed to provide comprehensive control over your digital audio workstation's (DAW) monitoring functions. It ensures high-quality audio reproduction through both studio monitors and headphones, allowing you to hear every detail of your mix. Key features include a precise speaker volume potentiometer, active circuitry for sound integrity, and a unique Crossfeed control for accurate headphone monitoring that simulates a stereo speaker image.
2. دستورالعمل های ایمنی
- قبل از کار با دستگاه، این دستورالعملها را به طور کامل مطالعه کنید.
- این راهنما را برای مراجعات بعدی نگه دارید.
- برای جلوگیری از آتشسوزی یا برقگرفتگی، دستگاه را در معرض باران یا رطوبت قرار ندهید.
- تهویه مناسب را تضمین کنید؛ هیچ یک از منافذ تهویه را مسدود نکنید.
- فقط از پیوست ها/لوازم جانبی مشخص شده توسط سازنده استفاده کنید.
- در هنگام رعد و برق یا زمانی که برای مدت طولانی از دستگاه استفاده نمیشود، سیم برق را از آن جدا کنید.
- تمام خدمات را به پرسنل خدمات واجد شرایط ارجاع دهید.
- از قرار دادن دستگاه در نزدیکی منابع گرما مانند رادیاتور، هیترهای برقی، اجاق گاز یا سایر دستگاهها (از جمله ...) خودداری کنید. ampزنده کننده ها) که گرما تولید می کنند.
3. محتویات بسته
هنگام باز کردن بستهبندی، لطفاً بررسی کنید که اقلام زیر در آن گنجانده شده باشد:
- 1 x SPL 2Control Module
- 1 x کابل برق
- این کتابچه راهنمای کاربر
4. محصول تمام شدview
4.1 کنترل ها و نشانگرهای پنل جلویی
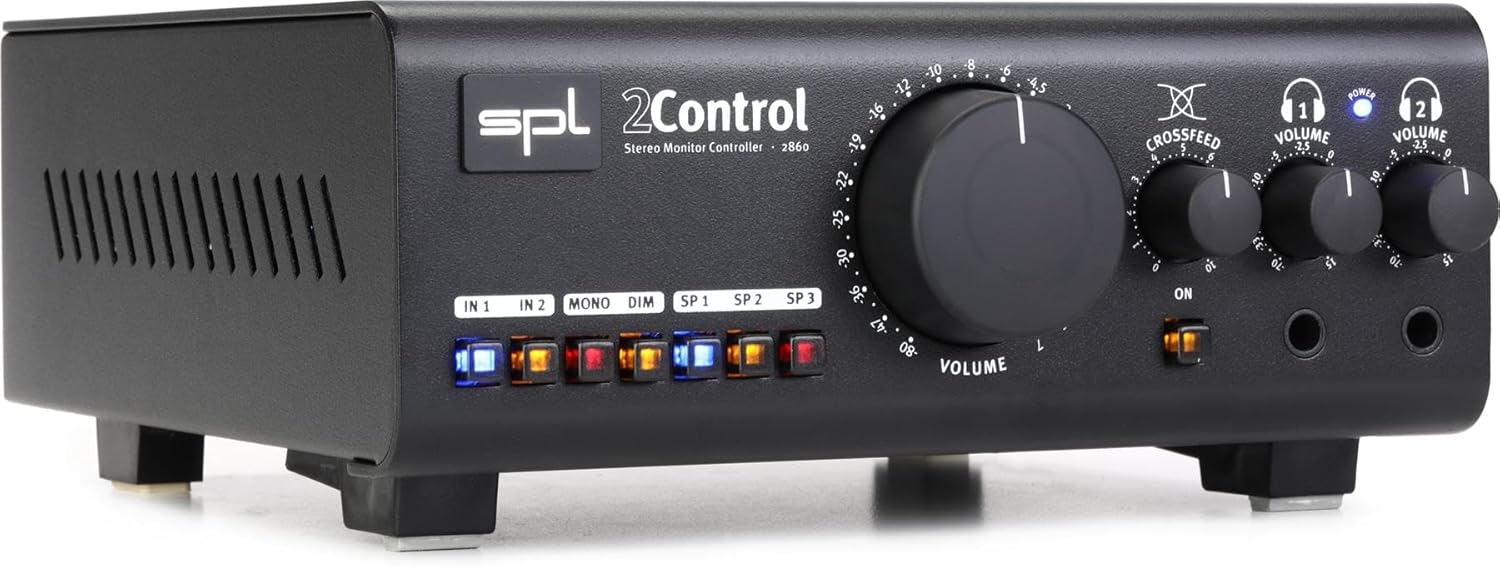
شکل 1: Front Panel of the SPL 2Control Stereo Monitor Controller.
This image displays the front panel of the SPL 2Control. From left to right, it features input selection buttons (IN 1, IN 2), function buttons (MONO, DIM), speaker output selection buttons (SP 1, SP 2, SP 3), a large central master VOLUME knob, a CROSSFEED knob, and two individual headphone VOLUME knobs with corresponding headphone output jacks. A power indicator LED is visible above the headphone controls.
- IN 1 / IN 2 Buttons: Selects the active stereo input source.
- MONO Button: Sums the stereo signal to mono for compatibility checking.
- دکمه DIM: Reduces the output volume by a fixed amount (e.g., -20dB) for temporary level reduction.
- SP 1 / SP 2 / SP 3 Buttons: Selects the active stereo speaker output pair.
- دستگیره VOLUME: Master volume control for selected speaker outputs.
- CROSSFEED Knob: Adjusts the stereo panorama for headphone monitoring to simulate a speaker listening environment.
- HEADPHONE VOLUME 1 / 2 Knobs: Independent volume controls for the two headphone outputs.
- HEADPHONE 1 / 2 Jacks: 1/4-inch stereo headphone outputs.
- چراغ برق: نشان میدهد که دستگاه روشن است.
4.2 Rear Panel Connections (Inferred)
The rear panel typically houses the audio input and output connections, as well as the power input. Based on common audio equipment and product specifications, you can expect:
- ورودی آنالوگ: Balanced XLR or TRS inputs for connecting your audio interface or mixer.
- خروجی بلندگو: Multiple sets of balanced XLR or TRS outputs for connecting up to three pairs of studio monitors.
- ورودی برق: Connector for the included power cord.
5. راه اندازی
- قرار دادن: Position the SPL 2Control on a stable, flat surface, ensuring adequate ventilation around the unit.
- اتصال برق: Connect the provided power cord to the power input on the rear panel of the 2Control and then to a suitable AC power outlet.
- اتصالات ورودی: Connect the stereo outputs of your audio interface, mixer, or other audio source to the IN 1 and/or IN 2 inputs on the rear panel using balanced XLR or TRS cables.
- اتصالات بلندگو: Connect your studio monitors to the SP 1, SP 2, and/or SP 3 outputs on the rear panel using balanced XLR or TRS cables. Ensure correct left and right channel connections.
- Headphone Connections: Plug your headphones into the HEADPHONE 1 and/or HEADPHONE 2 jacks on the front panel.
- روشن شدن اولیه: Ensure all volume controls are set to their minimum positions before powering on the unit. Then, connect the power cord to the wall outlet. The POWER LED on the front panel will illuminate.
6. دستورالعمل های عملیاتی
- انتخاب ورودی: یکی را فشار دهید در سال 1 or در سال 2 button to select your desired audio source. The active button will illuminate.
- Selecting Speaker Outputs: را فشار دهید SP 1, SP 2، یا SP 3 button to route the audio to the corresponding pair of studio monitors. Only one speaker output can be active at a time.
- تنظیم صدای اصلی: Slowly turn the large VOLUME knob clockwise to increase the listening level for the selected speaker outputs. Turn counter-clockwise to decrease.
- Mono Summing: را فشار دهید مونونوکلئوز button to sum the stereo signal to mono. This is useful for checking phase compatibility and mix balance. Press again to return to stereo.
- تابع کم نور: را فشار دهید کم نور button to temporarily reduce the output volume. This is useful for quick conversations or when you need to lower the volume without losing your main volume setting. Press again to restore the original volume.
- مانیتورینگ هدفون:
- Plug your headphones into the desired headphone jack (HEADPHONE 1 or 2).
- Adjust the individual HEADPHONE VOLUME 1 or 2 knob to set the listening level for your headphones.
- استفاده کنید متقاطع knob to adjust the stereo image for headphone listening. Turning it clockwise increases the crossfeed, simulating a more natural speaker-like stereo field by blending the left and right channels slightly.
7. تعمیر و نگهداری
- تمیز کردن: برای تمیز کردن قسمت بیرونی دستگاه از یک پارچه نرم و خشک استفاده کنید. از پاک کننده های مایع یا حلال ها استفاده نکنید.
- تهویه: Ensure that the ventilation slots are kept clear of dust and debris to prevent overheating.
- ذخیره سازی: اگر دستگاه را برای مدت طولانی نگهداری میکنید، آن را از برق بکشید و در جای خشک و خنک نگهداری کنید.
8 عیب یابی
| مشکل | علت احتمالی | راه حل |
|---|---|---|
| صدایی از بلندگوها وجود ندارد. |
|
|
| صدایی از هدفون نمیاد. |
|
|
| صدا تحریف شده |
|
|
9. مشخصات
| ویژگی | جزئیات |
|---|---|
| نام مدل | 2 Control (also known as 2860) |
| نام تجاری | SPL |
| نوع بلندگو | نظارت کنید |
| موارد استفاده توصیه شده | Control, Volume for Monitors |
| دستگاه های سازگار | Monitors, Speakers |
| پیکربندی کانال صدای فراگیر | 2.0 |
| رنگ | مشکی |
| اجزای شامل | 1 x SPL Control Module |
| ابعاد محصول (D x W x H) | ۵.۹ اینچ در ۱۱.۸ اینچ در ۱۴.۶ اینچ |
| وزن مورد | ۳.۷۴ پوند (تقریباً ۱.۷ کیلوگرم) |
| منبع تغذیه | سیم برقی |
| فناوری اتصال | TRS, XLR |
| حالت خروجی صدا | استریو |
| نوع نصب | پایه روی میز |
| سازنده | Sound Performance Lab |
10. گارانتی و پشتیبانی
The SPL 2Control Monitor Controller comes with a limited warranty. For specific warranty terms, duration, and conditions, please refer to the documentation provided with your purchase or visit the official SPL website. For technical support, service, or inquiries, please contact the manufacturer, Sound Performance Lab, or your authorized dealer.
سازنده: Sound Performance Lab