Thermaltake CL-W364-PL12SW-A
Thermaltake TH240 V2 ARGB All-in-One Liquid Cooler User Manual
Model: CL-W364-PL12SW-A
Sarrera
The Thermaltake TH240 V2 ARGB All-in-One Liquid Cooler is designed to provide efficient cooling for your CPU while adding vibrant ARGB lighting to your system. This liquid cooler features a high-performance copper base plate for accelerated heat conductivity, a reliable pump for maximum water circulation, and a low evaporation tube that minimizes coolant loss, eliminating the need for refills. The V2 ARGB Snow Series incorporates an industrial design with an infinity mirror lighting effect on the 360-degree rotational cap, enhancing the aesthetic appeal of your build. Its innovative cable-integrated daisy-chain design simplifies fan connections, reducing cable clutter and optimizing motherboard port usage.

1 Irudia: Gainetikview of the Thermaltake TH240 V2 ARGB All-in-One Liquid Cooler, showcasing the radiator, two ARGB fans, and the pump/water block unit.
Segurtasun Informazioa
- Ensure all power is disconnected from your computer before installation or maintenance.
- Manipulatu osagaiak kontu handiz kalteak ekiditeko.
- Do not attempt to disassemble the pump or radiator.
- Produktua likidoetatik eta muturreko tenperaturetatik urrun eduki.
- Use only the provided accessories and mounting hardware.
- Arazoren bat sortzen bada, jo arazoak konpontzeko atalera edo jarri harremanetan bezeroarentzako laguntza-zerbitzuarekin.
Paketearen edukia
Egiaztatu osagai guztiak paketean daudela:
- Zaleak
- Kableak
- Erradiadorea
- Water Block (Pump integrated)
- Intel eta AMD CPUetarako muntaketa-euskarriak
- Screws and other installation hardware
- PWM kablea
- ARGB kablea
Konfigurazioa eta Instalazioa
Follow these general steps for installation. Refer to the detailed diagram included with your product for specific mounting instructions for your CPU socket type.
- Prestatu plaka nagusia: Install the appropriate backplate and standoffs for your CPU socket (Intel LGA 2066/2011/1700/1200/1156/1155/1151/1150 or AMD AM5/AM4/AM3+/AM3/AM2+/AM2).
- Aplikatu pasta termikoa: Aplikatu pasta termiko geruza fin eta uniforme bat CPUaren bero-hedatzaile integratuan (IHS).
- Ur-blokea mendian: Carefully place the water block onto the CPU, aligning it with the standoffs. Secure it with the provided thumb screws.
- Erradiadorea eta haizagailuak instalatzea: Mount the radiator to an available fan mount location in your PC case (e.g., top, front, or rear). Attach the fans to the radiator using the long screws. The cable-integrated daisy-chain design allows fans to connect directly to each other, minimizing cable clutter.
- Konektatu kableak:
- Connect the pump's 3-pin power cable to an available fan header on your motherboard (e.g., AIO_PUMP or CPU_FAN).
- Connect the fan's PWM cable to a 4-pin PWM fan header on your motherboard.
- Connect the ARGB cable from the fans/pump to a compatible 3-pin 5V ARGB header on your motherboard or an ARGB controller.
- Kableen kudeaketa: Utilize the integrated daisy-chain design and included cables to manage wiring neatly within your PC case.

Figure 2: Underside of the water block, showing the high-performance copper base plate designed for efficient heat transfer from the CPU.

3. irudia: Goikoa view of the two 120mm ARGB fans mounted on the radiator, showcasing their vibrant lighting capabilities.

4. irudia: Xehetasuna view of the radiator's aluminum fins, designed to maximize heat dissipation from the liquid coolant.
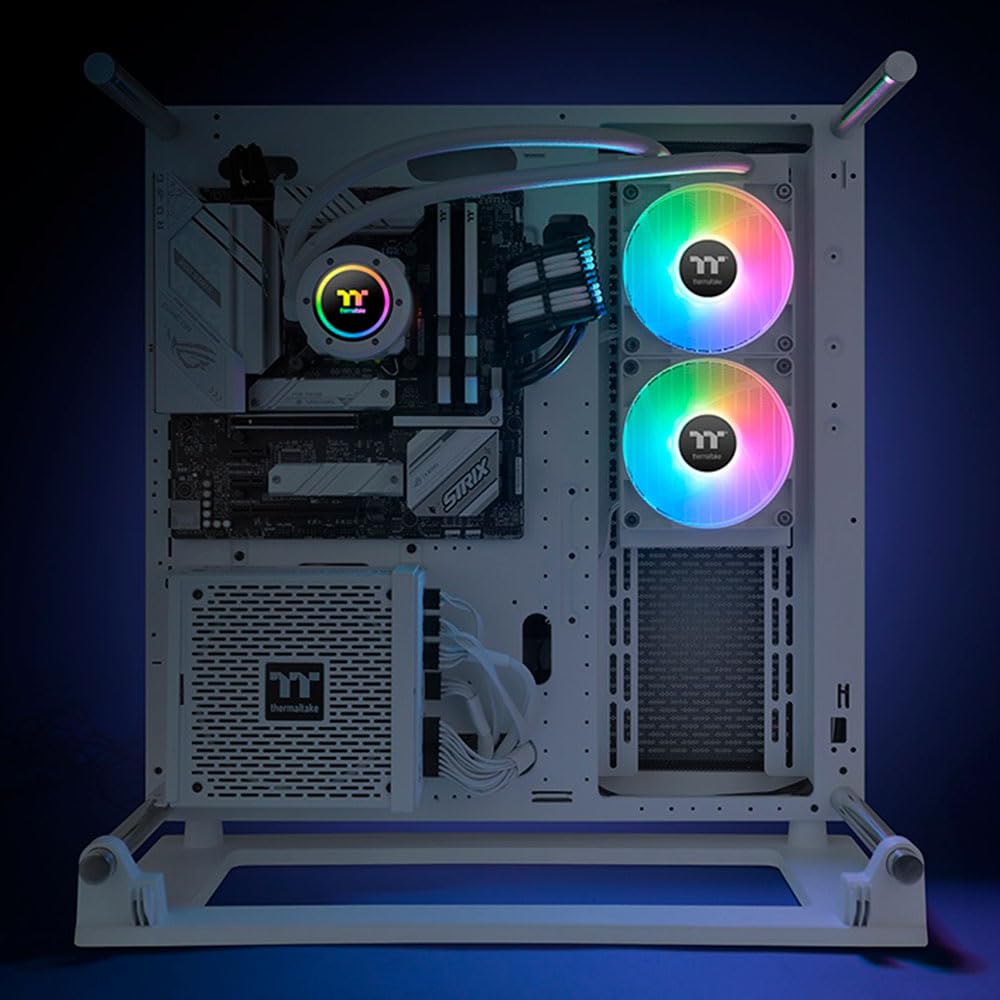
Figure 5: The TH240 V2 ARGB cooler installed in a white PC build, showing the radiator mounted at the top and the illuminated pump and fans.

6. irudia: Alde bat view of the cooler installed, highlighting the vibrant ARGB lighting of the fans and the pump's infinity mirror effect.
Funtzionamendu-argibideak
Once installed and powered on, the TH240 V2 ARGB cooler will automatically begin circulating coolant and cooling your CPU. The fans will adjust their speed based on CPU temperature, controlled by your motherboard's PWM settings.
ARGB Argiztapen Kontrola
The Addressable RGB (ARGB) lighting on the fans and pump can be controlled via your motherboard's ARGB software (e.g., ASUS Aura Sync, MSI Mystic Light Sync, GIGABYTE RGB Fusion, ASRock Polychrome Sync) or a compatible external ARGB controller. This allows for synchronization of lighting effects across your system and customization of colors and patterns.

Figure 7: Close-up of the pump unit, featuring the 360-degree rotational cap with infinity mirror ARGB lighting, providing dynamic visual effects.
Mantentzea
The Thermaltake TH240 V2 ARGB All-in-One Liquid Cooler is designed for minimal maintenance.
- No Refill Required: The low evaporation tube effectively decreases the loss of coolant, meaning no refills are required throughout the product's lifespan under normal operating conditions.
- Hautsa garbitzea: Periodically inspect the radiator fins and fans for dust accumulation. Use compressed air or a soft brush to gently remove dust, ensuring optimal airflow and cooling performance.
- Hodien ikuskapena: Occasionally check the hoses for any signs of kinks or damage.
Arazoak konpontzea
If you encounter issues with your TH240 V2 ARGB cooler, refer to the following common problems and solutions:
| Arazoa | Kausa posiblea | Irtenbidea |
|---|---|---|
| No ARGB lighting | ARGB cable not connected or incorrect header. Software issue. | Ensure the 3-pin 5V ARGB cable is securely connected to the correct motherboard header or controller. Check motherboard software settings. |
| Fans not spinning or pump not working | Power cable not connected. Incorrect header. | Verify that the pump's 3-pin power cable and fan's PWM cable are securely connected to the correct motherboard headers. Check BIOS settings for fan control. |
| CPU tenperatura altuak | Improper water block mounting. Insufficient thermal paste. Air bubbles in loop. | Re-seat the water block, ensuring even pressure. Reapply thermal paste. Ensure radiator and pump are positioned correctly to allow air bubbles to settle in the radiator. Check fan orientation for proper airflow. |
| Missing parts or difficult installation | Manufacturing error or user error. | Arretaz berriroview the package contents list and installation diagrams. If parts are genuinely missing, contact Thermaltake customer support. |
Zehaztapenak
| Ezaugarri | Xehetasuna |
|---|---|
| Modelo zenbakia | CL-W364-PL12SW-A |
| Marka | Thermaltake |
| Hozteko metodoa | Ura |
| Gailu bateragarriak | Mahaigaina |
| Zarata Maila | 25.8 dB |
| Materiala | Copper (Base Plate) |
| Biraketa-abiadura maximoa | 2000 RPM (Haizagailuak) |
| Energia konektore mota | 3-Pin (Pump), 4-Pin (Fans) |
| liburukiatage | 5 Volts (ARGB) |
| Wattage | 5 watt |
| CPU Socket bateragarritasuna | Intel: LGA 2066/2011/1700/1200/1156/1155/1151/1150 AMD: AM5/AM4/AM3+/AM3/AM2+/AM2 |
Bermea eta Laguntza
For detailed warranty information, please refer to the official Thermaltake webwebgunean edo produktuarekin batera datorren berme-txartelean. Bermearen baldintzak eta zehaztapenak eskualdearen arabera alda daitezke.
For technical support, product inquiries, or to report missing parts, please visit the official Thermaltake support page or contact their customer service directly.
Official Thermaltake Store: Thermaltake Store on Amazon
Ask a question about this manual
Ask about setup, troubleshooting, compatibility, parts, safety, or missing instructions. Manuals+ will review the question and use this page’s manual context to help answer it.