Sissejuhatus
This manual provides essential information for the safe and efficient operation, maintenance, and troubleshooting of your Sealey SAC5020A 50L Direct Drive Air Compressor. The compressor features an aluminium cylinder head with a cast iron cylinder for enhanced wear resistance, making it suitable for general-purpose workshop applications. Its pump head is directly coupled to a heavy-duty induction motor, ensuring reliable and quiet operation. The precision-welded receiver tank complies with the Pressure Vessel Directive. It is equipped with a fully automatic pressure cut-out switch and twin gauges to display both tank and working pressures. The unit is supplied with a 3-pin plug.
Ohutusteave
Kehavigastuste või seadmete kahjustumise vältimiseks järgige alati järgmisi ohutusnõudeid:
- Enne kompressori kasutamist lugege läbi kõik juhised ja mõistke neid.
- Ensure the compressor is placed on a level, stable surface in a well-ventilated area.
- Kandke sobivaid isikukaitsevahendeid, sealhulgas silmakaitset ja kuulmiskaitset.
- Ärge kasutage kompressorit d-režiimis.amp või märgades tingimustes või tuleohtlike vedelike või gaaside läheduses.
- Always disconnect the compressor from the power supply before performing any maintenance or adjustments.
- Ärge kunagi suunake suruõhku inimeste ega loomade poole.
- Regularly inspect the air tank for signs of corrosion or damage. Do not use a damaged tank.
- Enne kasutamist veenduge, et kõik ühendused on kindlad ja lekkevabad.
- Ärge muutke kompressorit ega selle ohutusseadmeid.
Lahtipakkimine ja seadistamine
Carefully remove the compressor from its packaging. Inspect the unit for any signs of shipping damage. If damage is found, contact your supplier immediately.
Component Identification and Dimensions

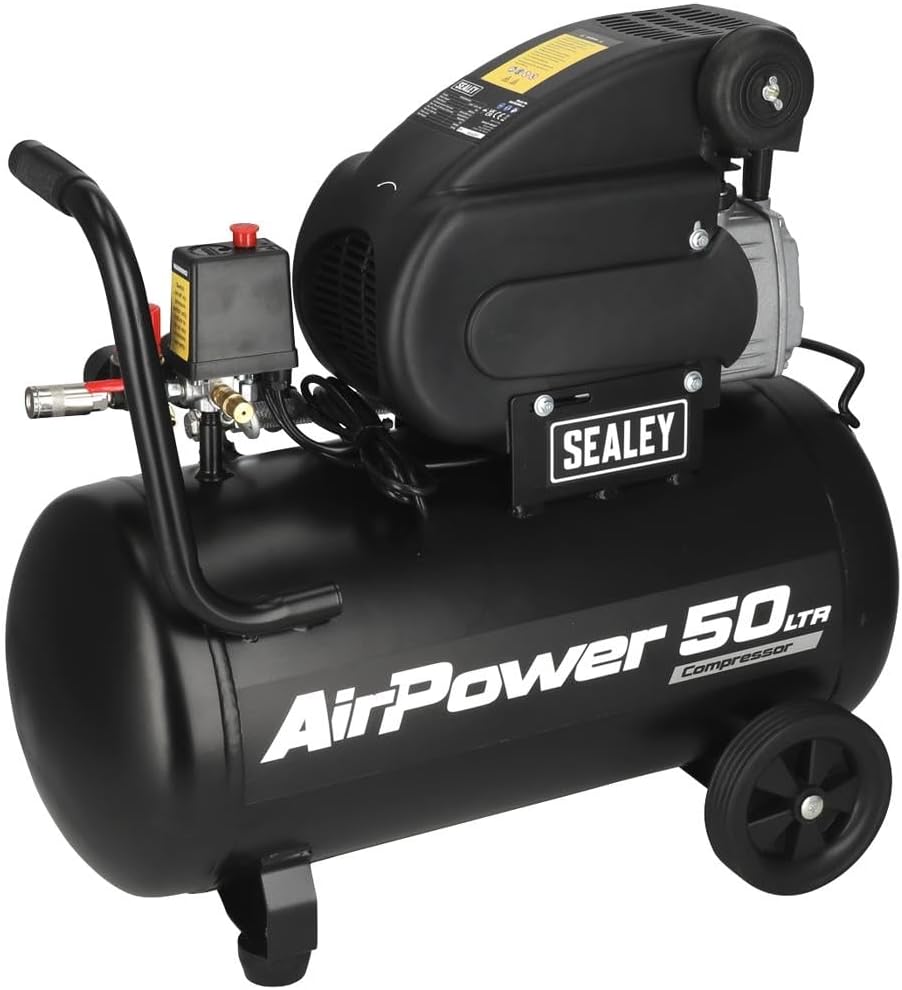
Joonis 1: Overall dimensions of the Sealey SAC5020A 50L Direct Drive Air Compressor. The image shows the compressor with its tank, motor, handle, wheels, and control panel, indicating a width of 705mm, a height of 600mm, and a depth of 300mm.
Familiarize yourself with the main components of your compressor. Refer to Figure 1 for an overview of the unit's dimensions and general layout.
Kokkupanek
- Rataste kinnitamine: Securely attach the wheels to the compressor base using the provided hardware.
- Kinnitage käepide: Mount the transport handle to the designated points on the compressor body.
- Positsioneerimine: Place the compressor on a firm, level surface. Ensure there is adequate space around the unit for ventilation.
Elektriühendus
Connect the compressor to a suitable grounded power outlet. Ensure the power supply matches the voltage and frequency specifications of the compressor (typically 230V, 50Hz for this model). The unit is fitted with a 3-pin plug.
Initial Run-in Procedure
Before first use, or after extended storage, perform a brief run-in:
- Open the air outlet valve completely to allow air to escape freely.
- Switch on the compressor and let it run for approximately 15-20 minutes without building pressure. This helps to lubricate internal components.
- Switch off the compressor and close the air outlet valve.
Kasutusjuhised
Controls and Gauges

Joonis 2: Lähivõte view of the twin pressure gauges. One gauge displays the tank pressure, and the other displays the regulated working pressure.
Joonis 3: The pressure cut-out switch (black box with yellow warning label) and the red pressure regulator knob, along with the quick-connect air outlet.
- Surve lüliti: The black box (Figure 3) automatically turns the compressor on and off to maintain tank pressure.
- Paagi manomeeter: Displays the current pressure inside the air tank (Figure 2).
- Working Pressure Gauge: Displays the pressure of the air being supplied to your tools, adjustable via the regulator (Figure 2).
- Rõhuregulaator: The red knob (Figure 3) allows you to adjust the working pressure. Turn clockwise to increase pressure, counter-clockwise to decrease.
- Quick-Connect Air Outlet: For attaching air hoses and tools (Figure 3).
Kompressori käivitamine
- Veenduge, et paagi põhjas olev tühjendusventiil on suletud.
- Ühendage kompressor sobivasse pistikupessa.
- Turn the main power switch to the "ON" position. The compressor will start to build pressure.
- Once the tank reaches its maximum pressure, the compressor will automatically shut off.
Connecting and Using Air Tools
- Connect your air hose to the quick-connect air outlet.
- Kinnitage õhutööriist vooliku teise otsa külge.
- Adjust the working pressure using the red regulator knob to suit the requirements of your air tool. Monitor the working pressure gauge.
- Begin using your air tool. The compressor will cycle on and off automatically to maintain pressure as needed.
Väljalülitamine
- Keera peamine toitelüliti asendisse "OFF".
- Ühendage õhuvoolik ja tööriistad lahti.
- Avage aeglaselt paagi põhjas olev tühjendusventiil, et vabastada kondenseerunud niiskus ja järelejäänud õhurõhk. Sulgege ventiil, kui paak on tühi.
Hooldus
Regulaarne hooldus tagab teie õhukompressori pikaealisuse ja ohutu töö.
Iga päev/pärast iga kasutamist
- Kondensaadi äravool: After each use, or daily if used frequently, open the drain valve at the bottom of the air tank to release accumulated moisture. This prevents rust and corrosion inside the tank.
Weekly/Monthly
- Kontrollige õhufiltrit: Check the air filter for dirt and debris. Clean or replace if necessary to ensure proper airflow to the pump.
- Kontrollige lekkeid: Listen for any air leaks around fittings, hoses, and valves. Tighten connections as needed. A soapy water solution can help identify small leaks.
- Kontrollige voolikuid ja liitmikke: Examine air hoses for cracks, cuts, or wear. Replace damaged hoses immediately. Ensure all quick-connect fittings are functioning correctly.
- Kontrollige toitejuhet: Check the power cord for any damage, fraying, or exposed wires.
Igal aastal
- Paagi kontroll: Visually inspect the air tank for any signs of external corrosion, dents, or damage. If any damage is found, do not use the compressor and seek professional inspection.
- Kaitseklapi kontroll: Briefly pull the ring on the safety relief valve to ensure it operates freely and reseats properly.
For any maintenance beyond these basic steps, it is recommended to consult a qualified service technician.
Veaotsing
See jaotis pakub lahendusi levinud probleemidele, mis võivad teie õhukompressoriga kokku puutuda.
| Probleem | Võimalik põhjus | Lahendus |
|---|---|---|
| Kompressor ei käivitu. |
|
|
| Kompressor töötab pidevalt või tsüklid liiga sageli. |
|
|
| Madal õhurõhk väljalaskeavas. |
|
|
| Liigne müra või vibratsioon. |
|
|
Tehnilised andmed
| Funktsioon | Detail |
|---|---|
| Kaubamärk | Sealey |
| Mudeli number | SAC5020A |
| Toiteallikas | AC |
| Maksimaalne võimsus | 2 hobujõudu |
| Mootori hobujõud | 2 hobujõudu |
| Paagi maht | 50 liitrit |
| Õhuvoolu maht | 6.8 kuupjalga minutis (CFM) |
| Kauba kaal | 32980 grammi (umbes 33 kg) |
| Erifunktsioon | Vaikne töö |
| Kaasatud komponendid | 50ltr Direct Drive Compressor 2hp |
| Soovitatavad kasutusalad | Bolting, Drilling, Spraying, Sanding, Grinding, Tire Inflation |
Garantii teave
This Sealey product is covered by a manufacturer's warranty against defects in materials and workmanship. The specific terms and duration of the warranty may vary by region and purchase date. Please retain your proof of purchase for warranty claims.
For detailed warranty information, please refer to the warranty card included with your product or visit the official Sealey websaidile.
Tugi ja kontakt
Should you require technical assistance, spare parts, or have any questions regarding your Sealey SAC5020A air compressor, please contact Sealey customer support or your authorized dealer.
Sealey ametnik Websait: www.sealey.co.uk
Please have your model number (SAC5020A) and serial number (if applicable) ready when contacting support.