1. Introducción
This manual provides detailed instructions for setting up, operating, and maintaining your AOOSTAR MACO AMD Ryzen 7 H255 Mini PC. Please read this manual thoroughly before using the device to ensure proper functionality and safety. The AOOSTAR MACO Mini PC is designed for high performance, featuring an AMD Ryzen 7 H255 processor, Radeon 780M graphics, and extensive connectivity options.
2. Contenido del paquete
Verifique que todos los artículos que se enumeran a continuación estén presentes en su paquete:
- 1 x AOOSTAR MACO AMD Ryzen 7 H255 Mini PC
- 1 x SSD Cooling Pad
- 1 x 120W 19V 6.32A Type-C Power Supply
3. Producto terminadoview
The AOOSTAR MACO Mini PC is a compact yet powerful computing solution. Below are key features and an overview of its components and ports.
3.1 Características principales
- Procesador: AMD Ryzen 7 H255 (8-core, 16-thread, up to 4.9 GHz) with Zen 4 architecture and 4nm process.
- Gráficos: Integrated Radeon 780M graphics (RDNA 3 architecture).
- Memoria: Dual-channel DDR5 5600MHz (expandable up to 128GB).
- Almacenamiento: Dual-channel M.2 2280 NVMe PCIe4.0x4 SSD (expandable up to 8TB).
- Seguridad: One-touch fingerprint unlock for secure access.
- Soporte de pantalla: Supports up to four 4K displays simultaneously.
- Conectividad: OCuLink, Dual USB4, USB 3.2 Gen2, USB 3.0, HDMI, DisplayPort, Dual 2.5G LAN, Wi-Fi 6.
3.2 Componentes y puertos externos
Familiarize yourself with the various ports and components of your Mini PC.
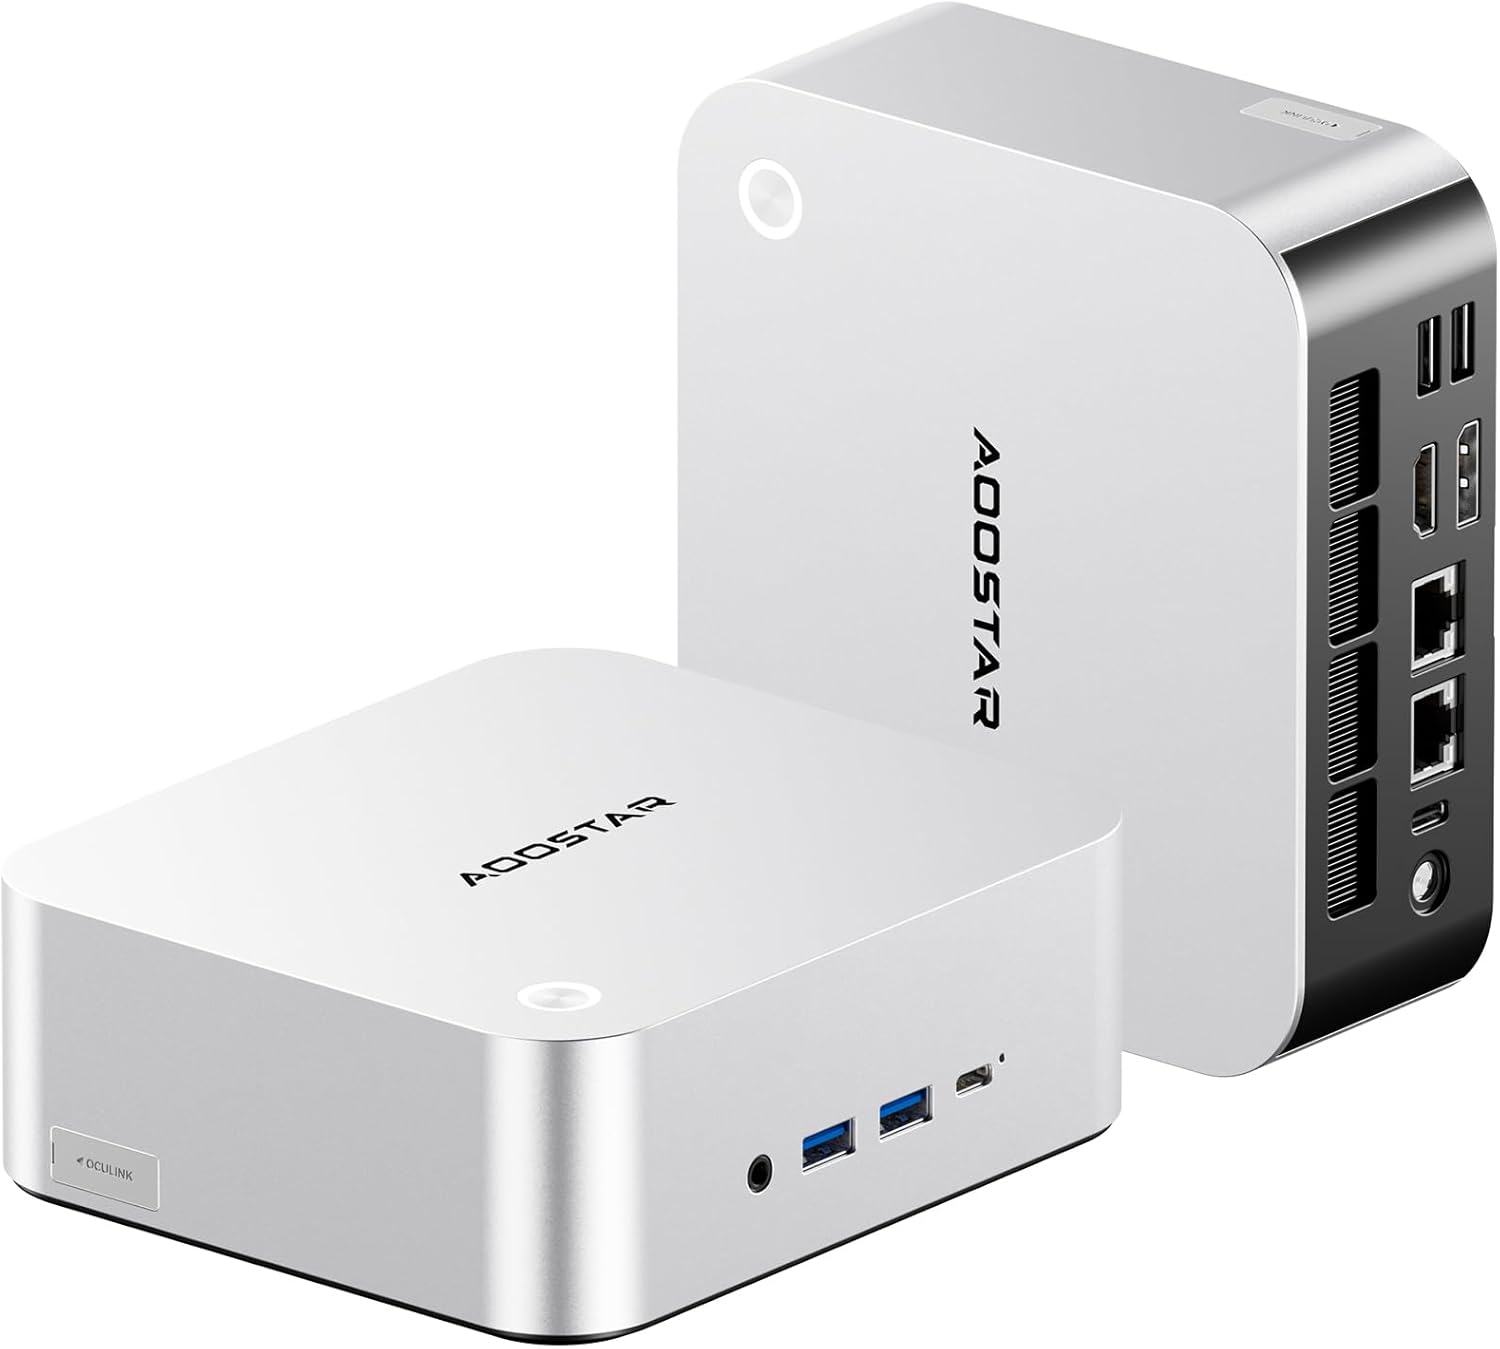
Imagen: delantera y trasera view of the AOOSTAR MACO Mini PC, showcasing su diseño compacto y varios puertos.

Imagen: Detallada view of the AOOSTAR MACO Mini PC's rear ports, including OCuLink, USB4, USB 3.2 Gen2, HDMI, DisplayPort, and Dual 2.5G LAN ports.
- Panel frontal: Power button with fingerprint sensor, USB ports.
- Panel trasero: OCuLink port (1), USB4 ports (2), USB 3.2 Gen2 ports (2), USB 3.0 ports (2), HDMI port (1), DisplayPort (1), 2.5G LAN ports (2), DC power input (1), Audio Jack (1).

Image: Close-up of the one-touch fingerprint sensor on the AOOSTAR MACO Mini PC for secure login.

Image: Visual representation of the AMD Ryzen 7 H255 processor, highlighting its core count, turbo frequency, and architecture.

Imagen: interna view showing the dual DDR5 memory slots and dual M.2 PCIe 4.0 SSD slots for high-speed storage and memory.

Image: The OCuLink port connected to an external GPU enclosure, demonstrating its use for enhanced graphics performance.

Image: Two AOOSTAR MACO Mini PCs side-by-side, highlighting the dual USB4 ports for high-speed data transfer and power delivery.
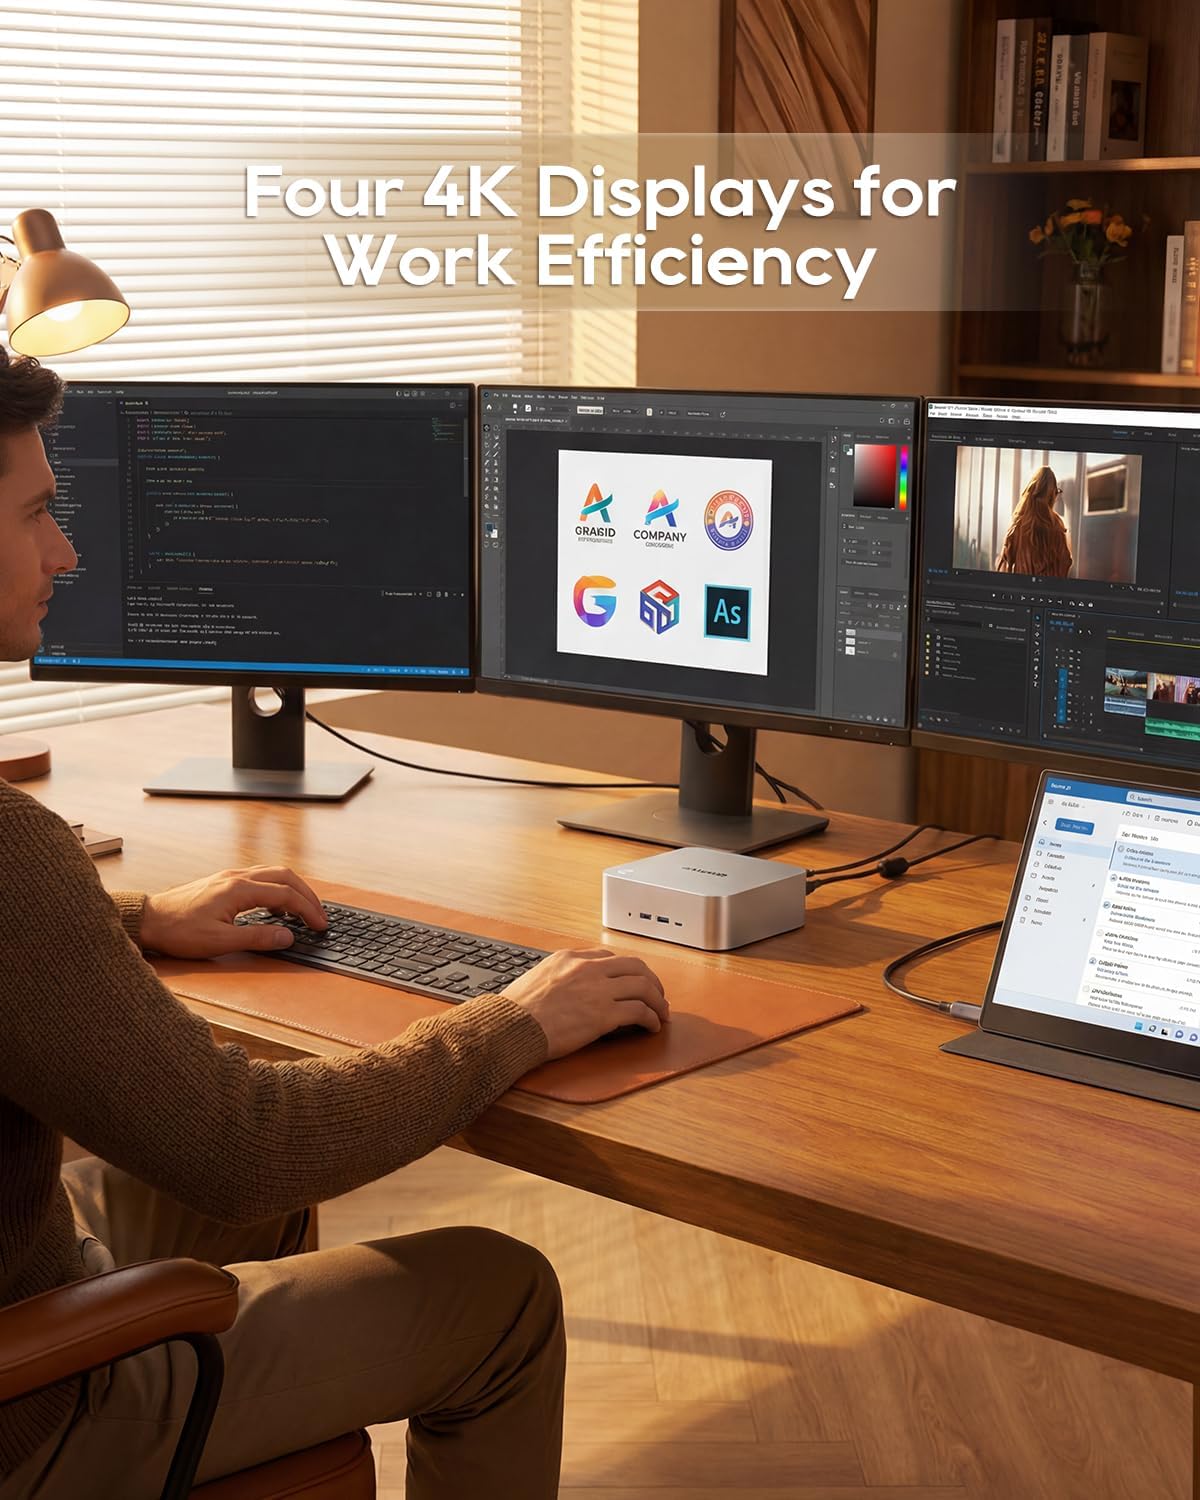
Image: A user working with the AOOSTAR MACO Mini PC connected to four 4K displays, illustrating its multi-display capability for productivity.
Image: The rear of the Mini PC showing the dual 2.5G LAN ports and an external WiFi antenna, emphasizing its high-speed networking capabilities.
Vídeo: Un overview of the AOOSTAR MACO Mini PC, demonstrating its features such as fingerprint unlock, business applications, gaming performance, and home theater use.
4. Instrucciones de configuración
Follow these steps to set up your AOOSTAR MACO Mini PC:
- Conectar pantalla: Connect your monitor(s) to the Mini PC using an HDMI or DisplayPort cable. The Mini PC supports up to four 4K displays.
- Conectar periféricos: Conecte su teclado, mouse y cualquier otro dispositivo USB en los puertos USB disponibles.
- Conexión de red: For wired internet, connect an Ethernet cable to one of the 2.5G LAN ports. For wireless internet, ensure the Wi-Fi antenna is connected (if external) and the device is powered on to configure Wi-Fi settings.
- Conexión de energía: Connect the 120W Type-C power supply to the DC input port on the Mini PC, then plug the power adapter into a wall outlet.
- Encendido: Presione el botón de encendido en la parte frontal de la mini PC. El sistema se iniciará.
- Configuración inicial: Siga las instrucciones en pantalla para completar la configuración del sistema operativo (por ejemplo, sistema operativo Windows).
5. Instrucciones de funcionamiento
This section covers general operation and specific features of your Mini PC.
5.1 Desbloqueo por huella dactilar
The Mini PC features a one-touch fingerprint unlock for enhanced security and quick access. During initial OS setup or via system settings, you can enroll your fingerprints. Once configured, simply touch the power button to wake and log in without needing a password.
5.2 Configuración de múltiples pantallas
The Mini PC supports connecting up to four 4K displays. Connect your monitors to the available HDMI and DisplayPort outputs. You can configure display settings (e.g., extend, duplicate) within your operating system's display settings.
5.3 OCuLink for External Graphics
The OCuLink port provides a high-bandwidth connection (64 Gbps) for external GPU solutions. This allows for significantly improved graphics performance for demanding applications or gaming. Note that OCuLink is not hot-swappable and does not occupy an M.2 2280 PCIe4.0 SSD slot.
5.4 USB4 Ports
The dual USB4 ports offer versatile connectivity with high data transfer speeds and power delivery capabilities (up to 100W). These ports can be used for external graphics card docks, NVMe SSD arrays, or other high-speed peripherals.
6. Mantenimiento
El mantenimiento regular ayuda a garantizar la longevidad y el rendimiento óptimo de su Mini PC.
- Limpieza: Utilice un paño suave y seco para limpiar el exterior de la minicomputadora. Para eliminar el polvo acumulado en las rejillas de ventilación, utilice aire comprimido. Asegúrese de que el dispositivo esté apagado y desenchufado antes de limpiarlo.
- Ventilación: Asegúrese de que la minicomputadora esté ubicada en un área bien ventilada. No obstruya las aberturas de ventilación.
- Actualizaciones de software: Regularly update your operating system, drivers, and applications to maintain security and performance.
7. Solución de problemas
Si tiene problemas con su Mini PC, consulte los siguientes pasos de solución de problemas comunes:
- Sin energía:
- Asegúrese de que el adaptador de corriente esté conectado de forma segura tanto a la mini PC como a una toma de corriente que funcione.
- Verifique que la toma de corriente funcione enchufando otro dispositivo.
- Sin pantalla:
- Check that the display cable (HDMI/DisplayPort) is securely connected to both the Mini PC and the monitor.
- Asegúrese de que el monitor esté encendido y configurado en la fuente de entrada correcta.
- Intente conectarse a una pantalla diferente o utilizar un cable diferente.
- Sin conexión a Internet:
- Para la conexión por cable, verifique el estado del cable Ethernet y del enrutador.
- For Wi-Fi, ensure Wi-Fi is enabled in the operating system settings and you are connected to the correct network with the correct password.
- Reinicie su enrutador/módem y la mini PC.
- Rendimiento lento:
- Cierre las aplicaciones innecesarias que se ejecutan en segundo plano.
- Verifique que haya suficiente espacio de almacenamiento libre en su SSD.
- Ensure the Mini PC is well-ventilated to prevent overheating.
8. Especificaciones
Detailed technical specifications for the AOOSTAR MACO AMD Ryzen 7 H255 Mini PC:
| Característica | Especificación |
|---|---|
| Marca | AOOSTAR |
| Número de modelo | MACO AMD Ryzen 7 H255 |
| Modelo de CPU | AMD Ryzen 7 H255 |
| Velocidad de la CPU | 3.8 GHz (Base), up to 4.9 GHz (Max Boost) |
| Coprocesador gráfico | Radeon 780M |
| Tamaño de la memoria RAM instalada | 24 GB |
| Tecnología de memoria RAM | DDR5 |
| Velocidad de la memoria | 5600 MHz |
| Tamaño máximo de la memoria RAM | 128 GB |
| Capacidad de almacenamiento de memoria | SSD de 1TB |
| Interfaz del disco duro | PCIEx4 |
| Sistema operativo | Sistema operativo (preinstalado) |
| Tecnología de conectividad | HDMI, USB, Wi-Fi 6, 2.5G LAN, OCuLink |
| Interfaz de salida de vídeo | Puerto de pantalla, HDMI |
| Resolución | 4K |
| Puertos USB totales | 6 (2x USB4, 2x USB 3.2 Gen2, 2x USB 3.0) |
| Dimensiones del artículo | 5.12 x 5.12 x 2.36 pulgadas |
| Peso del artículo | 660 gramos |
| Color | Negro |
9. Garantía y soporte
The AOOSTAR MACO AMD Ryzen 7 H255 Mini PC comes with a 1-year warranty. For warranty claims, technical support, or service inquiries, please contact AOOSTAR customer support through their official channels or the retailer where the product was purchased. Keep your proof of purchase for warranty validation.