1. Introducción
The Kiprim WM02 is a versatile pin-type moisture meter designed for quick and accurate measurement of moisture content in various materials. It features a large LCD display, temperature measurement, a data hold function, and four selectable material modes, making it an essential tool for professionals and DIY enthusiasts alike.
2. Información de seguridad
- Always keep the protective cap on the measurement pins when the device is not in use to prevent injury.
- Do not allow the probes to come into contact with live electrical objects or wires. This can cause electric shock or damage to the device.
- Mantenga el dispositivo fuera del alcance de los niños.
- No intente desmontar ni modificar el dispositivo. Las reparaciones solo deben ser realizadas por personal cualificado.
- Retire la batería si el dispositivo no se utilizará durante un período prolongado para evitar fugas de la batería.

Figura 2.1: Safety warning regarding probes and protective cap.
3. Contenido del paquete
Verifique que todos los artículos estén presentes en el paquete:
- 1 x Kiprim WM02 Moisture Meter
- 1 x 9V 6LR61 Battery
- 2 x Pairs of Replacement Probes (4 total)
- 1 x Probe Replacement Wrench
- 1 x Manual de usuario
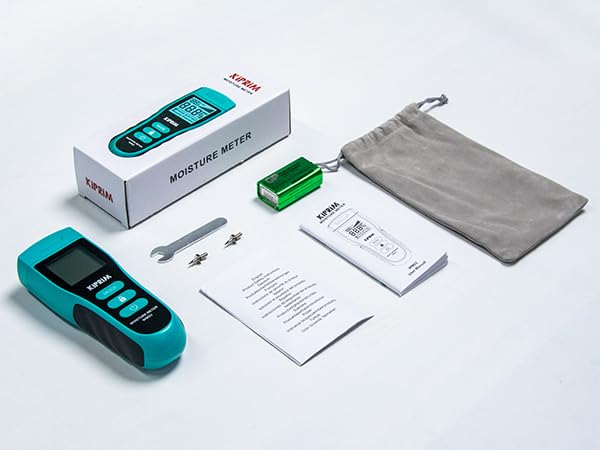
Figura 3.1: Contents included in the Kiprim WM02 package.
4. Producto terminadoview
4.1 Disposición del dispositivo

Figura 4.1: Delante y detrás view of the Kiprim WM02 with labeled components.
- Pines de medición: Used to penetrate the material and detect moisture.
- Pantalla de temperatura: Muestra la temperatura ambiente en °C o °F.
- Icono de estado de la batería: Indica la vida útil restante de la batería.
- Gráfico de barras analógico: Provides a visual representation of moisture level.
- Visualización del valor medido: Muestra el porcentaje numérico de humedad.tage.
- Material Mode Display: Indicates the currently selected material type (Softwood, Hardwood, Building, Packing).
- Botón MODE: Press to cycle through material modes.
- HOLD / °C/°F Button: Short press to hold the current reading; long press to switch between Celsius and Fahrenheit.
- Botón de encendido / apagado: Enciende o apaga el dispositivo.
- Compartimento de la batería: Ubicado en la parte posterior para la instalación de batería de 9 V.
- Tabla de contenido de humedad: Printed on the back for quick reference of moisture levels.
5. Configuración
5.1 Instalación de la batería
The Kiprim WM02 requires one 9V 6LR61 battery (included). To install or replace the battery:
- Localice el compartimento de la batería en la parte posterior del dispositivo (consulte la Figura 4.1).
- Deslice la tapa del compartimento de la batería para abrirla.
- Conecte la batería de 9 V al clip de la batería, asegurándose de la polaridad correcta.
- Coloque la batería en el compartimiento y cierre la tapa de forma segura.
5.2 Replacing Measurement Pins
The measurement pins are replaceable. Two additional pairs are included. To replace the pins:
- Ensure the device is powered off and the protective cap is removed.
- Use the provided small wrench to carefully unscrew the old pins.
- Insert the new pins and tighten them with the wrench until secure. Do not overtighten.
- Replace the protective cap after replacement.

Figura 5.1: Replacing the measurement pins using the provided wrench.
6. Instrucciones de funcionamiento
6.1 Encendido y apagado
- Para encender el dispositivo, presione el Encendido/apagado botón ().
- Para apagar el dispositivo, mantenga presionado el botón Encendido/apagado button for approximately 2 seconds. The device will also automatically shut off after 2 minutes of inactivity to conserve battery life.
6.2 Selecting Material Mode
The WM02 offers four material modes for accurate measurements:
- Madera blanda: For materials like Lauan, Spruce/Pine, Cork, Cedar, Beech.
- Madera dura: For materials like Teak, Noyer, Afrormosia, Hevea, Imbuia, Kokrodua, Niové, Bilinga, Keruing, Poplar, Tola, Frène, Orme, Érable, Padouk, Chêne, Cerisier, Bouleau.
- Edificio: For materials like lime mortar, earth walls, cement walls, roofs, brick walls, stone walls, plasterboard, mastic walls.
- Embalaje: For materials like cardboard, paperboard, corrugated cardboard.
Para seleccionar un modo, presione el botón MODO botón () repeatedly until the desired material type is displayed on the screen.

Figura 6.1: The four material modes available on the Kiprim WM02.
6.3 Realización de una medición
- Retire la tapa protectora de las clavijas de medición.
- Encienda el dispositivo.
- Select the appropriate material mode using the MODO botón.
- Carefully push the measurement pins into the material you wish to test. Ensure both pins are fully inserted and make good contact.
- Lea el porcentaje de humedadtage and temperature from the LCD display. The analog bar graph provides a quick visual reference.
- Después de la medición, extraiga con cuidado los pasadores y vuelva a colocar la tapa protectora.
6.4 Using the Hold Function
The HOLD function allows you to freeze the current reading on the display, which is useful when taking measurements in hard-to-reach or poorly lit areas.
- While taking a measurement, short press the MANTENER / °C/°F botón (). The reading will be frozen, and a "HOLD" icon will appear on the display.
- To exit the HOLD function and resume live readings, short press the MANTENER / °C/°F botón de nuevo.

Figura 6.2: Using the HOLD function to freeze a measurement.
6.5 Cambio de unidades de temperatura (°C/°F)
The device can display ambient temperature in either Celsius (°C) or Fahrenheit (°F).
- To switch between temperature units, long press the MANTENER / °C/°F botón () for approximately 2 seconds. The unit will change on the display.

Figura 6.3: Toggling between Celsius and Fahrenheit temperature units.
6.6 Interpreting Readings (Moisture Level Chart)
The device provides a general guide for moisture levels (DRY, MID, WET) based on the selected material mode. Refer to the chart below and also printed on the back of the device for interpretation:
| Nivel de humedad | Madera blanda | Madera dura | Embalaje | Edificio |
|---|---|---|---|---|
| SECO | <20% | <12% | <13% | <17% |
| MEDIO | 20-26% | 12-16% | 13-21% | 17-20% |
| HÚMEDO | >26% | >16% | >21% | >20% |

Figura 6.4: Moisture level interpretation chart and example lectura.
7. Calibración
The Kiprim WM02 features a self-calibration function to ensure long-term accuracy. If the device does not read "0" when held in open air (not touching any material), it may require recalibration.
- To recalibrate, ensure the device is powered on and held in open air, away from any moisture sources or materials.
- The device will automatically adjust its baseline to read "0" in this environment. If the reading is still not zero, power off the device and power it back on in open air.
8. Mantenimiento
8.1 Limpieza
- Limpie el dispositivo con un paño suave y seco.
- No utilice limpiadores abrasivos ni disolventes.
- Asegúrese de que los pines de medición estén limpios y libres de residuos después de cada uso.
8.2 Almacenamiento
- Always replace the protective cap over the measurement pins before storing.
- Guarde el dispositivo en un lugar fresco y seco, alejado de la luz solar directa y de temperaturas extremas.
- Remove the battery if the device will not be used for an extended period to prevent battery leakage and potential damage.
9. Solución de problemas
- El dispositivo no se enciende: Compruebe que la batería de 9 V esté correctamente instalada y tenga suficiente carga. Reemplácela si es necesario.
- Lecturas inexactas:
- Asegúrese de que esté seleccionado el modo de material correcto.
- Verify that the measurement pins are fully inserted into the material and making good contact.
- Perform a self-calibration in open air (refer to Section 7).
- Check if the pins are bent or damaged; replace them if needed.
- La pantalla está oscura o parpadea: La batería puede estar baja. Reemplace la batería de 9 V.
- "HOLD" icon is stuck: Short press the HOLD button to release the function.
10. Especificaciones
| Número de modelo | WM02 |
| Tipo de pantalla | Pantalla LCD |
| Principio de medición | Pin-type (Resistance) |
| Exactitud | ±4 % HR |
| Modos materiales | Softwood, Hardwood, Building, Packing |
| Rango de medición de temperatura | 0–50 °C (32–122 °F) |
| Fuente de poder | 1 x 9V 6LR61 Battery |
| Apagado automático | Después de 2 minutos de inactividad |
| Dimensiones | 139 x 52 x 31 mm (5.47 x 2.05 x 1.22 pulgadas) |
| Peso | 78 g (sin batería) |
| Características especiales | Large LCD display, 4 material modes, temperature measurement, hold function, replaceable probes, auto-calibration |
11. Garantía y soporte
Kiprim products are designed for reliability and performance. For warranty information, technical support, or assistance with your WM02 moisture meter, please refer to the contact information provided with your purchase or visit the official Kiprim webSitio web. Conserve su comprobante de compra para reclamaciones de garantía.