FLARING FC650D PLUS
Manual del usuario de la cortadora de plasma FLARING FC650D PLUS
Model: FC650D PLUS
1. Introducción
Thank you for choosing the FLARING FC650D PLUS Plasma Cutter. This advanced 65 AMP plasma cutting machine is designed for efficient and precise cutting of various metals. Featuring dual voltage compatibility (120V/240V), a high-frequency IGBT inverter, and a large digital display, it offers powerful performance and ease of use for both professionals and enthusiasts. This manual provides essential information for safe operation, setup, maintenance, and troubleshooting to ensure optimal performance and longevity of your device.

Figure 1.1: FLARING FC650D PLUS Plasma Cutter and included accessories.
2. Información de seguridad
Priorice siempre la seguridad al operar la cortadora de plasma. No seguir las normas de seguridad puede provocar lesiones graves o daños al equipo.
- Descarga eléctrica: El corte por plasma implica un alto volumentage. Ensure proper grounding. Do not operate in wet conditions. Wear dry gloves.
- Humos y Gases: Cutting metals produces fumes and gases that can be hazardous. Work in a well-ventilated area or use local exhaust ventilation.
- Rayos de arco: The plasma arc produces intense visible and invisible (UV and IR) rays that can burn eyes and skin. Always wear appropriate welding helmet with a suitable shade filter, protective clothing, and gloves.
- Incendio y Explosión: Sparks and hot metal can cause fires. Keep flammable materials away from the cutting area. Do not cut containers that have held combustible materials.
- Ruido: Plasma cutting can be noisy. Wear hearing protection.
- Partes calientes: The torch and workpiece will become hot. Allow them to cool before handling or wear heat-resistant gloves.
- Aire comprimido: Ensure air compressor is properly maintained and regulated to the specified PSI.
- Equipo de protección individual (EPI): Always wear appropriate PPE, including a welding helmet, flame-resistant clothing, heavy-duty gloves, and safety footwear.
3. Contenido del paquete
Verifique que todos los artículos enumerados a continuación estén incluidos en su paquete. Si falta algún artículo o está dañado, comuníquese con atención al cliente.
- FLARING FC650D PLUS Plasma Cutter Unit
- PT31 Plasma Cutting Torch (4M)
- Cl de tierraamp con cable (3M)
- Air Filter Regulator (Pre-installed)
- Additional Consumables (4 PCS)
- Power Adapter (for 120V connection)
- Manual de instrucciones
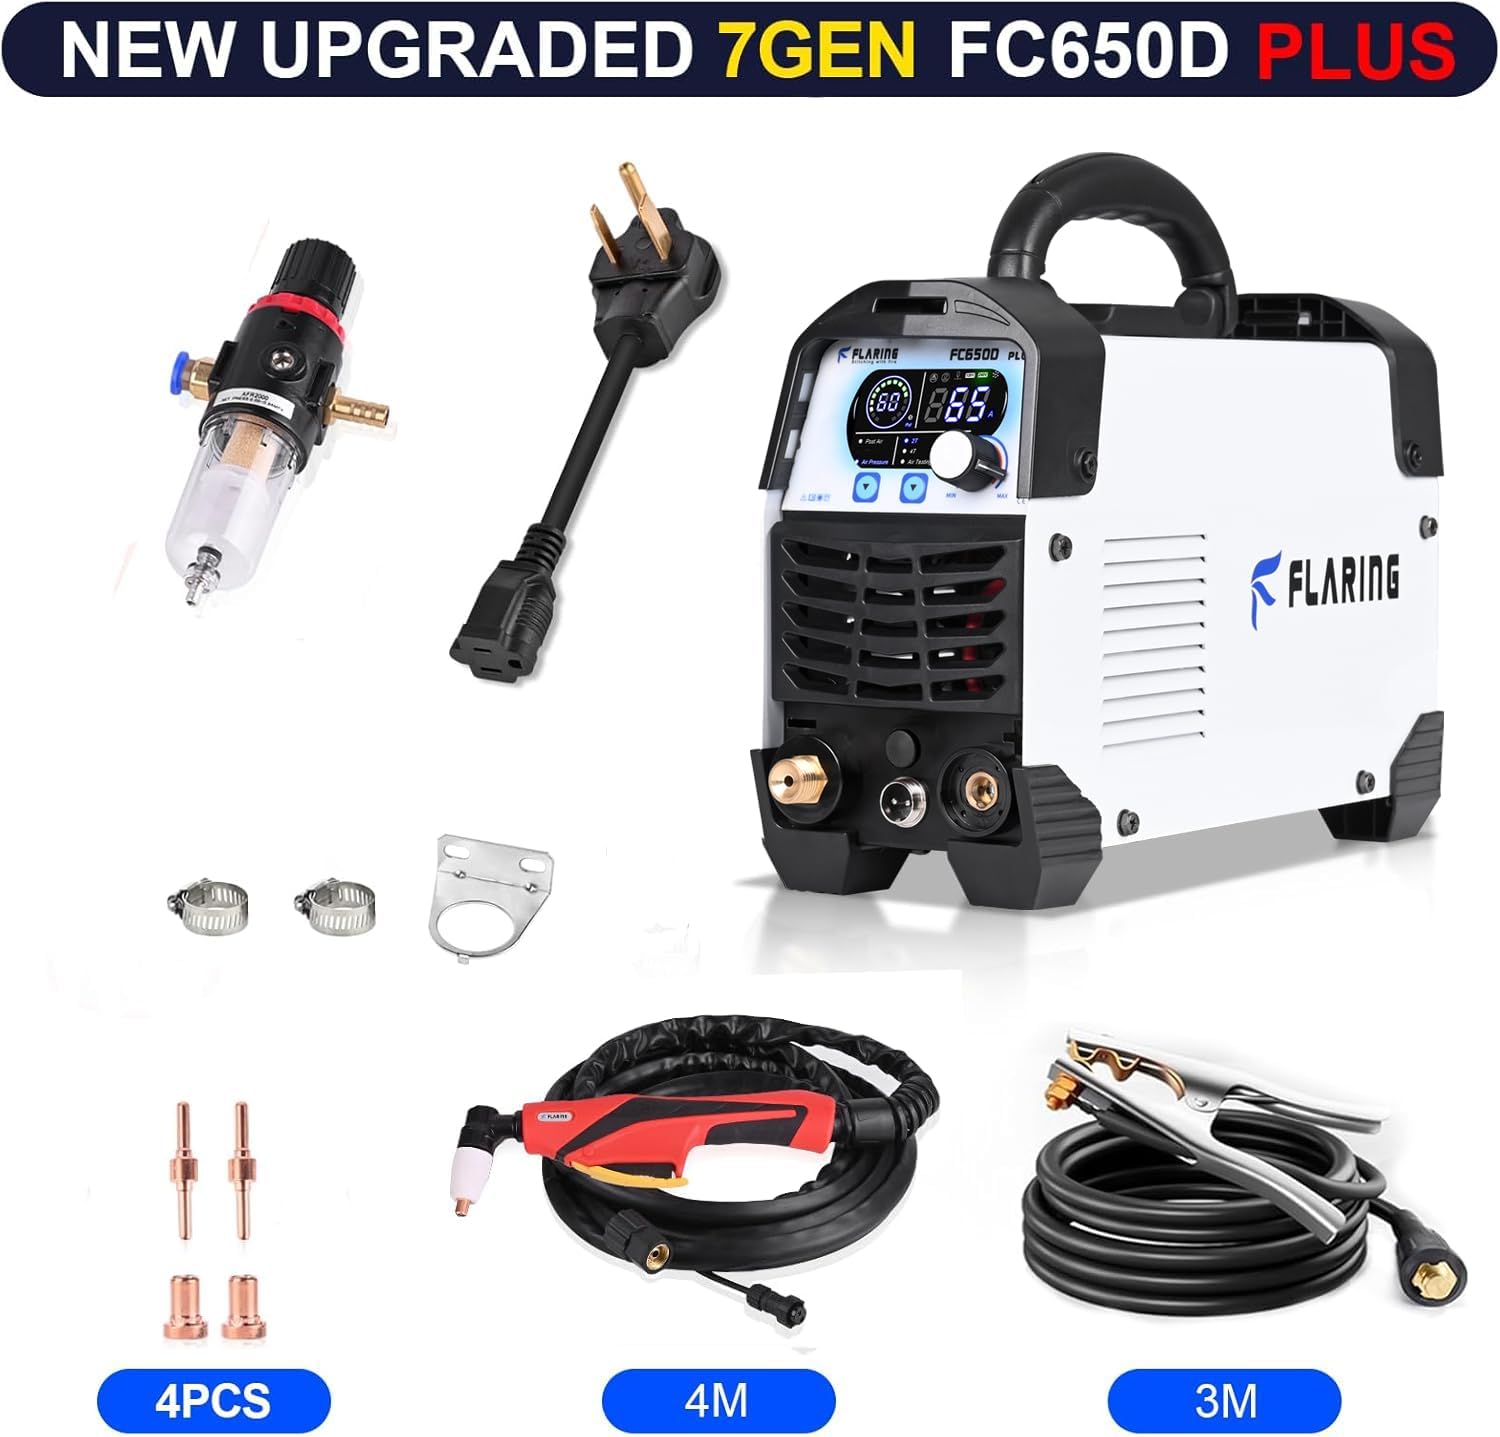
Figure 3.1: All components included with the FC650D PLUS Plasma Cutter.
4. Producto terminadoview y especificaciones
4.1. Características principales
- 7th Generation 65A Touch Arc Plasma Cutter: High-frequency touch arc starting for efficient cutting.
- Vol dobletage (120 V/240 V): Vol automáticotage adaptation for versatile use.
- Tecnología de inversor IGBT: Provides stable and powerful cutting performance.
- Pantalla digital grande: Visualización en tiempo real de la presión del aire, vol.tage, y actual.
- PA/2T/4T Functions: Offers control modes for various cutting needs.
- Portátil y compacto: Diseño ligero con asa para fácil transporte.
4.2. Especificaciones técnicas
| Especificación | Valor |
|---|---|
| Modelo | FC650D PLUS |
| Vol de entradatage | Vol. doble de 120 V/240 Vtage |
| Corriente máxima (120 V) | 35A |
| Corriente máxima (240 V) | 65A |
| Espesor de corte limpio (120 V) | 1/2" (12mm) at 35A, 50 PSI |
| Espesor de corte de separación (240 V) | 5/8" (16mm) at 60A, 60 PSI |
| Recommended Breaker Size (240V) | 40A |
| Recommended Breaker Size (120V) | 55A |
| Required Air Compressor | 90 PSI, 60 L/min or above |
| Peso del artículo | 14.92 libras |
| Dimensiones del paquete | 17.5 x 11 x 9.7 pulgadas |
| Fuente de poder | AC |

Figure 4.1: Compact and lightweight design of the FC650D PLUS.
5. Instrucciones de configuración
5.1. Conexión de alimentación
The FC650D PLUS supports dual voltagEntrada electrónica (120V/240V).
- For 240V operation, connect the main power cord directly to a compatible 240V outlet. Ensure the circuit breaker is rated for at least 40A.
- For 120V operation, use the provided power adapter to connect the main power cord to a 120V outlet. Ensure the circuit breaker is rated for at least 55A.
- Always ensure the power source is stable and properly grounded.
5.2. Conexión del compresor de aire
A clean, dry air supply is crucial for optimal plasma cutting performance.
- Connect your air compressor to the air inlet on the back of the plasma cutter.
- The FC650D PLUS features a pre-installed air filter regulator. This regulator automatically senses and displays the air pressure on the digital screen, eliminating the need for an external gauge.
- Ensure your air compressor can provide a minimum of 90 PSI and 60 L/min airflow.

Figure 5.1: The pre-installed air regulator simplifies setup and displays pressure digitally.
5.3. Antorcha y limpieza a tierraamp Conexión
- Connect the PT31 plasma cutting torch cable to the designated port on the front panel of the machine. Ensure it is securely fastened.
- Conecte el cable de tierraamp Cable al terminal de tierra en el panel frontal.
- Adjuntar el suelo clamp firmly to the workpiece or a clean, bare metal surface that is electrically connected to the workpiece. A good ground connection is essential for safe and effective cutting.
6. Instrucciones de funcionamiento
6.1. Encendido y visualización digital
Turn on the power switch located on the back of the unit. The large digital display will illuminate, showing real-time parameters.
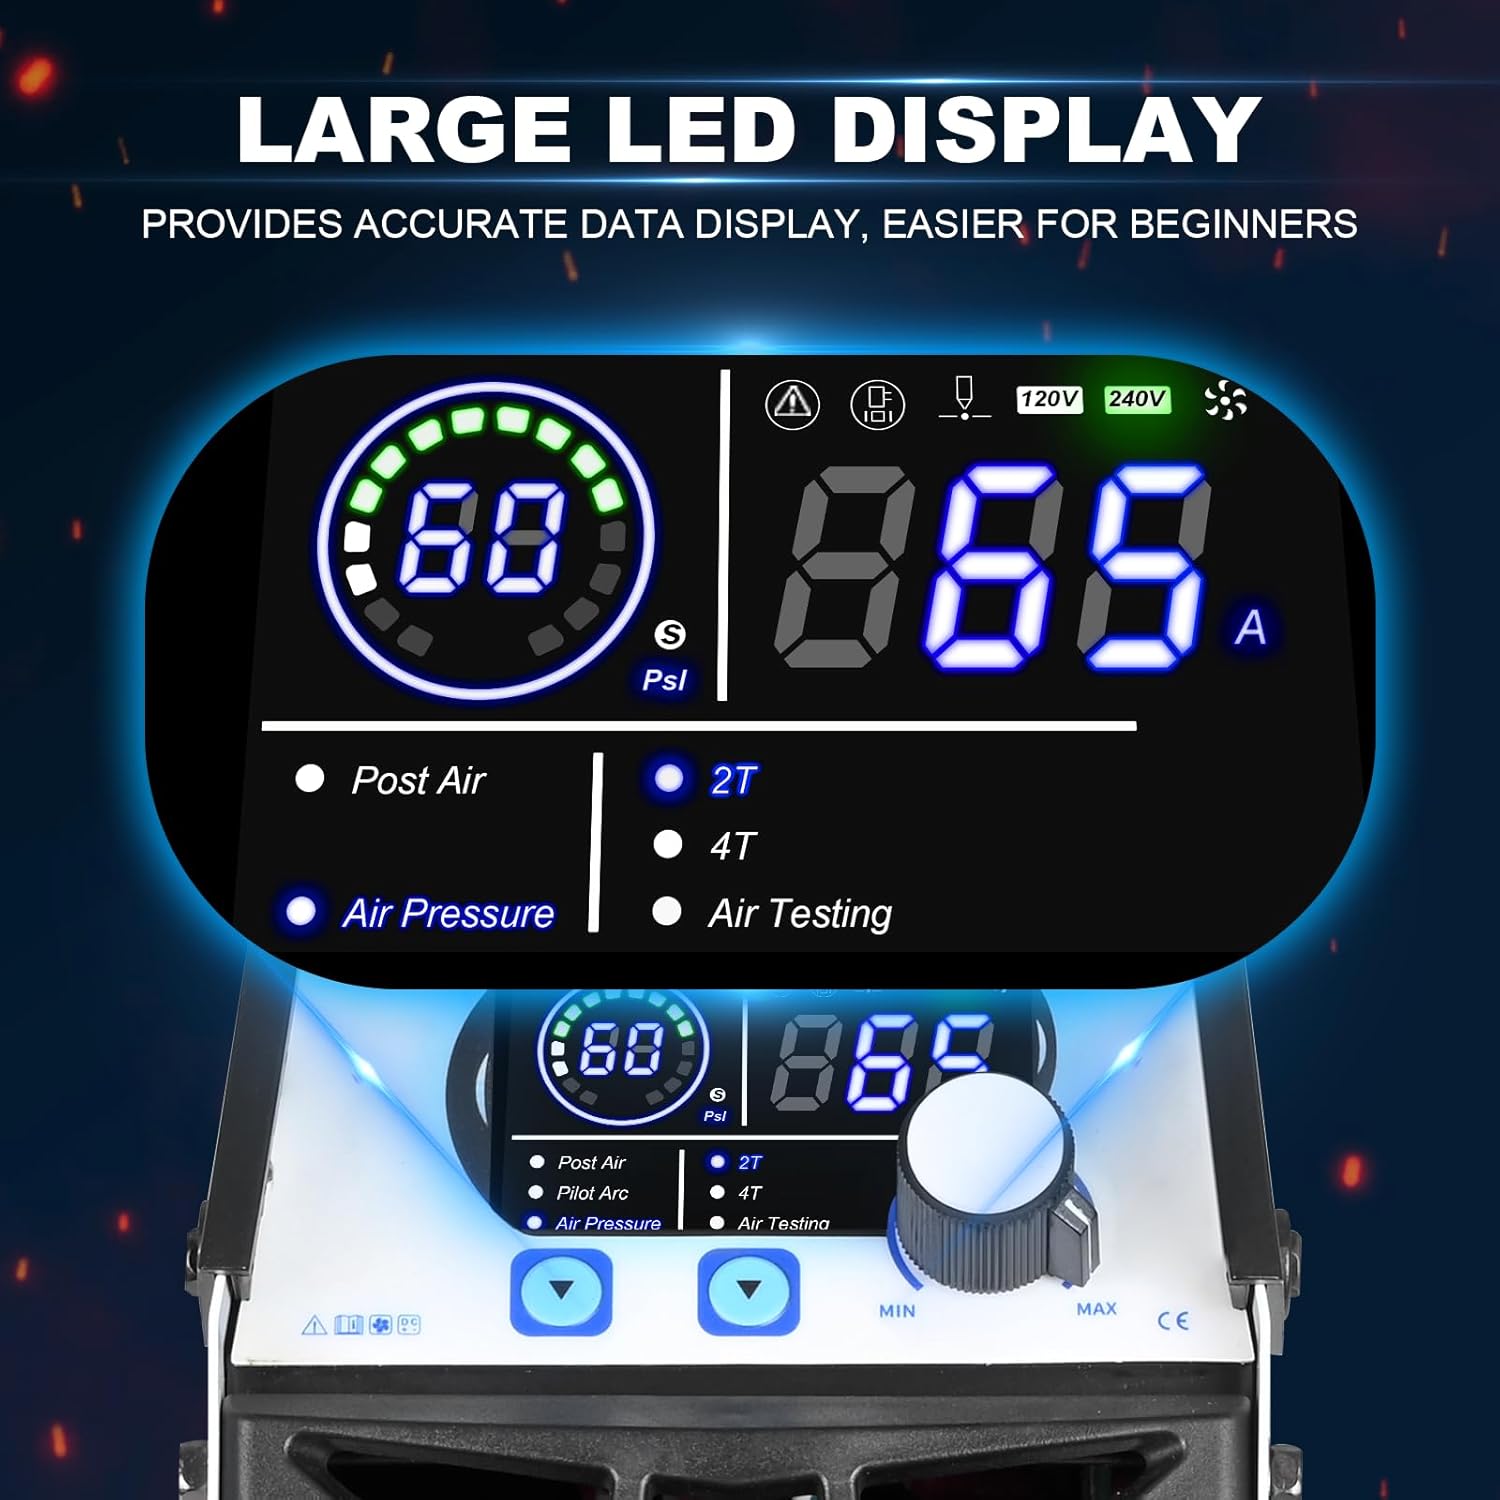
Figure 6.1: The digital display provides real-time operational data.
- The display shows air pressure (PSI), output current (Amps), y voltage.
- Indicators for Post Air, Pilot Arc, Air Pressure, Air Testing, 2T, and 4T functions are also present.
- Adjust the current using the control knob on the front panel to match your cutting requirements.
6.2. Understanding PA/2T/4T Functions
- PA (Post Air) Time: This function allows adjustment of the post-flow air time after the arc is extinguished. Proper post-air time helps cool the torch consumables, extending their lifespan.
- 2T (Two-Touch) Control: This is a semi-automatic cutting control mode. Press and hold the torch trigger to start the arc and cut. Release the trigger to stop. Ideal for short, quick cuts.
- 4T (Four-Touch) Control: This is an automatic cutting control mode. Press and release the torch trigger to start the arc and cut continuously. Press and release the trigger again to stop. This mode is suitable for long, continuous cuts, reducing operator fatigue and potentially leading to higher cutting quality with lower consumable wear.
6.3. Cutting Performance and Material Compatibility
The FC650D PLUS is capable of cutting various types of metal with precision.
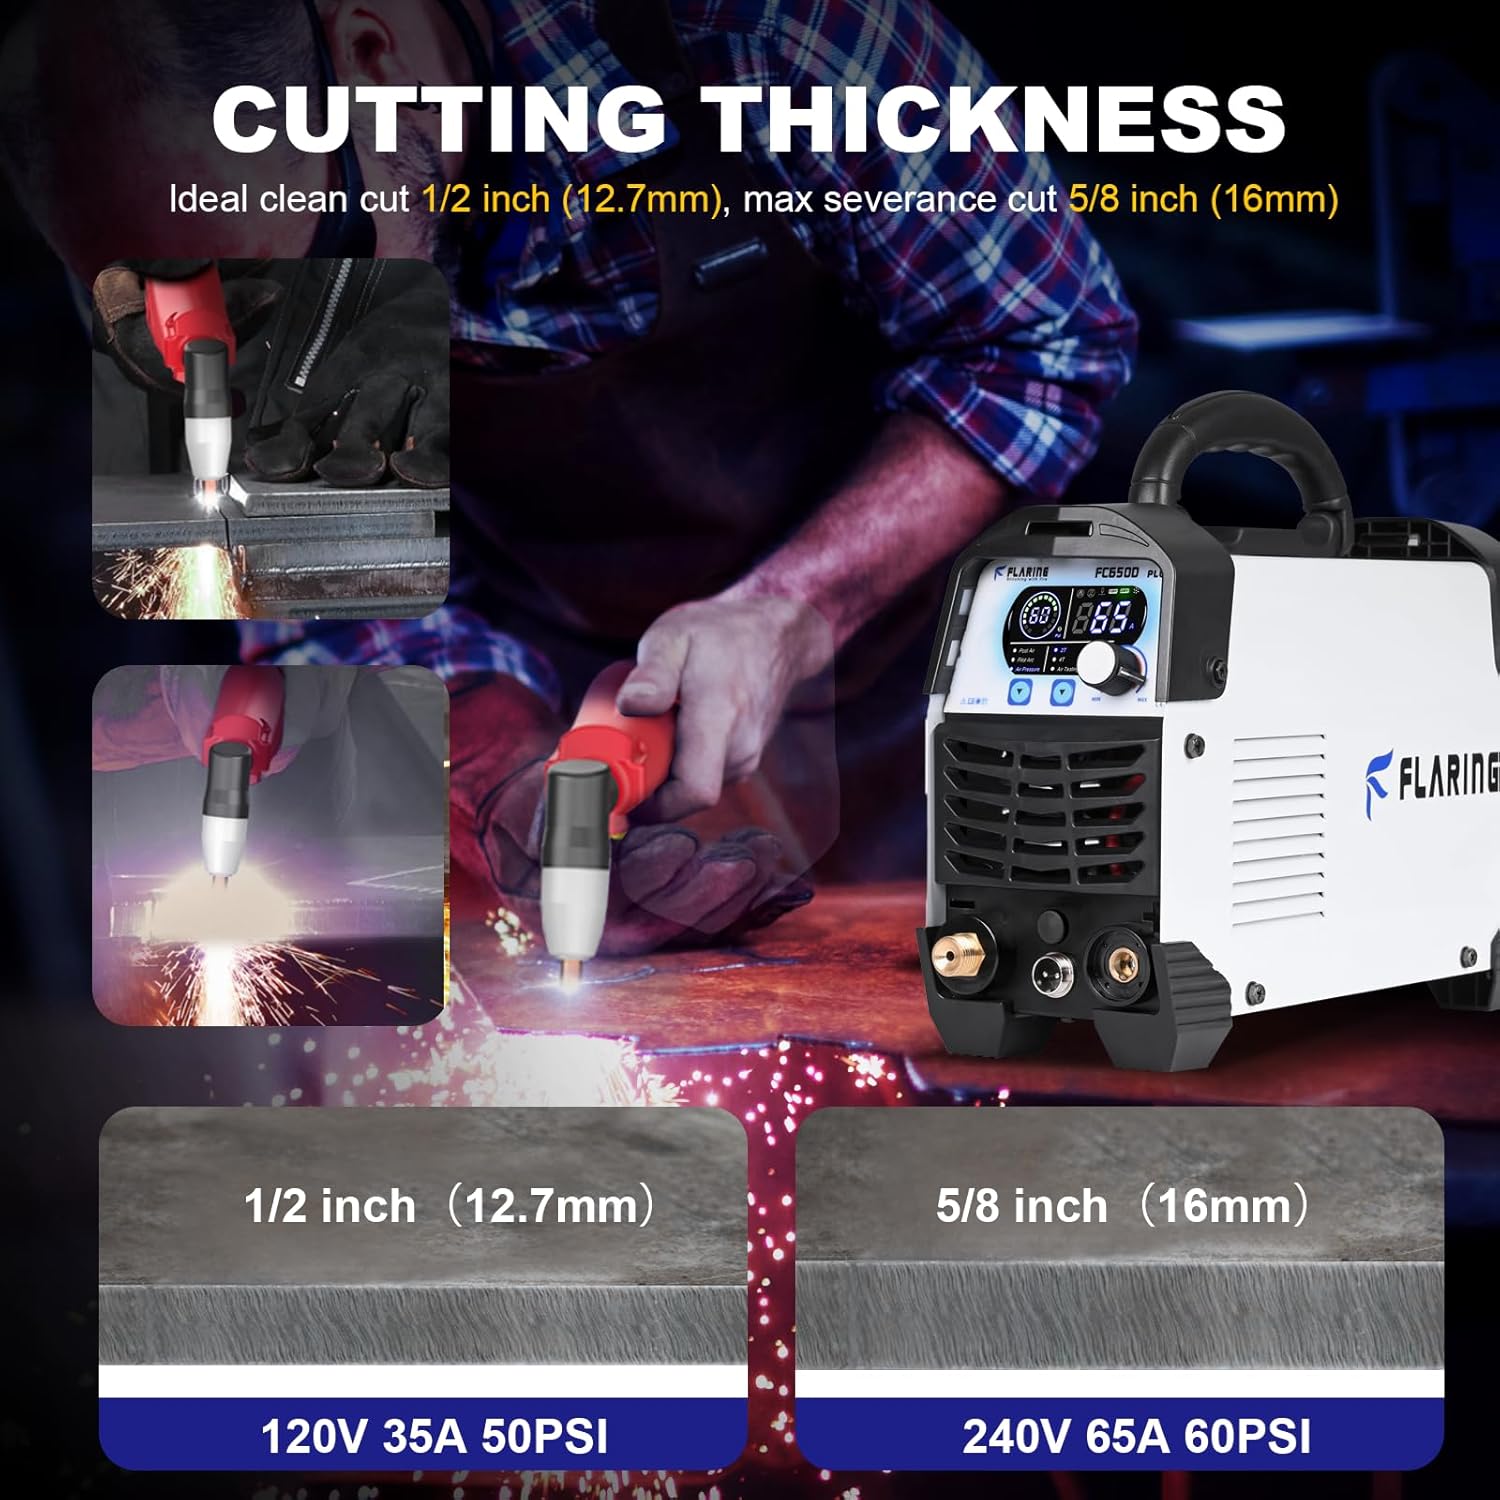
Figure 6.2: Demonstrating clean cut and severance cut capabilities.
- Corte limpio: Up to 1/2 inch (12mm) at 35A (120V, 50 PSI). This refers to a cut with minimal dross and a smooth edge.
- Recorte de indemnización: Up to 5/8 inch (16mm) at 60A (240V, 60 PSI). This refers to the maximum thickness the machine can cut, though the quality of the cut may be reduced.
- The machine effortlessly cuts through rough, painted, and rusty surfaces while generating minimal slag.
Materiales compatibles:
- Metal
- Steels
- Placa de aluminio
- Hierro
- Acero inoxidable
- Acero aleado
- Acero dulce
- Cobre
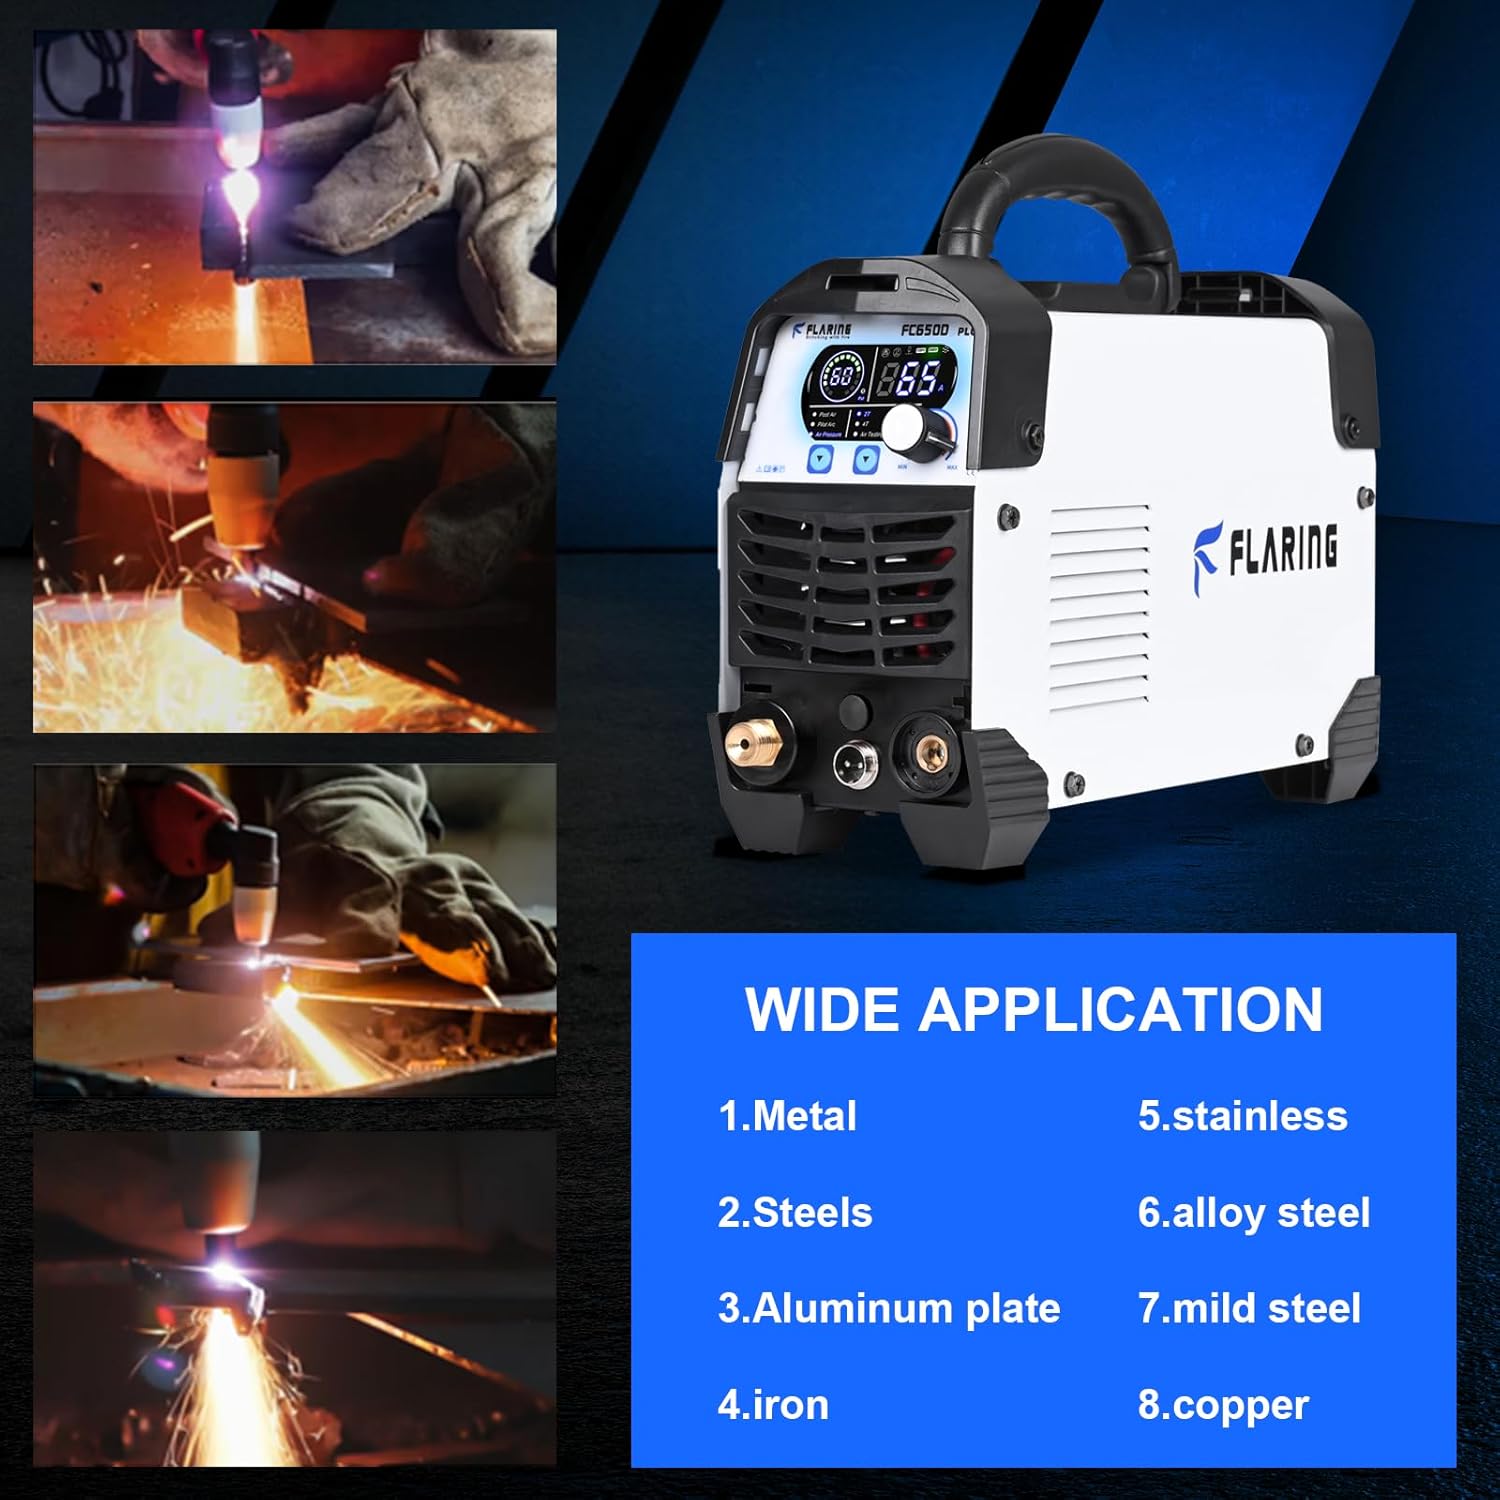
Figure 6.3: The FC650D PLUS is suitable for a wide range of metal cutting applications.
7. Mantenimiento
Regular maintenance ensures the longevity and optimal performance of your plasma cutter. Always disconnect the power before performing any maintenance.
- Inspección de consumibles: Regularly inspect the torch consumables (electrode, nozzle, swirl ring, shield cup) for wear. Replace them when they show signs of degradation to maintain cut quality and prevent damage to the torch.
- Regulador del filtro de aire: Periodically check the water trap on the air filter regulator. Drain any accumulated moisture to ensure a dry air supply. Clean or replace the filter element if it becomes clogged.
- Sistema de enfriamiento: Ensure the cooling vents on the machine are clear of dust and debris to prevent overheating. Use compressed air to blow out dust from inside the machine if necessary (do this in a well-ventilated area).
- Cables y Conexiones: Inspect all cables (power, torch, ground) for damage, cuts, or frayed insulation. Ensure all connections are tight and secure.
- Limpieza general: Keep the exterior of the machine clean. Wipe down with a dry cloth. Avoid using solvents that could damage the casing.
8. Solución de problemas
Esta sección aborda problemas comunes que podrías encontrar. Si tienes problemas que no se enumeran aquí, contacta con atención al cliente.
| Problema | Posible causa | Solución |
|---|---|---|
| La máquina no se enciende. | No hay suministro de energía; disyuntor disparado; cable de alimentación defectuoso. | Check power connection, wall outlet, and circuit breaker. Ensure power cord is undamaged. |
| Sin arco o arco débil. | Insufficient air pressure; worn consumables; poor ground connection; incorrect current setting. | Verify air pressure (min 90 PSI); replace worn torch consumables; ensure ground clamp has good contact; adjust current setting. |
| Poor cut quality (excessive dross, rough cut). | Worn consumables; incorrect cutting speed; incorrect current/air pressure; torch too far from workpiece. | Replace consumables; adjust cutting speed; optimize current and air pressure settings; maintain proper torch standoff distance. |
| El aire fluye pero no hay arco. | Torch trigger issue; internal fault; consumables not seated correctly. | Check torch trigger; reseat consumables; if problem persists, contact support. |
| Indicador de sobrecalentamiento encendido. | Machine has exceeded duty cycle; blocked cooling vents. | Allow machine to cool down; ensure cooling vents are clear. Reduce continuous cutting time. |
9. Garantía y soporte
FLARING products are manufactured to high-quality standards. For information regarding warranty coverage, technical support, or to purchase replacement parts and consumables, please refer to the warranty card included with your product or visit the official FLARING websitio.
También puedes visitar el Tienda FLARING en Amazon Para obtener información y soporte sobre el producto.