1. Producto terminadoview
The Commercial Electric Slim LED Color Changing Recessed Kit is a versatile lighting solution designed for both new construction and retrofit projects. This 4-inch fixture offers adjustable color temperatures from warm white (2700K) to daylight (5000K), along with a dedicated night light function. Its ultra-slim profile eliminates the need for a traditional can, allowing for easy installation in various ceiling types. With a rated life of 50,000 hours and 650 lumens of brightness, it provides efficient and long-lasting illumination.

Descripción de la imagen: This image displays the complete Commercial Electric Slim LED Recessed Kit. It shows the main LED light fixture connected by a cable to a separate junction box. An inset in the bottom right corner illustrates the difference between the bright main light mode and the softer amber night light mode.
2. Información de seguridad
Lea y comprenda todas las instrucciones antes de comenzar la instalación. De lo contrario, podría producirse una descarga eléctrica, un incendio u otros peligros que podrían causar lesiones o daños materiales.
- Siempre apague la energía en el disyuntor antes de instalar o realizar mantenimiento al artefacto.
- Consulte a un electricista calificado si no está seguro acerca del proceso de instalación.
- Asegúrese de que todas las conexiones eléctricas se realicen de acuerdo con los códigos y ordenanzas locales.
- Do not install in areas with excessive moisture or direct water exposure unless specifically rated for such environments.
- No intente modificar el accesorio de ninguna manera.
3. Contenido del paquete
Verifique que todos los componentes estén presentes antes de continuar con la instalación:
- LED Wall Pack Light (includes integrated LED fixture and remote junction box)
4. Especificaciones del producto
| Característica | Especificación |
|---|---|
| Número de modelo | 1005596102 |
| Tipo de fuente de luz | CONDUJO |
| Brillo | 650 Lumens (4-inch model) |
| Temperatura de color | Seleccionable: 2700K, 3000K, 3500K, 4000K, 5000K |
| Función de luz nocturna | Yes (Amber) |
| Vida clasificada | 50,000 horas |
| Volumentage | 120 voltios |
| Fuente de poder | Cableado |
| Material | Aluminio |
| Proceso de dar un título | ETL |

Descripción de la imagen: This image presents a visual comparison of four different sizes of canless recessed lights: 3-inch (550 Lumens, 10-Watts), 4-inch (650 Lumens, 11-Watts), 6-inch (900 Lumens, 15-Watts), and 8-inch (1800 Lumens, 30-Watts). The image helps to illustrate the range of available products, with the 4-inch model being the subject of this manual.
5. Configuración e instalación
5.1 Preinstalación
Before installing the fixture, select your desired color temperature using the slide switch located on the side of the metal junction box. This setting cannot be changed after installation without removing the junction box.

Descripción de la imagen: Un primer plano view of the metal housing box (junction box) for the recessed light. A small slide switch is visible on the side, with labels indicating different color temperature options: 2700K, 3000K, 3500K, 4000K, and 5000K. This switch allows the user to pre-select the light's color output.
5.2 Cableado
- Apague la energía en el disyuntor.
- Open the cover of the remote junction box.
- Connect the supply wires to the wires inside the junction box using appropriate wire connectors: black to black (live), white to white (neutral), and green/bare copper to green (ground).
- Secure the junction box cover.
5.3 Montaje
The fixture is designed for easy installation into a ceiling cutout. Ensure the cutout diameter matches the fixture size (4 inches).
- Connect the LED fixture cable to the junction box cable, ensuring a secure connection.
- Push the junction box through the ceiling cutout.
- One at a time, flip the spring clamps on the fixture upward and insert the fixture into the opening in the ceiling.
- Una vez que ambos clamps are inside the cutout, gently push the fixture upward until the trim is flush with the ceiling surface. The spring clamps will hold the fixture securely in place.

Descripción de la imagen: This image provides a close-up of the underside of the LED downlight, highlighting the spring-loaded clamps used for installation. The text overlay emphasizes the 'Ultra-Slim' design, suitable for low clearance or sloped ceilings.

Descripción de la imagen: una parte inferior view of the 4-inch LED recessed light fixture. The image clearly shows the two spring clips on opposite sides of the fixture, which are used to secure the light within the ceiling opening.
6. Instrucciones de funcionamiento
6.1 Changing Light Modes (Main Light / Night Light)
This fixture features two distinct light modes: a bright white main light and a soft amber night light. You can switch between these modes using your existing wall switch or dimmer switch.
- To change modes, quickly flip the wall switch (or dimmer switch) OFF and then ON again within 3 seconds.
- Each quick cycle will alternate between the main white light mode and the accent/nightlight mode.

Descripción de la imagen: A diagram showing how to operate the light modes. It illustrates a standard wall switch and a dimmer switch, demonstrating that flipping the switch ON/OFF/ON within 3 seconds will toggle between the 'White Light Mode' and 'Accent/Nightlight Mode'.

Descripción de la imagen: This image shows two recessed lights installed in a ceiling. The top light is illuminated in 'MAIN LIGHT' mode, displaying a bright white light. The bottom light is in 'NIGHT LIGHT' mode, emitting a soft, warm amber glow.

Descripción de la imagen: A split image showing a kitchen area. The left side depicts the kitchen illuminated by the bright, main white light mode of the recessed fixtures. The right side shows the same kitchen with the lights set to the softer, amber night light mode, creating a different ambiance.
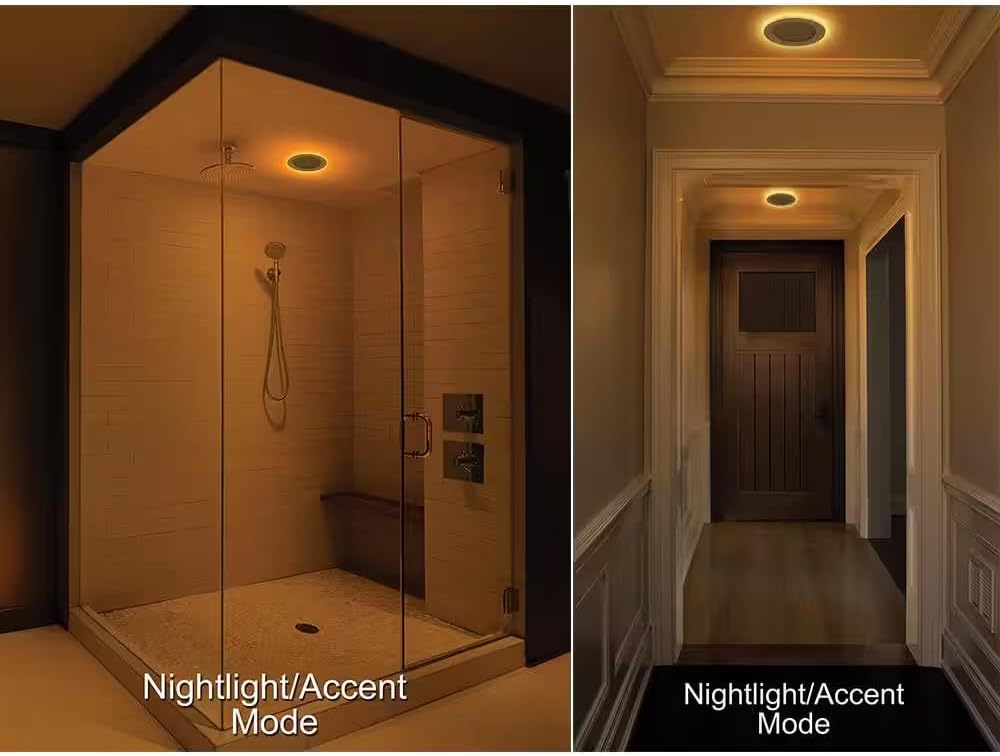
Descripción de la imagen: This image displays two different interior settings utilizing the nightlight/accent mode. On the left, a shower area is softly lit with an amber glow from a recessed light. On the right, a hallway also features the same warm, subtle illumination from a recessed night light.
6.2 Ajuste de la temperatura de color
The color temperature (2700K, 3000K, 3500K, 4000K, 5000K) is selected via a slide switch on the junction box during pre-installation. This setting is static once installed and cannot be changed without accessing the junction box.
6.3 Atenuación
This fixture is dimmable. Ensure you use a compatible LED dimmer switch for optimal performance. Refer to your dimmer switch's instructions for proper operation.
7. Mantenimiento
The LED light source is integrated and does not require replacement. For cleaning, ensure the power is off at the circuit breaker.
- Limpie el accesorio con un paño suave, seco o ligeramente húmedo.amp paño.
- Do not use harsh chemicals, abrasive cleaners, or solvents, as these may damage the finish or electrical components.
8. Guía de solución de problemas
If you experience issues with your LED recessed kit, refer to the following table for common problems and solutions:
| Problema | Posible causa | Solución |
|---|---|---|
| La luz no enciende | No power to the fixture; Loose wiring connection; Faulty switch. | Check circuit breaker; Verify all wiring connections are secure; Test the wall switch. |
| La luz parpadea o se atenúa incorrectamente | Interruptor de regulación incompatible; cableado suelto. | Ensure an LED-compatible dimmer is used; Check wiring connections. |
| No se puede cambiar la temperatura del color | Color temperature switch is set internally. | Color temperature is set on the junction box before installation. It cannot be changed via the wall switch. |
| El modo de luz nocturna no funciona | Secuencia de conmutación incorrecta. | Ensure you are cycling the wall switch OFF/ON within 3 seconds to toggle modes. |
9. Información de garantía
This Commercial Electric product is backed by a manufacturer's warranty against defects in materials and workmanship. Please retain your proof of purchase for warranty claims. For specific warranty terms and duration, refer to the product packaging or contact customer support.
10. Atención al cliente
If you have any questions, require technical assistance, or need to report a problem, please contact Commercial Electric customer support. Contact information can typically be found on the product packaging or the manufacturer's official websitio.