HUTACT NHKJ-3J5-893
HUTACT NHKJ-3J5-893 Compound Biology Microscope User Manual
Model: NHKJ-3J5-893 | Brand: HUTACT
Introducción
This manual provides detailed instructions for the proper assembly, operation, maintenance, and troubleshooting of your HUTACT NHKJ-3J5-893 Compound Biology Microscope. Please read this manual thoroughly before using the microscope to ensure optimal performance and longevity of the instrument.
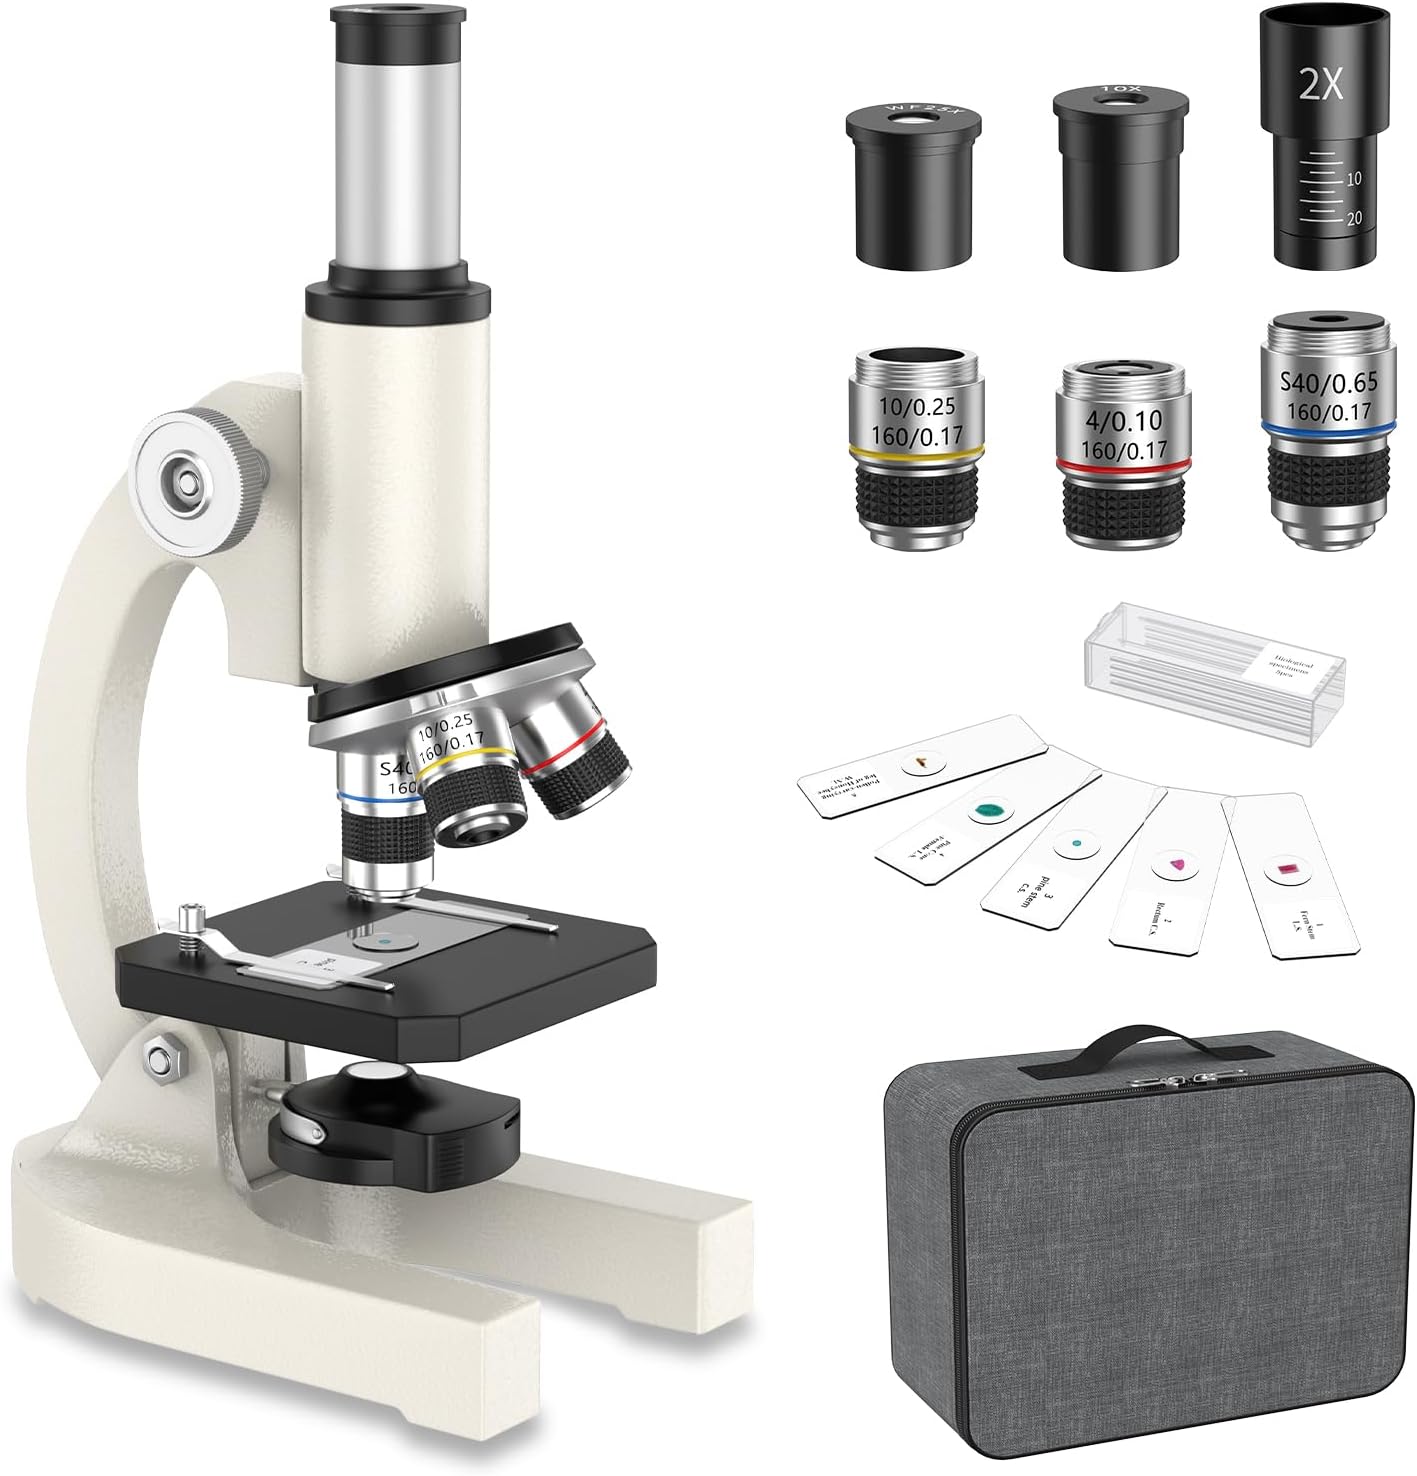
Figura 1: The HUTACT NHKJ-3J5-893 Compound Biology Microscope, shown with its various components and included accessories such as eyepieces, objective lenses, prepared slides, and a storage bag.
Contenido del paquete
Verifique que todos los artículos que se enumeran a continuación estén presentes en su paquete:
- HUTACT Compound Biology Microscope
- Eyepieces: H10X, H25X
- Objective Lenses: 4X, 10X, 40X
- 2X Magnification Lens (Barlow lens)
- Set of 5 Prepared Microscope Slides
- Bolsa de almacenamiento
- Paño de limpieza
- Manual de usuario (este documento)

Figura 2: A visual representation of the items included in the microscope package, such as the microscope body, lens group, microscope slide set, instructions, cleaning cloth, storage bag, and packaging box.
Instrucciones de instalación
- Desembalaje: Retire con cuidado todos los componentes del embalaje. Conserve el embalaje para su posterior almacenamiento o transporte.
- Colocación: Coloque el microscopio sobre una superficie plana y estable en un área bien iluminada.
- Instalación del ocular: Insert the desired eyepiece (H10X or H25X) into the top of the monocular tube.
- Objective Lens Selection: Rotate the revolving nosepiece to select the 4X objective lens. This is the lowest magnification and is recommended for initial observation.
- Powering the Illumination: The microscope uses LED illumination. Ensure that the necessary AAA batteries (not included) are installed in the battery compartment located at the base of the microscope.
- Ajuste de la iluminación: Turn on the LED light source using the switch, and adjust its intensity if available.
Operación del microscopio
1. Preparación de un portaobjetos de muestra
Use one of the included prepared slides or prepare your own specimen on a clean glass slide. Place the slide onto the stage, asegurándolo con la stagy clips.

Figura 3: A set of prepared microscope slides, demonstrating the variety of specimens that can be observed, along with examples de magnificado views.
2. Enfoque
- Initial Focus (Low Power): With the 4X objective lens in place, look through the eyepiece. Use the coarse focus knob (larger knob) to bring the specimen into approximate focus.
- Fine Focus (High Power): Once the specimen is roughly in focus with the 4X objective, rotate the revolving nosepiece to a higher magnification objective (10X or 40X). Use the fine focus knob (smaller knob) for precise focusing.
- Ajuste de la iluminación: Adjust the LED light source and diaphragm to achieve optimal brightness and contrast for your specimen.

Figura 4: Examples of magnified images at 40X, 200X, and 2000X, illustrating the microscope's capability to reveal intricate details of biological specimens.
3. Cambio de aumento
To change magnification, simply rotate the revolving nosepiece to the desired objective lens. The microscope is parfocal, meaning that once focused at one magnification, the specimen should remain largely in focus when switching to another objective, requiring only minor adjustments with the fine focus knob.
For maximum magnification up to 2000X, you can insert the 2X magnification lens (Barlow lens) between the eyepiece and the monocular tube, in conjunction with the H25X eyepiece and 40X objective lens.
Mantenimiento y cuidado
- Limpieza de lentes: Use the provided cleaning cloth or a specialized lens cleaning paper to gently wipe objective lenses and eyepieces. Avoid touching optical surfaces with bare hands.
- Limpieza corporal: Limpie el cuerpo del microscopio con un paño suave y húmedo.amp paño. No utilice productos químicos agresivos ni limpiadores abrasivos.
- Almacenamiento: When not in use, cover the microscope with a dust cover or store it in the provided storage bag to protect it from dust and moisture.
- Reemplazo de batería: Replace AAA batteries when the LED illumination becomes dim.
- Manejo: Transporte siempre el microscopio por el brazo y la base para garantizar su estabilidad.
Solución de problemas
| Problema | Posible causa | Solución |
|---|---|---|
| Sin iluminación | Las baterías están agotadas o instaladas incorrectamente. | Verifique la orientación de la batería y reemplácela con baterías AAA nuevas. |
| La imagen está borrosa o desenfocada | Incorrect focus adjustment; objective lens not properly engaged. | Adjust coarse and fine focus knobs. Ensure objective lens clicks into place. |
| Dark spots or dust in view | Dust on eyepiece, objective lens, or specimen slide. | Clean eyepiece, objective lens, and slide using a cleaning cloth. |
| Difficulty seeing specimen at high magnification | Insufficient illumination; specimen too thick; incorrect focus. | Increase LED brightness. Ensure specimen is thin enough for light to pass through. Refocus carefully. |
Presupuesto
- Ampliación total: 40X-2000X
- Oculares: H10X, H25X
- Lentes objetivos: 4X, 10X, 40X (acromático)
- Magnification Multiplier: 2X (Barlow Lens)
- Observation Head: Monocular Vertical Tube
- Muserola: Revólver portaobjetivos triple
- Sistema de enfoque: Coarse adjustment range of 16 mm
- Stage: 90 x 90 mm with Slide Clips
- Fuente de luz: Iluminación LED
- Microscope Dimensions: 11 x 16.1 x 27 cm
- Peso neto: 0.76 kilogramos
- Material del cuerpo: Aleación de aluminio
- Número de modelo: NHKJ-3J5-893
Garantía y soporte
For warranty information or technical support, please refer to the contact details provided with your purchase documentation or visit the official HUTACT webSitio. Conserve su recibo de compra como comprobante para reclamaciones de garantía.
This product is designed for educational and exploratory purposes. For any issues not covered in this manual, please contact customer support.
Ask a question about this manual
Ask about setup, troubleshooting, compatibility, parts, safety, or missing instructions. Manuals+ will review the question and use this page’s manual context to help answer it.