Culligan ZEROP10
Manual del usuario de la jarra filtrante de agua de 10 tazas Culligan con tecnología ZeroWater
Model: ZEROP10 | Brand: Culligan
Introducción
La jarra con filtro de agua de 10 tazas Culligan con tecnología ZeroWater proporciona 5 funciones avanzadastage water filtration, guaranteed to remove 99.9% of dissolved solids – guaranteed. This pitcher is IAPMO certified to reduce lead, Total PFAS (forever chemicals), mercury, fluoride, and chlorine, ensuring cleaner, better-tasting water for your household. Its space-saving design fits easily into most refrigerators, and the integrated TDS meter helps you monitor water quality and filter life.

Figure 1: The Culligan with ZeroWater Technology 10-Cup Water Filter Pitcher.
¿Qué hay en la caja?
Your Culligan with ZeroWater Technology 10-Cup Water Filter Pitcher package includes the following components:
- Jarra con filtro de agua de 10 tazas
- 5-StagFiltro de agua avanzado
- TDS Water Tester
- Manual de usuario
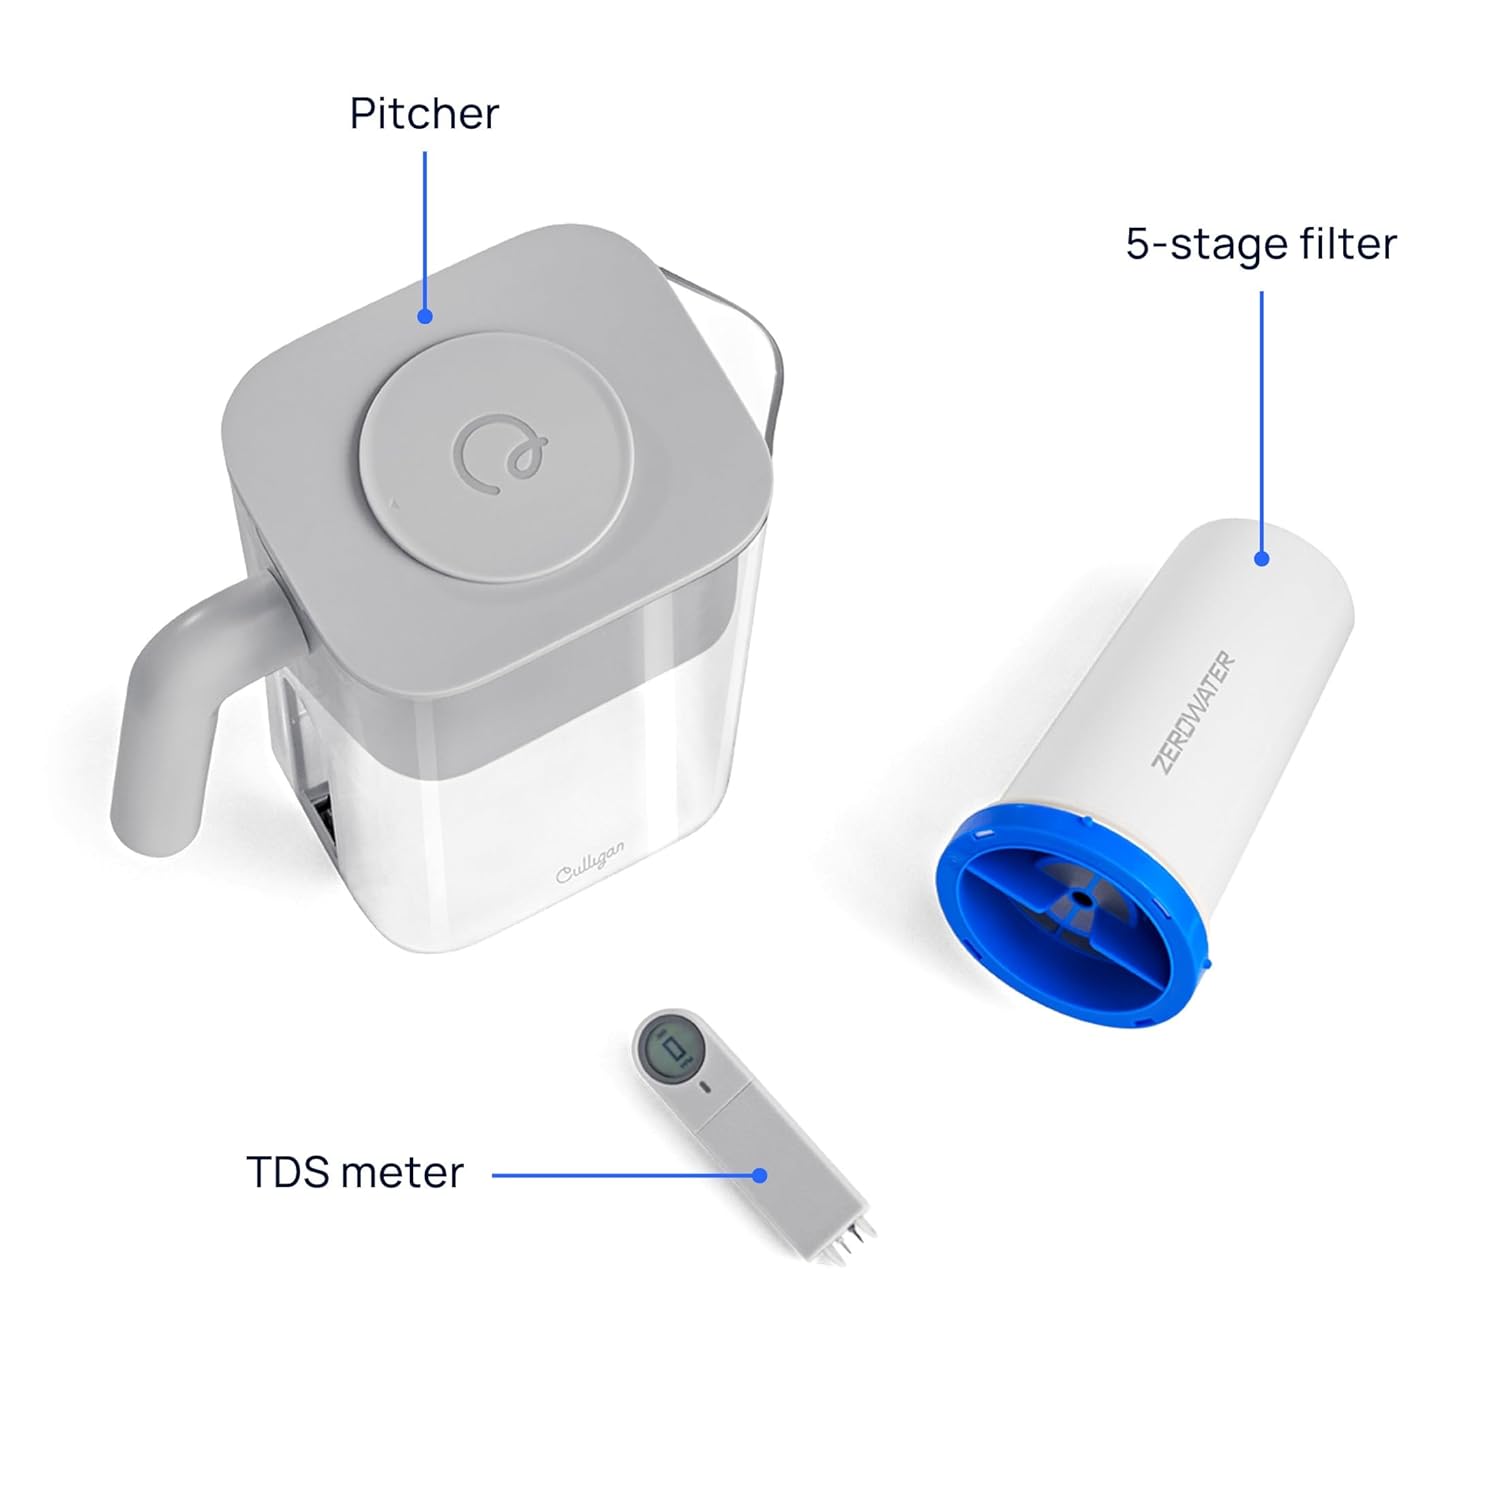
Figure 2: All components included in the package: the pitcher, the 5-stagy el filtro y el medidor TDS.
Instrucciones de instalación
- Desempaquetar componentes: Retire con cuidado todas las piezas del embalaje.
- Componentes de lavado: Wash the pitcher, lid, and reservoir with warm water and mild soap. Rinse thoroughly. Do not wash the filter or TDS meter with soap.
- Instalar filtro: Insert the 5-stage advanced water filter into the designated slot in the reservoir. Ensure it is securely seated.
- Ensamblar la jarra: Place the reservoir with the installed filter into the pitcher body.
- Coloque la tapa: Secure the lid onto the pitcher.
- Relleno inicial: Fill the top reservoir with tap water. Allow the water to filter through completely. Discard the first two full pitchers of filtered water to prime the filter.

Figure 3: The pitcher and its packaging, illustrating the product as it appears out of the box.
Instrucciones de funcionamiento
Llenando la jarra
- Tapa abierta: Slide open the easy-slide lid on top of the pitcher.
- Verter agua: Pour tap water into the top reservoir. The water will slowly filter through the 5-stage filter into the main pitcher body.
- Esperar la filtración: Allow the water to fully filter before pouring. The Ready-Pour® design allows dispensing while filtering.
Dispensación de agua
- Torrencial: Use the ergonomic handle for an easy and convenient pour. The smooth spout is designed for no-drip pouring.
- Refrigerator Dispensing (for dispenser models): If using a dispenser model, pull the spigot lever to dispense water directly into your glass or bottle.

Figure 4: Demonstrates the ergonomic handle and smooth spout for easy, no-drip pouring.
Using the TDS Meter
The built-in TDS (Total Dissolved Solids) meter measures the level of dissolved solids in your water. A reading of "0" indicates that the filter is removing virtually all TDS from your water, providing optimal purity.
- Comprobar lectura: The digital display on the TDS meter will show the PPM (parts per million) of dissolved solids.
- Indicador de reemplazo de filtro: The meter alerts you when it's time to change your filter. When the reading is no longer 0, or reaches a higher number (e.g., 006), it's time to replace the filter.

Figura 5: Un primer plano view of the integrated TDS meter, displaying a reading of 0 PPM, indicating highly filtered water.
Mantenimiento
Reemplazo de filtro
Replace your filter when the TDS meter indicates a reading above 0, or when the water flow significantly slows down. Filter life varies based on water quality and usage.
- Eliminar filtro antiguo: Lift the reservoir out of the pitcher and carefully remove the old filter by twisting and pulling it out.
- Insertar nuevo filtro: Align the new Culligan with ZeroWater Technology filter with the opening in the reservoir and push it firmly into place until it clicks.
- Prime New Filter: After installing a new filter, fill the top reservoir and discard the first two full pitchers of filtered water to ensure optimal performance.
Note: This pitcher is compatible only with new Culligan with ZeroWater Technology filters. It is NOT compatible with legacy ZeroWater filters.

Figure 6: Compatibility chart for Culligan with ZeroWater Technology filters.
Limpieza de la jarra
Regularly clean the pitcher body, lid, and reservoir with warm water and mild dish soap. Rinse all parts thoroughly before reassembly. Do not put the filter or TDS meter in a dishwasher.
Solución de problemas
| Problema | Posible causa | Solución |
|---|---|---|
| Water filters slowly. | Filter is nearing end of life or is clogged. | Replace the filter. Ensure proper filter installation. |
| TDS meter reading is not 0. | Es necesario reemplazar el filtro. | Reemplazar los 5-stage filter. Ensure the TDS meter is properly inserted. |
| El agua tiene un sabor extraño. | Filter needs replacement or initial priming was insufficient. | Replace the filter. Discard the first two full pitchers of water after new filter installation. |
| Pitcher leaks. | Components not assembled correctly. | Disassemble and reassemble all parts, ensuring they are securely fitted. Check for cracks. |
Presupuesto
- Nombre del modelo: Jarra de 10 tazas
- Número de modelo: CEROP10
- Dimensiones del producto: 9.5" de largo x 5" de ancho x 10.5" de alto
- Peso del artículo: 1.74 kilogramos (3.84 libras)
- Capacidad: 10 tazas
- Tipo de filtro: 5-StagFiltración avanzada de agua
- Certificaciones: IAPMO Certified to Reduce Lead, Total PFAS, Mercury, Fluoride, and Chlorine
- Características especiales: Built-In TDS Meter, Change Filter Indicator, Ergonomic Handle, Lightweight, Reduce TDS
- Material: Plástico libre de BPA
- Fuente de energía: Manual (TDS meter uses small batteries, typically button cells)
- Código postal: 810136500349

Figure 7: Product dimensions for the 10-Cup Pitcher.
Garantía y soporte
For warranty information and customer support, please refer to the contact details provided on the product packaging or visit the official Culligan websitio. Guarde su recibo de compra para reclamos de garantía.
Puedes visitar el Culligan Store on Amazon Para obtener más información y comprar filtros de repuesto.
Ask a question about this manual
Ask about setup, troubleshooting, compatibility, parts, safety, or missing instructions. Manuals+ will review the question and use this page’s manual context to help answer it.