AAU FC-BP120
AAU Blood Pressure Monitor FC-BP120 User Manual
Modelo: FC-BP120
1. Introducción
This manual provides detailed instructions for the proper use and maintenance of your AAU Automatic Upper Arm Blood Pressure Monitor, model FC-BP120. Please read this manual thoroughly before using the device to ensure accurate measurements and safe operation. Keep this manual for future reference.

Image 1.1: The AAU Blood Pressure Monitor FC-BP120, showing the main unit and the adjustable arm cuff.
2. Información importante de seguridad
Observe the following precautions to ensure safe and effective use:
- Consulte a su médico antes de utilizar este dispositivo si tiene alguna condición médica.
- No utilice este dispositivo en bebés, niños o personas que no puedan expresar su consentimiento.
- Evite tomar medidas en un vehículo en movimiento o durante la actividad física.
- No intente reparar ni modificar el dispositivo usted mismo. Contacte con el servicio de atención al cliente para obtener ayuda.
- Mantenga el dispositivo y el brazalete alejados del agua y de temperaturas extremas.
- Este dispositivo está diseñado para uso doméstico y no debe sustituir el consejo o tratamiento médico profesional.
3. Contenido del paquete
Verifique que todos los artículos estén presentes en el paquete:
- 1 x AAU Blood Pressure Monitor (Model FC-BP120)
- 1 x Adjustable Upper Arm Cuff (8.66-16.54 inches / 22-42 cm)
- 1 x cable USB tipo C
- 1 x Manual de instrucciones
- 1 x Guía de inicio rápido

Image 3.1: The complete package contents, including the monitor, cuff, USB cable, and manuals.
4. Producto terminadoview
4.1. Main Unit and Display
The monitor features a large LCD display and intuitive buttons for easy operation. The display provides clear readings of systolic pressure, diastolic pressure, pulse rate, and other indicators.

Image 4.1: Labeled diagram of the LCD display, indicating battery icon, user number, systolic pressure, diastolic pressure, pulse rate, time/date, cuff self-check icon, body motion detection icon, average icon, memory icon, and irregular heartbeat icon.
4.2. Botones
- Botón de ajuste: Used to enter settings mode (e.g., date, time, user selection).
- Botón START / STOP: Initiates and stops a measurement. Also used to power the device on/off.
- Botón MEM: Accede a los registros de medición almacenados.
5. Configuración
5.1. Fuente de alimentación
The monitor can be powered by either AAA batteries or a Type-C USB cable.
- Instalación de la batería: Open the battery compartment cover on the back of the monitor. Insert four (4) AAA batteries, ensuring correct polarity (+/-). Close the cover securely.
- Alimentación USB tipo C: Connect the provided Type-C USB cable to the monitor's port and to a compatible USB power adapter (not included) or a computer USB port.
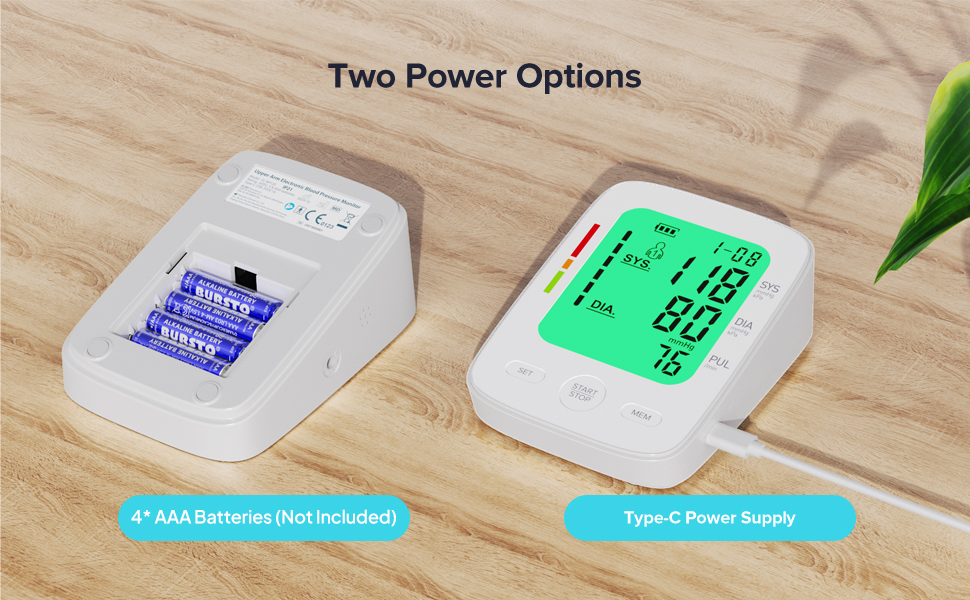
Image 5.1: Illustration of the two power options: inserting 4 AAA batteries into the compartment or connecting via a Type-C USB cable.
5.2. Conexión del manguito
Inserte firmemente el tapón de aire del brazalete en el conector de aire ubicado en el costado del monitor.
6. Instrucciones de funcionamiento
6.1. preparación para la medición
For accurate readings, follow these steps before taking a measurement:
- Siéntate cómodamente con la espalda apoyada y los pies apoyados en el suelo.
- Apoye el brazo sobre una mesa de modo que el brazalete quede a la altura del corazón.
- Ensure the cuff is placed directly on your bare upper arm, 1-2 cm above the elbow joint. The air tube should run down the center of your arm.
- Relax for 5 minutes before measuring. Avoid talking or moving during the measurement.
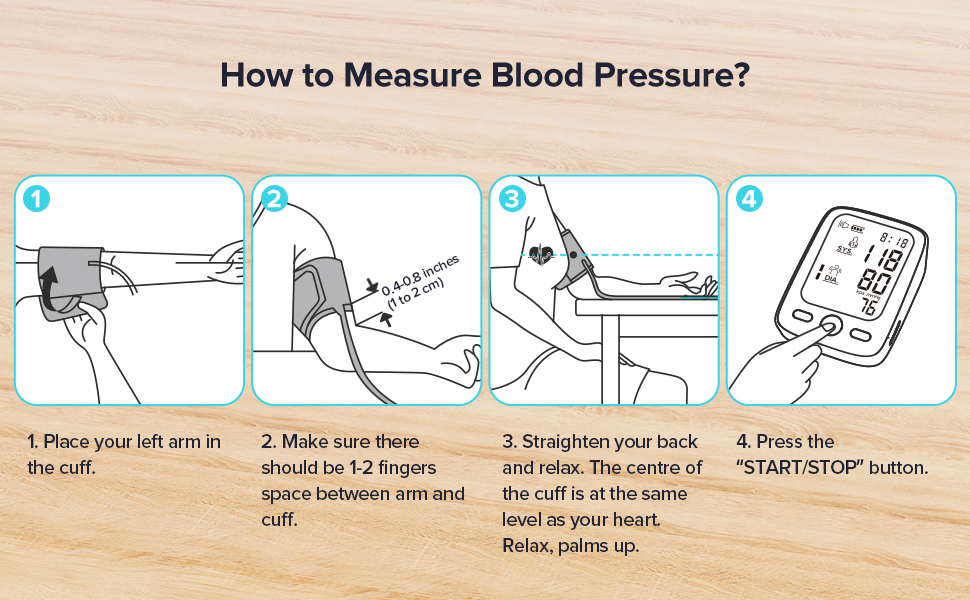
Image 6.1: A visual guide demonstrating the four key steps for proper blood pressure measurement: cuff placement, finger space, arm position, and pressing the start button.
6.2. Tomando una medida
With the cuff correctly positioned and the device powered on:
- Presione el INICIAR/DETENER Botón. El brazalete se inflará automáticamente.
- Remain still and silent during inflation and deflation.
- Once the measurement is complete, the results (Systolic, Diastolic, Pulse) will be displayed on the screen.
- The device will automatically shut off after 2 minutes of inactivity to conserve power.
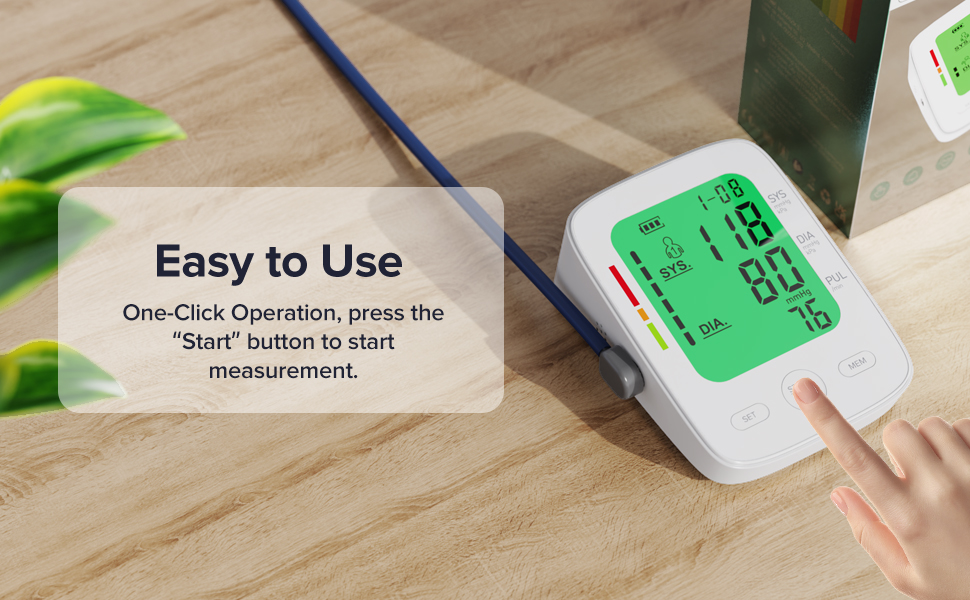
Image 6.2: A hand initiating a measurement by pressing the START/STOP button on the monitor.
6.3. Entendiendo sus resultados
The monitor displays Systolic (SYS), Diastolic (DIA), and Pulse (PUL) readings. It also features a 3-color backlight display to help interpret blood pressure levels:
- Verde: Indicates blood pressure within the normal range.
- Naranja: Indicates elevated or pre-hypertensive blood pressure.
- Rojo: Indicates high blood pressure (hypertension).
An irregular heartbeat icon will appear if an irregular pulse is detected during measurement.
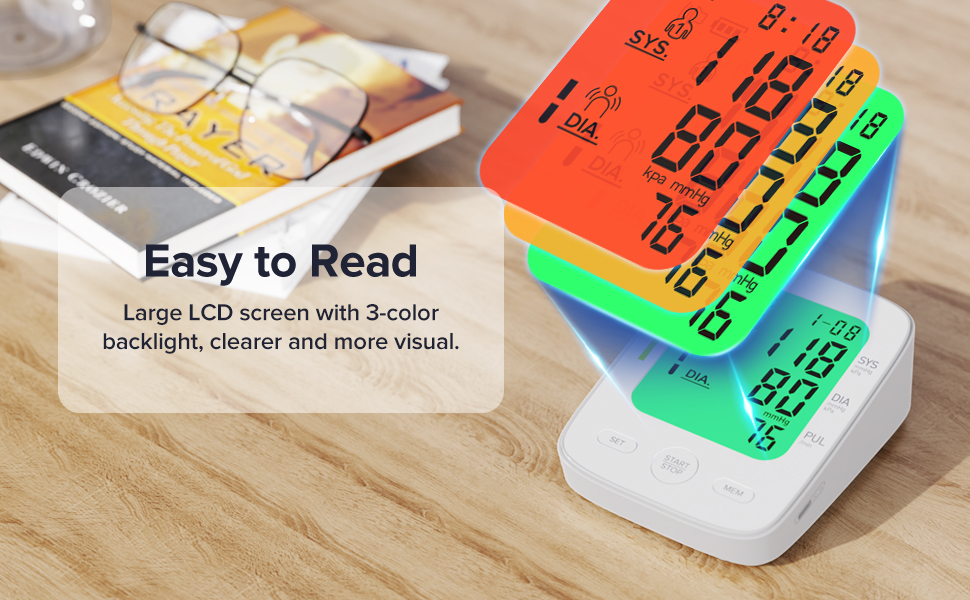
Image 6.3: The monitor's display with a visual guide explaining the 3-color backlight system for blood pressure interpretation (Green for normal, Orange for elevated, Red for high).
6.4. Dual User Mode and Memory Function
The device supports two users, each with 99 memory sets, allowing for tracking of individual blood pressure trends.
- Seleccionar un usuario: En el modo de espera, presione el botón COLOCAR Botón para alternar entre Usuario 1 y Usuario 2.
- Viewing Memory: Presione el MIEMBRO botón para view stored readings. Repeatedly press MIEMBRO to scroll through records.
- Average Function: The monitor can display the average of the last three measurements.

Image 6.4: An illustration of the dual-user mode, showing separate measurement records for User 1 and User 2.
7. Mantenimiento
7.1. Limpieza
Limpie el monitor y el brazalete con un paño suave y seco. Si es necesario, utilice un paño ligeramente seco.amp Lave el dispositivo con un paño humedecido con jabón suave y séquelo. No utilice limpiadores abrasivos ni sumerja el dispositivo en agua.
7.2. Almacenamiento
Store the device in a clean, dry place, away from direct sunlight, extreme temperatures, and humidity. If not in use for an extended period, remove the batteries.
8. Solución de problemas
| Problema | Posible causa | Solución |
|---|---|---|
| Sin energía/pantalla en blanco | Las baterías están agotadas o insertadas incorrectamente; el cable USB no está conectado. | Reemplace las pilas por unas nuevas, asegurándose de que la polaridad sea correcta. Compruebe la conexión del cable USB. |
| "Err" or "E" displayed | Cuff not applied correctly; excessive movement during measurement; air leakage. | Reapply cuff correctly. Remain still and silent. Check cuff and tube for damage. |
| Lecturas inexactas | Incorrect posture; talking during measurement; cuff size incorrect. | Ensure proper posture and silence. Verify cuff fits arm circumference (8.66-16.54 inches). |
| El manguito no se infla | Air plug not fully inserted; cuff or tube damaged. | Ensure air plug is securely connected. Check for visible damage to cuff or tube. |
9. Especificaciones
- Nombre del modelo: FC-BP120
- Dimensiones del producto: 5.5" de largo x 3.5" de ancho x 2.7" de grosor
- Peso del artículo: 0.9 libras (aproximadamente 14.4 onzas)
- Tamaño de puño: Adjustable, 8.66-16.54 inches (22-42 cm)
- Fuente de energía: 4* AAA Batteries (not included) or Type-C Power Supply
- Tipo de pantalla: LCD digital
- Memoria: 2 usuarios x 99 conjuntos de lecturas
- Método de medición: Oscilométrico
- Fabricante: Shenzhen Finicare Co., Limitado
10. Garantía y atención al cliente
AAU provides professional customer service. If you have any questions or require assistance with your FC-BP120 Blood Pressure Monitor, please contact our customer support team. Refer to the contact information provided in your quick start guide or product packaging for details.
Ask a question about this manual
Ask about setup, troubleshooting, compatibility, parts, safety, or missing instructions. Manuals+ will review the question and use this page’s manual context to help answer it.