1. Introducción
This manual provides essential instructions for the safe installation, operation, and maintenance of your VEVOR SCA-80W 8 kW Electric Sauna Heater. Please read this manual thoroughly before installation and use to ensure proper function and safety. Keep this manual for future reference.

Figure 1: VEVOR 8 kW Electric Sauna Heater in a sauna environment.
2. Instrucciones de seguridad
El incumplimiento de estas instrucciones de seguridad puede provocar descargas eléctricas, incendios, lesiones graves o la muerte.
- Read all instructions carefully before installing or operating the sauna heater.
- Electrical installation must be performed by a qualified and licensed electrician in accordance with all local and national electrical codes.
- Do not place any flammable materials (e.g., towels, clothing) on or near the sauna heater. Maintain adequate clearance as specified in the installation section.
- Ensure the sauna room has proper ventilation to prevent overheating and ensure fresh air circulation.
- Sauna stones are not included with this heater. Use only approved sauna stones designed for electric sauna heaters. The required quantity is approximately 15 kg (33 lbs).
- When pouring water onto the hot stones, use a ladle and pour no more than 100 ml (approximately 3.4 fl oz) at a time. Use only pure water. Avoid pouring water directly onto the heating elements.
- Mantenga a los niños y a las mascotas alejados del calentador de sauna durante su funcionamiento.
- Do not operate the heater if any part is damaged or malfunctioning. Disconnect power immediately and contact customer support.
- Never block the air vents of the heater.
3. Producto terminadoview
3.1 Componentes
The VEVOR SCA-80W Electric Sauna Heater system includes the main heater unit and an external digital controller.

Figure 2: Heater unit and external digital controller.
3.2 Características
- Calentamiento rápido: 8 kW power output, suitable for sauna rooms ranging from 8 to 12 cubic meters (283-424 cu.ft).
- Construcción duradera: Features an aluminized zinc casing for high corrosion resistance and a long service life. Equipped with 304 stainless steel heating elements for efficient and even heat distribution.
- External Digital Controller: Provides convenient control from outside the sauna. The controller has a clear display and user-friendly interface for adjusting temperature, time, and other settings.
- Modos de funcionamiento duales: Offers a Normal mode for constant heating up to 4 hours and a Preset mode for automatic start and stop functionality.
- Diseño de montaje en pared: Space-saving installation with a pre-drilled bracket and reserved tensioners for easy mounting.
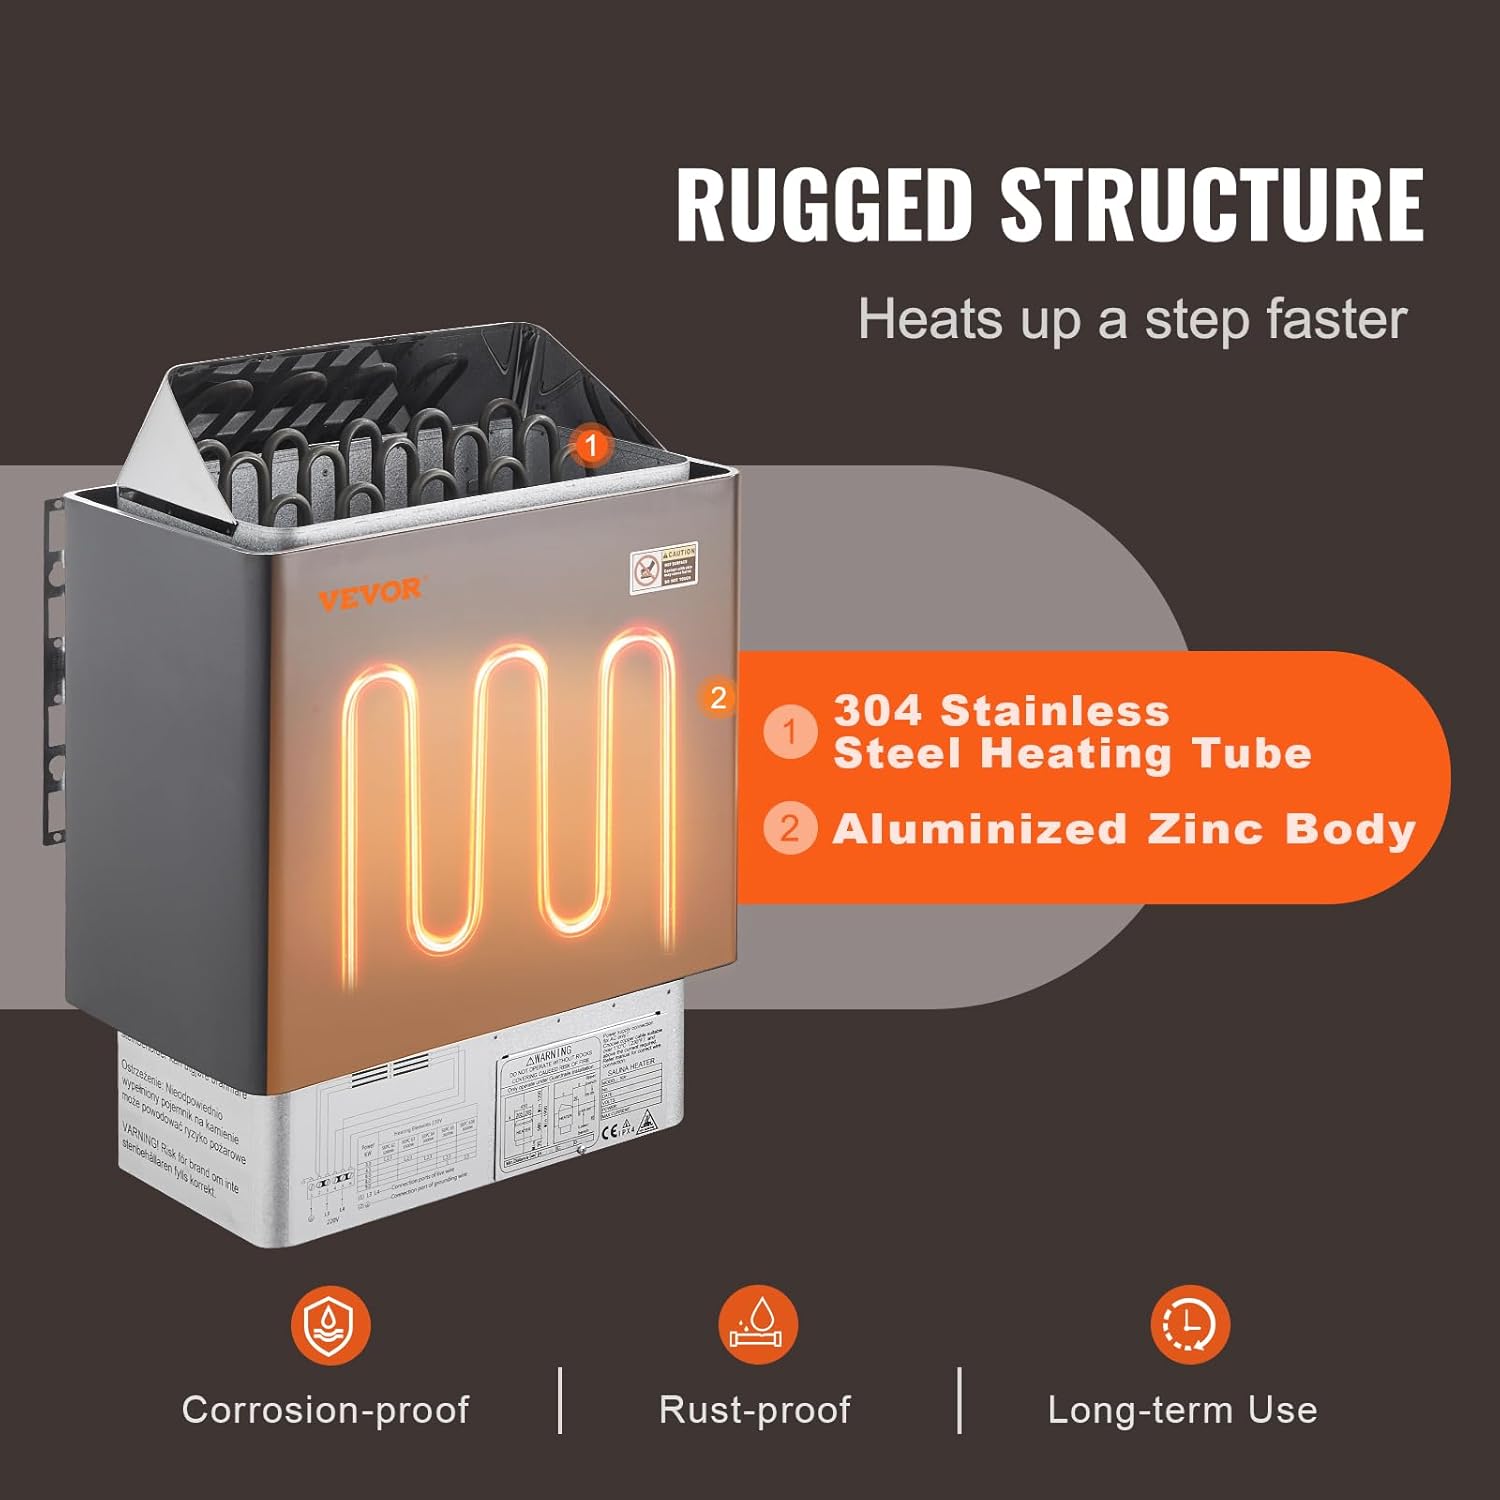
Figure 3: Internal structure showing heating elements and body material.
4. Especificaciones
| Especificación | Valor |
|---|---|
| Número de modelo | SCA-80W |
| Fuerza | 8 kW |
| Volumentage | 400V 3N~ 50Hz/60Hz |
| Tamaño adecuado de sala de sauna | 8 - 12 m³ (283 - 424 cu.ft) |
| Dimensiones (L x An x Al) | 409 x 278 x 570 mm (16.1 x 10.9 x 22.4 pulgadas) |
| Requisitos de piedra para sauna | Max. 15 kg (33 lbs) (Not included) |
| Rango máximo de temperatura | 110 °C (230 °F) |
| Minutero | 3 horas |
| Material | Stainless Steel, Aluminized Zinc |
| Peso | 11.7 kg (25.8 libras) |

Figure 4: VEVOR SCA-80W dimensions and specifications overview.
5. Configuración e instalación
Proper installation is crucial for the safe and efficient operation of your sauna heater. It is highly recommended that installation be performed by a qualified electrician.
5.1 Montaje del calentador
- Choose a suitable wall inside the sauna room. The heater is designed for wall-mounting.
- Ensure there is adequate clearance around the heater from walls and benches as per local building codes and manufacturer recommendations.
- Mount the heater using its pre-drilled bracket. The recommended installation height is at least 9 cm (approximately 3.5 inches) from the floor to ensure optimal heat dissipation and safety.
- Secure the heater firmly to the wall using appropriate fasteners for the wall material.

Figure 5: Wall-mount installation of the sauna heater.
5.2 Conexión eléctrica
- Todo el cableado eléctrico debe cumplir con los códigos eléctricos locales y nacionales.
- Connect the heater to a 400V 3N~ 50Hz/60Hz power supply.
- Ensure the circuit breaker and wiring are appropriately sized for an 8 kW load.
- Connect the external digital controller to the heater unit as per the wiring diagram provided with the product.
5.3 Colocación de piedras de sauna
- Before first use, carefully place approximately 15 kg (33 lbs) of approved sauna stones into the stone compartment of the heater.
- Arrange the stones loosely to allow for good air circulation through the heating elements. Do not pack them tightly.
- Ensure stones do not cover the air vents or extend too far above the heater's top edge.
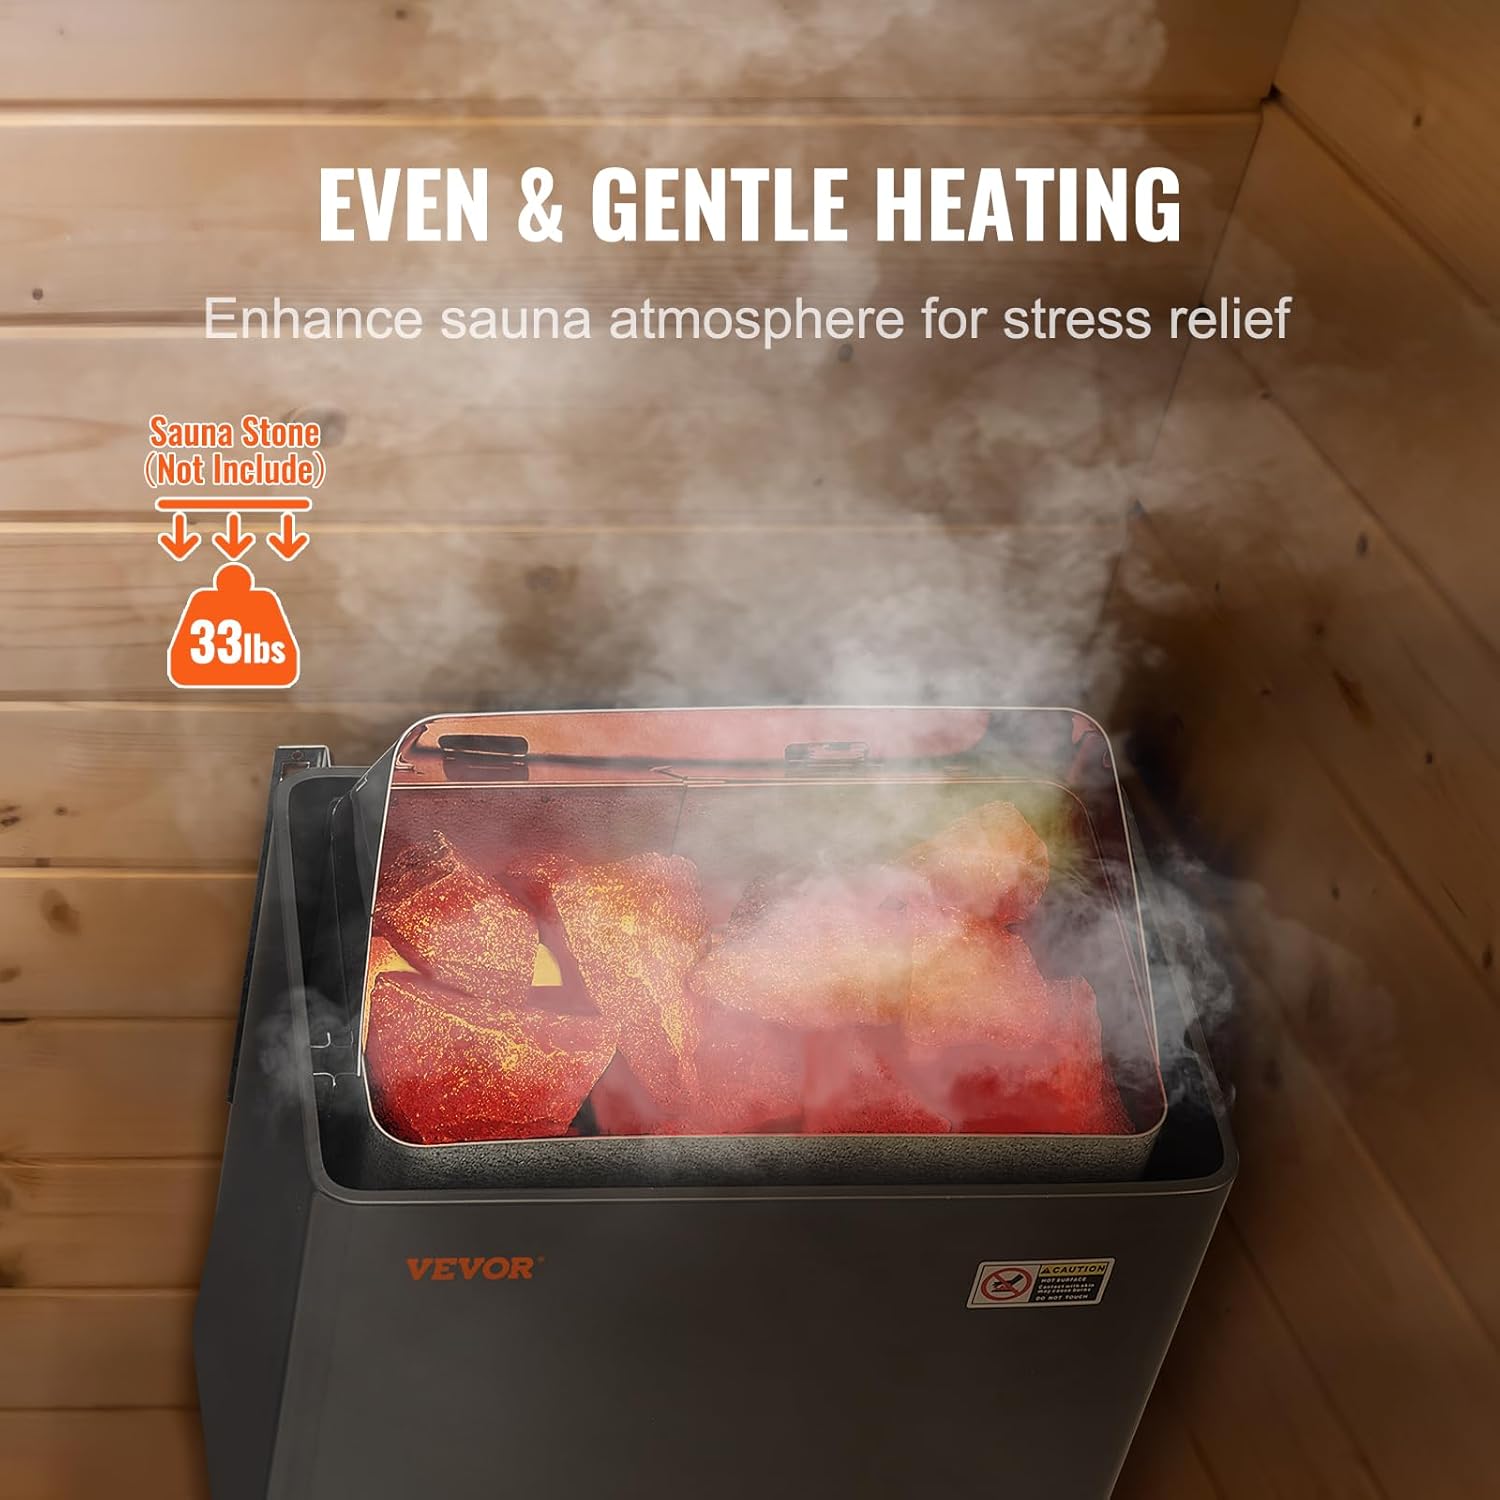
Figure 6: Sauna stones placed in the heater compartment.
6. Instrucciones de funcionamiento
The VEVOR SCA-80W heater is controlled by an external digital panel.
6.1 Using the Digital Controller
The external controller allows you to set the desired temperature and operating time.

Figure 7: External digital controller interface.
- Botón de encendido: Presione para encender/apagar el calentador.
- Temperatura establecida: Use the temperature adjustment buttons (usually up/down arrows) to set your desired sauna temperature, up to a maximum of 110°C (230°F).
- Establecer temporizador: Use the timer adjustment buttons to set the operating duration. The heater can run for up to 3 hours in continuous mode.
Modos de funcionamiento de 6.2
- Modo normal: For continuous heating. Set the desired temperature and time (up to 4 hours). The heater will maintain the set temperature for the duration.
- Modo preestablecido: Allows for delayed start and automatic stop. You can set a future start time (up to 24 hours) and a heating duration (minimum 10 minutes, maximum 4 hours). The heater will automatically start and stop according to your settings.
6.3 Adding Water to Stones
To generate steam, carefully pour a small amount of pure water onto the hot sauna stones. Do not exceed 100 ml (approximately 3.4 fl oz) at a time. Avoid pouring water directly onto the heating elements.
7. Mantenimiento
Regular maintenance ensures the longevity and safe operation of your VEVOR sauna heater.
- Limpieza: Limpie periódicamente el exterior del calentador con adamp Paño. No utilice limpiadores abrasivos ni disolventes. Asegúrese de que el calentador esté frío y desconectado de la corriente antes de limpiarlo.
- Piedras de sauna: Inspect the sauna stones regularly. Replace any cracked or crumbling stones. Rearrange stones annually to ensure good air circulation and prevent hot spots.
- Elementos calefactores: Visually inspect the heating elements for any signs of damage or corrosion. If damage is observed, contact a qualified technician for repair or replacement.
- Conexiones eléctricas: Have a qualified electrician periodically check all electrical connections for tightness and signs of wear.
8. Solución de problemas
If you encounter issues with your sauna heater, refer to the following troubleshooting guide:
| Problema | Posible causa | Solución |
|---|---|---|
| El calentador no enciende | No power supply; Circuit breaker tripped; Controller not set correctly | Check main power supply; Reset circuit breaker; Ensure controller is powered on and settings are correct. |
| Salida de calor insuficiente | Incorrect temperature setting; Sauna room too large; Insufficient sauna stones; Poor stone arrangement | Increase temperature setting; Verify sauna room size is within specifications (8-12 m³); Ensure 15 kg of stones are used; Rearrange stones for better airflow. |
| La pantalla del controlador no funciona | Loose connection; Controller malfunction | Check cable connections between heater and controller; If problem persists, contact customer support. |
| El calentador se apaga inesperadamente | Timer expired; Overheat protection activated; Electrical fault | Check timer settings; Allow heater to cool down, ensure proper ventilation; Consult an electrician for electrical faults. |
If troubleshooting steps do not resolve the issue, please contact VEVOR customer support.
9. Garantía y soporte
For information regarding the product warranty, please refer to the warranty card included with your purchase or visit the official VEVOR website. For technical support, spare parts, or any other inquiries, please contact VEVOR customer service through their official channels.