Poafamx POA-20
Manual del usuario de la bomba flotante para aireador de fuente de estanque Poafamx de 5000 GPH
Model: POA-20 | Brand: Poafamx
1. Introducción
This manual provides essential instructions for the safe and efficient operation, installation, and maintenance of your Poafamx 5000GPH Floating Pond Fountain Aerator. Please read this manual thoroughly before use and retain it for future reference.

Figure 1: Poafamx Floating Pond Fountain Aerator and included components.
2. Instrucciones de seguridad
Always follow these safety precautions to reduce the risk of injury, electric shock, or damage to the product.
- Asegúrese de que la fuente de alimentación coincida con las especificaciones (110 V/60 Hz).
- No opere la bomba si el cable de alimentación o el enchufe están dañados.
- Always disconnect the power before performing any maintenance or cleaning.
- Keep children and pets away from the fountain while it is operating.
- Do not use the product for purposes other than its intended use (pond aeration and fountain display).
- Avoid touching the impeller when the unit is connected to power.
- Install the unit in a location where it is stable and cannot be easily dislodged.
3. Contenido del paquete
Verifique que todos los componentes estén presentes y sin daños al abrir el paquete:

Figura 2: Explosión view and list of included parts.
- Boya
- Marco de fijación
- bomba de fuente
- Power cord (33ft)
- Red protectora
- Protective net fixing frame
- Tornillos (x4)
- Nylon rope (33ft x2)
- Insert rod (x2)
- Timer outlet
- Destornillador
4. Configuración e instalación
Follow these steps for proper assembly and installation of your floating pond fountain aerator.
4.1 Asamblea
- Attach Protective Net: Secure the protective net to the protective net fixing frame.
- Attach Fixing Frame to Buoy: Place the fountain pump into the buoy. Then, align the fixing frame with the buoy and secure it using the provided screws. Ensure it is tightened to prevent movement.
- Install Filter (Optional): If desired, install the fine filter mesh according to your specific filtration needs. This is typically placed within the fixing frame.
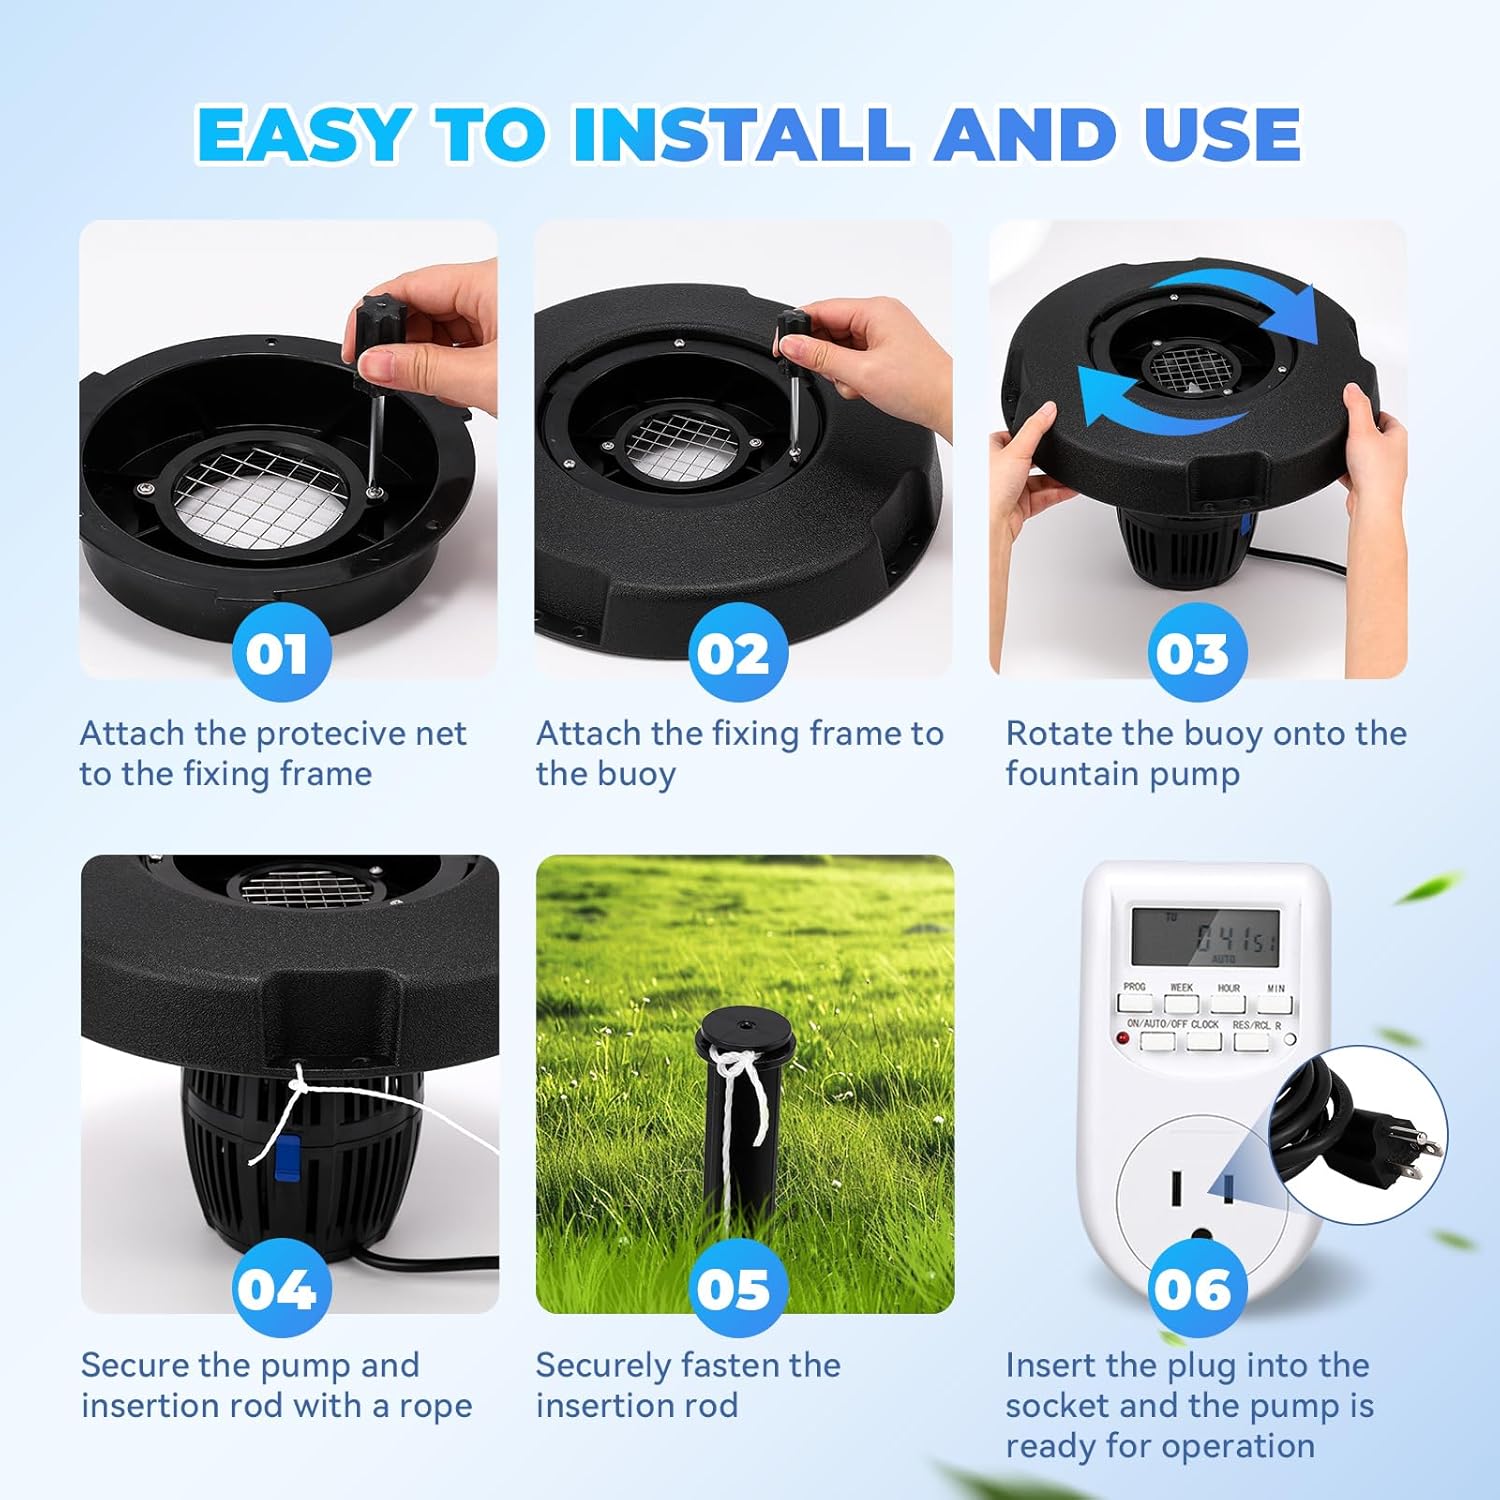
Figure 3: Visual guide for assembling the fountain aerator.
Video 1: A demonstration of the simple installation process for the pond fountain pump.
4.2 Placement and Securing
- Attach Mooring Ropes: Thread the nylon ropes through the designated holes on the buoy.
- Secure Insert Rods: Tie the other end of each rope to an insert rod. Drive the insert rods into the ground at the desired locations around your pond to anchor the fountain.
- Posición Fuente: Carefully place the assembled fountain into the water. Adjust the ropes to position the fountain in the desired area of your pond or lake.
- Conecte la electricidad: Plug the 33ft power cord into the included timer outlet, then plug the timer outlet into a standard 110V power source.
5. Instrucciones de funcionamiento
The Poafamx Floating Pond Fountain Aerator is designed for continuous operation or timed use via the included outlet timer.
- Puesta en marcha inicial: Once connected to power, the pump will begin operating, creating a fountain display and aerating the water.
- Uso del temporizador: Refer to the separate instructions provided with the timer outlet for detailed programming. The timer allows you to set specific on/off times to conserve energy and customize operation.
- Fountain Display: The pump creates a fountain covering an area of approximately 3.28 x 9.84 feet, enhancing the aesthetic appeal and promoting water circulation and oxygenation.
Video 2: A brief demonstration of the 5000GPH Pond Fountain Aerator in operation.
6. Mantenimiento
Regular maintenance ensures optimal performance and extends the lifespan of your aerator.
- Desconectar la energía: Always unplug the unit from the power source before any cleaning or maintenance.
- Filtros limpios: Periodically inspect and clean the protective net and internal filters to prevent debris buildup, which can reduce performance. The filter is designed for easy dismantling.
- Inspeccionar el impulsor: Check the ceramic wear-resistant shaft and impeller for any obstructions or damage. Remove any foreign matter carefully.
- Winterización: In freezing climates, remove the aerator from the pond before winter to prevent ice damage. Store it in a dry, frost-free location.

Figure 4: Filter with locking clip for easy cleaning.

Figure 5: Ceramic spindle impeller for long-lasting performance.
7. Solución de problemas
Si encuentra problemas, consulte la siguiente tabla antes de comunicarse con el servicio de atención al cliente.
| Problema | Posible causa | Solución |
|---|---|---|
| La bomba no arranca. | No power; clogged impeller; damaged motor. | Check power connection and timer settings. Disconnect power and clean impeller. If motor is damaged, contact support. |
| Weak or no fountain spray. | Clogged intake/filter; low water level; air in pump. | Clean protective net and filters. Ensure adequate water level. Briefly lift and re-submerge the pump to release trapped air. |
| Ruido o vibración excesivos. | Debris in impeller; pump not stable. | Disconnect power and clean impeller. Ensure the buoy is properly secured and stable in the water. |
8. Especificaciones
| Característica | Detalle |
|---|---|
| Modelo | POA-20 |
| Marca | Poafamx |
| Fuerza | 90 W |
| Volumentage | 110 V/60 Hz |
| Caudal máximo | 5000 GPH |
| Altura de la fuente | Hasta 3.28 pies |
| Fountain Diameter | Hasta 9.84 pies |
| Longitud del cable de alimentación | 33 pies |
| Dimensiones del producto (L x An x Al) | 10.83" x 9.92" x 16.54" |
| Peso del artículo | 9.18 libras |
| Material | Plástico |
| Características especiales | Timer Function, Floating Design, Energy Efficient Motor |
9. Garantía y soporte
For warranty information, technical support, or replacement parts, please refer to the contact information provided with your purchase or visit the official Poafamx webSitio. Conserve su recibo de compra como comprobante de compra.
Ask a question about this manual
Ask about setup, troubleshooting, compatibility, parts, safety, or missing instructions. Manuals+ will review the question and use this page’s manual context to help answer it.