DCA ADJZ2035i13
DCA 20V Cordless Hammer Drill Set ADJZ2035i13 User Manual
Model: ADJZ2035i13 | Brand: DCA
1. Instrucciones de seguridad importantes
Always follow basic safety precautions when using this power tool to reduce the risk of fire, electric shock, and serious personal injury.
Advertencias generales de seguridad para herramientas eléctricas
- Seguridad en el área de trabajo: Mantenga su área de trabajo limpia y bien iluminada. Las áreas desordenadas u oscuras pueden provocar accidentes. No opere herramientas eléctricas en atmósferas explosivas, como en presencia de líquidos, gases o polvo inflamables.
- Seguridad eléctrica: Evite el contacto del cuerpo con superficies conectadas a tierra, como tuberías, radiadores, estufas y refrigeradores. Existe un mayor riesgo de descarga eléctrica si su cuerpo está conectado a tierra.
- Seguridad personal: Use siempre protección ocular. Use gafas de seguridad, gafas protectoras o una careta. Use protección auditiva al operar la herramienta durante períodos prolongados. Vístase adecuadamente; no use ropa holgada ni joyas. Mantenga el cabello, la ropa y los guantes alejados de las piezas móviles.
- Uso y cuidado de herramientas: No fuerce la herramienta eléctrica. Utilice la herramienta eléctrica correcta para su aplicación. Desconecte la batería de la herramienta eléctrica antes de realizar ajustes, cambiar accesorios o guardarla.
2. Producto terminadoview
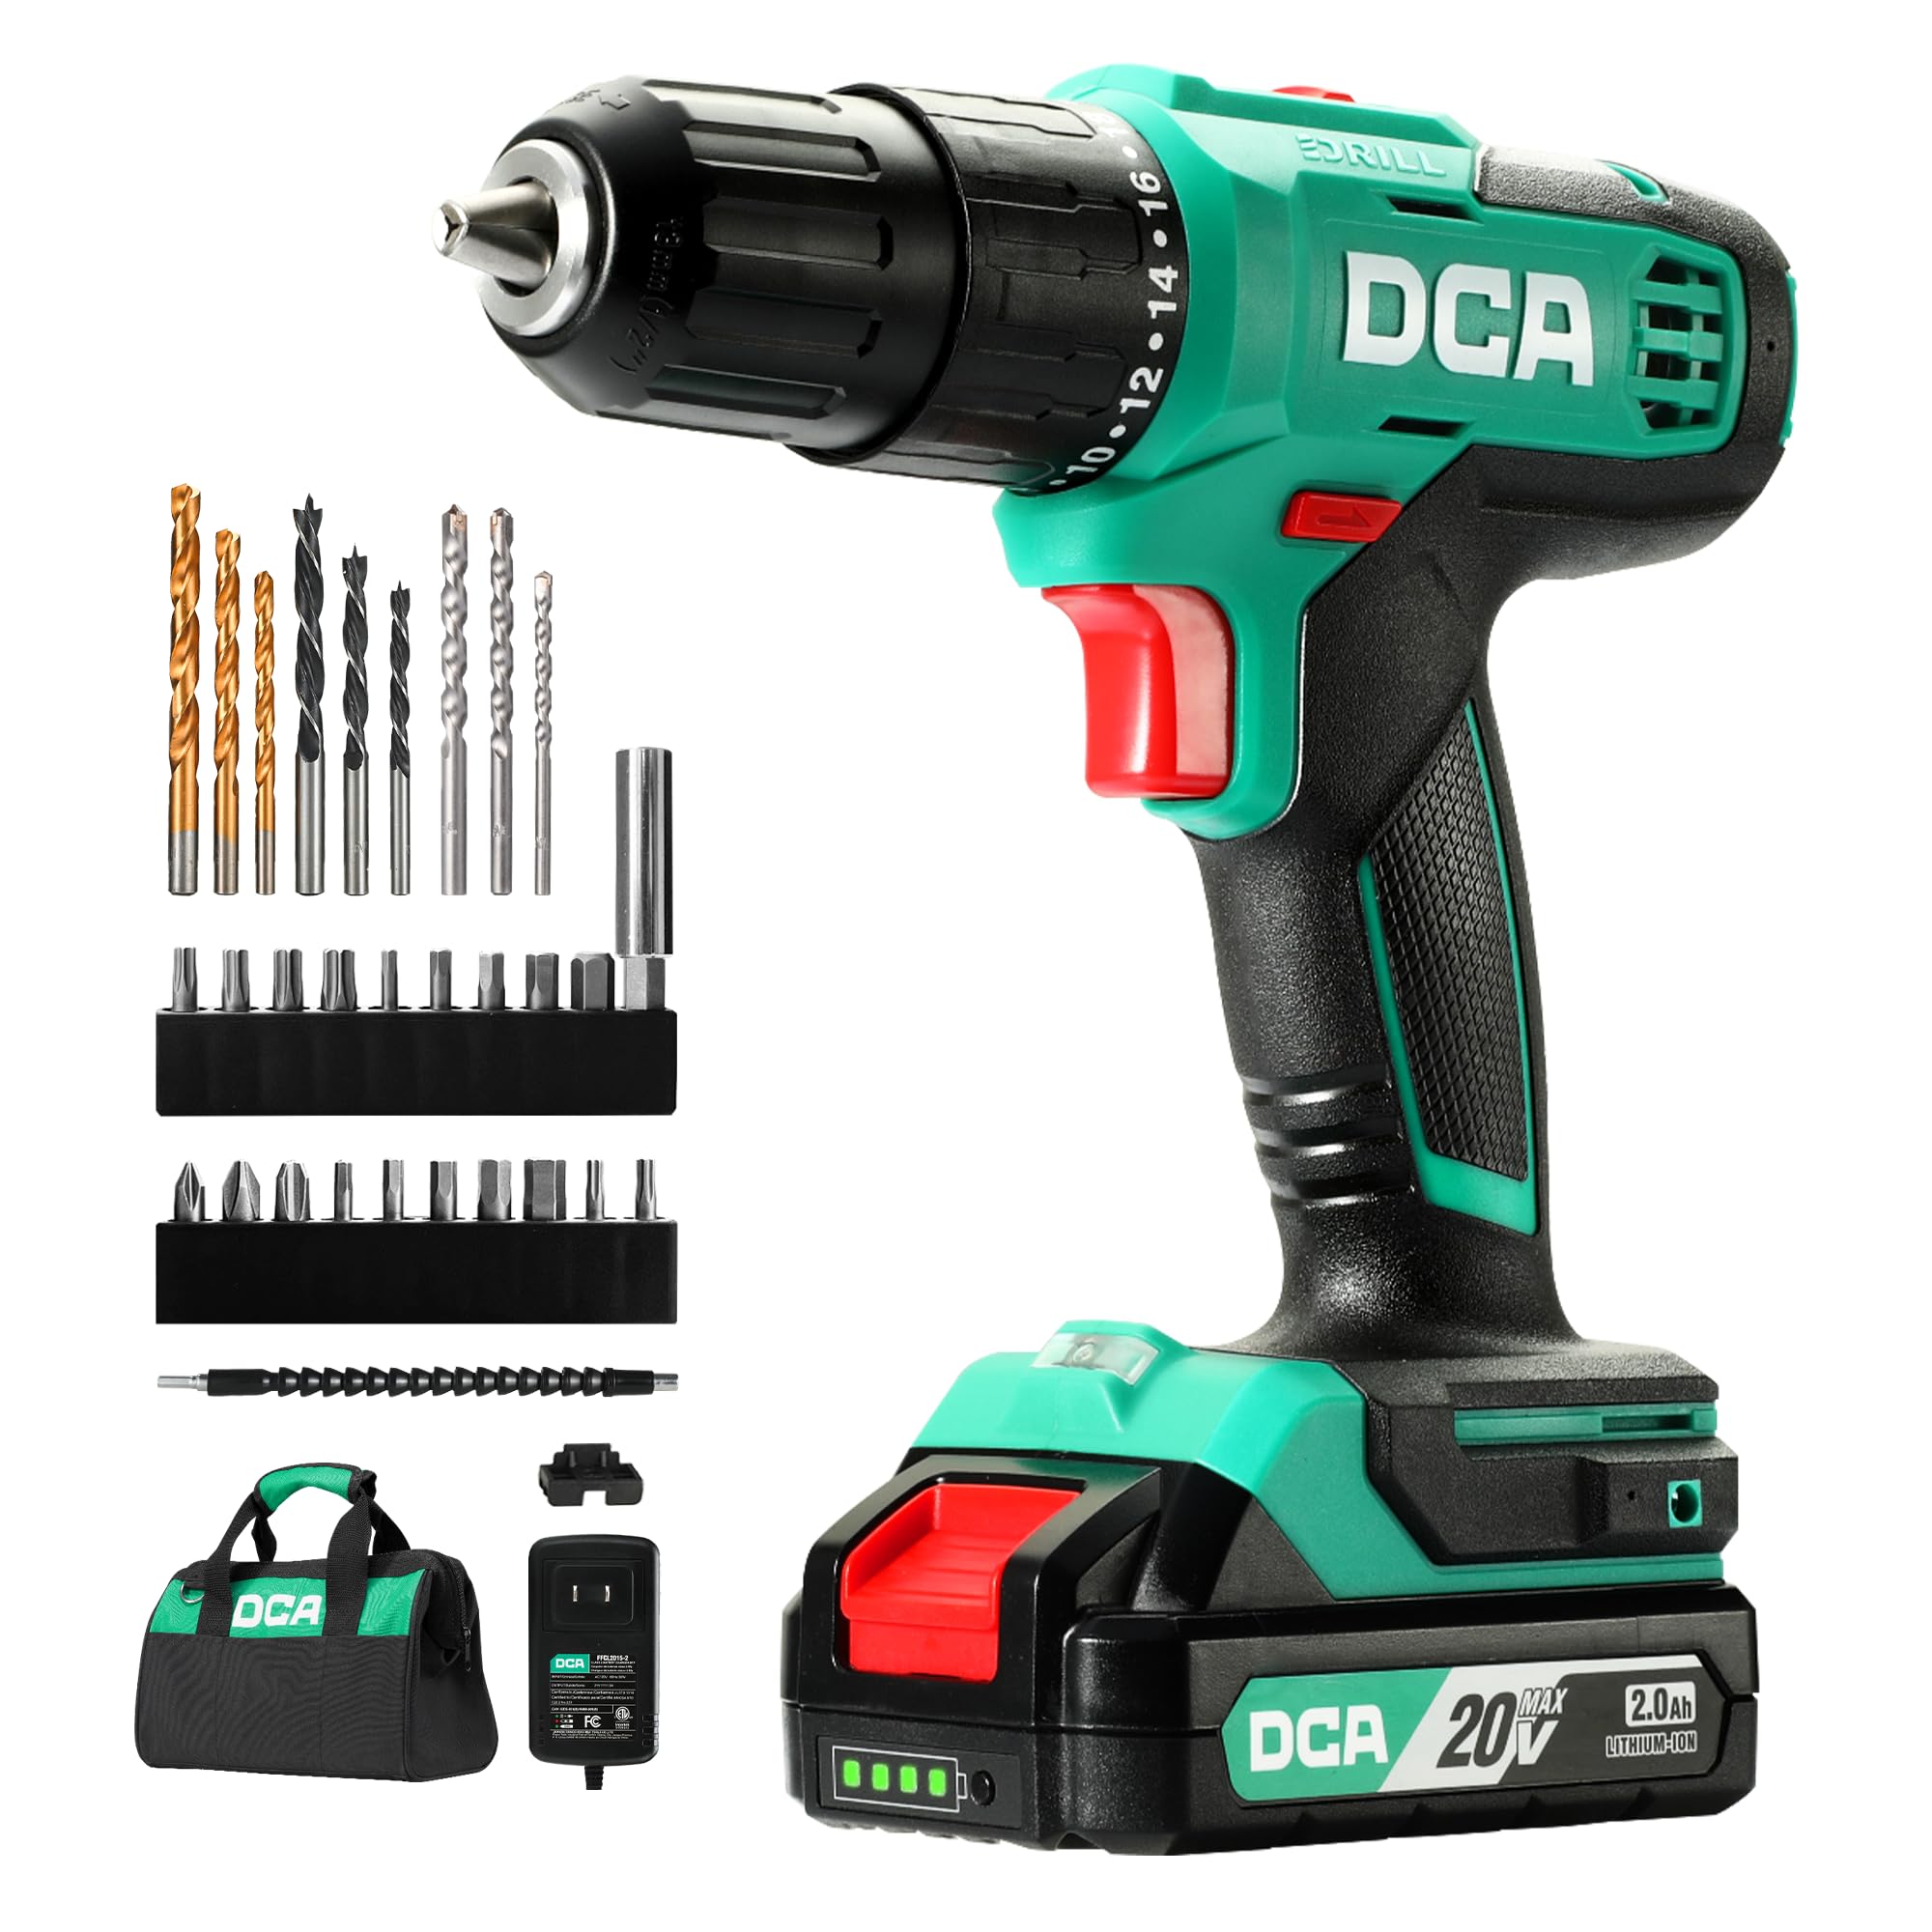
Figure 2.0: The DCA 20V Cordless Hammer Drill Set, model ADJZ2035i13.
The DCA 20V Cordless Hammer Drill Set (Model ADJZ2035i13) is a versatile tool designed for drilling into various materials including wood, metal, and masonry, as well as for driving screws. It features a high-performance motor, variable speed control, and multiple clutch settings for precise operation.
Características principales:
- Motor de alto rendimiento: Equipped with a pure copper motor, delivering 354 in-lbs of torque for strong power and extended lifespan.
- Función del martillo: Features a 22,500 IPM impact rate for efficient drilling into tough materials like brick walls.
- 2 velocidades variables: Offers speed settings of 0-400 RPM for precision fastening and 0-1500 RPM for high-speed drilling.
- 18+1+1 Clutch Settings: Provides 18 torque settings for screwdriving, 1 drill setting, and 1 hammer drill setting for versatile applications.
- Mandril sin llave de 1/2": Permite cambios de broca rápidos y sencillos.
- Batería de iones de litio de 2.0 Ah: Proporciona energía duradera para un uso prolongado.
- Luz de trabajo LED integrada: Ilumina el área de trabajo para mejorar la visibilidad.
- Diseño compacto y ligero: Weighs only 4.9 pounds for comfortable handling.
Componentes:
- Taladro de percusión inalámbrico
- Batería de iones de litio de 2.0 Ah
- Cargador 1.5A
- Bolsa de transporte
- 9-Piece Drilling Bits
- 19-Piece Screwdriver Bits
- 1-Piece Extension Bit Holder
- 1-Piece Flexible Shaft
- 1-Piece On-board Bits Holder
- 1 Gancho para cinturón

Figure 2.1: Included components of the DCA 20V Cordless Hammer Drill Set.
3. Configuración
3.1 Carga de la batería
- Conecte el cargador a una toma de corriente estándar.
- Deslice la batería en el cargador. Asegúrese de que encaje en su lugar.
- The charger's indicator light will show the charging status. A red light typically indicates charging, while a green light indicates a full charge.
- Una vez completamente cargada, desconecte la batería del cargador.
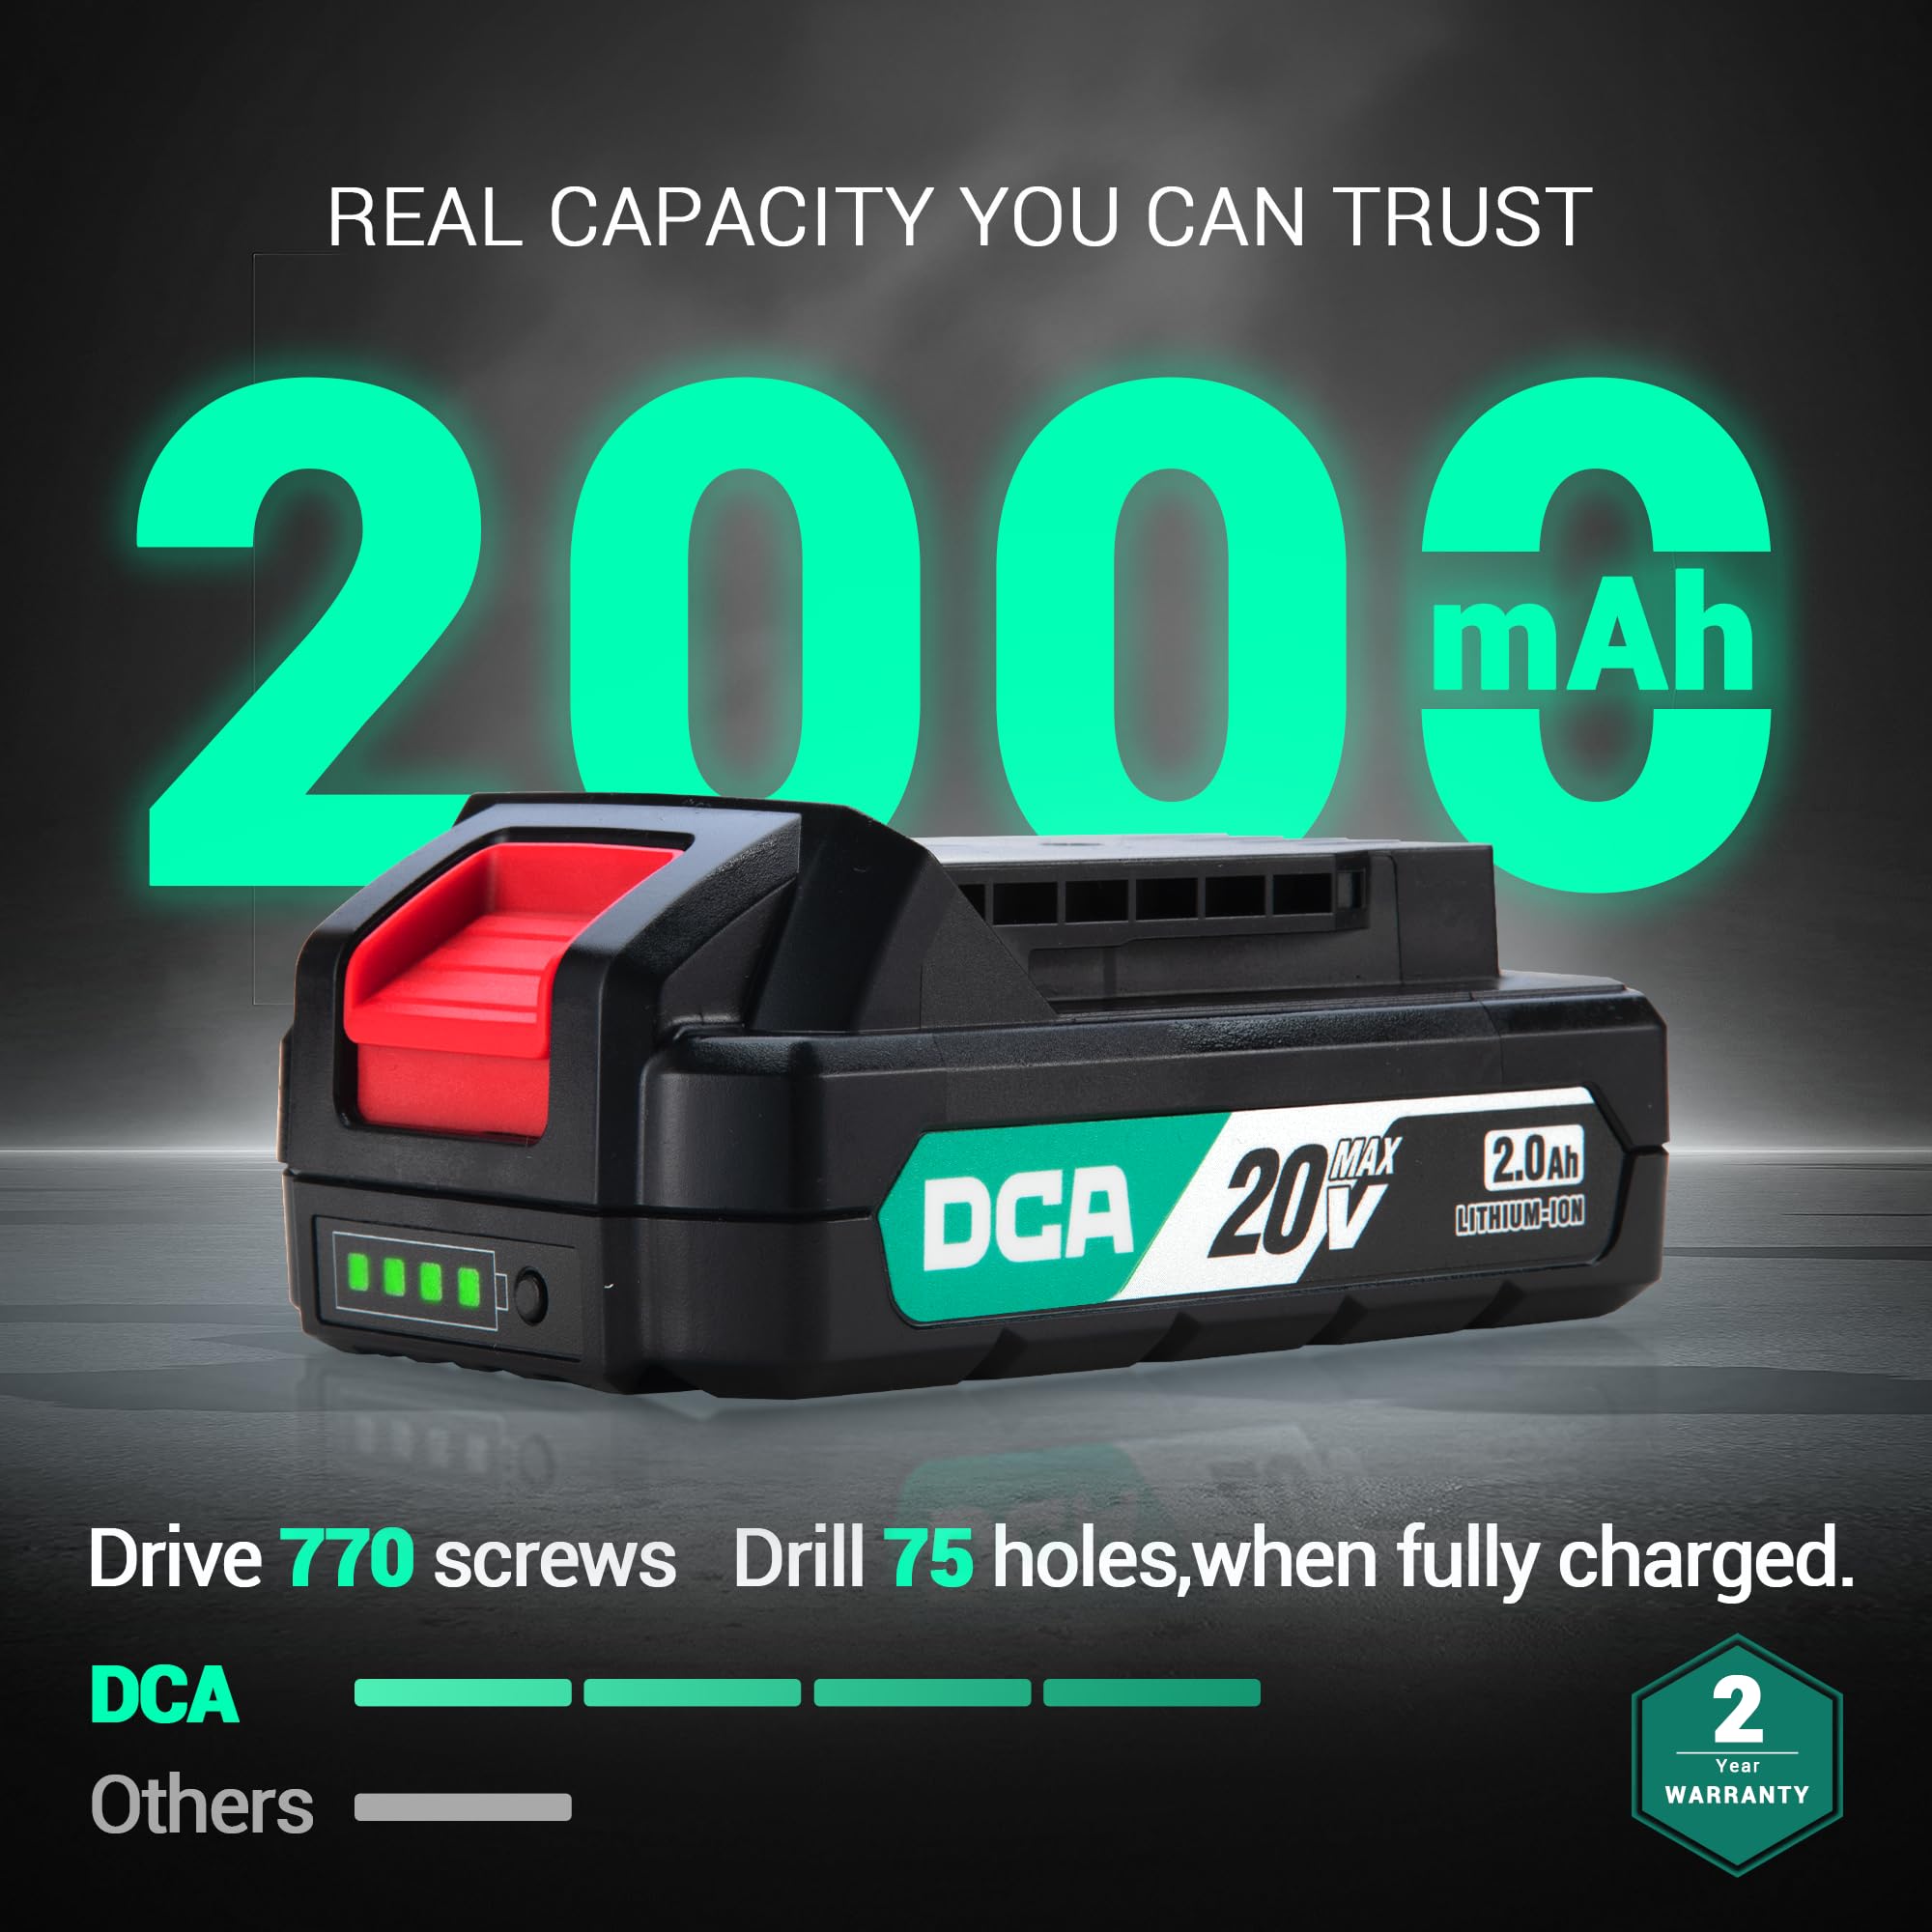
Figure 3.1: The 2000mAh battery and its charge indicator lights.
3.2 Instalación y extracción de brocas
- Ensure the drill is off and the forward/reverse switch is in the center (locked) position.
- Gire el mandril en sentido antihorario para abrir las mordazas.
- Inserte la broca o la punta de destornillador deseada en el mandril. Asegúrese de que esté bien encajada.
- Gire el mandril en sentido horario para apretar firmemente las mordazas alrededor de la broca. Apriete firmemente con la mano.
- Para retirar una broca, gire el mandril en sentido antihorario hasta que las mordazas se abran y luego extraiga la broca.

Figure 3.2: The 1/2-inch keyless chuck for quick bit changes.

Figure 3.3: Included drill bit and screwdriver bit pack.
Video 3.1: Official product video demonstrating the DCA Hammer Drill ADJZ2035i13 in various applications.
4. Instrucciones de funcionamiento
4.1 Selección del modo de funcionamiento y del par
The drill features an 18+1+1 clutch system, allowing you to select between screwdriving, drilling, and hammer drilling modes.
- Screwdriver Mode (1-18 Torque Settings): Rotate the torque adjustment ring to select a setting from 1 to 18. Lower numbers are for smaller screws and softer materials, while higher numbers are for larger screws and harder materials. This prevents overdriving screws.
- Modo de taladro (Icono de taladro): Rotate the ring to the drill icon for general drilling into wood, plastic, and metal without impact.
- Modo taladro percutor (Icono de martillo): Rotate the ring to the hammer icon for drilling into masonry, brick, and concrete with impact action.
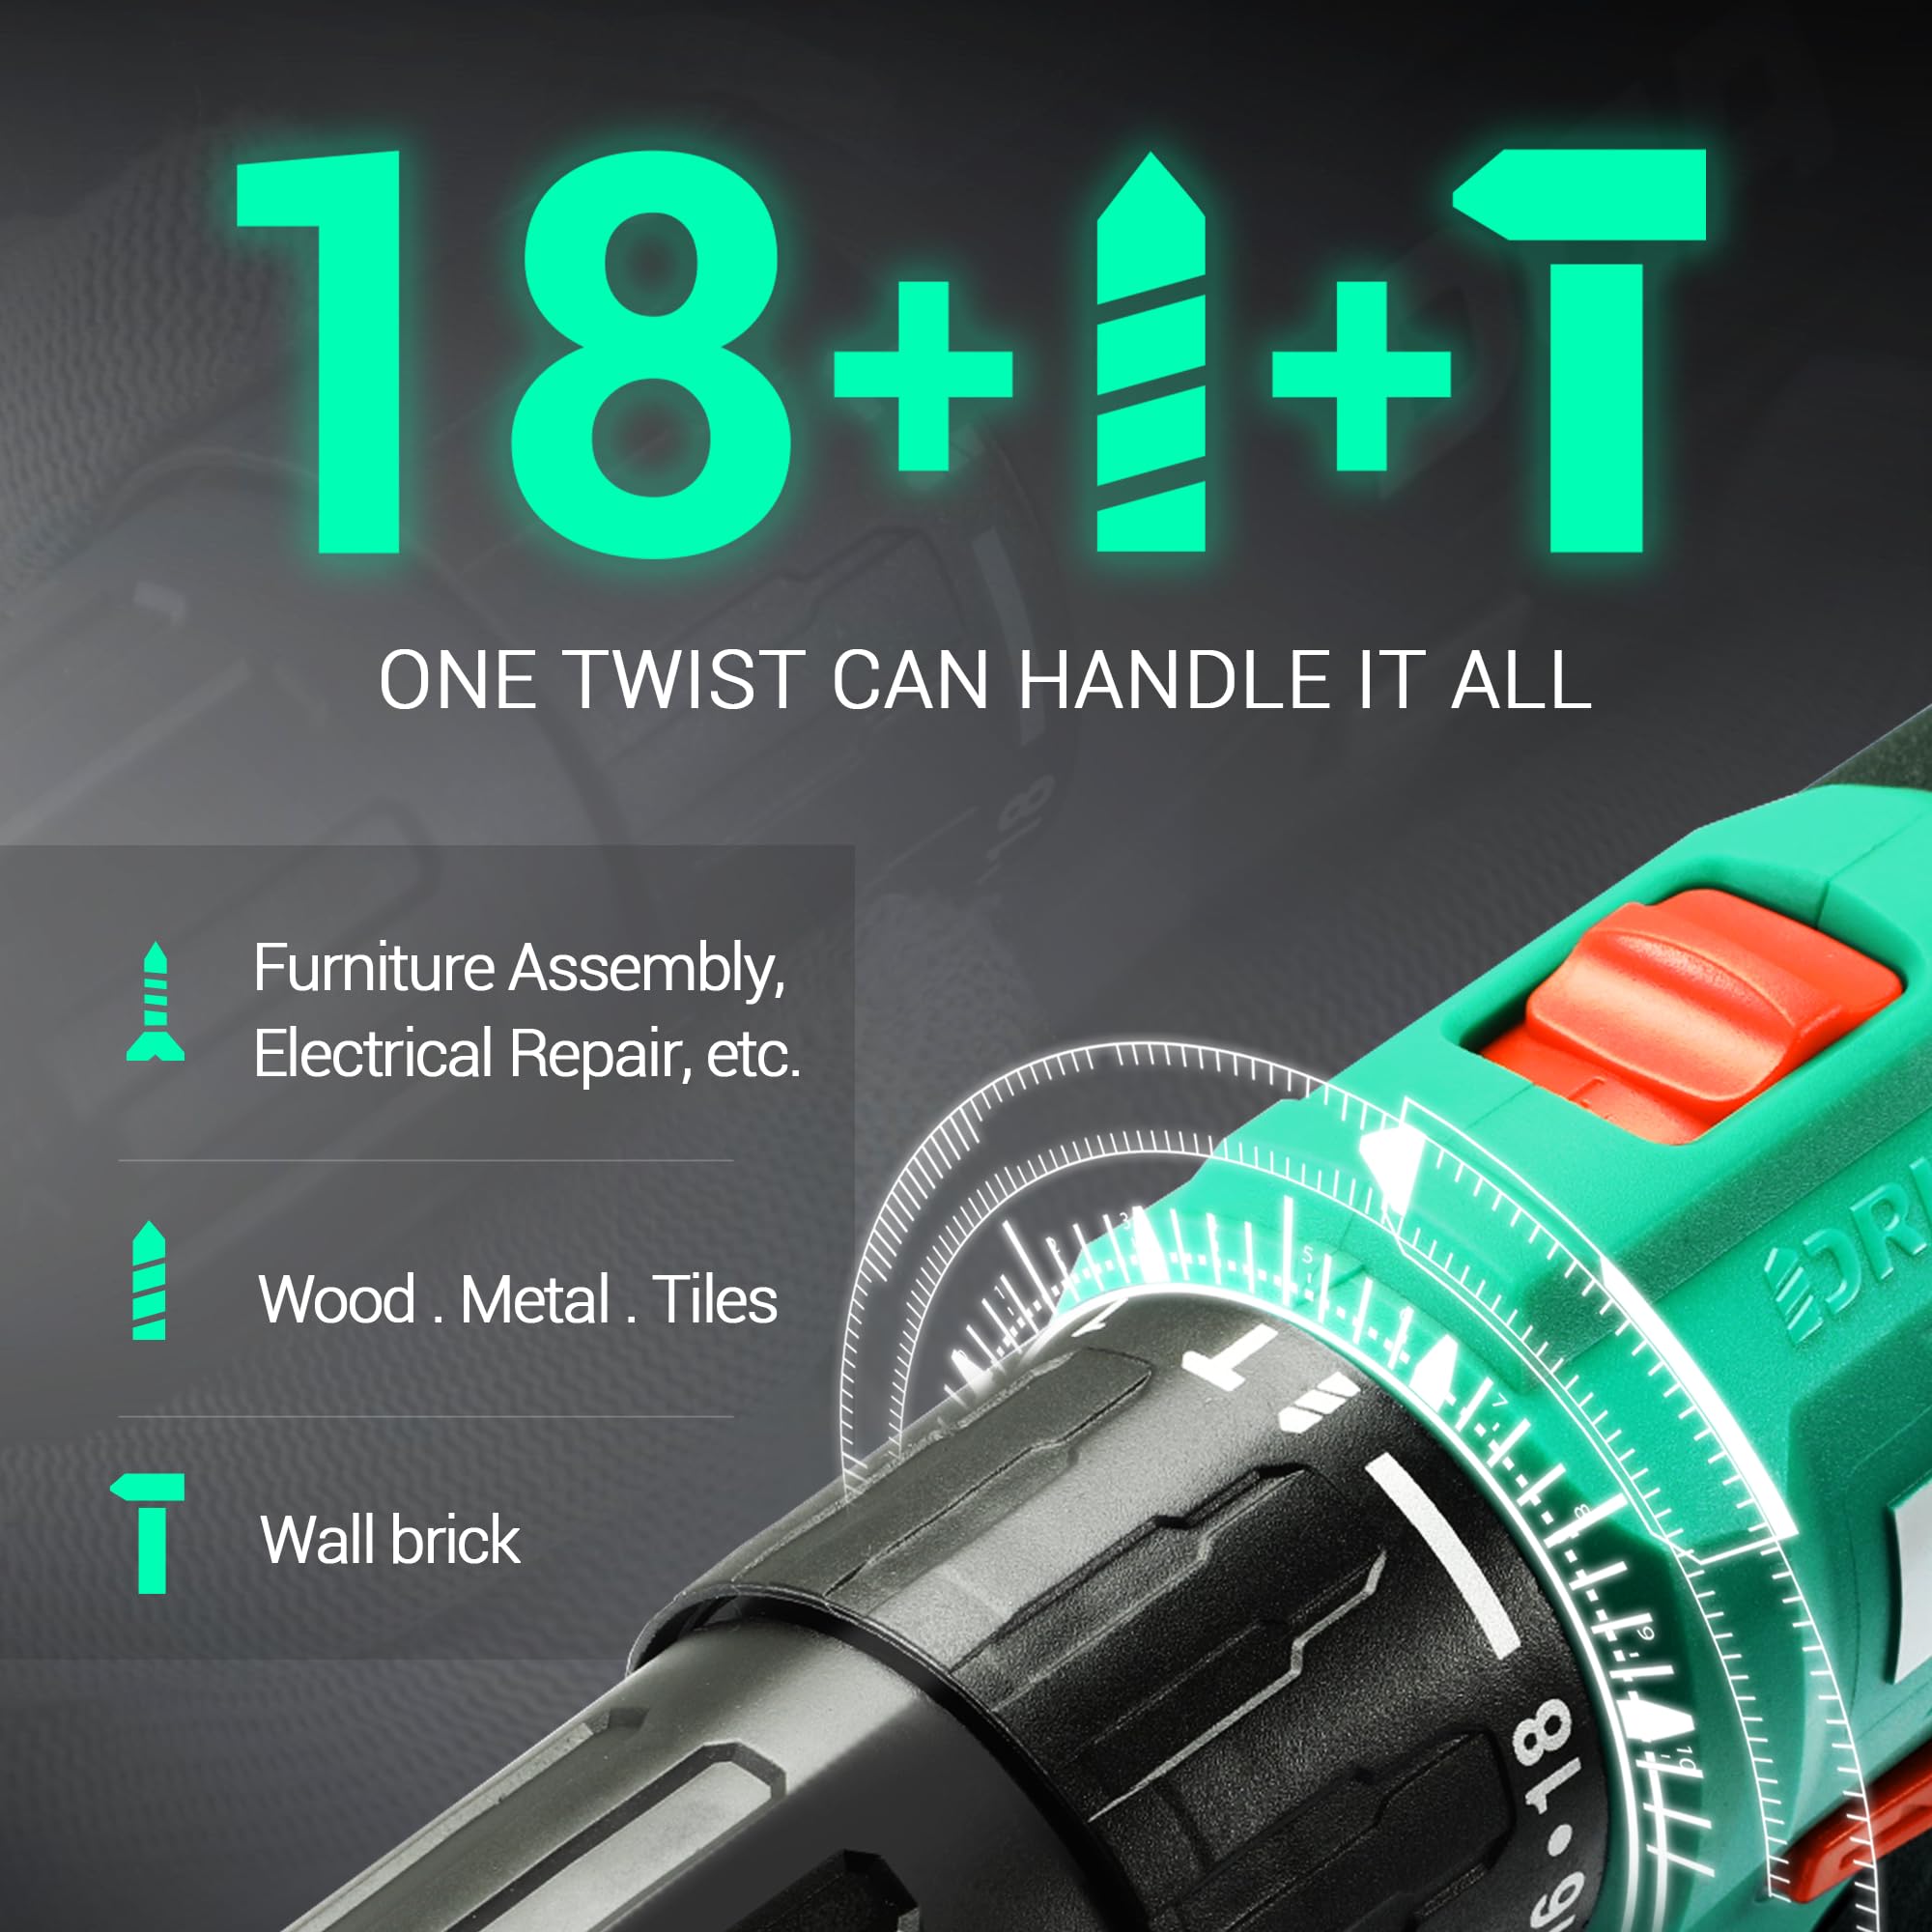
Figure 4.1: The 18+1+1 clutch and mode selector ring.
4.2 Control de velocidad variable
The drill offers two mechanical speed settings and a variable speed trigger.
- Interruptor selector de velocidad: Located on top of the drill, slide it to position '1' for low speed (0-400 RPM) and high torque, ideal for screwdriving. Slide it to position '2' for high speed (0-1500 RPM) and lower torque, suitable for drilling.
- Gatillo de velocidad variable: The trigger allows for fine control over the speed. Pressing the trigger lightly results in lower speed, while pressing it fully increases the speed to the maximum selected by the speed selector switch.

Figure 4.2: The two variable speed settings and impact frequency of the drill.

Figure 4.3: The variable speed trigger for precise control.
4.3 Interruptor de avance/retroceso
The forward/reverse switch is located above the trigger. Push it to the left for forward rotation (drilling/driving) and to the right for reverse rotation (removing screws/bits). Position it in the center to lock the trigger and prevent accidental starting.

Figure 4.4: Forward and reverse rotation for driving and removing fasteners.
4.4 Luz de trabajo LED
The integrated LED work light automatically illuminates when the trigger is pressed, providing better visibility in dimly lit work areas.

Figure 4.5: The LED work light in action.
4.5 Uso del eje flexible
The included flexible shaft allows you to reach screws or drill in tight, awkward spaces where the main drill body cannot fit directly.
- Insert the flexible shaft into the drill's chuck and tighten securely.
- Insert the desired screwdriver or drill bit into the end of the flexible shaft.
- Use the drill as normal, guiding the flexible shaft to the desired work area.

Figure 4.6: Using the flexible shaft for accessing confined areas.
4.6 Aplicaciones generales
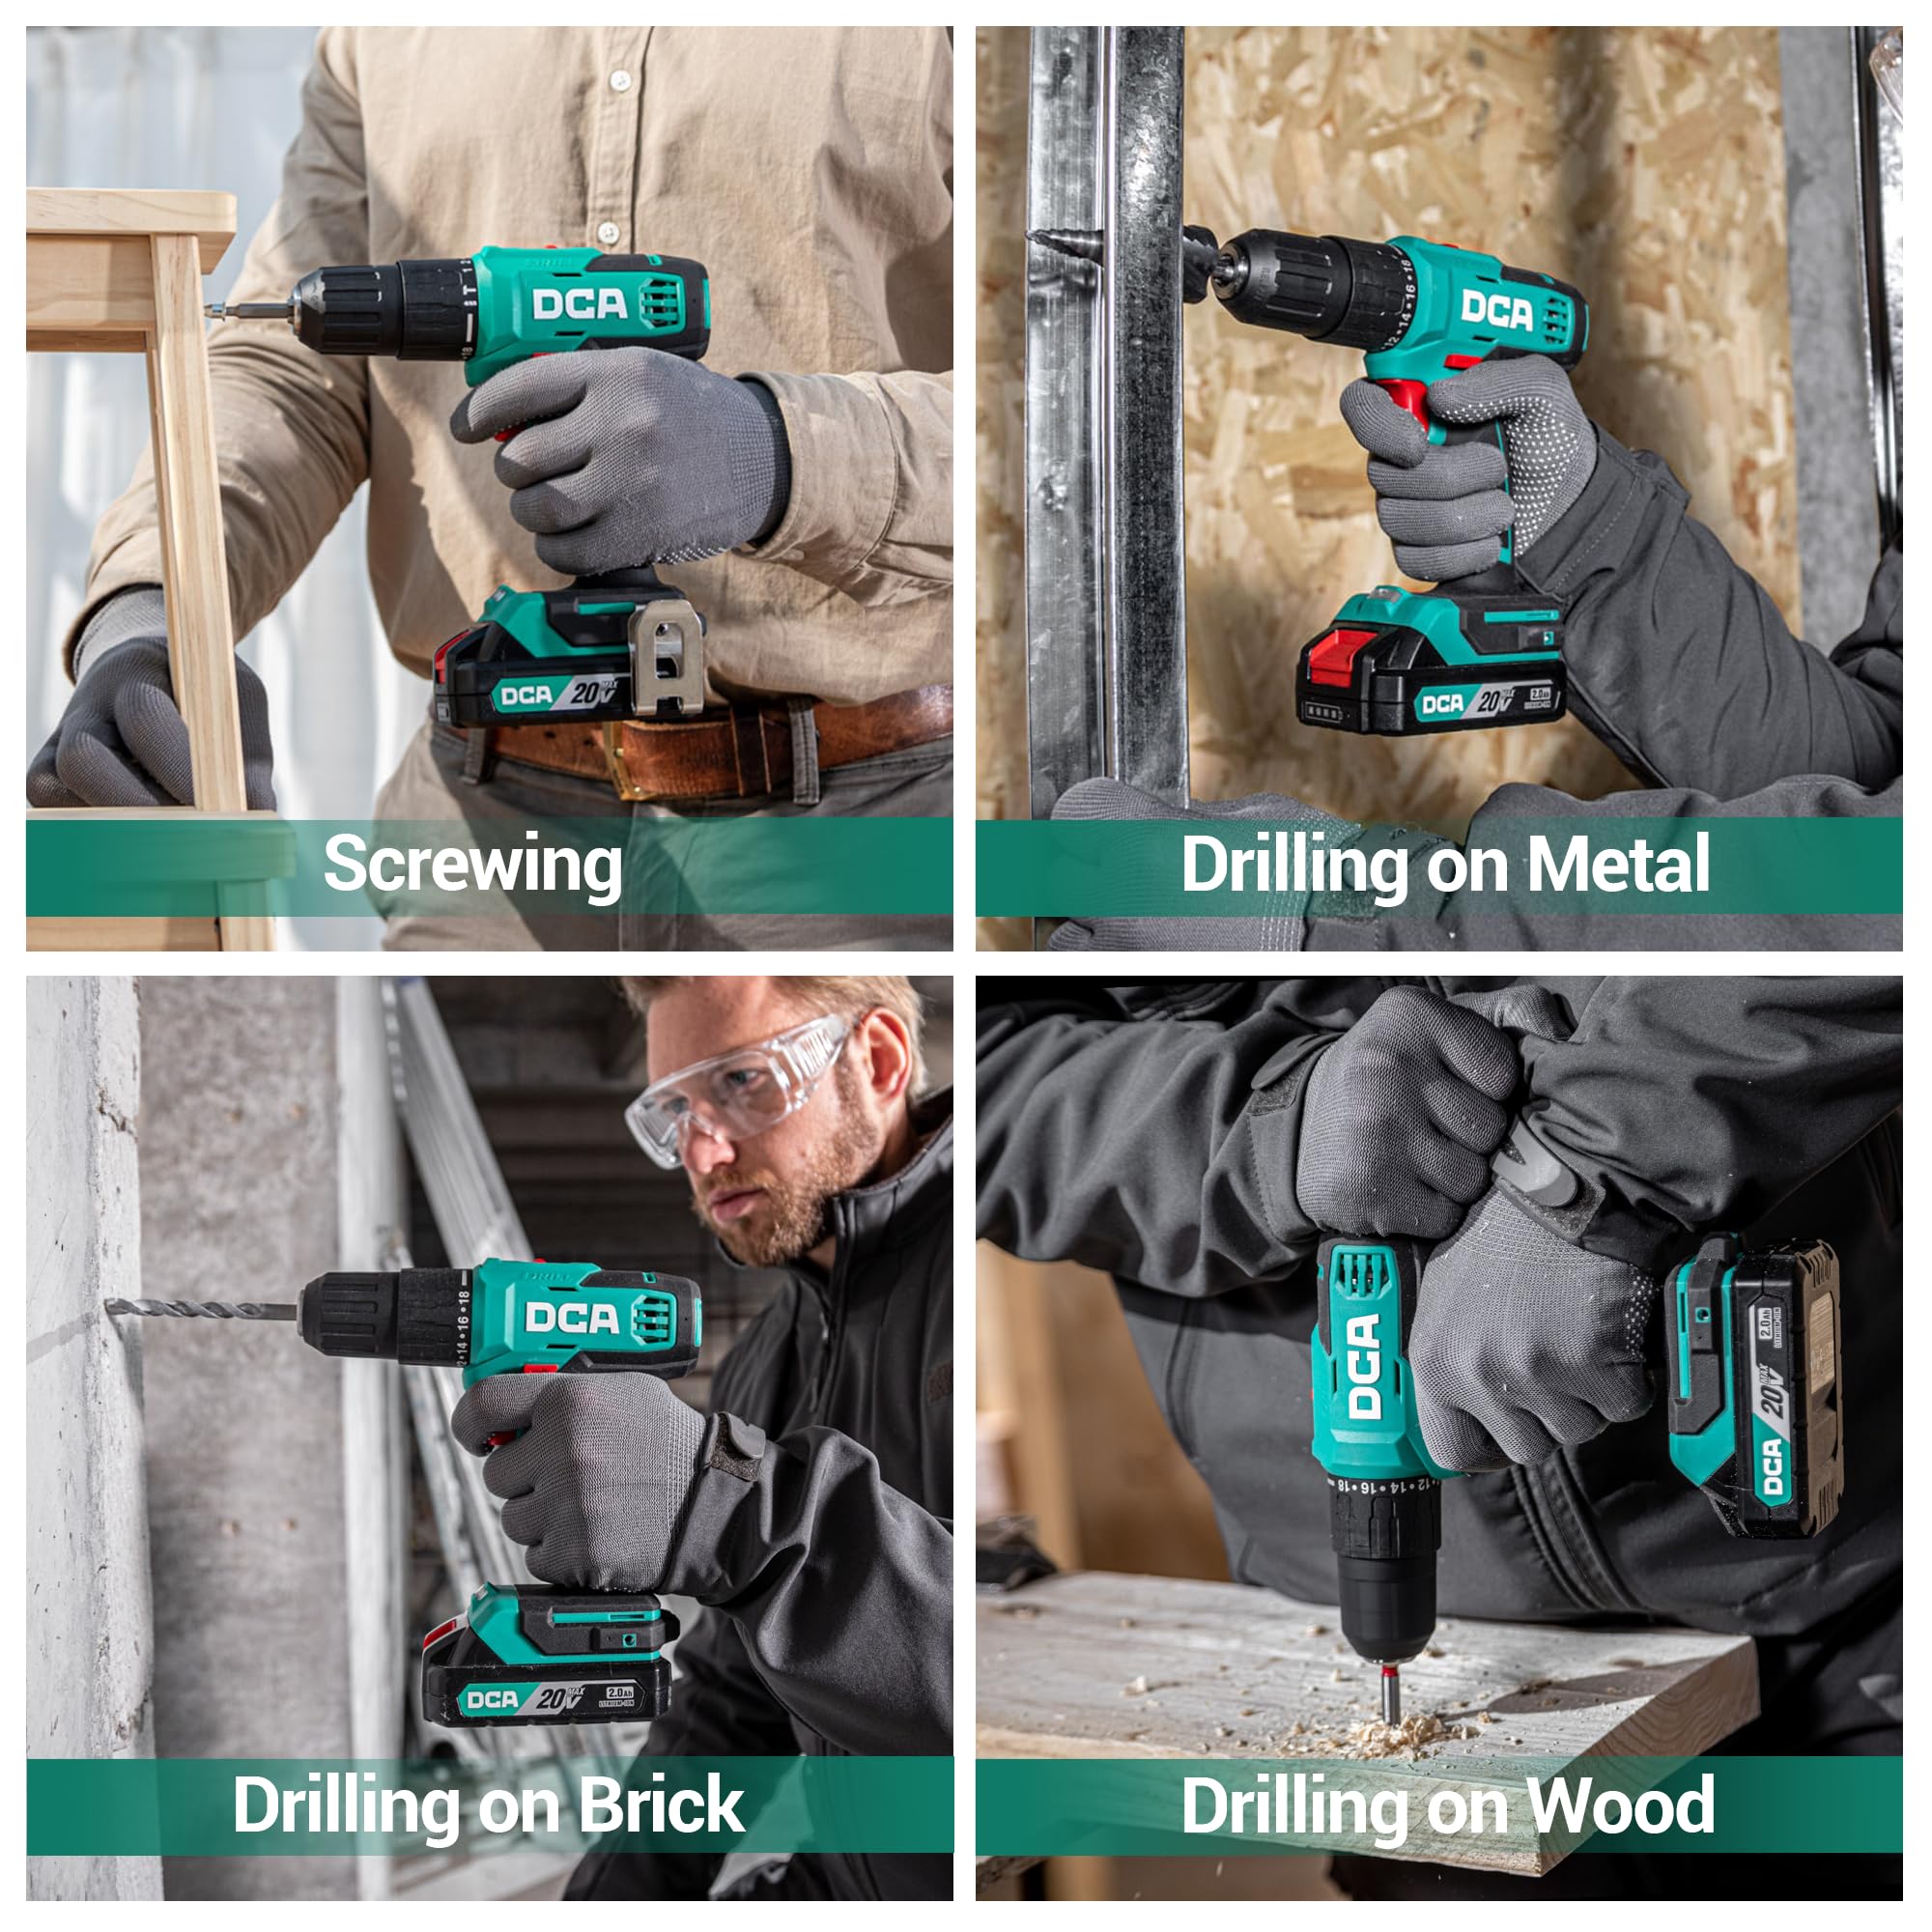
Figure 4.7: The DCA hammer drill performing various tasks: screwing, drilling into metal, brick, and wood.
5. Mantenimiento
5.1 Limpieza
- Desconecte siempre la batería antes de limpiarla.
- Utilice un paño suave y seco.amp Paño para limpiar el exterior de la herramienta. No utilice productos químicos agresivos ni limpiadores abrasivos.
- Clear any dust or debris from the ventilation openings using compressed air or a soft brush to ensure proper motor cooling.
- Limpie periódicamente las mordazas del mandril para garantizar un agarre adecuado de las brocas.
5.2 Cuidado y almacenamiento de la batería
- Guarde la batería en un lugar fresco y seco, alejado de la luz solar directa y de temperaturas extremas.
- Para almacenamiento a largo plazo, cargue la batería aproximadamente al 50 % de su capacidad.
- No guarde la batería con objetos metálicos que puedan provocar un cortocircuito en los terminales.
- Avoid fully discharging the battery before recharging, as this can reduce its lifespan.
5.3 Almacenamiento general
- Store the drill and all accessories in the provided carry bag to protect them from dust and damage.
- Mantenga la herramienta fuera del alcance de los niños.
6. Solución de problemas
| Problema | Posible causa | Solución |
|---|---|---|
| El taladro no arranca. | La batería no está cargada o está insertada incorrectamente. Interruptor de avance/retroceso en posición central (bloqueado). | Charge battery and ensure it is securely inserted. Mueva el interruptor a la posición de avance o retroceso. |
| Pérdida de potencia durante el funcionamiento. | La carga de la batería es baja. Protección contra sobrecarga activada. | Recargar la batería. Reduce pressure on the tool or use a lower speed setting. Allow tool to cool if overheated. |
| La broca se resbala en el mandril. | El mandril no está suficientemente apretado. El vástago de la broca está sucio o dañado. | Vuelva a apretar el mandril firmemente. Limpie o reemplace la broca. |
| Vibración o ruido excesivo. | Loose bit or accessory. Problema con el componente interno. | Ensure bit is properly secured. Si el problema persiste, comuníquese con el servicio de atención al cliente. |
7. Especificaciones
| Característica | Detalle |
|---|---|
| Número de modelo | ADJZ2035i13 |
| Marca | DCA |
| Fuente de poder | Funciona con pilas |
| Volumentage | 20 voltios |
| Tipo de batería | Iones de litio |
| Capacidad de la batería | 2.0 Ah (2000 miligramos)amp Horas) |
| Par máximo | 354 pulgadas libras |
| Velocidad sin carga (baja) | 0-400 RPM |
| Velocidad sin carga (alta) | 0-1500 RPM |
| Tasa de impacto (IPM) | 0-22,500 IPM |
| Tamaño de Chuck | 1/2 Inch Keyless |
| Configuración del embrague | 18+1+1 (Screwdriver, Drill, Hammer Drill) |
| Capacidad de perforación (madera) | 7/8 de pulgada (22 mm) |
| Capacidad de perforación (acero) | 1/2 de pulgada (13 mm) |
| Drilling Capacity (Brick Wall) | 5/16 de pulgada (8 mm) |
| Peso del artículo | 4.9 libras |
| Dimensiones del artículo (largo x ancho x alto) | 13.3" x 9.2" x 3.5" |
8. Garantía y soporte
This DCA 20V Cordless Hammer Drill Set is covered by a 2-year warranty. For warranty claims, technical assistance, or general inquiries, please contact DCA customer support through the retailer where the product was purchased or visit the official DCA websitio para información de contacto.
Conserve su comprobante de compra para validar la garantía.
Ask a question about this manual
Ask about setup, troubleshooting, compatibility, parts, safety, or missing instructions. Manuals+ will review the question and use this page’s manual context to help answer it.