1. Introducción
The HITBOX MIG200III is a versatile multi-process welding machine designed for both beginners and professionals. It supports Gas MIG, Flux MIG, Stick (MMA), Lift TIG, and Spot Welding. This welder is suitable for various materials including carbon steel, iron, galvanized steel, stainless steel, and aluminum, providing precision and efficiency for DIY projects, agricultural repairs, and professional tasks.
Key features include an easy-to-read LED display for essential welding data, compatibility with a spool gun for aluminum welding, and 2T/4T/Spot Welding modes for precise control.
2. Información de seguridad
ADVERTENCIA: Welding can be dangerous. Always follow safety precautions to prevent injury or damage.
- Use equipo de protección personal (EPP) adecuado, que incluya casco de soldador, guantes y ropa protectora.
- Asegúrese de que haya una ventilación adecuada en el área de trabajo para evitar la inhalación de humos.
- Mantenga materiales inflamables alejados del área de soldadura.
- No toque piezas eléctricas activas.
- Desconecte siempre la alimentación antes de realizar mantenimiento o cambiar accesorios.
- The HITBOX MIG200III is equipped with safety protections such as VRD (Voltage Dispositivo de reducción), sobrecorriente, sobrevol.tage, protección contra sobrecarga y sobrecalentamiento.

Figura 1: Internal components and safety features of the HITBOX MIG200III welder. This image illustrates the machine's robust design, incorporating protections against overcurrent, overvoltage, overheating, overload, and a Voltage Reduction Device (VRD) for enhanced user safety.
3. Contenido del paquete
Verifique que todos los artículos enumerados a continuación estén incluidos en su paquete:
- Cl de tierraamp 1.5 metros
- Electrode Holder 1.5 m
- MIG 15AK Torch 3.0 m
- Graphene Tube 3.5 m
- Gas Hose 2.0 m
- Flux Wire 0.8 mm 1 kg
- Puntas de contacto (0.8 mm * 2; 1.0 mm * 2)
- Rollers * 3 (V: 0.6 mm / 0.8 mm & 0.9 mm / 1.0 mm; U: 1.0 mm / 1.2 mm, Note: Max. 1.0 mm supported)
- Llave inglesa
- Martillo
- Manguera Clamps * 2
- Manual de usuario
4. Especificaciones
| Característica | Detalle |
|---|---|
| Fabricante | HITBOX |
| Número de modelo | MIG200III (H1032035) |
| Dimensiones del producto (L x An x Al) | 40 x 20 x 35 cm |
| Peso de la máquina | 8.52 kilogramos |
| Tipo de energía | AC |
| Procesos de soldadura | Flux MIG, Gas MIG, MMA (Stick), Lift TIG, Spot Welding |
| Gasless Welding Wire Sizes | 0.8 mm / 0.9 mm / 1.0 mm |
| Gas Welding Wire Sizes (Carbon Steel with CO2) | 0.6 mm / 0.8 mm / 0.9 mm / 1.0 mm |
| Gas Welding Wire Sizes (Aluminum with Argon) | 1.0 milímetros |
| TIG Electrode Sizes | De 1.6 mm a 3.2 mm |
| Espesor de soldadura (TIG) | De 1 mm a 4 mm |
| Welding Thickness (MIG) | De 1 mm a 4 mm |
| Welding Thickness (MMA) | De 2 mm a 10 mm |
| Wire Feed Speed Adjustment | 0 a 10 |
| Inductance Adjustment | -10 a +10 |
| Pre/Post Gas Flow Adjustment | 0 a 2 segundos |
5. Configuración
5.1 Conexión de alimentación
Connect the welder to a suitable 230V AC power supply. Ensure the power source meets the machine's requirements.
5.2 Wire Spool Installation and Feeding
Open the wire spool compartment. Place the welding wire spool onto the spindle, ensuring it rotates freely. Thread the wire through the guide tube and into the drive rollers. Adjust the tension of the drive rollers to prevent slipping or crushing the wire.
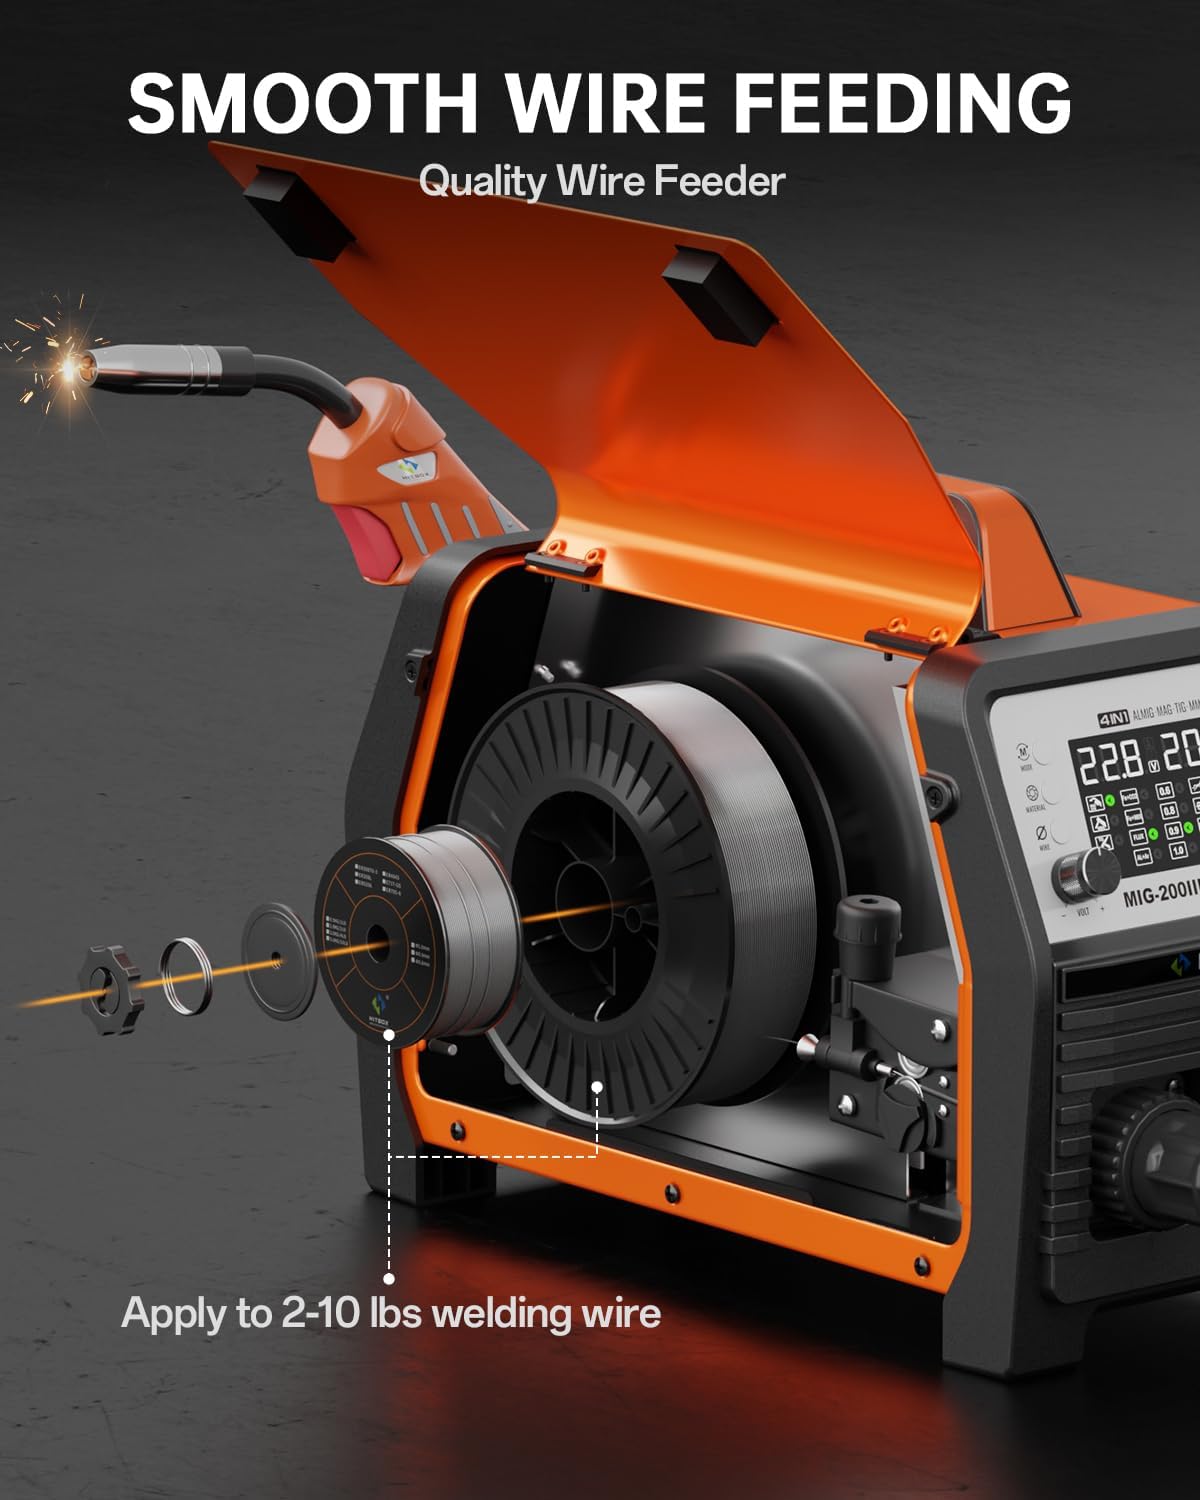
Figura 2: Wire spool installation and feeding mechanism. This illustration shows how to correctly install the welding wire spool and thread it through the machine's smooth wire feeding system, compatible with 2-10 lbs spools.
5.3 Conexión de Gas (para Gas MIG/TIG)
For Gas MIG or TIG welding, connect the gas hose (included) from your gas cylinder regulator to the gas inlet on the back of the welder. Ensure all connections are secure and leak-free.
5.4 Antorcha y limpieza a tierraamp Conexión
- MIG/TIG without Gas (Flux Core MIG): Conecte el cable de tierraamp al terminal positivo (+).
- MIG/MMA with Gas: Conecte el cable de tierraamp al terminal negativo (-).
- Connect the MIG torch or TIG torch (sold separately for TIG) to the appropriate connectors on the front panel.
6. Instrucciones de funcionamiento
The HITBOX MIG200III offers multiple welding modes and synergic control for ease of use.

Figura 3: Encimaview of welding processes. This image highlights the 7-in-1 multi-process capabilities of the welder, including Gas MIG, Flux MIG, Spool Gun compatibility, Lift TIG, Spot Welding, Single Pulse MIG, and MMA.
6.1 Synergic Control and Mode Selection
The synergic control feature simplifies parameter setting.
- Select SYN mode: Activate synergic mode on the control panel.
- Seleccionar material: Choose the material type (e.g., Fe+CO2 for carbon steel with CO2 gas, AL+Ar for aluminum with Argon gas).
- Seleccione el tamaño del cable: Specify the diameter of your welding wire.
The machine will automatically suggest recommended current and wire feed speed settings. You can fine-tune these settings as needed.

Figura 4: Synergic control panel. The LED display provides clear visual feedback for selecting welding modes, materials, and wire sizes, making setup straightforward for all skill levels.
6.2 Welding Modes and Adjustments
- 2T/4T/Spot Welding: Select between 2T (trigger held for weld), 4T (trigger press to start, press again to stop), or Spot Welding mode for precise control. Spot welding time is adjustable.
- Velocidad de alimentación de alambre: Adjust the wire feed speed from 0 to 10 for optimal welding control.
- Inductancia: Adjust inductance from -10 to +10 to control arc stability.
- Pre/Post Gas Flow: Customize pre-flow and post-flow gas times from 0 to 2 seconds for optimal weld protection.
6.3 Soldadura de aluminio
The MIG200III supports aluminum welding with argon gas using a 1.0 mm wire. For enhanced performance, a spool gun (sold separately) is recommended.

Figura 5: Aluminum welding methods. This image demonstrates the use of both the standard MIG gun and an optional spool gun for effective aluminum welding.
7. Mantenimiento
El mantenimiento regular garantiza la longevidad y el rendimiento óptimo de su máquina de soldar.
- Limpieza: Limpie periódicamente el exterior y las aberturas de ventilación de la máquina para evitar la acumulación de polvo y residuos. Utilice aire comprimido para limpiar los componentes internos si es necesario, asegurándose de que la máquina esté desenchufada.
- Antorcha y consumibles: Inspect the MIG torch, contact tips, nozzles, and electrode holder regularly. Replace worn or damaged consumables to maintain weld quality.
- Alimentador de alambre: Keep the wire feeder rollers clean and free of debris. Check for proper wire tension.
- Cables y Conexiones: Inspect all cables for damage and ensure connections are tight and secure.
- Almacenamiento: Guarde la soldadora en un entorno seco y limpio cuando no esté en uso.
8. Solución de problemas
Esta sección proporciona soluciones a problemas comunes que puede encontrar.
| Problema | Posible causa | Solución |
|---|---|---|
| Sin poder | Cable de alimentación desconectado, disyuntor disparado, máquina apagada | Verifique las conexiones eléctricas, reinicie el disyuntor, encienda el interruptor de la máquina. |
| Inicio de arco deficiente/arco inestable | Improper ground connection, incorrect settings, dirty workpiece, worn contact tip | Ensure good ground, adjust voltage/wire speed, clean workpiece, replace contact tip |
| Problemas de alimentación de alambre | Incorrect roller tension, clogged liner, wrong wire size, tangled wire spool | Adjust roller tension, clean/replace liner, verify wire size, untangle spool |
| Protección contra sobrecalentamiento activada | Ciclo de trabajo excedido, ventilación bloqueada | Deje que la máquina se enfríe y asegúrese de que haya vías de ventilación despejadas. |
Si encuentra problemas que no se tratan aquí, comuníquese con atención al cliente.
9. Garantía y soporte
Each HITBOX MIG welding machine undergoes rigorous testing before leaving the factory to ensure it meets high industrial standards.
For specific warranty details and terms, please refer to the warranty card included with your product or contact HITBOX customer support directly.
Atención al cliente: For technical assistance, troubleshooting, or parts inquiries, please visit the official HITBOX websitio o comuníquese con su departamento de servicio al cliente.