1. Introducción
This manual provides detailed instructions for the setup, operation, and maintenance of your JoFomp 17.3" Large Digital Wall Clock. Please read this manual thoroughly before use to ensure proper functionality and longevity of the product.
2. Información de seguridad
- Ensure the clock is connected to a stable power source (5V/2A adapter included).
- No exponga el dispositivo a temperaturas extremas, luz solar directa o humedad alta.
- Mantener fuera del alcance de los niños.
- No intente desmontar ni reparar el dispositivo usted mismo. Póngase en contacto con el servicio de atención al cliente para obtener ayuda.
- El control remoto requiere 2 pilas AAA (no incluidas).
- A 1 AAA battery (not included) is required for the memory function to retain settings during power outages.
3. Contenido del paquete
Verifique que todos los artículos estén presentes en el paquete:
- JoFomp 17.3" Digital Wall Clock
- Mando a distancia
- Adaptador de corriente DC 5V / 1A
- Cable de alimentación
- Mounting Hooks (2)
- Mounting Template Ruler
- Manual de usuario (este documento)

Figura 3.1: Accesorios incluidos y unidad principal.
4. Producto terminadoview
The JoFomp 17.3" Large Digital Wall Clock features a clear LED display and multiple functions for convenience.

Figure 4.1: Front display of the digital wall clock.
4.1 Funciones de visualización
- Visualización de la hora: Large 17.3" LED digits.
- Visualización de la fecha: Month and Day.
- Día de la semana: Indicated by illuminated text (Mon-Sun).
- Temperatura: Se muestra en grados Celsius o Fahrenheit.
- Humedad: Displays relative humidity percentage.
- Alarmas duales: Dos configuraciones de alarma independientes.
- Indicador DST: Daylight Saving Time status.

Figure 4.2: Labeled display functions.
4.2 Back Panel and Buttons
The back of the clock houses control buttons and connection ports.

Figure 4.3: Back panel with labeled components.
- Botones de configuración: Five buttons for manual adjustments (Light, SET, +, -, Alarm).
- Compartimento de la batería de memoria: For 1 AAA battery (not included) to retain settings.
- Puerto de alimentación: Para conectar el adaptador de corriente.
- Orificios de montaje: Para instalación en pared.
5. Configuración
5.1 Conexión de alimentación
- Connect the power cord to the clock's power port.
- Plug the 5V/2A power adapter into a standard electrical outlet. The clock will power on and display.
Nota: The clock requires continuous power to operate. It is not battery-powered for primary display.
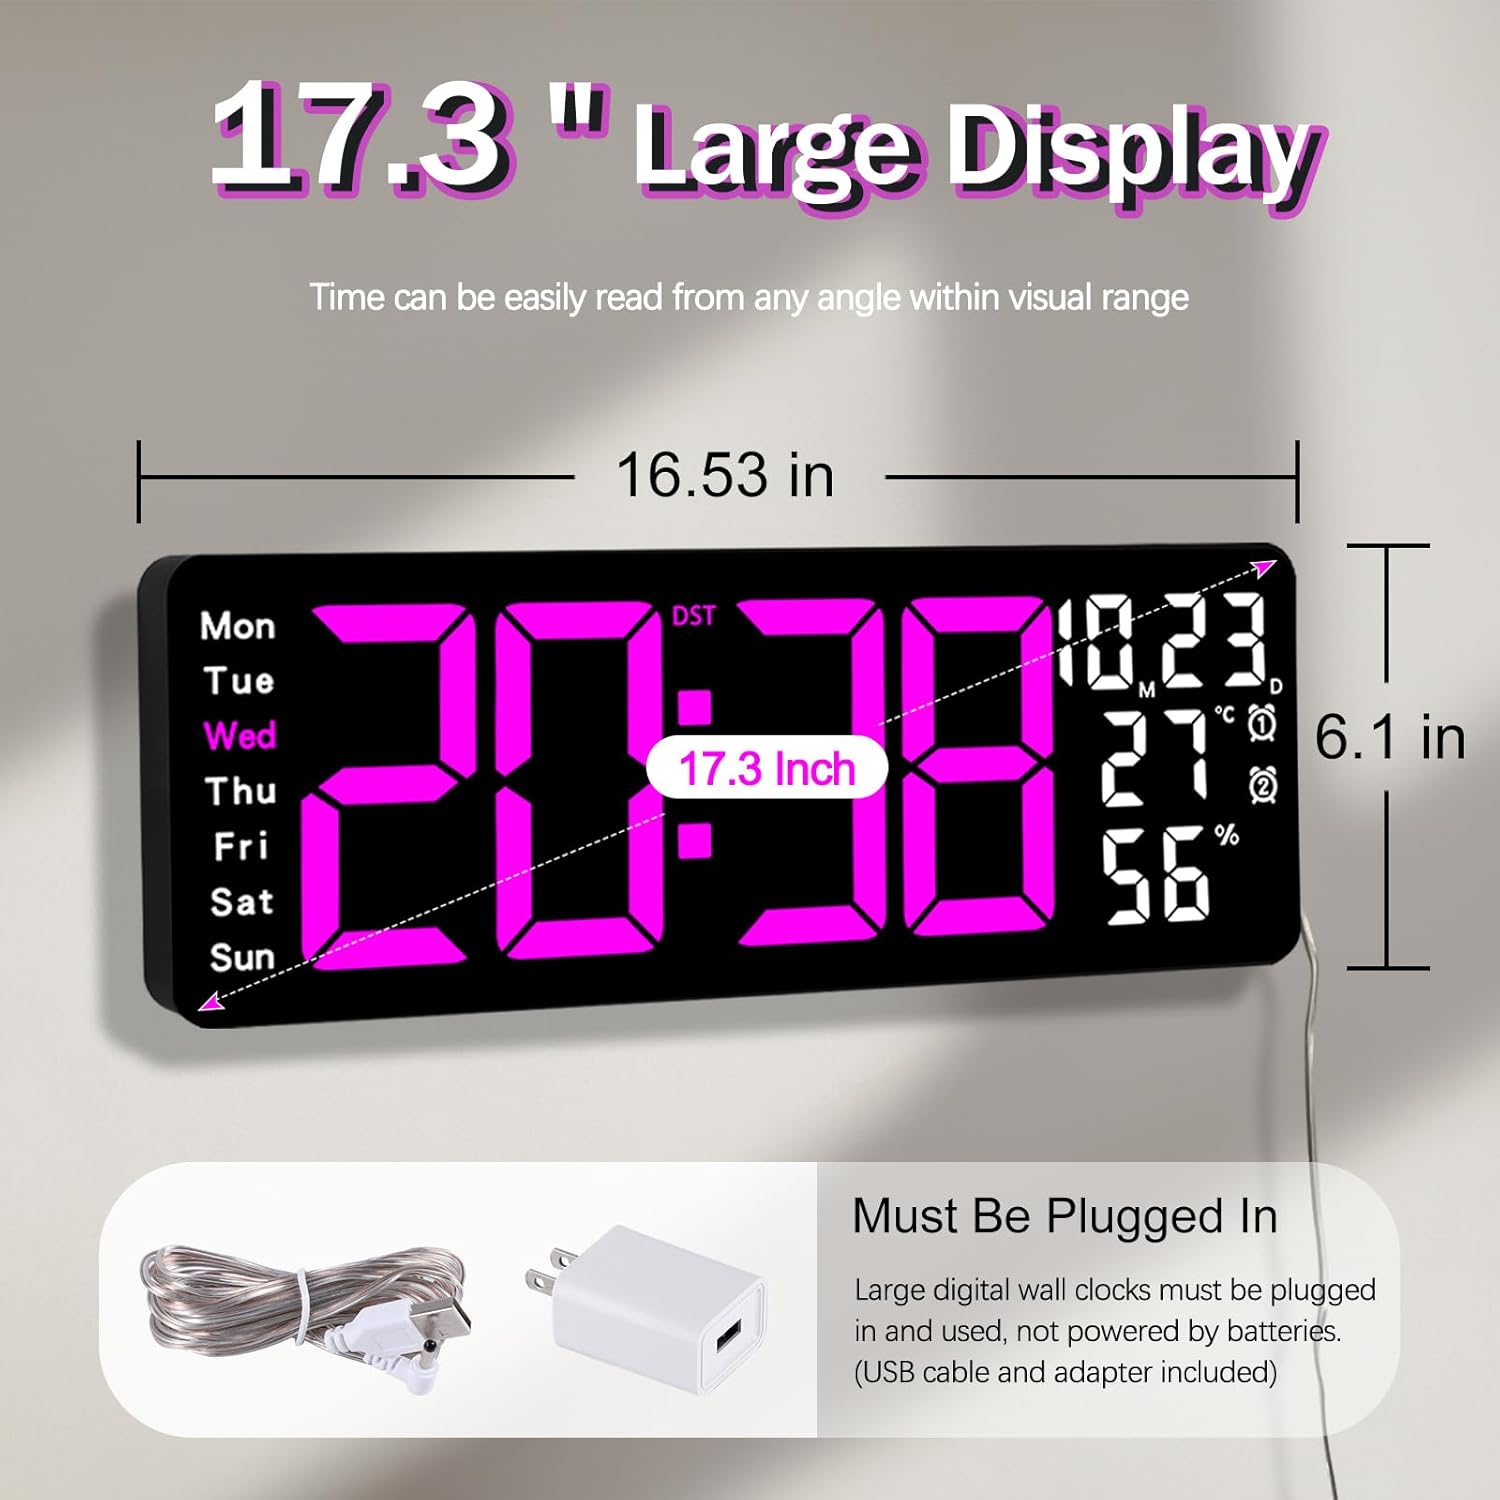
Figure 5.1: Power connection and dimensions.
5.2 Memory Battery Installation (Optional)
To retain time and settings during a power outage, install a 1 AAA battery (not included) into the memory battery compartment on the back of the clock.
- Locate the memory battery compartment on the back of the clock.
- Abra la tapa del compartimento.
- Inserte una batería AAA de 1.5 V, asegurándose de la polaridad correcta (+/-).
- Cierre la tapa del compartimento de forma segura.
5.3 Montaje en pared
Use the included mounting template ruler and hooks for easy wall installation.
- Determine the desired location for your clock.
- Place the mounting template ruler on the wall at the desired height.
- Mark the positions for the mounting hooks according to the ruler's indications.
- Install the mounting hooks into the wall at the marked positions.
- Carefully hang the clock onto the installed hooks, ensuring it is level and secure.
6. Instrucciones de funcionamiento
The clock can be operated using either the remote control or the buttons on the back.
6.1 Configuración de fecha y hora
Use the remote control or the "SET" button on the back of the clock.
- Presione el COLOCAR button (on remote or back of clock) to enter setting mode.
- Utilice el + y - Botones para ajustar el valor intermitente (por ejemplo, hora, minuto, año, mes, día).
- Prensa COLOCAR again to confirm the current setting and move to the next parameter.
- Repita hasta que todos los ajustes estén configurados.
6.2 12/24 Hour Format Conversion
Para cambiar entre los formatos de hora de 12 y 24 horas:
- Presione el botón dedicado 12/24 horas Botón en el control remoto.
- Alternatively, during time setting, the format option will appear.

Figure 6.1: 12/24H format conversion.
6.3 Conversión de unidades de temperatura (°C/°F)
Para cambiar entre unidades de temperatura Celsius y Fahrenheit:
- Presione el ° C / ° F Botón en el control remoto.
6.4 Configuración de alarma (alarmas duales)
El reloj admite dos alarmas independientes.
- Presione el ALARMA button on the remote control or the back of the clock.
- Usar + y - para configurar la hora de alarma deseada.
- Prensa ALARMA again to confirm and move to the next alarm or exit.
- To activate/deactivate an alarm, press the corresponding alarm button (e.g., AL1 or AL2) en el control remoto.
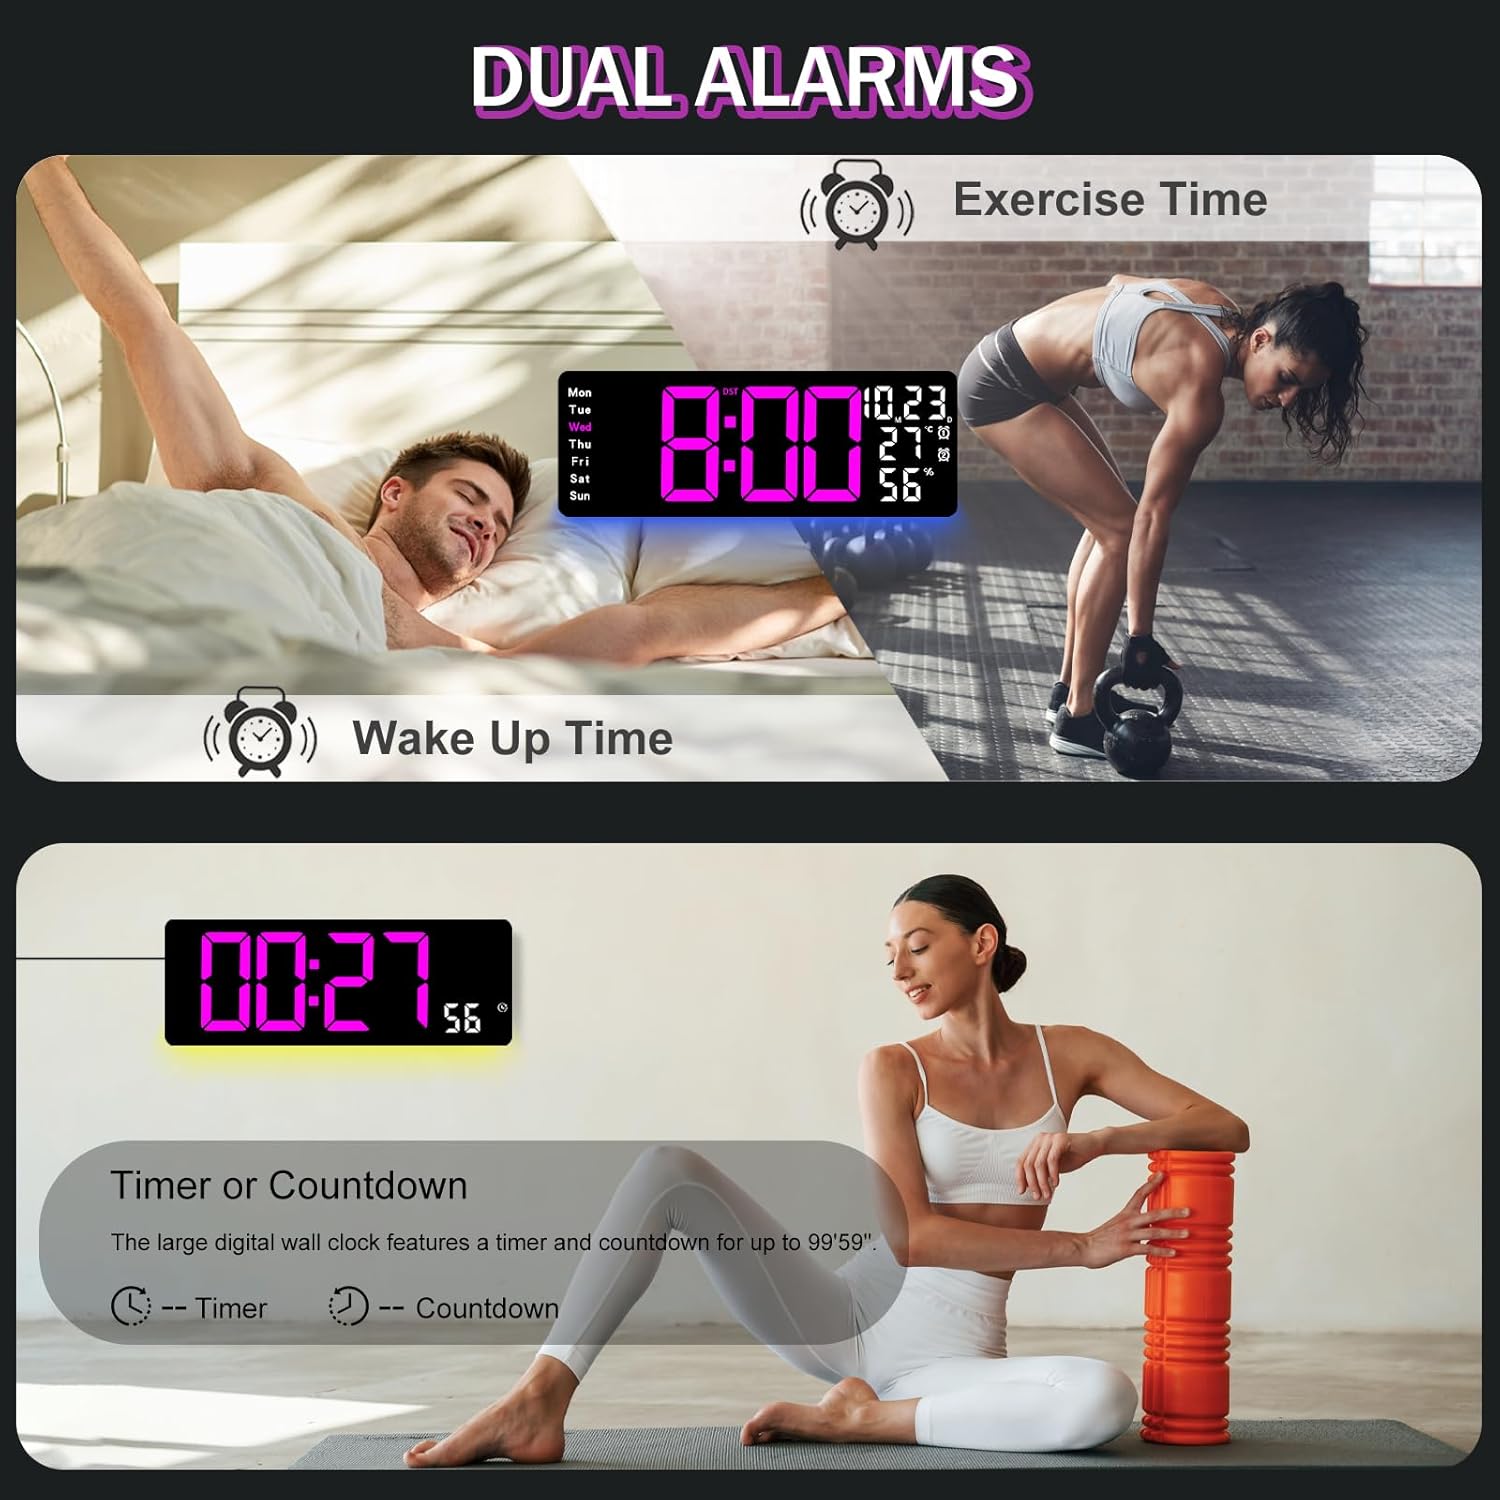
Figure 6.2: Dual alarm and timer functions.
6.5 Ajuste del brillo
The clock offers 10 levels of brightness, adjustable manually or automatically.
- Brillo automático: The built-in light sensor adjusts brightness based on ambient light. Activate this mode by pressing the AUTO Botón en el control remoto.
- Brillo manual: Presione el BRILLO button on the remote, then use + y - to select one of the 10 levels.

Figure 6.3: Custom and auto-brightness settings.

Figure 6.4: Brightness regulator illustration.
6.6 Ambient Light Features
The clock includes a night light feature at the bottom with multiple color options.
- Presione el LUZ button on the remote control or the back of the clock to cycle through 8 fixed colors and 1 multi-color mode.
- In multi-color mode, the colors automatically convert. Press OK to fix a favorite color.
- Adjust the brightness of the ambient light using the + y - buttons when the ambient light is active.

Figure 6.5: Multiple ambient night light options.

Figure 6.6: 9 color ambient light options.
6.7 Función de temporizador y cuenta regresiva
The clock features a timer (count-up) and countdown function up to 99 minutes and 59 seconds.
- Presione el MINUTERO Botón en el control remoto.
- Usar + y - to set the desired time for countdown.
- Prensa INICIAR/DETENER to begin or pause the timer/countdown.
- Prensa REINICIAR para borrar el temporizador.

Figure 6.7: Timing function (count-up/countdown).
Video 6.1: Demonstration of multi-functional features including night light change, brightness control, count-up, and countdown. This video also shows the time, date, day, alarm clock, temperature, and humidity displayed on the same screen, along with 12/24 hour conversion, Celsius/Fahrenheit conversion, and DST enablement. The back design and buttons are also briefly shown.
6.8 Horario de verano (DST)
If DST is observed in your region, you can enable or disable it.
- Mantenga pulsado el - button on the remote control to enable or disable DST. The DST indicator will appear/disappear on the display.

Figure 6.8: Enabling and disabling Daylight Saving Time.

Figure 6.9: Daylight Saving Time (DST) functionality.
6.9 Uso del control remoto
The remote control provides convenient access to all clock functions without needing to reach the clock directly.

Figure 6.10: Remote control and its functions.

Figure 6.11: Remote control in use.
- Ensure the remote control has 2 AAA batteries installed (not included).
- Point the remote control directly at the clock for optimal response.
- Each button on the remote corresponds to a specific function as described in this manual.
7. Mantenimiento
- Clean the clock's display and body with a soft, dry cloth. Avoid abrasive cleaners or solvents.
- Ensure the power adapter and cord are free from damage.
- Replace the memory battery annually to ensure settings are retained during power interruptions.
8. Solución de problemas
| Problema | Posible causa | Solución |
|---|---|---|
| La pantalla del reloj está apagada. | No hay suministro de energía. | Check if the power adapter is securely plugged into the clock and the outlet. Ensure the outlet is functional. |
| El control remoto no funciona. | Low or dead batteries in remote; obstruction; remote out of range. | Replace remote batteries (2 AAA). Ensure no obstructions between remote and clock. Point directly at the clock within effective range. |
| Configuración perdida después de un corte de energíatage. | No memory battery or dead memory battery. | Install a fresh 1.5V AAA battery in the memory compartment. |
| Lectura incorrecta de temperatura/humedad. | Sensor interference or placement. | Ensure the clock is not placed near heat sources, direct sunlight, or in areas with extreme drafts. Allow time for the sensor to stabilize. |
| Ambient light not changing colors. | Stuck in fixed color mode. | Press the LIGHT button on the remote to cycle through modes. If stuck on a fixed color, press the OK button to release it from fixed mode. |
9. Especificaciones
| Característica | Detalle |
|---|---|
| Marca | jofomp |
| Número de modelo | 6669 |
| Tipo de pantalla | LED digitales |
| Tamaño de la pantalla | 17.3 pulgadas |
| Dimensiones del producto | 16.5" de ancho x 6.7" de alto |
| Fuente de poder | Corded Electric (5V/2A adapter included) |
| Batería de memoria | 1 x AAA (no incluido) |
| Niveles de brillo | 10 (Auto/Manual) |
| Colores de luz ambiental | 8 Fixed + 1 Multi-color |
| Características especiales | Large Display, Adjustable Brightness, Temperature Display, Humidity Display, Dual Alarms, Timer, Countdown, DST, Remote Control |
| Tipo de montaje | Montaje en pared |
| Peso del artículo | 1.95 libras |
10. Garantía y soporte
JoFomp products are designed for reliability and performance. For warranty information or technical support, please refer to the contact details provided with your purchase or visit the official JoFomp webSitio. Conserve su recibo de compra como comprobante de compra.