1. Introducción
Gracias por la compraasing the MLWSHR Digital LED Alarm Clock Model 8808. This device combines a digital alarm clock with a thermo-hygrometer, offering dual alarms, snooze function, date and year display, 12/24 hour switch, weekday settings, Daylight Saving Time (DST) functionality, auto-dimmable display with three brightness levels, and a convenient 5V1A USB output for charging other devices. Please read this manual carefully to ensure proper use and maintenance of your new alarm clock.
2. Información de seguridad
- Mantenga el dispositivo alejado del agua y de entornos con alta humedad.
- No exponga el dispositivo a temperaturas extremas ni a la luz solar directa durante períodos prolongados.
- Use only the provided USB Type-C cable for power.
- No intente desmontar ni reparar el dispositivo usted mismo. Contacte con atención al cliente si surge algún problema.
- Ensure proper ventilation when using the USB output to charge other devices.
3. Contenido del paquete
- MLWSHR Digital LED Alarm Clock Model 8808
- Cable de alimentación USB tipo C
- Manual de usuario
4. Producto terminadoview
Familiarícese con los principales componentes y controles de su reloj despertador.
This image displays the front of the MLWSHR Digital LED Alarm Clock, highlighting the time display, weekday indicators, temperature in Celsius, humidity percentage, and dual alarm icons. It also points to the Daylight Saving Time (DST) indicator.

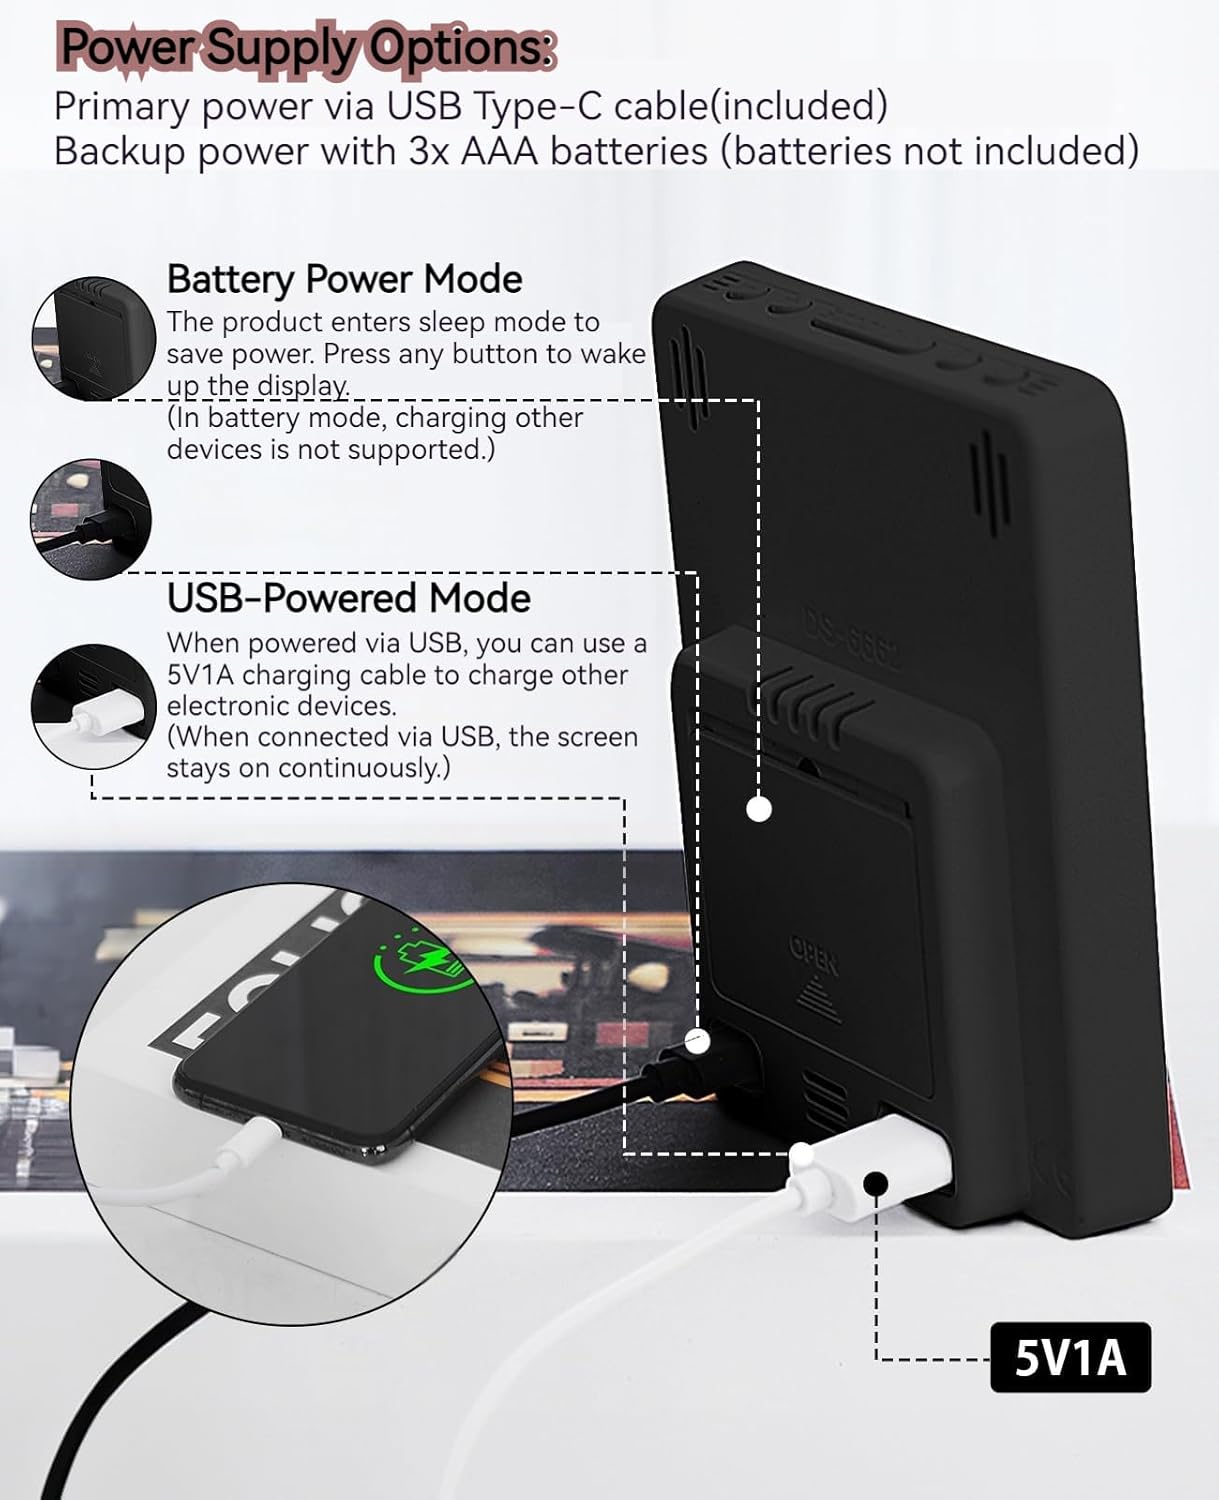
This image illustrates the side and back of the alarm clock, detailing the USB Type-C input for primary power, the battery compartment for 3x AAA backup batteries (not included), and the USB-A output (5V1A) for charging other devices. It also shows the control buttons located on the top edge.
Controles:
- Botón de ajuste: Ingresa al modo de configuración de hora, fecha y alarmas.
- Botón ARRIBA (+): Aumenta los valores durante la configuración, ajusta el brillo.
- Botón ABAJO (-): Disminuye los valores durante la configuración, ajusta el brillo.
- Botón SNOOZE/LIGHT: Activa la función de repetición y ajusta el brillo de la pantalla.
- Botón ALARMA 1: Activates/deactivates Alarm 1, enters Alarm 1 setting.
- Botón ALARMA 2: Activates/deactivates Alarm 2, enters Alarm 2 setting.
- Botón 12/24HR: Cambia entre formatos de hora de 12 y 24 horas.
- Botón °C/°F: Cambia entre la visualización de temperatura en Celsius y Fahrenheit.
5. Configuración
5.1 Fuente de alimentación
The MLWSHR Digital LED Alarm Clock can be powered in two ways:
- Primary Power (USB Type-C): Connect the provided USB Type-C cable to the clock's input port and plug the other end into a 5V1A USB power adapter (not included). When powered via USB, the display will remain continuously on.
- Backup Power (3x AAA Batteries): Insert 3 AAA batteries (not included) into the battery compartment on the back of the clock. In battery-only mode, the display will enter sleep mode to conserve power. Press any button to temporarily activate the display. Note that the USB output for charging other devices is not supported when operating on battery power alone.
5.2 Configuración inicial de hora y fecha
After connecting power, the clock will typically display a default time. To set the correct time and date:
- Mantenga pulsado el COLOCAR Mantenga pulsado el botón durante 3 segundos para acceder al modo de ajuste de la hora. Los dígitos de la hora parpadearán.
- Utilice el ARRIBA (+) or ABAJO (-) Botones para ajustar la hora.
- Prensa COLOCAR De nuevo para confirmar la hora y pasar al ajuste de los minutos. Los dígitos de los minutos parpadearán.
- Utilice el ARRIBA (+) or ABAJO (-) Botones para ajustar los minutos.
- Continuar presionando COLOCAR para recorrer y configurar el año, mes y día usando el ARRIBA (+) or ABAJO (-) Botones para ajuste.
- Después de configurar el día, presione COLOCAR una última vez para salir del modo de configuración.
6. Instrucciones de funcionamiento
6.1 Cambio de formato de 12/24 horas
Presione el 12 / 24HR Botón para alternar entre formatos de hora de 12 horas (con indicador AM/PM) y 24 horas.
This video demonstrates various features of the MLWSHR Digital LED Alarm Clock, including the time, temperature, humidity, weekday display, auto/manual brightness adjustment, 12/24 hour switch, and the easy-to-use buttons and USB-C input/USB-A output.
6.2 Configuración de alarmas (Alarma 1 y Alarma 2)
The clock features two independent alarms. Each alarm can be set for specific days of the week (Monday-Friday, Monday-Saturday, or Monday-Sunday).

This image illustrates the dual alarm functionality, showing how each alarm can be customized to ring on specific days of the week: Monday to Friday, Monday to Saturday, or every day. It highlights the alarm icons and weekday indicators on the display.
- Presione el ALARMA 1 or ALARMA 2 button to select the desired alarm. The alarm icon will appear on the display.
- Mantenga presionado el botón seleccionado ALARMA button for 3 seconds to enter alarm setting mode. The hour digits will flash.
- Utilice el ARRIBA (+) or ABAJO (-) Botones para ajustar la hora de la alarma.
- Presione el ALARMA Presione nuevamente el botón para confirmar la hora y pasar al ajuste de minutos.
- Utilice el ARRIBA (+) or ABAJO (-) Botones para ajustar los minutos de la alarma.
- Presione el ALARMA button again to set the alarm frequency (e.g., Mon-Fri, Mon-Sat, Mon-Sun). Use ARRIBA (+) or ABAJO (-) Para seleccionar.
- Presione el ALARMA Presione el botón una última vez para salir del modo de configuración de alarma.
- To turn an alarm ON or OFF, simply press the corresponding ALARMA 1 or ALARMA 2 button briefly. The alarm icon will appear (ON) or disappear (OFF) from the display.
6.3 Función de repetición
When an alarm sounds, you can activate the snooze function for a temporary delay.

This image shows the clock's snooze button and how it functions. When the alarm rings, a brief press of the snooze button will delay the alarm for 5 minutes. Holding the button for more than two seconds will turn off the alarm for that day.
- Cuando suene la alarma, presione el botón DORMITOR / LUZ button briefly. The alarm will pause and ring again after 5 minutes.
- To turn off the alarm for the current day, press and hold the DORMITOR / LUZ button for more than 2 seconds, or press any other button (except DORMITOR / LUZ).
6.4 Ajuste del brillo
The clock features an auto-dimmable display and three manual brightness levels.
- Regulable automáticamente: The built-in light sensor automatically adjusts the display brightness based on ambient light conditions. This is the default setting.
- Brillo manual: Presione brevemente el DORMITOR / LUZ button to cycle through 3 manual brightness levels (L-01, L-02, L-03).
- To return to auto-dimmable mode, continue pressing the DORMITOR / LUZ button until 'L-AU' appears on the display.
6.5 Thermometer & Hygrometer
The clock displays indoor temperature and humidity levels.

This image highlights the temperature and humidity readings on the clock's display. It also provides guidance on ideal humidity levels and suggests actions (humidifier/dehumidifier) if levels are too low or too high. The temperature detection range is 23°F to 122°F (-5°C to 50°C) with an error margin of ±2°F.
- Interruptor de la unidad de temperatura: Presione el ° C / ° F button to switch between Celsius and Fahrenheit temperature display.
- The temperature range is 23°F to 122°F (-5°C to 50°C) with an error margin of ±2°F.
- The humidity measurement error is within ±5%.
6.6 USB Power Output (5V1A)
The clock features a USB-A output port (5V1A) that can be used to charge other electronic devices.

This image demonstrates the use of the clock's USB-A output port to charge a smartphone. The clock provides a 5V1A output, making it a convenient charging station. This feature is only available when the clock is powered via its USB Type-C input.
- Connect your device's charging cable to the USB-A output port on the back of the alarm clock.
- Ensure the alarm clock is powered via its USB Type-C input for this feature to function. The USB output is not active when the clock is running on battery power alone.
6.7 Horario de verano (DST)
The clock supports Daylight Saving Time adjustment.
- Para activar o desactivar el horario de verano, mantenga presionada la tecla Horario de verano button (if available, or refer to the SET button sequence for DST in specific models). The DST indicator will appear or disappear.
7. Mantenimiento
- Limpie el reloj con un paño suave y seco. No utilice limpiadores abrasivos ni disolventes.
- Si el reloj no se utilizará durante un período prolongado, retire las pilas AAA para evitar fugas.
- Mantenga los puertos USB libres de polvo y residuos.
8. Solución de problemas
| Problema | Posible causa | Solución |
|---|---|---|
| Display is off or intermittent. | Running on battery power in sleep mode, or no power. | Press any button to activate display in battery mode. Connect USB Type-C cable for continuous display. Check USB power source. |
| La salida USB no carga los dispositivos. | Clock is running on battery power, or USB cable is faulty. | Ensure the clock is connected to primary USB Type-C power. Try a different USB cable. |
| La alarma no suena. | La alarma no está activada o está configurada incorrectamente. | Check if the alarm icon is displayed. Re-set the alarm time and frequency. |
| La lectura de la temperatura es inexacta. | Environmental factors or sensor error. | Allow time for the sensor to stabilize. Ensure the clock is not near heat sources or vents. Note the ±2°F error margin. |
| No se puede establecer la hora/fecha. | Not in setting mode, or buttons are unresponsive. | Press and hold the SET button for 3 seconds. Ensure the clock has stable power. |
9. Especificaciones
- Marca: MLWSHR
- Número de modelo: 8808
- Tipo de pantalla: CONDUJO
- Fuente de energía: USB Type-C (5V1A) / 3x AAA Batteries (backup)
- Dimensiones del producto: 3.54" de ancho x 4.72" de alto
- Características: Dual Alarms, Snooze, Thermo-Hygrometer, Date & Year Display, 12/24 Hour Switch, Weekdays, DST, Auto Dimmable (3 levels), USB Output (5V1A)
- Material: Eco-friendly Plastic
- Uso en interiores y exteriores: Interior
10. Garantía y soporte
The MLWSHR Digital LED Alarm Clock Model 8808 comes with a Garantía de 2 años Desde la fecha de compra. Esta garantía cubre defectos de fabricación y mal funcionamiento en condiciones normales de uso.
For technical support, warranty claims, or any questions regarding your product, please contact MLWSHR customer service through the retailer's platform or visit our official webSitio para obtener información de contacto. Tenga a mano el recibo de compra y el número de modelo al contactar con el servicio de asistencia.