1. Introducción
This manual provides essential information for the safe and effective operation, maintenance, and troubleshooting of your DCA 20V Cordless Impact Drill, model ADJZ2035i13. Please read this manual thoroughly before using the tool and keep it for future reference.
2. Instrucciones de seguridad
Siga siempre las precauciones básicas de seguridad para reducir el riesgo de incendio, descarga eléctrica y lesiones personales. El incumplimiento de estas instrucciones podría provocar lesiones graves.
- Seguridad en el área de trabajo: Mantenga su área de trabajo limpia y bien iluminada. Las áreas desordenadas u oscuras pueden provocar accidentes. No opere herramientas eléctricas en atmósferas explosivas, como en presencia de líquidos, gases o polvo inflamables.
- Seguridad eléctrica: Evite el contacto corporal con superficies conectadas a tierra. No exponga las herramientas eléctricas a la lluvia ni a la humedad. La entrada de agua en una herramienta eléctrica aumenta el riesgo de descarga eléctrica.
- Seguridad personal: Always wear eye protection. Use hearing protection when operating impact drills. Dress properly; do not wear loose clothing or jewelry. Keep hair, clothing, and gloves away from moving parts.
- Uso y cuidado de herramientas: No fuerce la herramienta eléctrica. Utilice la herramienta eléctrica correcta para su aplicación. Desconecte la batería de la herramienta eléctrica antes de realizar ajustes, cambiar accesorios o guardarla.
- Uso y cuidado de la batería: Recargue únicamente con el cargador especificado por el fabricante. No utilice las baterías con otras herramientas eléctricas.
3. Contenido del paquete
The DCA 20V Cordless Impact Drill ADJZ2035i13 set includes the following items:
- 1x DCA 20V Cordless Impact Drill
- 1x 2.0Ah Li-ion Battery
- 1x Charger (1.5A)
- 1x Bolsa de transporte
- 9x Drill Bits (for various materials)
- 10 puntas de destornillador
- 1x Bit Extension Rod
- 1x eje flexible
- 1x Integrated Bit Holder
- 1x Belt Hook

Image: Complete kit including the DCA 20V Cordless Impact Drill, battery, charger, and a selection of drill and screwdriver bits, all neatly organized in a durable carrying bag.
4. Características del producto
- Motor de alto rendimiento: Equipped with a pure copper motor, delivering 40 Nm of torque for powerful drilling and driving with reduced noise and extended durability.
- Hammer Function & Variable Speeds: Features a hammer function with 22,500 impacts per minute (IPM) for masonry. Two variable speed settings (0–400 RPM for driving, 0–1500 RPM for drilling) allow for precise control across different applications.
- 18+1+1 Clutch Settings: Provides 18 torque settings for screwdriving, 1 setting for drilling, and 1 setting for impact drilling, preventing overtightening and ensuring optimal performance.
- Mandril sin llave de 13 mm: Allows for quick and easy bit changes without the need for additional tools. Supports maximum drilling diameters of 8mm (brick), 13mm (steel), and 22mm (wood).
- Batería de larga duración de 2.0 Ah: The 20V 2.0Ah Li-ion battery provides extended runtime, capable of driving up to 800 screws (4mm x 25mm) per charge.
- Luz de trabajo LED integrada: Ilumina el área de trabajo para mejorar la visibilidad en condiciones de poca iluminación.
- Diseño compacto y ligero: Weighing only 1 kg (tool only), it offers comfortable handling and reduces user fatigue during prolonged use.

Image: The DCA 20V Cordless Impact Drill highlighting its compact design and powerful 40 Nm torque.
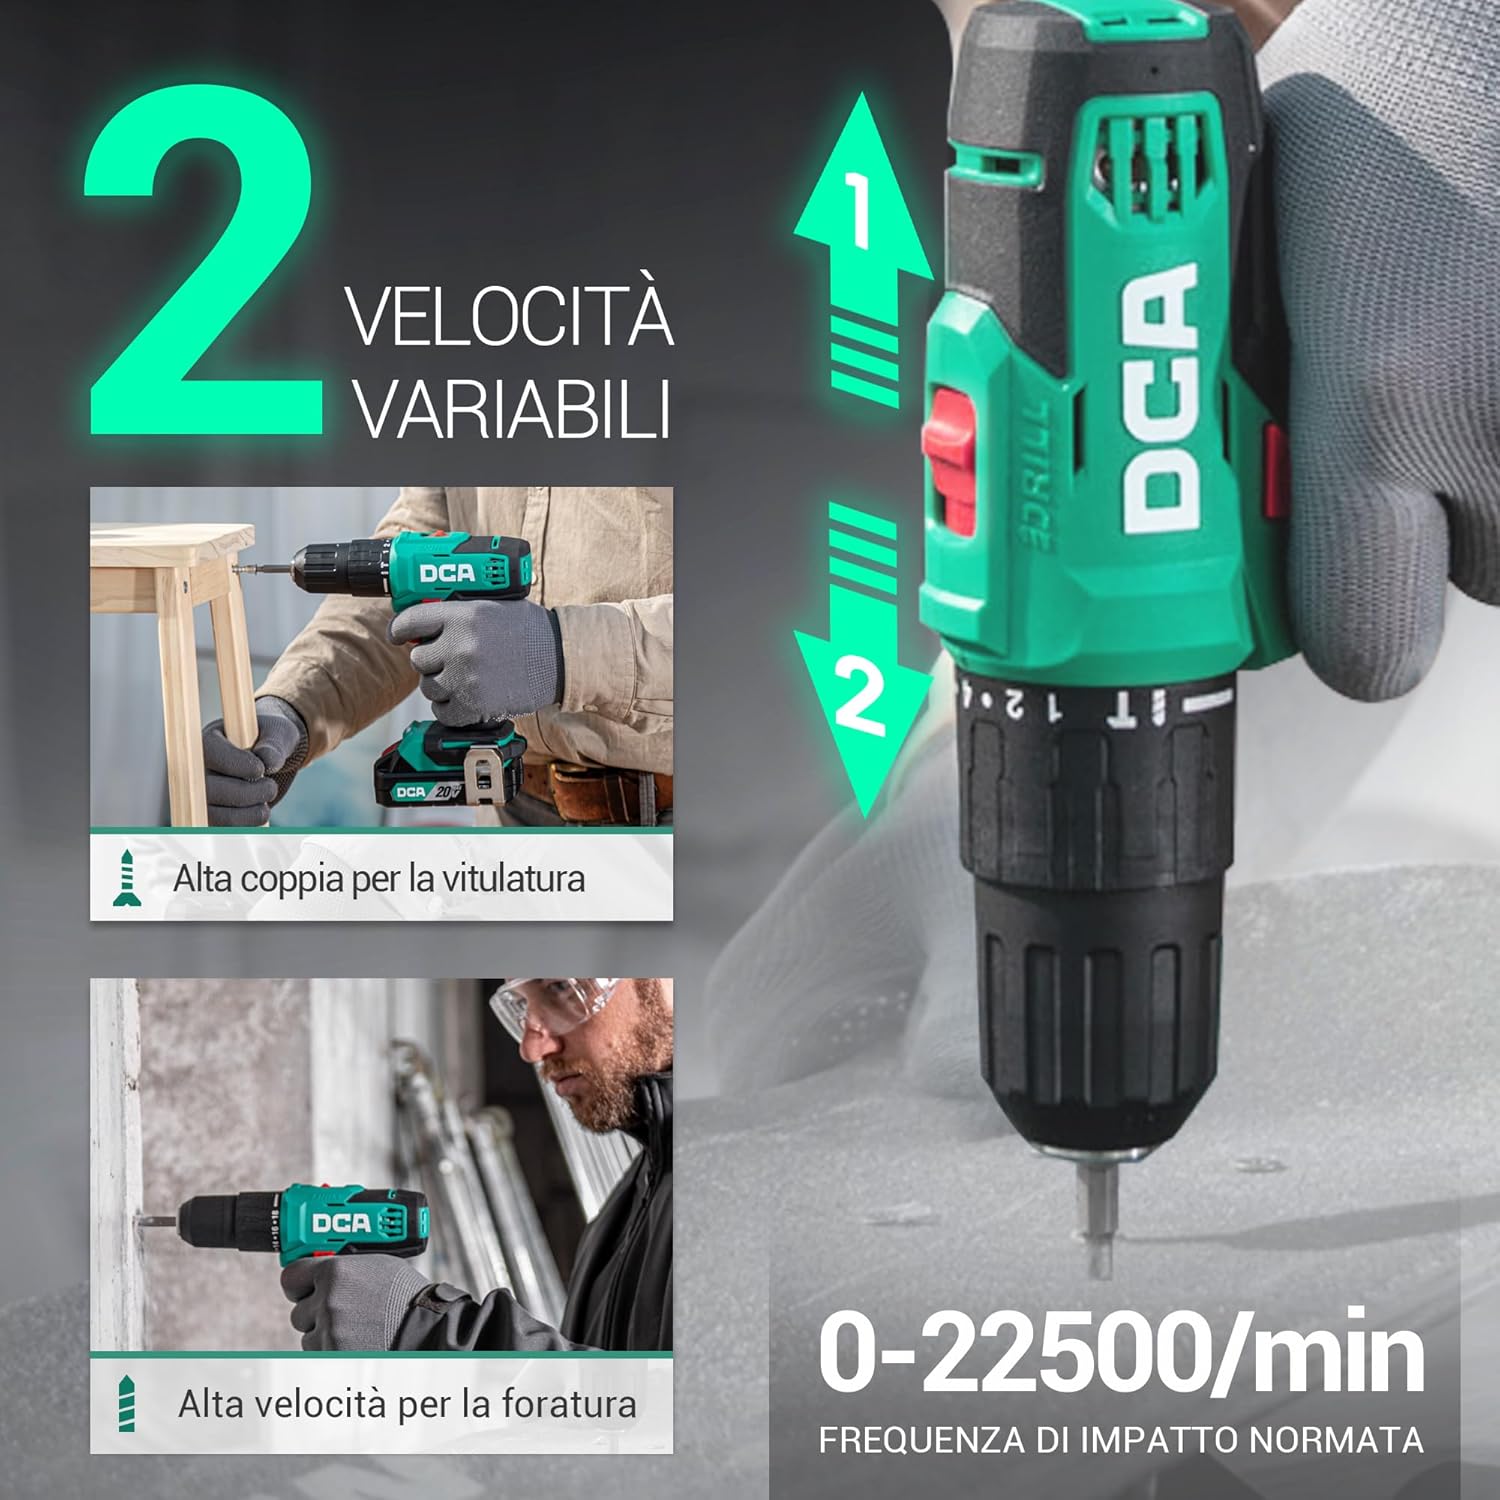
Image: Visual representation of the drill's two variable speed settings and its 22,500 IPM impact frequency for versatile use.

Imagen: Un interno view of the drill's motor, illustrating its 100% pure copper winding for enhanced performance and durability.
5. Configuración
5.1. Carga de la batería
- Conecte el cargador a una toma de corriente estándar.
- Insert the charging cable into the battery pack's charging port.
- La luz indicadora del cargador mostrará el estado de carga (por ejemplo, rojo para cargando, verde para completamente cargado).
- Una vez completamente cargada, desconecte el cargador de la batería y de la toma de corriente.

Image: The battery charger indicating charging status with green and red lights.
5.2. Conexión y desconexión del paquete de baterías
- To attach: Align the battery pack with the base of the drill handle and slide it in until it clicks securely into place.
- To detach: Press the battery release button (usually located on the front or sides of the battery pack) and slide the battery pack out.
5.3. Inserting/Removing Drill Bits
- To insert: Rotate the chuck counter-clockwise until the jaws are wide enough to accept the bit. Insert the bit fully into the chuck. Rotate the chuck clockwise to tighten it securely around the bit.
- To remove: Rotate the chuck counter-clockwise until the jaws open, then pull the bit out.

Imagen: Un detalle view of the 13mm keyless chuck, designed for secure and easy bit changes.
6. Instrucciones de funcionamiento
6.1. Selección de la velocidad
Use the speed selector switch located on top of the drill to choose between two speed ranges:
- Velocidad 1 (baja, 0-400 RPM): Ideal for screwdriving and applications requiring high torque.
- Velocidad 2 (Alta, 0-1500 RPM): Adecuado para perforación y aplicaciones que requieren mayor velocidad.
6.2. Ajuste del par y el modo
Rotate the torque adjustment collar behind the chuck to select the desired setting:
- 1-18: Torque settings for screwdriving. Start with a lower setting and increase as needed to prevent overtightening.
- Símbolo de taladro: For general drilling applications without impact.
- Hammer Symbol: For impact drilling into masonry.

Image: The drill's collar displaying the 18+1+1 clutch settings for precise control in various tasks.
6.3. Perforación y atornillado
- Select the appropriate bit for the material and task.
- Choose the correct speed and torque/mode setting.
- Hold the drill firmly with both hands if necessary.
- Position the bit on the workpiece and press the variable speed trigger. Apply steady, even pressure.
- La luz LED integrada iluminará el área de trabajo cuando se presione el gatillo.

Image: The drill in action, demonstrating its versatility across different materials and applications.

Image: The flexible shaft accessory attached to the drill, enabling access to confined work areas.
6.4. Rotación hacia adelante/atrás
The forward/reverse switch, located above the trigger, controls the direction of rotation. Push it left for forward rotation (drilling/driving) and right for reverse rotation (removing screws/bits).

Image: Illustration of the forward and reverse rotation function for efficient screwdriving and removal.
6.5. Vídeo oficial del producto
Vídeo: Una demostración oficial del producto muestraasing the DCA 20V Cordless Impact Drill's features and capabilities, including drilling and screwdriving tasks.
7. Mantenimiento
El mantenimiento regular garantiza un rendimiento óptimo y prolonga la vida útil de su herramienta.
- Limpieza: Mantenga limpias las ranuras de ventilación de la herramienta para evitar el sobrecalentamiento. Utilice un paño suave y seco.amp Paño para limpiar la carcasa. No utilice productos químicos agresivos ni limpiadores abrasivos.
- Cuidado de la batería: Guarde las baterías en un lugar fresco y seco, alejado de la luz solar directa. No guarde las baterías completamente descargadas durante periodos prolongados. Cárguelas periódicamente si no las usa.
- Mantenimiento del mandril: Limpie periódicamente las mordazas del mandril para garantizar un agarre adecuado de las brocas.
- Almacenamiento: Store the drill and accessories in the provided carrying bag in a dry, secure location out of reach of children.
8. Solución de problemas
If you encounter issues with your DCA 20V Cordless Impact Drill, refer to the following common problems and solutions:
| Problema | Posible causa | Solución |
|---|---|---|
| El taladro no arranca | La batería no está cargada o no está insertada correctamente. | Cargue la batería por completo y asegúrese de que esté colocada firmemente en su lugar. |
| Pérdida de potencia durante el funcionamiento | La carga de la batería es baja. | Recargar la batería. |
| La broca se resbala en el mandril | El mandril no está lo suficientemente apretado o el vástago de la broca está sucio o dañado. | Apriete el mandril firmemente. Limpie o reemplace la broca si es necesario. |
| Calentamiento excesivo | Ranuras de ventilación bloqueadas o uso intensivo prolongado. | Clean ventilation slots. Allow the tool to cool down. Reduce load. |
9. Especificaciones
| Característica | Especificación |
|---|---|
| Marca | DCA |
| Número de modelo | ADJZ2035i13(ADW-DE01) |
| Fuente de poder | Funciona con pilas |
| Volumentage | 20 voltios |
| Capacidad de la batería | 2 Ampere/horas |
| Par máximo | 40 Newton Metros |
| Velocidad máxima de rotación | 1500 revoluciones por minuto |
| Frecuencia de impacto | 22500 impactos/min |
| Tamaño de Chuck | 13 milímetros |
| Número de velocidades | 2 |
| Configuración del embrague | 18+1+1 |
| Capacidad de perforación (madera) | 22 milímetros |
| Capacidad de perforación (metal) | 13 milímetros |
| Drilling Capacity (Brick) | 8 milímetros |
| Características especiales | Compact, Cordless, Speed Lock Button |
| Color | Verde |
| Dimensiones del artículo (LxWxH) | 33L x 27L x 10H cm |
10. Garantía y soporte
Your DCA 20V Cordless Impact Drill ADJZ2035i13 comes with a 2 año de garantía Contra defectos de fabricación. Conserve su comprobante de compra para reclamaciones de garantía.
For technical support, spare parts, or warranty inquiries, please contact the seller or visit the official DCA website. Contact information can typically be found on the product packaging or the seller's Amazon store page.
You can visit the DCA Store for more products and support: DCA Store