1. Instrucciones de seguridad importantes
Lea atentamente todas las instrucciones antes de utilizar este aparato. Si no las sigue, podría sufrir una descarga eléctrica, un incendio o lesiones personales graves.
- No toque superficies calientes. Utilice asas o perillas.
- Para protegerse contra descargas eléctricas, no sumerja el cable, los enchufes ni el aparato en agua ni en ningún otro líquido.
- Es necesaria una estrecha supervisión cuando cualquier aparato sea utilizado por niños o cerca de ellos.
- Desenchufe el aparato del tomacorriente cuando no lo utilice y antes de limpiarlo. Deje que se enfríe antes de colocar o quitar piezas.
- No opere ningún aparato con un cable o enchufe dañado o después de que el aparato funcione mal o haya sufrido algún daño.
- El uso de accesorios no recomendados por el fabricante del aparato puede provocar lesiones.
- No utilizar en exteriores.
- No deje que el cable cuelgue del borde de la mesa o mostrador, ni que toque superficies calientes.
- No lo coloque sobre o cerca de un quemador de gas o eléctrico caliente, ni dentro de un horno caliente.
- Se debe tener mucho cuidado al mover un aparato que contenga aceite caliente u otros líquidos calientes.
- Siempre conecte primero el enchufe al aparato y luego el cable a la toma de corriente. Para desconectarlo, apague cualquier control y desenchúfelo de la toma de corriente.
- No utilice el aparato para ningún fin distinto del previsto.
- Los alimentos de gran tamaño o los utensilios de metal no deben insertarse en un horno tostador, ya que pueden crear un incendio o riesgo de descarga eléctrica.
- Puede ocurrir un incendio si el horno se cubre o toca material inflamable, incluidas cortinas, tapices, paredes y similares, cuando está en funcionamiento.
- No coloque ningún material que no sean los accesorios recomendados por el fabricante en este horno cuando no esté en uso.
- No coloque ninguno de los siguientes materiales en el horno: papel, cartón, plástico o materiales similares.
- No cubra la bandeja recogemigas ni ninguna parte del horno con papel de aluminio, ya que esto provocaría un sobrecalentamiento del horno.
2. Producto terminadoview
This 22L tabletop electric mini oven is designed for household baking and toasting. It features adjustable temperature control, a 120-minute timer, and a three-layer baking position for versatile cooking.

Figura 1: Frente view of the 22L Tabletop Electric Mini Oven with food cooking inside.

Figure 2: Dimensions of the oven: 421mm (width), 252mm (depth), 273mm (height).
3. Configuración
3.1 Desembalaje
- Retire con cuidado el horno y todos los materiales de embalaje de la caja.
- Remove any protective films or stickers from the oven surfaces.
- Compruebe si el dispositivo ha sufrido algún daño durante el transporte. Si presenta algún daño, no lo utilice y póngase en contacto con atención al cliente.
3.2 Colocación
- Coloque el horno sobre una superficie estable, plana y resistente al calor.
- Ensure there is adequate ventilation around the oven (at least 10 cm clearance on all sides).
- No coloque el horno cerca de materiales inflamables como cortinas o paredes.
- Asegúrese de que el cable de alimentación no esté obstruido ni pellizcado.
3.3 Antes del primer uso
- Wash the baking tray, wire rack, and crumb tray in warm, soapy water. Rinse and dry thoroughly.
- Limpie el interior y exterior del horno con un anuncio.amp paño.
- To eliminate any manufacturing odors, operate the oven empty for approximately 15 minutes at 200°C (400°F). Ensure the area is well-ventilated during this process.
4. Instrucciones de funcionamiento
4.1 controles sobreview
The oven features three mechanical control knobs:
- Perilla superior: Temperature Control (0-250°C)
- Perilla del medio: Function Selector (Controls upper/lower heating elements)
- Perilla inferior: Temporizador (0-120 minutos)

Figure 3: Temperature control knob, adjustable from 70°C to 250°C.

Figure 4: Timer knob, adjustable from 0 to 120 minutes.
4.2 Precalentamiento del horno
- Place the wire rack or baking tray in the desired position.
- Gire la perilla de control de temperatura hasta alcanzar la temperatura deseada.
- Turn the Timer knob to the desired preheating time (e.g., 10-15 minutes). The power indicator light will illuminate.
- Once the preheating time has elapsed, the oven is ready for use.
4.3 Baking and Roasting
This oven offers three-layer baking positions and independent temperature control for upper and lower heating tubes.

Figure 5: The 22L capacity oven features three distinct baking positions for versatile cooking.
- Preheat the oven as described above.
- Carefully place your food on the baking tray or wire rack into the desired baking position. Use oven mitts.
- Select the appropriate temperature using the Temperature Control knob (0-250°C).
- Use the Function Selector knob to choose between upper heating, lower heating, or simultaneous upper and lower heating, depending on your recipe's requirements. This allows for precise control over browning and cooking.
- Set the cooking time using the Timer knob (0-120 minutes). The oven will automatically shut off and ring a bell when the timer expires.
- Monitor food through the wide view ventana.

Figura 6: El ancho viewing window allows for easy monitoring of food changes during cooking.
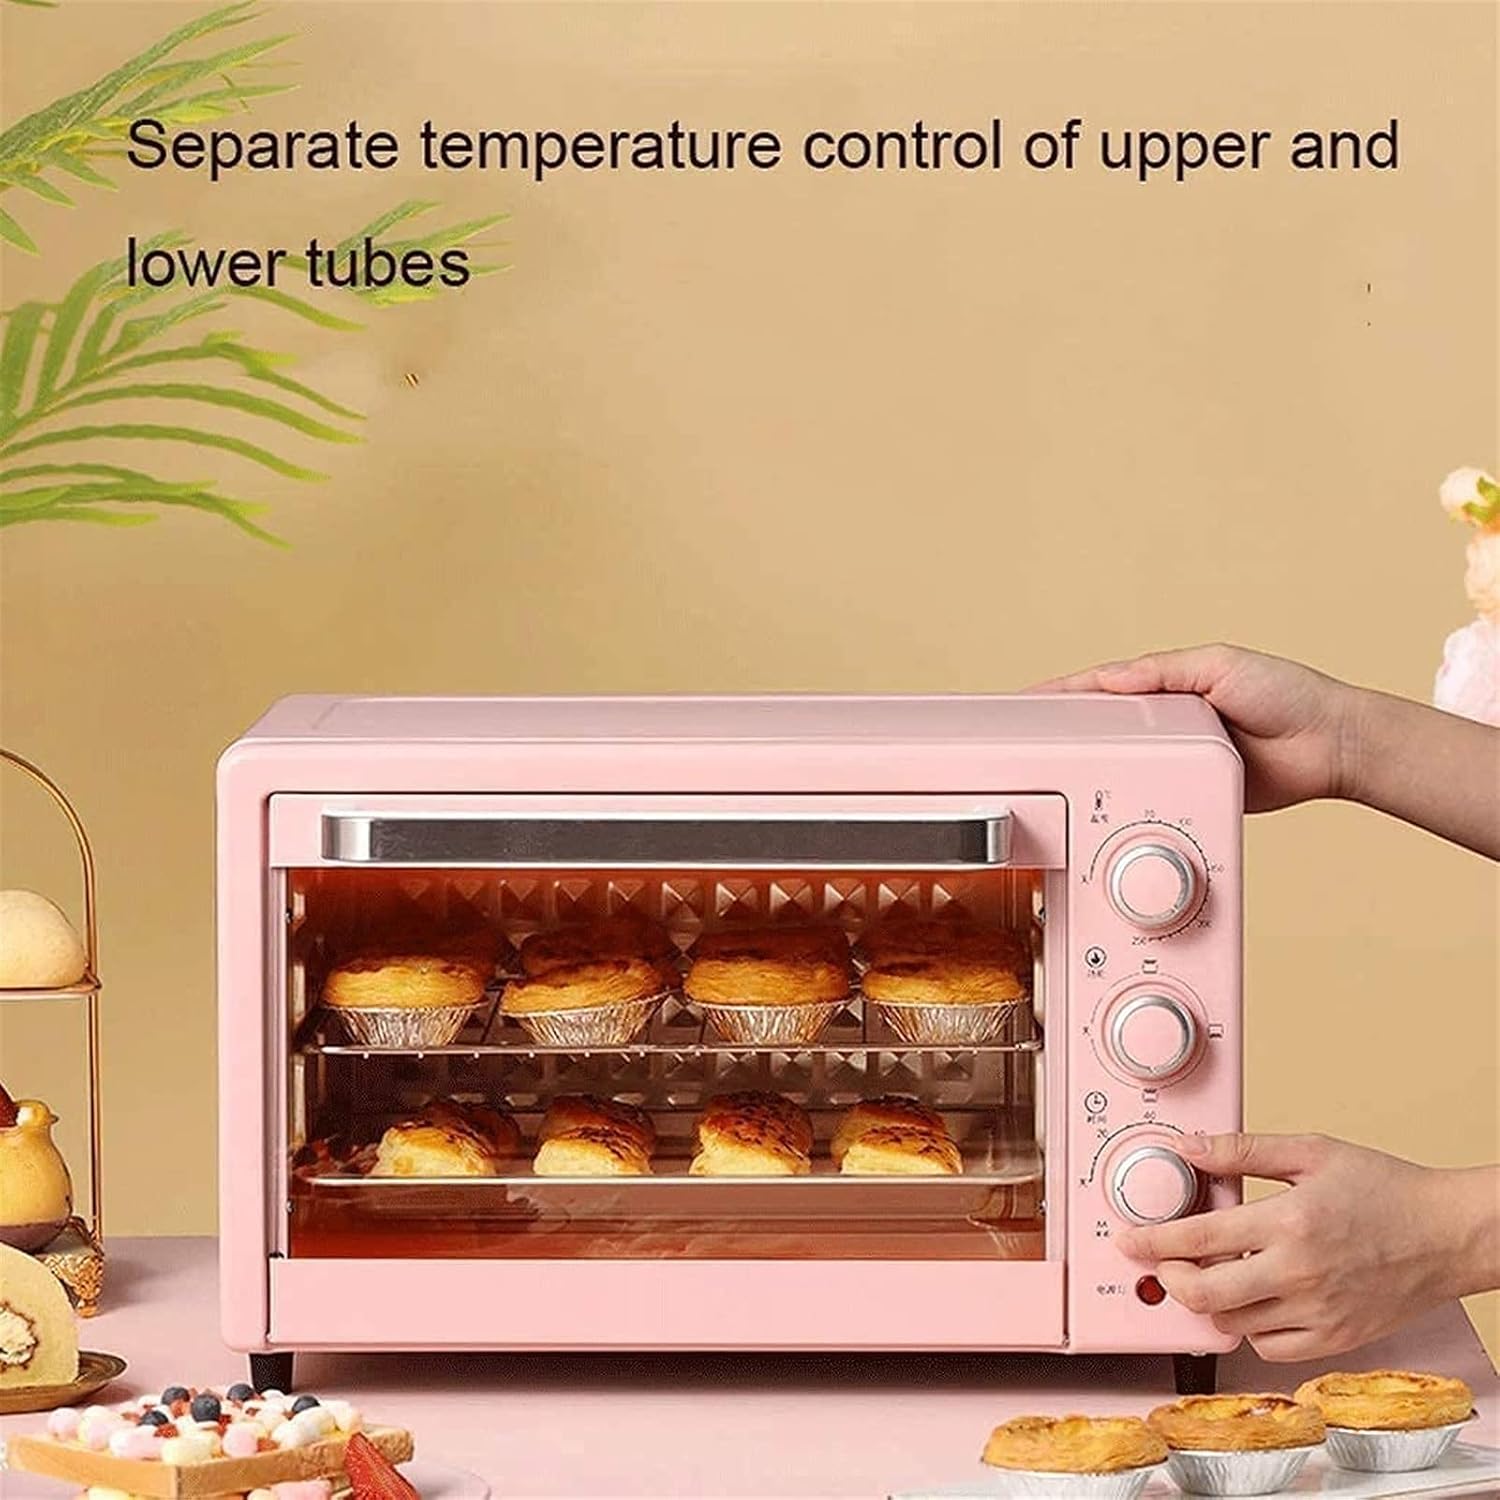
Figure 7: The oven features separate temperature control for upper and lower heating tubes, enabling precise cooking.
5. Mantenimiento y limpieza
5.1 Limpieza general
- Desenchufe siempre el horno de la toma de corriente y deje que se enfríe completamente antes de limpiarlo.
- No sumerja el cuerpo del horno, el cable ni el enchufe en agua ni en ningún otro líquido.
- Limpie el exterior con publicidad.amp paño y detergente suave. No utilice limpiadores abrasivos ni estropajos.
5.2 Cleaning Interior and Accessories
- Remove the baking tray, wire rack, and crumb tray. Wash them in warm, soapy water. For stubborn stains, soak them before cleaning.
- Las paredes interiores se pueden limpiar con publicidad.amp cloth and mild detergent. Avoid touching the heating elements.
- Asegúrese de que todas las piezas estén completamente secas antes de volver a ensamblar y guardar el horno.

Figure 8: The oven door features a three-layer safety explosion-proof glass for enhanced durability and safety, including a transparent layer, tempered glass layer, and oil-proof cleaning layer.
6. Solución de problemas
Si encuentra algún problema con su horno, consulte los siguientes problemas y soluciones comunes:
- El horno no enciende:
- Asegúrese de que el cable de alimentación esté enchufado de forma segura a una toma eléctrica que funcione.
- Check if the timer knob is set to a cooking duration. The oven will not operate if the timer is at "OFF" or "0".
- Verifique que el disyuntor no se haya disparado.
- La comida no se cocina de manera uniforme:
- Ensure the oven is preheated to the correct temperature.
- Check that the correct heating function (upper, lower, or both) is selected for your recipe.
- Rotate food halfway through cooking for more even results.
- Ensure there is adequate space around the food for heat circulation.
- Humo u olor inusual durante el primer uso:
- This is normal during the initial use as manufacturing oils burn off. Ensure good ventilation. If it persists after the first few uses, discontinue use and contact support.
7. Especificaciones
| Característica | Especificación |
|---|---|
| Modelo | Minihorno 22L |
| Capacidad | 22 litros |
| Vol nominaltage | 110 V-240 V/50 Hz |
| Potencia nominal | 1300 W |
| Rango de temperatura | 0-250°C (Controllable) |
| Temporizador de horneado | 0-120 Minutes with Bell Ring and Auto Shut Off |
| Material del tubo de calentamiento | Stainless Steel (4 tubes) |
| Material del revestimiento | Chapa galvanizada |
| Método de control | Perillas mecánicas |
| Dimensiones (An. × Pr. × Al.) | 421 mm × 252 mm × 273 mm |
| Estilo de puerta | Puerta desplegable |
8. Garantía y soporte
8.1 Garantía limitada
This product comes with a limited warranty against defects in materials and workmanship. Please refer to the warranty card included with your purchase or contact the retailer for specific warranty terms and conditions. Keep your proof of purchase for warranty claims.
8.2 Atención al cliente
For technical assistance, troubleshooting, or parts replacement, please contact the retailer where you purchased the product. If purchased directly from the manufacturer, refer to the contact information provided in your packaging or on their official websitio.