Aurosports Aurosports
Manual de instrucciones del telescopio refractor Aurosports de 90 mm de apertura y 600 mm
Model: Aurosports
Introducción
This manual provides detailed instructions for the assembly, operation, and maintenance of your Aurosports 90mm Aperture 600mm Refractor Telescope. Please read this manual thoroughly before using your telescope to ensure proper setup and optimal viewing experience. This telescope is designed for observing celestial objects such as the moon and planets, as well as terrestrial objects.
¿Qué hay en la caja?
Desempaque cuidadosamente todos los componentes y verifique que estén presentes todos los artículos enumerados a continuación. Si falta alguna pieza o está dañada, comuníquese con atención al cliente.

Descripción de la imagen: A complete set of Aurosports telescope components laid out on a flat surface. This includes the main telescope tube, tripod, accessory tray, 10mm and 25mm eyepieces, 3x Barlow lens, finderscope, zenith mirror, phone adapter, wireless remote, and a carry bag.
- 1x Telescope Tube (90mm Aperture, 600mm Focal Length)
- 1x Stainless Steel Tripod
- 1x adaptador de teléfono
- 1x bolsa de transporte
- 1x Finderscope
- 1x Zenith Mirror (Diagonal)
- 2x Eyepieces (10mm, 25mm)
- 1x Barlow Lens (3X)
- 1x Accessory Tray
- 1x control remoto inalámbrico
- 1x Manual de instrucciones (este documento)
Identificación de componentes

Descripción de la imagen: A diagram illustrating the main parts of the Aurosports telescope. Labels point to the Finderscope, Eyepieces, Diagonal Mirror, Control Lever, Telescope Tube, 90mm Aperture, 600mm Focal Length, Phone Adapter, and Stable Tripod.
Familiarize yourself with the various parts of your telescope before assembly:
- Tubo del telescopio: El cuerpo principal que contiene la lente del objetivo.
- Buscador: A small telescope mounted parallel to the main telescope, used for locating objects.
- Oculares: Lentes intercambiables que determinan el aumento.
- Diagonal Mirror (Zenith Mirror): Redirects light at a 45-degree angle for comfortable viewEn.
- Palanca de control: Used for adjusting the telescope's position.
- Trípode: Proporciona una base estable para el telescopio.
- Adaptador de teléfono: Allows attachment of a smartphone for photography.
Instrucciones de instalación
- Configurar el trípode:
Extend the tripod legs to a stable position. Adjust the height using the leg clamps. Ensure the accessory tray is securely attached to the center brace for added stability.

Descripción de la imagen: An illustration showing the Aurosports telescope mounted on its aluminum alloy tripod. The image highlights the three-level height adjustment (20, 33, and 48 inches) and the multi-angle movement capabilities (180-degree vertical, 360-degree horizontal rotation).
- Conecte el tubo del telescopio:
Mount the telescope tube onto the tripod head. Secure it firmly using the provided screws or clamps. Ensure it is balanced and stable.
- Instalar el Finderscope:
Slide the finderscope into its mounting bracket on the main telescope tube and tighten the screws to secure it. The finderscope helps in quickly locating objects before viewmirándolos a través del telescopio principal.

Descripción de la imagen: A graphic explaining the 5x24 finderscope. It shows the finderscope mounted on the telescope and illustrates that the image seen through it will be inverted. The text clarifies that for astronomical observations, image orientation is not critical.
- Insertar el espejo diagonal:
Insert the diagonal mirror into the focuser of the telescope. Secure it with the small thumbscrew.

Descripción de la imagen: A graphic demonstrating the 45-degree zenith mirror. It shows how the diagonal mirror provides a positive, upright image, which is beneficial for terrestrial viewing compared to direct viewing which might be inverted.
- Insertar un ocular:
Choose an eyepiece (e.g., 25mm for lower magnification and wider field of view) and insert it into the diagonal mirror. Tighten the thumbscrew to hold it in place.
Instrucciones de funcionamiento
1. Alineación del buscador
Before observing, align the finderscope with the main telescope. Point the main telescope at a distant, stationary object (e.g., a tree or building) during daylight hours. Look through the finderscope and adjust its alignment screws until the object is centered in its crosshairs. Then, look through the main telescope's eyepiece and fine-tune the finderscope's alignment until the object is also centered in the main telescope's view.
2. Observación con el telescopio
- Localizar un objeto: Use the finderscope to locate the desired celestial or terrestrial object. Center the object in the finderscope's crosshairs.
- View through Eyepiece: Mire a través del ocular del telescopio principal. El objeto debe ser visible dentro del campo de view.
- Enfocar: Gire lentamente la perilla de enfoque hasta que la imagen esté nítida y clara.
- Cambiar ampliación: To increase magnification, replace the 25mm eyepiece with the 10mm eyepiece. For even higher magnification, insert the 3x Barlow lens into the focuser first, then insert an eyepiece into the Barlow lens. Remember to refocus after changing eyepieces or adding the Barlow lens.
3. Magnification Options
Your telescope comes with two eyepieces (10mm and 25mm) and a 3x Barlow lens, offering various magnification levels:
- Ocular de 25 mm: 600mm (focal length) / 25mm = 24x magnification
- Ocular de 10 mm: 600mm (focal length) / 10mm = 60x magnification
- 25mm Eyepiece + 3x Barlow: 24x * 3 = aumento de 72x
- 10mm Eyepiece + 3x Barlow: 60x * 3 = aumento de 180x
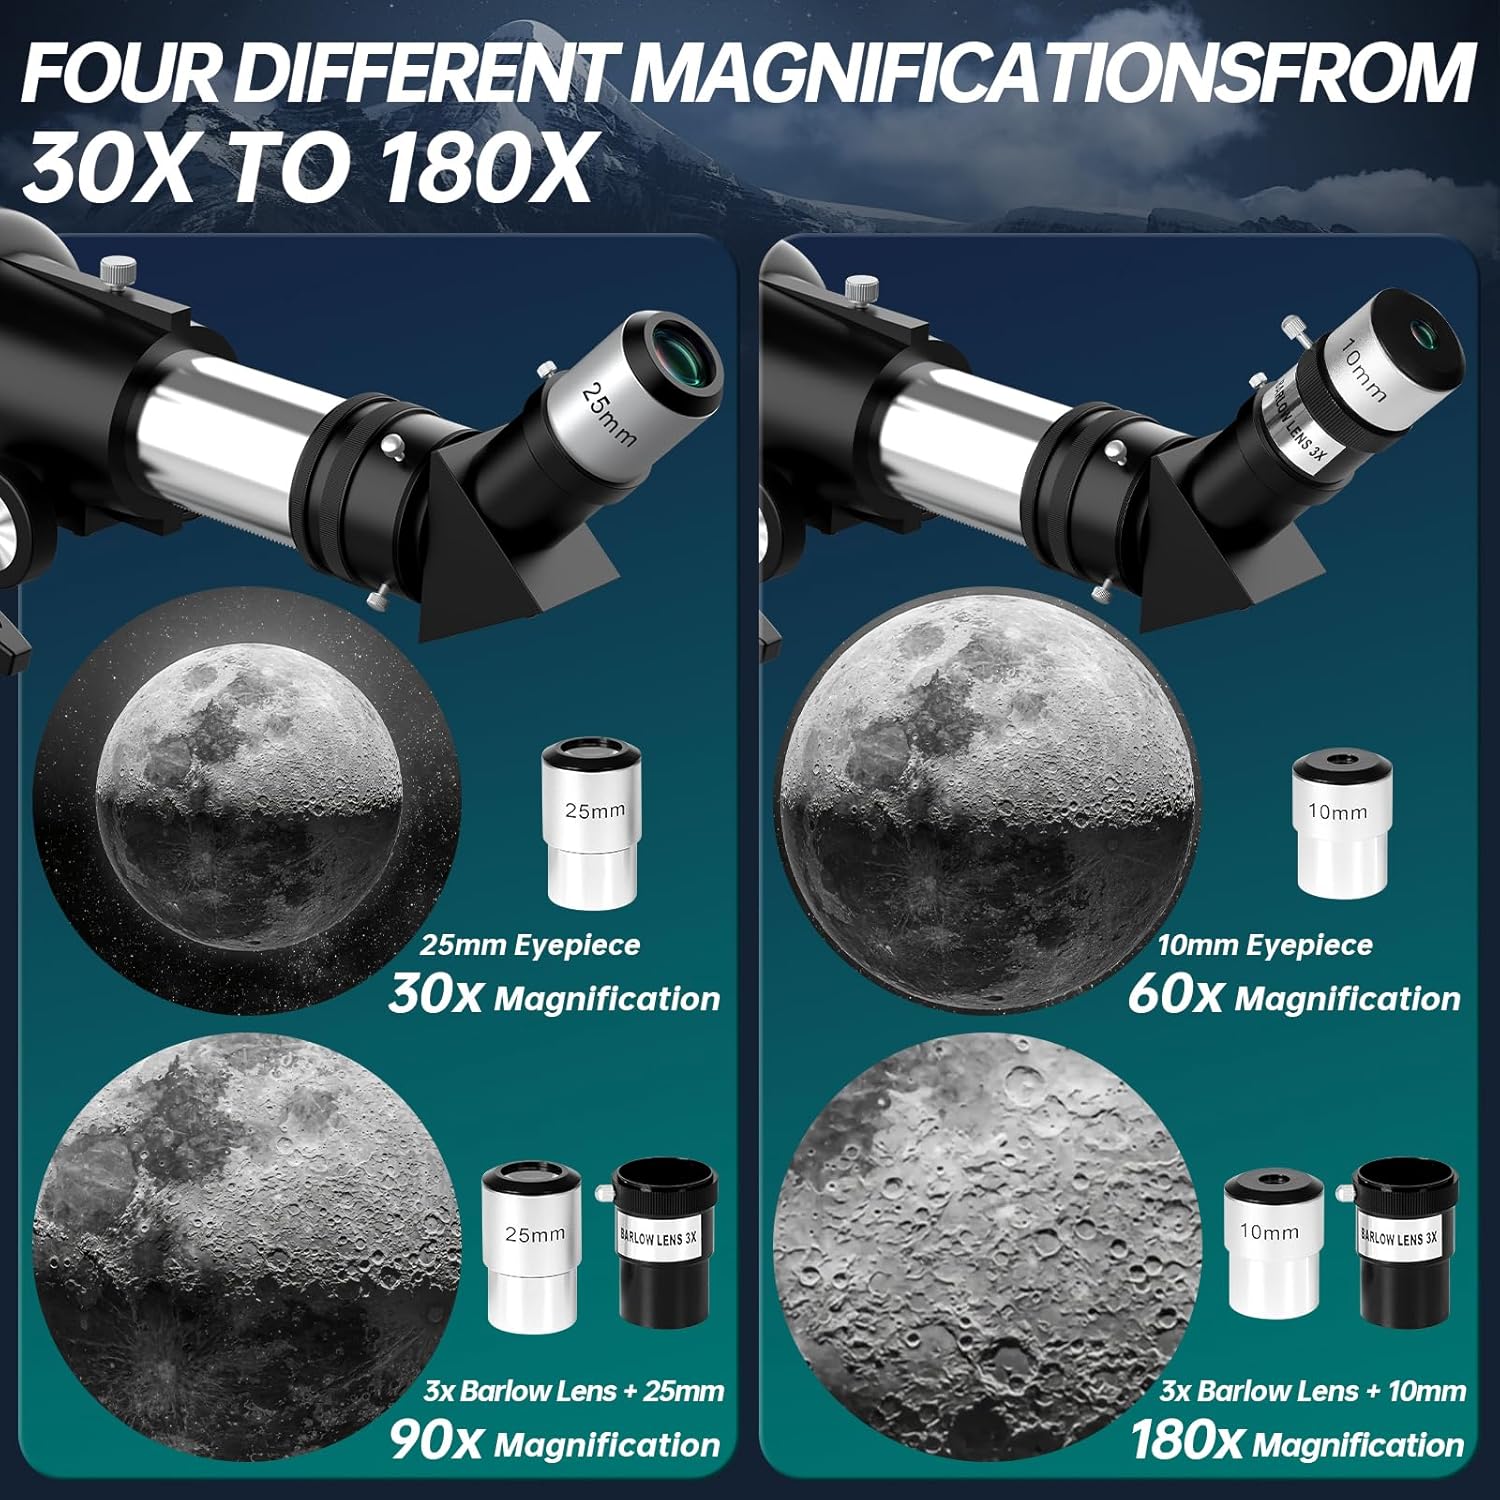
Descripción de la imagen: A visual guide demonstrating four different magnification levels achievable with the Aurosports telescope. It shows the moon's surface at 30x (25mm eyepiece), 60x (10mm eyepiece), 90x (3x Barlow + 25mm eyepiece), and 180x (3x Barlow + 10mm eyepiece).
4. Using the Phone Adapter and Wireless Remote
The included phone adapter allows you to attach your smartphone to the eyepiece for capturing photos or videos through the telescope. The wireless remote can be used to trigger your phone's camera without touching the phone, minimizing vibrations.
- Attach Phone to Adapter: Secure your smartphone into the phone adapter.
- Mount Adapter to Eyepiece: Carefully attach the phone adapter (with phone) over the telescope's eyepiece. Ensure it is snug and aligned.
- Adjust Camera: Open your phone's camera app and adjust the phone's position on the adapter until the telescope's view llena la pantalla.
- Capturar imágenes: Use the wireless remote to take photos or start/stop video recording.

Descripción de la imagen: A four-step visual guide demonstrating how to use the phone adapter and wireless remote with the Aurosports telescope. Step 1 shows placing the phone in the adapter, Step 2 shows attaching the adapter to the eyepiece, Step 3 shows adjusting the phone's position, and Step 4 shows using the wireless remote to capture an image.
Mantenimiento
- Limpieza de lentes: Utilice un paño suave y sin pelusa, especialmente diseñado para lentes ópticas. Limpie con cuidado las superficies de las lentes. Para manchas difíciles, aplique una pequeña cantidad de líquido limpiador óptico en el paño, no directamente sobre la lente.
- Almacenamiento: When not in use, store the telescope in its carry bag in a dry, dust-free environment. Keep dust caps on the objective lens and eyepieces.
- Evite temperaturas extremas: Do not expose the telescope to extreme temperatures or sudden temperature changes, as this can affect the optics.
- Tratar con cuidado: Always handle the telescope and its accessories with care to prevent damage.
Solución de problemas
| Problema | Posible causa | Solución |
|---|---|---|
| La imagen está borrosa o desenfocada. | Ajuste de enfoque incorrecto. | Ajuste la perilla de enfoque lentamente hasta que la imagen esté nítida. |
| No se pueden encontrar objetos. | El buscador no está alineado con el telescopio principal. | Alinee el buscador durante las horas del día utilizando un objeto distante y estacionario. |
| La imagen es tenue u oscura. | Utilizando un aumento demasiado alto para las condiciones actuales; contaminación lumínica. | Use a lower magnification eyepiece (e.g., 25mm). Observe from a darker location away from city lights. |
| La imagen aparece invertida. | This is normal for astronomical telescopes without an erecting prism. | Para astronómico viewing, image orientation is not critical. For terrestrial viewing, ensure the diagonal mirror is correctly installed. |
Presupuesto
- Diseño óptico: refractor
- Abertura: 90 mm
- Longitud focal: 600 mm
- Relación focal: f/6.7
- Oculares: 25 mm, 10 mm
- Lente Barlow: 3x
- Buscador: Reflejo 5x24
- Diagonal: Espejo cenital de 45 grados
- Tipo de montaje: Monte Altazimuth
- Material del trípode: Acero inoxidable
- Ajuste de altura del trípode: 20 a 48 pulgadas
- Dimensiones del producto: 25 x 5 x 8 pulgadas
- Peso del artículo: 6.59 libras
Garantía y soporte
Aurosports provides long-term service maintenance for this product. For any questions, technical assistance, or warranty claims, please contact Aurosports customer support through the retailer where the product was purchased or visit the official Aurosports websitio para información de contacto.
Conserve su recibo de compra como comprobante de compra para fines de garantía.
Ask a question about this manual
Ask about setup, troubleshooting, compatibility, parts, safety, or missing instructions. Manuals+ will review the question and use this page’s manual context to help answer it.