Fuers A670901
Manual del usuario del grabador DVR de seguridad híbrido 6 en 1 Fuers de 8 canales y 5 MP (modelo A670901)
Model: A670901 | Brand: Fuers
1. Introducción
This manual provides detailed instructions for the installation, operation, and maintenance of your Fuers 8-Channel 5MP Hybrid 6-in-1 Security DVR Recorder. Please read this manual thoroughly before using the product to ensure proper functionality and safety.
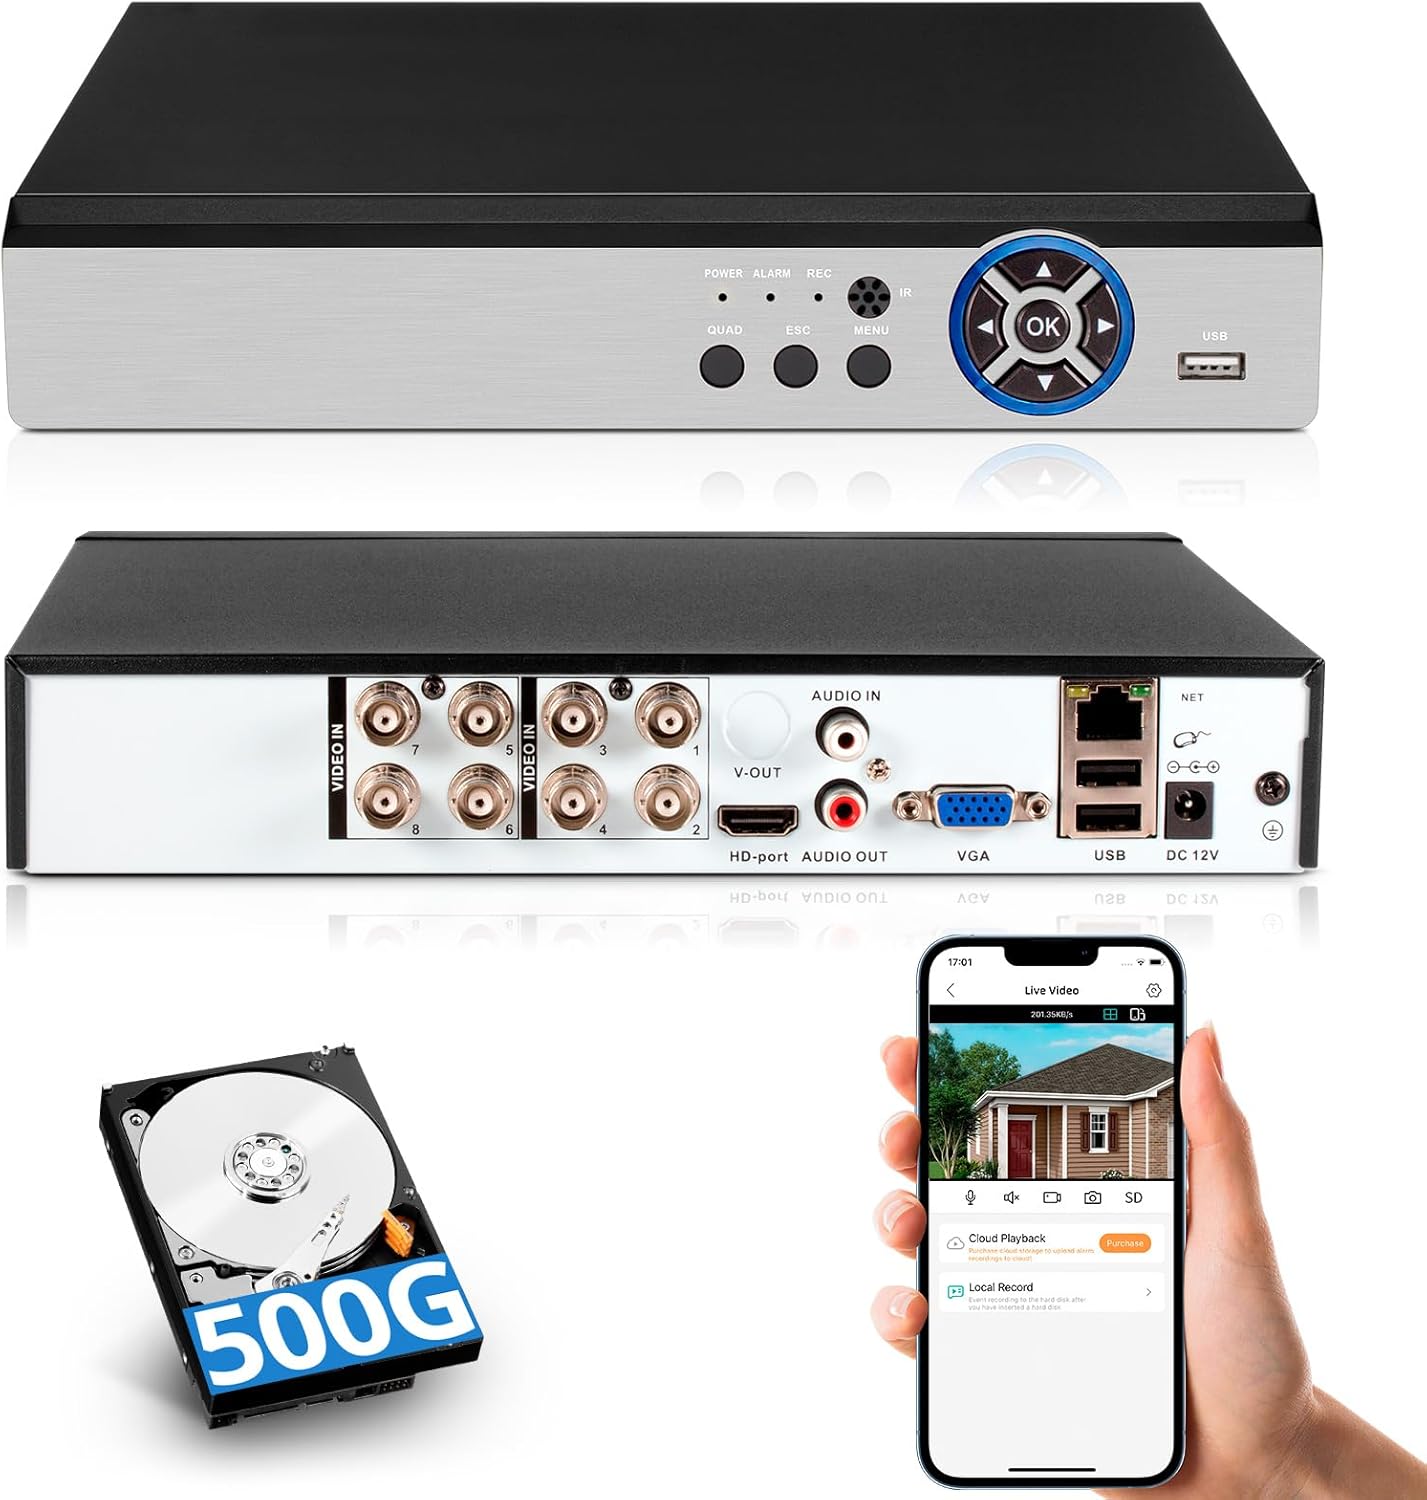
Imagen: delantera y trasera view of the Fuers DVR, illustrating its compact design and various connection ports. Also shown are the included 500GB hard drive and a smartphone demonstrating the remote viewaplicación ing.
The Fuers 8-Channel 5MP Hybrid DVR is designed for comprehensive surveillance, supporting various camera types including AHD, TVI, XVI, CVI, CVBS, and IP cameras. It features 5MP recording capability, human detection, 24/7 recording, and remote monitoring via a dedicated application. A 500GB hard drive is pre-installed for immediate use.

Image: Visual representation of the DVR system's capabilities, including multi-channel display, key features like motion detection and H.265+ compression, and the benefit of no monthly fees.
2. ¿Qué hay en la caja?
Verifique que todos los artículos estén presentes en el paquete:
- 1x 5MP 8CH DVR
- 1x 500GB Hard Drive (Pre-installed on DVR)
- 1 X DVR Power Supply
- 1 X USB Mouse
- 1 X Manual de usuario

Image: An illustration detailing the components included in the package, along with the physical dimensions of the DVR unit.
3. Producto terminadoview
3.1 Panel frontal
The front panel of the DVR features indicator lights and control buttons for basic operation and status monitoring.
- FUERZA: Luz indicadora de encendido.
- ALARMA: Indicador de estado de alarma.
- REC: Recording status indicator.
- IR: Receptor de control remoto por infrarrojos.
- PATIO: Display multiple camera feeds.
- ESCAPE: Exit menu or cancel operation.
- MENÚ: Accede al menú principal.
- Aceptar: Confirmar selección.
- Puerto USB: Para conectar un mouse USB o almacenamiento externo.
3.2 Panel trasero
The rear panel provides all necessary connection ports for cameras, display, audio, network, and power.
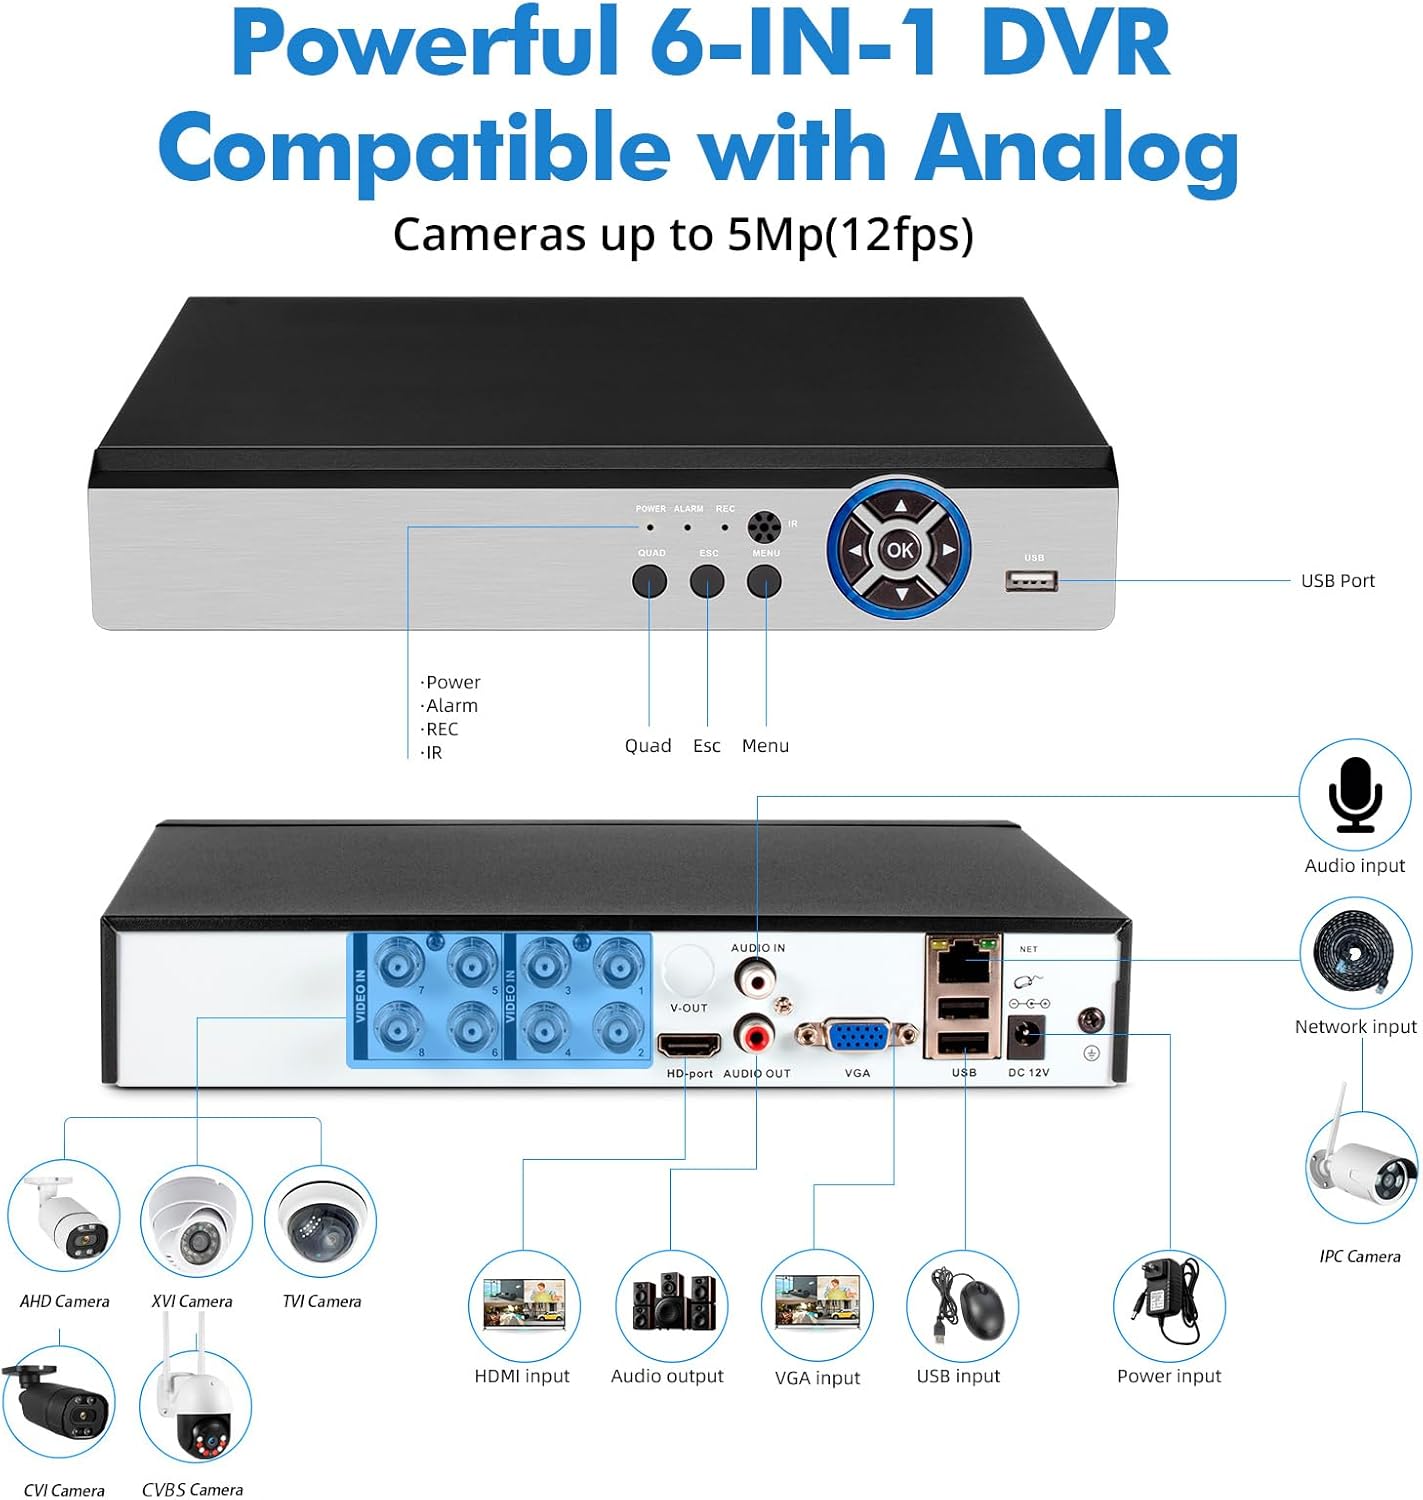
Imagen: Una imagen completa view of the DVR's rear panel, highlighting each port and its function, along with examples of compatible camera types such as AHD, XVI, TVI, CVI, CVBS, and IP cameras.
- VIDEO IN (1-8): BNC connectors for analog cameras (AHD, TVI, XVI, CVI, CVBS).
- ENTRADA/SALIDA DE AUDIO: Conectores RCA para entrada y salida de audio.
- SALIDA V: BNC video output.
- VGA: VGA output for connecting to a monitor.
- Puerto HD (HDMI): HDMI output for connecting to a TV or monitor.
- NETO: Puerto Ethernet RJ45 para conexión de red.
- USB: USB ports for mouse and external devices.
- 12 V CC: Entrada de energía para el DVR.
The DVR supports a 6-in-1 hybrid input, allowing compatibility with TVI, AHD, CVBS, CVI, XVI, and IP cameras. Note that it is not compatible with SDI/PoE cameras.
4. Guía de configuración
4.1 Conexión inicial
- Conectar cámaras: Connect your surveillance cameras to the "VIDEO IN" BNC ports on the rear panel of the DVR.
- Conectar pantalla: Conecte un monitor o televisor al DVR usando el puerto VGA o HDMI.
- Conectar el ratón USB: Conecte el mouse USB incluido en uno de los puertos USB del DVR.
- Conectar red (opcional): For remote access, connect an Ethernet cable from your router to the "NET" port on the DVR.
- Conecte la electricidad: Connect the DVR power supply to the "DC 12V" input and then plug it into a power outlet. The DVR will power on automatically.
Upon first power-on, the system will guide you through initial setup steps, including setting the date, time, and administrator password.
4.2 Remote Access Setup (iCSee App)
A view your surveillance system remotely on a smartphone or tablet, download the iCSee application.

Image: Instructions for setting up remote access, including physical connections, network setup, and downloading the iCSee mobile application using provided QR codes for both Android and iOS devices.
- Asegúrese de que el DVR esté conectado a su red mediante un cable Ethernet.
- Download the iCSee app:
- Para Android: Tienda Google Play
- Para iOS: Tienda de aplicaciones de Apple
- Open the app and follow the on-screen instructions to add your DVR device. This typically involves scanning a QR code displayed on the DVR's monitor or manually entering the device ID.
- Una vez añadido, puedes view Transmisiones en vivo y reproducción de alimentos grabadostage from your mobile device.
5. Instrucciones de funcionamiento
5.1 en vivo View y reproducción
After successful setup, the DVR will display live video feeds from connected cameras on the connected monitor. Use the USB mouse to navigate the on-screen menu.
- Vivir View: The default display shows multiple camera channels. You can switch between single-channel view and multi-channel view using the menu options or dedicated buttons on the front panel.
- Reproducción: Acceda al menú de reproducción para volverview comida grabadatage. Puede buscar por fecha, hora y tipo de evento (por ejemplo, detección de movimiento).

Image: Demonstration of accessing live and recorded video feeds through both a local monitor (laptop) and a remote mobile device, highlighting the flexibility of the system.
5.2 Modos de grabación
The DVR supports continuous 24/7 recording and event-triggered recording.
- Grabación continua: Registros footage constantly, overwriting the oldest data when the hard drive is full.
- Grabación por detección de movimiento: Records only when motion is detected by the cameras. This conserves storage space.
- Detección humana: The system features AI-powered human detection, which can differentiate human shapes from other moving objects, reducing false alarms. This feature requires compatible cameras.

Image: Illustration of the human detection feature, where the system identifies and highlights a human figure, triggering an alert via the iCSee application.
5.3 Alertas y notificaciones
Configure the DVR to send alerts when specific events occur.
- Alerta de correo electrónico: Receive email notifications with snapshots when motion or other events are detected.
- Notificaciones push de la aplicación: Get instant alerts on your smartphone via the iCSee app.
6. Mantenimiento
6.1 Administración del disco duro
The DVR comes with a pre-installed 500GB hard drive. The system automatically manages storage by overwriting the oldest footage when the drive is full. You can configure recording settings to optimize storage usage.
The DVR supports H.265+ video compression, which significantly reduces storage requirements compared to H.264, saving approximately 50% of storage space while maintaining video quality.
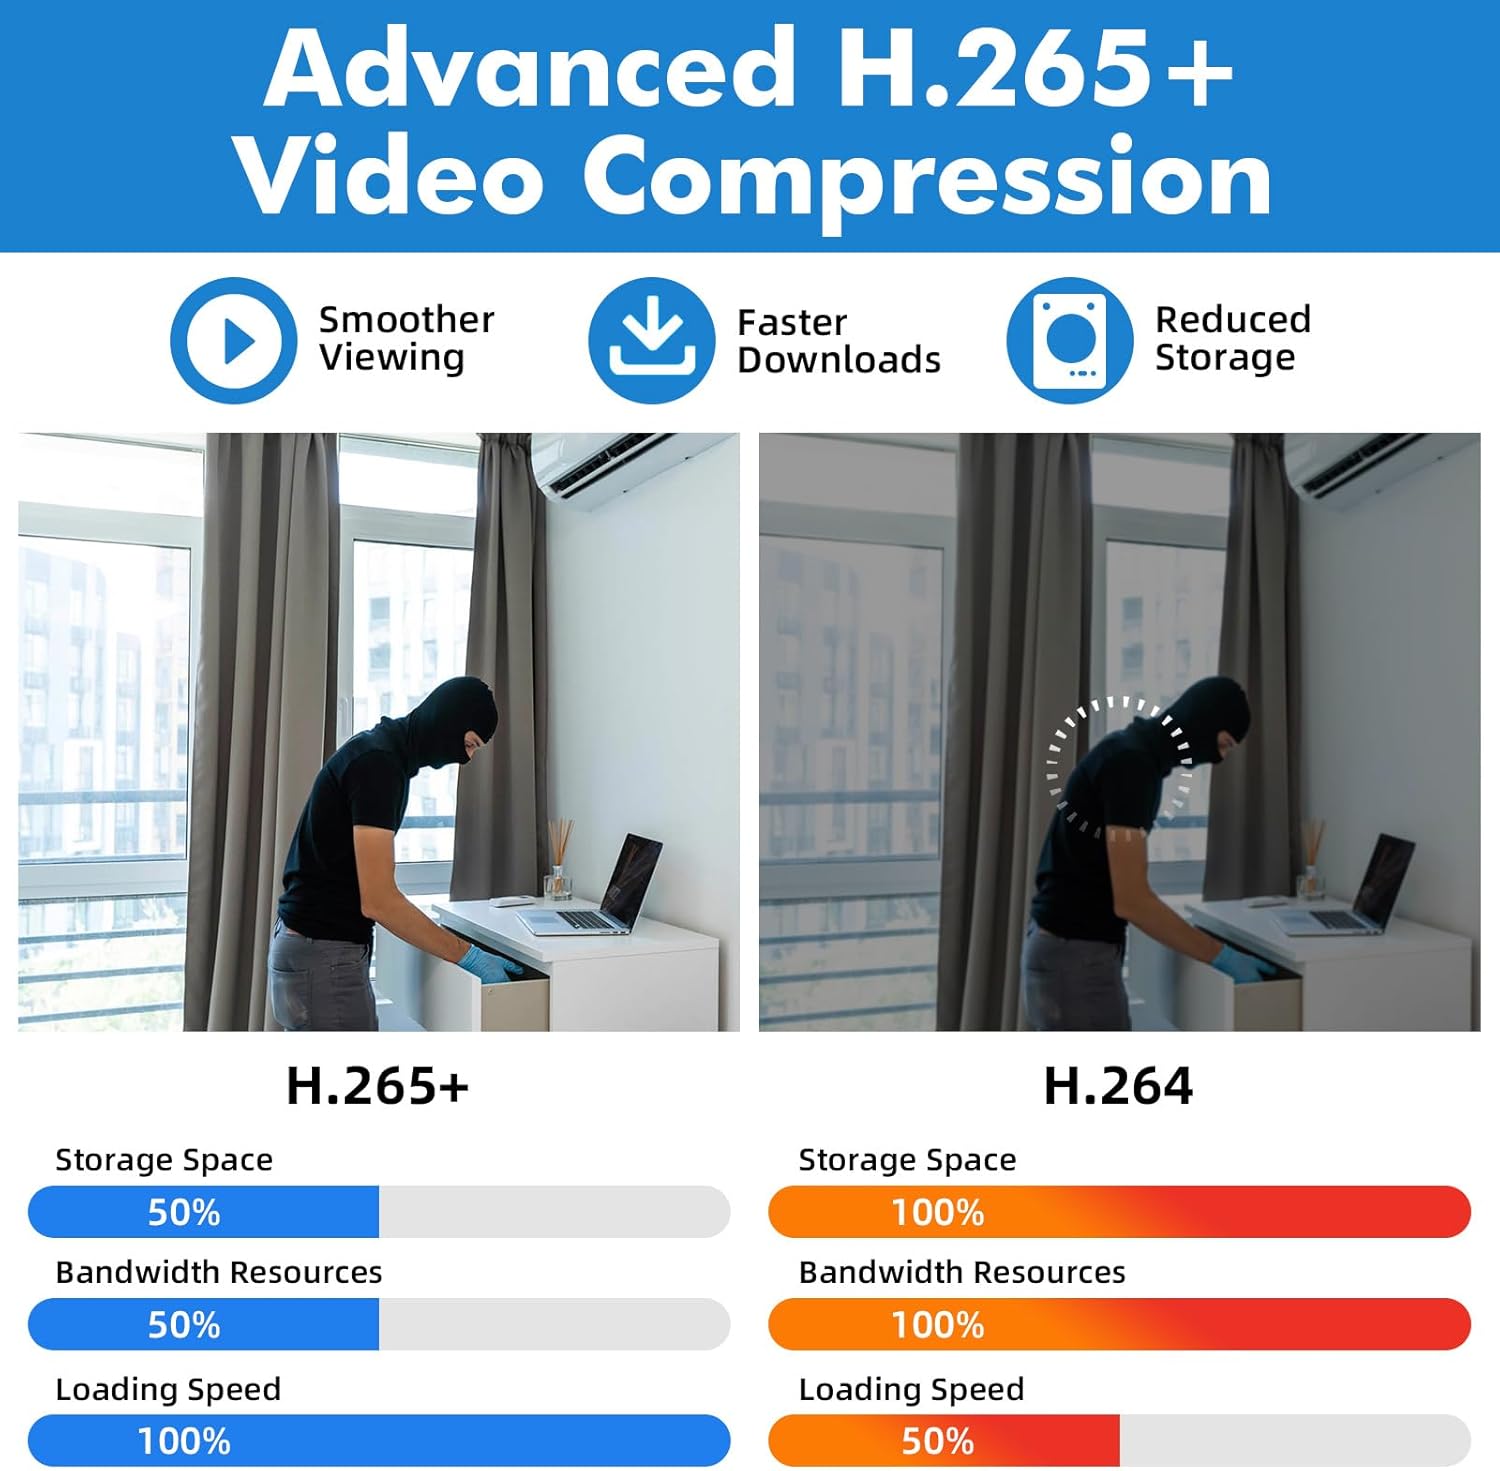
Image: A visual comparison highlighting the benefits of H.265+ video compression over H.264, specifically in terms of storage efficiency and streaming performance.
The DVR's storage capacity can be expanded up to 14TB. Replacing the hard drive may require a higher power supply.
6.2 Actualizaciones del sistema
Revise periódicamente las instrucciones del fabricante. website or the iCSee app for firmware updates to ensure optimal performance and access to new features.
6.3 Limpieza
Clean the exterior of the DVR with a soft, dry cloth. Do not use liquid cleaners or aerosols. Ensure ventilation openings are free from dust to prevent overheating.
7. Solución de problemas
| Problema | Posible causa | Solución |
|---|---|---|
| No hay visualización de video en el monitor. |
|
|
| Cannot access DVR remotely via app. |
|
|
| No hay grabación o falta comidatage. |
|
|
| Mala calidad de vídeo. |
|
|
Si los problemas persisten después de intentar estas soluciones, comuníquese con el servicio de atención al cliente.
8. Especificaciones
| Número de modelo | A670901 |
| Entradas de video | 8 canales (BNC) |
| Compresión de vídeo | H.265 + |
| Tipos de cámaras compatibles | AHD, TVI, XVI, CVI, CVBS, IP (Hybrid 6-in-1) |
| Resolución máxima | 5MP (12fps) |
| Capacidad del disco duro | 500GB (Pre-installed), Expandable up to 14TB |
| Salidas de video | HDMI, VGA, BNC (V-OUT) |
| Entradas / Salidas de audio | Entrada de audio RCA, salida de audio RCA |
| Interfaz de red | Ethernet RJ45 |
| Interfaz USB | Multiple USB ports for mouse and external devices |
| Fuente de alimentación | 12 V CC |
| Dimensiones del producto | 7.3 x 7 x 1.5 pulgadas (18.5 x 17.8 x 3.8 cm) |
| Peso del artículo | 3.39 libras (1.54 kg) |
9. Garantía y soporte
9.1 Información de garantía
This product is covered by a limited warranty against defects in materials and workmanship. Please refer to the warranty card included in your package or contact customer support for specific warranty terms and conditions.
9.2 Atención al cliente
For technical assistance, troubleshooting, or any questions regarding your Fuers DVR, please contact our customer support team. Contact information can typically be found on the manufacturer's websitio o en el embalaje del producto.
When contacting support, please have your product model number (A670901) and purchase details ready.
Ask a question about this manual
Ask about setup, troubleshooting, compatibility, parts, safety, or missing instructions. Manuals+ will review the question and use this page’s manual context to help answer it.