1. Introducción
This user manual provides detailed instructions for the installation, operation, and maintenance of your Hodozzy 6.86-inch 1 Din Car Stereo. Please read this manual thoroughly before using the product to ensure proper function and to prevent damage. Keep this manual for future reference.
2. Información de seguridad
- Instalación profesional recomendada: Due to the complexity of car audio systems, professional installation is highly recommended to avoid damage to the unit or your vehicle.
- Fuente de alimentación: This unit operates on a DC12V power supply. Ensure correct voltagy para evitar daños.
- Alambrado: Connect all wires correctly according to the wiring diagram. Incorrect wiring can cause malfunction or damage.
- Temperatura de funcionamiento: The optimal operating temperature range is -10°C to 60°C.
- Cuidado de la pantalla: The 6.86-inch touchscreen is a delicate component. Avoid applying excessive force or sharp objects. Clean with a soft, dry cloth.
- Seguridad en la conducción: No opere la unidad de forma que le distraiga de la conducción. Priorice siempre la seguridad vial.
- Ventilación: Asegúrese de que haya una ventilación adecuada alrededor de la unidad para evitar el sobrecalentamiento.
3. Contenido del paquete
Por favor, revise el contenido del paquete al abrirlo para asegurarse de que todos los elementos estén presentes:
- 1 reproductor MP5 para coche (unidad principal)
- 1 x cable de alimentación
- 1 x cable de bocina
- 1 x Accessories (General term, specific small parts)
- 1 x micrófono
- 1 x control remoto
- 1 x Steering Wheel Control (Remote)
- 1 x Manual de usuario
- 1 cámara trasera de 12 LED

Figure 3.1: Hodozzy 1 Din Car Stereo main unit with included accessories and dimensions. The image shows the 6.86-inch main unit, power cable, horn cable, remote control, microphone, steering wheel control, user manual, 12LED rear camera, and mounting bracket.
4. Producto terminadoview
The Hodozzy 6.86-inch 1 Din Car Stereo features a high-definition touchscreen display and supports various multimedia functions. Below is an overview de la unidad principal y sus componentes.
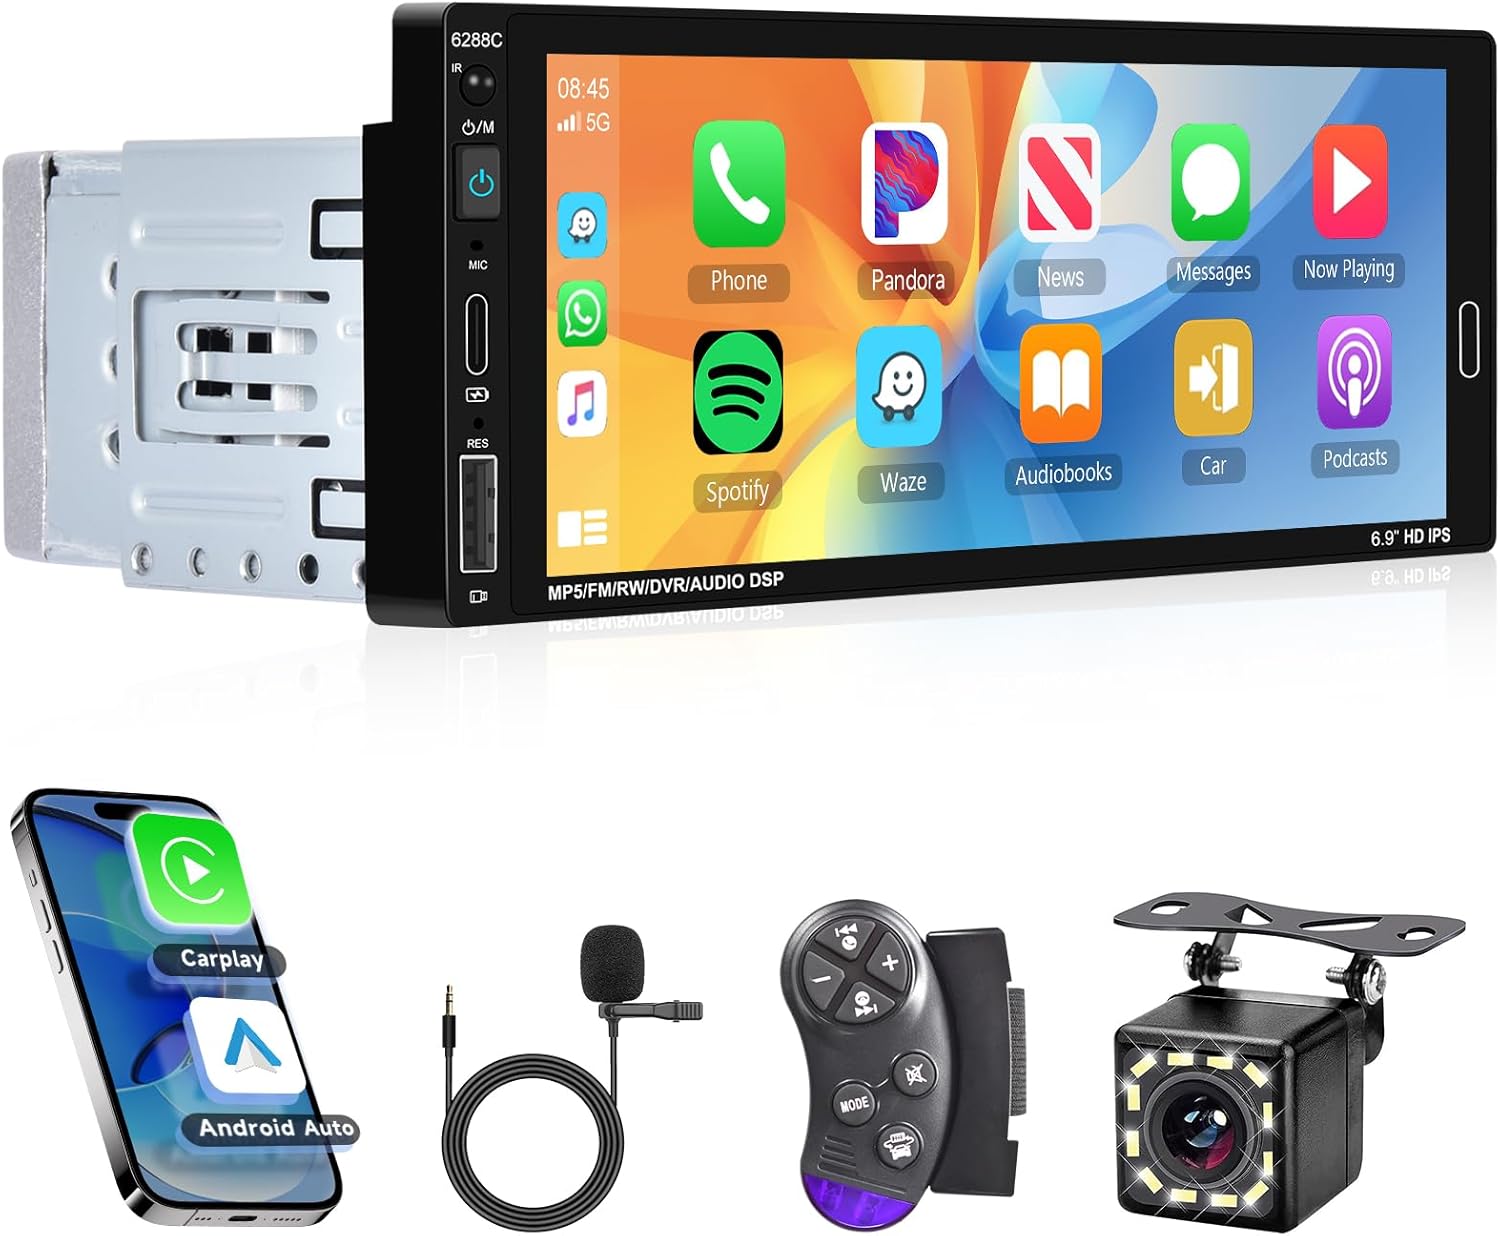
Figura 4.1: Frente view of the Hodozzy 1 Din Car Stereo, showing the 6.86-inch HD touchscreen display and physical buttons on the left side for power, microphone, reset, and volume/mode control.
4.1 Características principales
- 6.86-inch HD Touchscreen Display (Resolution: 1280*480)
- Wired CarPlay & Android Auto Connectivity
- Funcionalidad Mirror Link
- Bluetooth 5.0 para llamadas manos libres y transmisión de audio
- FM Radio Tuner (87.5-108MHz)
- Multiple EQ Modes for Audio Customization
- Soporte para control del volante
- Opciones de retroiluminación colorida
- Función de memoria de apagado
- Rear Camera Input (CVBS)
- USB, Type-C, and AUX Input Ports
- Supports TF Card / U Disk for media playback
5. Configuración
5.1 Instalación
Proper installation is crucial for the performance and safety of your car stereo. It is highly recommended to have the unit installed by a qualified professional. Refer to the wiring diagram provided in the separate installation guide or consult a professional for detailed wiring instructions.
- Asegúrese de que la batería del vehículo esté desconectada antes de comenzar la instalación.
- Connect the power cable, horn cable, and other necessary wires according to the provided diagram.
- Mount the unit securely in the 1 Din slot of your vehicle's dashboard.
- If installing the rear camera, route the camera cable and connect it to the unit's CVBS input. Ensure the reverse trigger wire is correctly connected.
5.2 Encendido inicial
After installation, reconnect the vehicle's battery. Press the power button on the unit to turn it on. The unit will boot up and display the main interface.
6. Instrucciones de funcionamiento
6.1 CarPlay, Android Auto y Mirror Link
This unit supports wired CarPlay and Android Auto, allowing seamless integration with your smartphone for navigation, music, calls, and more. The Mirror Link function allows you to display your phone's screen on the car stereo.
- Conexión: Connect your smartphone to the unit using a USB data cable.
- CarPlay/Android Auto: Once connected, the unit will automatically detect and launch CarPlay or Android Auto. You can then use voice commands (Siri or Google Assistant) for hands-free operation.
- Enlace espejo: For Mirror Link, ensure your phone's USB debugging mode is enabled (for Android) or trust the device (for iOS) when prompted.

Figure 6.1: Visual representation of CarPlay, Android Auto, and Mirror Link functionalities. Shows the car stereo displaying phone interfaces for navigation, apps, and media, with connection icons.
6.2 Bluetooth and FM Radio
Enjoy hands-free calls and wireless music streaming via Bluetooth, and tune into your favorite FM radio stations.
Operación de Bluetooth:
- Vaya al menú Bluetooth en el estéreo del automóvil.
- Habilite Bluetooth en su teléfono inteligente y busque dispositivos disponibles.
- Select "CAR BT" from the list on your phone to pair.
- Once paired, you can make/receive calls hands-free and play music from your phone through the car speakers.
Funcionamiento de la radio FM:
- Seleccione el icono "Radio" del menú principal.
- Use the scan function to automatically search and save available stations (up to 18 presets).
- Manually tune to a specific frequency (87.5-108MHz) or use the preset buttons to switch between saved stations.

Figure 6.2: Display showing the FM Radio interface with frequency tuning and preset options.

Figure 6.3: Display showing the Bluetooth interface, including pairing status, call screen, and music playback options.
6.3 Ajustes del ecualizador
Customize your audio experience with the built-in Equalizer (EQ) settings. Adjust treble, bass, and other frequency bands to match your preferences.
- Acceda a la configuración del ecualizador desde el menú principal.
- Choose from various preset EQ modes (e.g., Jazz, Classic, Rock, Pop, Soft) or create a custom user profile.
- Adjust individual frequency bands and bass amplification for optimal sound quality.

Figure 6.4: Screenshot of the EQ settings interface, showing various frequency sliders and preset options like Jazz, Classic, Rock, Pop, Soft, and User.
6.4 Power Off Memory Function & Seven Color Backlight
The unit features a power-off memory function that remembers the last playback state (music or radio) when the vehicle is turned off and resumes from that point upon restart. The buttons also feature a customizable seven-color backlight.
- Apagar la memoria: This function operates automatically.
- Retroiluminación de siete colores: Access the backlight settings in the system menu to choose your preferred color or set it to cycle automatically.

Figure 6.5: Illustration of the power-off memory function and the seven-color backlight feature, as part of the unit's interface, showing different button colors and a visual of the unit resuming playback.
6.5 Control del volante (SWC)
The unit supports steering wheel control, allowing you to operate key functions without taking your hands off the wheel. This enhances driving safety and convenience.
- Configuración: Access the "Steering Wheel" learning function in the system settings.
- Follow the on-screen prompts to map your vehicle's steering wheel buttons to the corresponding functions on the car stereo (e.g., volume up/down, track skip, mode change).
Figure 6.6: A section of the product overview image illustrating the steering wheel control remote and its connection, indicating the unit's compatibility with vehicle steering wheel controls.
6.6 Imagen inversa (cámara trasera)
The included 12LED rear camera provides a clear view behind your vehicle, automatically displaying the reverse image on the car stereo screen when you shift into reverse gear. This significantly improves parking safety.
- Ensure the rear camera is properly installed and connected to the unit's CVBS input and the reverse trigger wire.
- When the vehicle is put into reverse, the screen will automatically switch to the camera view.
Figure 6.7: A section of the product overview image showing the included 12LED rear camera and its connection, demonstrating the unit's reverse image display capability.
6.7 Multimedia Input
The unit supports various multimedia inputs for playing audio and video files.
- Puertos USB y Tipo-C: Connect USB drives or Type-C devices to play music (MP3/WMA/WAV/APE/FLAC) and videos (RM/RMVB/AVI/MP4/MKV/3GP).
- Ranura para tarjetas TF: Insert a TF card (microSD) with your media files.
- Entrada auxiliar: Conecte dispositivos de audio externos mediante un cable AUX de 3.5 mm.
Figure 6.8: Illustration showing various multimedia input options including USB, Type-C, and AUX ports, along with supported media formats.
7. Solución de problemas
If you encounter issues with your Hodozzy car stereo, please refer to the following common problems and solutions before contacting support.
| Problema | Posible causa | Solución |
|---|---|---|
| La unidad no se enciende. | Cableado incorrecto; Fusible quemado; Fuente de alimentación insuficiente. | Check power connections and fuse. Ensure stable 12V power supply. Consult installation professional. |
| No hay sonido. | Cables del altavoz desconectados; Volumen demasiado bajo; Función de silencio activa; Fuente de audio incorrecta. | Revisa las conexiones de los altavoces. Sube el volumen. Desactiva el silencio. Selecciona la fuente de audio correcta (FM, Bluetooth, USB, AUX). |
| La conexión Bluetooth falla. | Bluetooth no habilitado en el teléfono/unidad; Proceso de emparejamiento incorrecto; Interferencia. | Asegúrate de que el Bluetooth esté activado en ambos dispositivos. Elimina los emparejamientos anteriores y vuelve a emparejarlos. Acércate a la unidad. |
| CarPlay/Android Auto no se conecta. | Faulty USB cable; Phone settings (USB debugging); App issues. | Use a high-quality USB data cable. Check phone settings for USB connection mode. Restart phone and unit. |
| La imagen de la cámara trasera no se muestra. | Cámara no conectada; Cable disparador inverso no conectado; Cámara defectuosa. | Verify camera and trigger wire connections. Test camera with another display if possible. |
8. Especificaciones
Detailed technical specifications for the Hodozzy 6.86-inch 1 Din Car Stereo:
| Modelo: | 6288 W |
| Volumentage: | 12 V CC |
| Sistema: | CONTRAERSE DE DOLOR |
| Chip de CPU: | F133 |
| Tamaño de pantalla: | Pantalla táctil de 6.86 pulgadas |
| Resolución de pantalla: | 1280*480 |
| CarPlay/Android Auto: | Wired Connection Supported |
| Enlace espejo: | Apoyado |
| Banda de radio | FM (87.5-108MHz) |
| Chip de radio: | QN8035 |
| Potencia de salida: | 45 W*4 |
| Temperatura de funcionamiento: | -10 ~ 60 °C |
| Versión de Bluetooth: | 5.0 |
| Modos de ecualización: | Multiple modes supported |
| Control del volante: | Apoyado |
| Iluminar desde el fondo: | Seven-color adjustable |
| Memoria de apagado: | Apoyado |
| Entrada inversa: | CVBS |
| AmpChip elevador: | TDA7388 |
| Formato de audio: | MP3 / WMA / WAV / APE / FLAC |
| Formato de vídeo: | RM/RMVB/AVI/MP4/MKV/3GP |
| Formato de imagen: | JPGBMPPNG |
| Soporte de memoria: | Tarjeta TF / Disco U |
| Puertos: | USB, Type-C, AUX |
9. Mantenimiento
Para garantizar la longevidad y el rendimiento óptimo de su estéreo para automóvil Hodozzy, siga estas sencillas pautas de mantenimiento:
- Limpieza de la pantalla: Utilice un paño suave y sin pelusa para limpiar suavemente la pantalla táctil. Para manchas difíciles, limpie ligeramenteampEnjuague el paño con agua o un limpiador de pantallas. Evite materiales abrasivos o productos químicos agresivos.
- Limpieza general: Mantenga la unidad libre de polvo y residuos. Utilice un cepillo suave o aire comprimido para limpiar alrededor de los botones y puertos.
- Evite los líquidos: No derrame líquidos sobre la unidad. Si entra líquido, apáguela inmediatamente y consulte a un profesional.
- Temperaturas extremas: Evite exponer la unidad a temperaturas extremas (muy caliente o muy fría) durante períodos prolongados, ya que esto puede afectar el rendimiento y la vida útil.
10. Garantía y soporte
Hodozzy is committed to providing quality products and excellent customer service. Your Hodozzy car stereo comes with a manufacturer's warranty and dedicated support.
- Garantía del fabricante: Este producto cuenta con una garantía del fabricante de 2 años. Conserve el comprobante de compra para cualquier reclamación de garantía.
- Atención al cliente: For any technical assistance, troubleshooting not covered in this manual, or warranty inquiries, please contact Hodozzy customer support.
- Correo electrónico de contacto: hodozzyofficial@163.com

Figure 10.1: Hodozzy customer support information, including contact email and details about warranty and support services.