1. Introducción
The PEAKMETER PM8250 is a professional handheld digital multimeter designed for accurate and reliable electrical measurements, particularly in photovoltaic (PV) systems. It features a high DC voltage measurement capability up to 1700V, auto and manual ranging, and various functions including AC/DC voltage, current, resistance, capacitance, frequency, temperature, and specialized functions like LPF, MAX/MIN/PEAK, Continuity, Diode, and NCV detection. This manual provides essential information for the safe and effective operation of your PM8250 multimeter.

Figura 1: Frente view of the PEAKMETER PM8250 Multimeter, showing the display, rotary switch, and function buttons.
2. Información de seguridad
Para garantizar el funcionamiento y servicio seguros del multímetro, siga estas precauciones de seguridad:
- Respete siempre los códigos de seguridad locales y nacionales.
- No utilice el medidor si parece dañado o si la caja está abierta.
- Verifique el funcionamiento del medidor midiendo un volumen conocido.tage o actual antes de usar.
- Observe the input limits for each measurement range. The maximum DC voltage es 1700 V.
- Tenga cuidado al trabajar con vol.tages superior a 60 V CC o 30 V CA RMS, ya que representan un peligro de descarga eléctrica.
- Asegúrese de que los cables de prueba estén en buenas condiciones y conectados correctamente.
- Reemplace las baterías tan pronto como aparezca el indicador de batería baja para evitar lecturas incorrectas.
- The device complies with safety ratings EN61010-1, EN61010-2-030, EN61326, and CAT III 1000V.
3. Características del producto
The PM8250 multimeter offers a range of features for versatile measurement:
- Mostrar: Pantalla digital de 6000 cuentas.
- Rango: Automatic and Manual range selection.
- Alto voltagy CC: Mide el volumen CCtage up to 1700V, suitable for photovoltaic panels.
- Medición relativa: Mide la diferencia entre un valor almacenado y la lectura actual.
- MAX/MIN/PEAK: Records maximum, minimum, and peak values during a measurement session.
- LPF (filtro de paso bajo): Filters out high-frequency interference for accurate AC voltage measurements in variable frequency drive (VFD) environments.
- Prueba de continuidad: Indicación audible de continuidad del circuito.
- Prueba de diodo: Comprueba la funcionalidad del diodo.
- NCV (Vol sin contactotage) Detección: Detecta el volumen de CAtagy sin contacto directo.
- Medida de temperatura: Measures temperature using a K-type probe.
- Apagado automático: Automatically powers off after approximately 10 minutes of inactivity to conserve battery life.
- Iluminar desde el fondo: Ilumina la pantalla para su uso en condiciones de poca luz.
- Retención de datos: Congela la lectura actual en la pantalla.
4. Configuración
4.1 Instalación de la batería
The PM8250 requires four 1.5V AA batteries for operation. To install or replace batteries:
- Asegúrese de que el multímetro esté apagado y los cables de prueba estén desconectados.
- Localice la tapa del compartimiento de la batería en la parte posterior del medidor.
- Desatornille el/los tornillo(s) de retención y retire la cubierta.
- Insert four 1.5V AA batteries, observing the correct polarity (+/-) as indicated inside the compartment.
- Vuelva a colocar la tapa del compartimiento de la batería y fíjela con el/los tornillo(s).
4.2 Conexión de cables de prueba
Connect the test leads to the appropriate input jacks for your desired measurement:
- Inserte el cable de prueba negro en el COM Gato (común).
- Por voltage, resistance, capacitance, frequency, diode, continuity, and temperature measurements, insert the red test lead into the Temperatura VΩHz Jacobo.
- Para mediciones de corriente de hasta 600 mA, inserte el cable de prueba rojo en el mA Jacobo.
- For current measurements up to 10A, insert the red test lead into the 10A jack (if applicable, refer to meter markings).

Figura 2: Atrás view of the multimeter showing the battery compartment and test lead connections.
5. Instrucciones de funcionamiento
To operate the multimeter, turn the rotary switch to the desired function. The meter will typically default to auto-ranging. Press the 'RANGE' button to switch between auto and manual ranging if needed.
5.1 Vol. CCtage Medición (V–)
Para medir DC voltage, including high voltage PV systems:
- Coloque el interruptor giratorio en la V– position (1700V range).
- Conecte los cables de prueba en paralelo al circuito o componente bajo prueba.
- Leer el vol.tage valor en la pantalla.

Figura 3: Medición del volumen de CCtage of a battery using the multimeter.
5.2 Vol. CAtage Medición (V∼)
Para medir el voltaje CAtage:
- Coloque el interruptor giratorio en la V∼ posición.
- Connect the test leads in parallel to the AC source.
- Leer el vol.tage valor en la pantalla.
- Presione el LPF button to activate the Low Pass Filter for measurements in noisy environments (e.g., VFD outputs).
5.3 Medición de resistencia (Ω)
Para medir la resistencia:
- Coloque el interruptor giratorio en la Ω posición.
- Asegúrese de que el circuito esté desenergizado antes de conectar los cables de prueba al componente.
- Lea el valor de resistencia en la pantalla.

Figure 4: Measuring resistance using the multimeter.
5.4 Current Measurement (mA/A)
To measure DC or AC current:
- Coloque el interruptor giratorio en la mA or A posición. Utilizar el FUNC button to select AC or DC current.
- Connect the test leads in series with the circuit. Ensure the correct input jack (mA or 10A) is used.
- Lea el valor actual en la pantalla.
- Precaución: Never connect the meter in parallel when measuring current, as this can blow the fuse or damage the meter.
5.5 Temperature Measurement (Temp)
Para medir la temperatura:
- Coloque el interruptor giratorio en la Temperatura posición.
- Insert the K-type thermocouple probe into the Temperatura VΩHz y COM tomas
- Coloque la punta del termopar sobre el objeto que se va a medir.
- Press the ℃/℉ button to switch between Celsius and Fahrenheit units.
5.6 Otras funciones
- Continuidad/Diodo: Set the rotary switch to the continuity/diode position. Use the FUNC Botón para alternar entre modos.
- SIN VALOR COMERCIAL: Coloque el interruptor giratorio en la SIN VALOR COMERCIAL position. Bring the top of the meter near an AC voltage source to detect its presence.
- MAX/MIN/PEAK: Presione el MÁX/MÍN/PICO button to cycle through maximum, minimum, and peak hold readings.
- Relativo: Presione el REL button to store the current reading as a reference and display subsequent measurements relative to it.
- Retención de datos: Presione el SOSTENER Botón para congelar la lectura actual en pantalla. Presione nuevamente para liberar.
- Iluminar desde el fondo: Press the backlight button (often combined with another function) to turn the display backlight on/off.
6. Mantenimiento
6.1 Limpieza
Limpiar la carcasa con publicidadamp Paño y detergente suave. No utilice abrasivos ni disolventes. Asegúrese de que el medidor esté seco antes de usarlo.
6.2 Reemplazo de batería
Reemplace las baterías cuando aparezca el indicador de batería baja en la pantalla. Consulte la Sección 4.1 para obtener instrucciones.
6.3 Reemplazo de fusibles
If the current measurement function fails, the fuse may need replacement. The meter uses a 600mA FUSED input for mA ranges and a 10A MAX input for higher current ranges. Fuse replacement should only be performed by qualified personnel. Use only fuses of the specified type and rating.
6.4 Almacenamiento
Si el medidor no se utiliza durante un período prolongado, retire las baterías para evitar fugas y daños.
7. Solución de problemas
- Sin pantalla: Verifique la instalación y la carga de las baterías. Reemplace las baterías si es necesario.
- Lecturas incorrectas: Ensure test leads are properly connected and not damaged. Verify the correct function and range are selected. Check for blown fuses in current modes.
- Apagado automático: This is a normal function. Press any button or turn the rotary switch to reactivate the meter.
8. Especificaciones
| Medición | Rango | Exactitud |
|---|---|---|
| Vol DCtage | 600mV/6V/60V/600V/1700V | ±(0.8%+3) |
| Vol. CAtage | 600mV/6V/60V/600V/1000V | ±(1.0%+3) |
| Corriente continua | 60mA / 600mA | ±(1.2%+3) |
| Corriente alterna | 60mA / 600mA | ±(1.5%+3) |
| Resistencia | 600Ω/6kΩ/60kΩ/600kΩ/6MΩ | ±(1.2%+5) |
| 60 MΩ | ±(2.0%+5) | |
| Capacidad | 10nF/100nF/1µF/10µF/100µF | ±(3.0%+5) |
| 1 mF/10 mF | ±(4.0%+5) | |
| 100 mF | ±(5.0%+5) | |
| Frecuencia | 10 Hz a 10 MHz | ±(1.0%+5) |
| Ciclo de trabajo | 5% ~ 95% | ±(3.0%+5) |
| Temperatura | -20 ℃ ~ 1000 ℃ (-4 ℉ ~ 1832 ℉) | ±(2.0%+2) |
Especificaciones generales:
- Mostrar: 6000 cuentas
- Fuente de alimentación: 4 pilas AA de 1.5 V
- Tamaño: 204 mm x 94 mm x 57 mm
- Peso: Aprox. 410 g
- Clasificación de seguridad: EN61010-1, EN61010-2-030, EN61326, CAT III 1000 V
- Apagado automático: Después de unos 10 minutos sin operación
- Vol. De funcionamiento máximotage: 1700 voltios (CC)
- Clasificación de temperatura superior: 60 grados centígrados
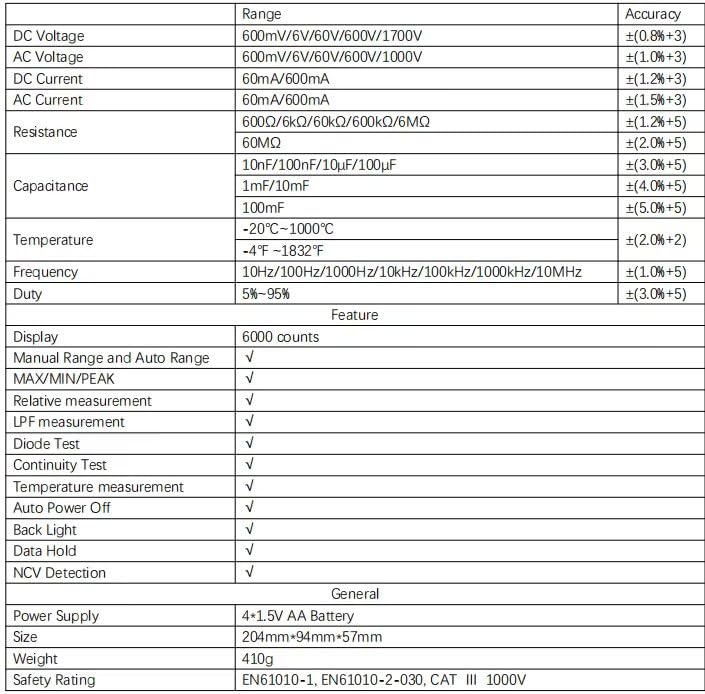
Figure 5: Detailed specifications table for the PM8250 multimeter.
9. Garantía y soporte
The PEAKMETER PM8250 multimeter comes with an EU Spare Part Availability Duration of 1 year. For warranty claims, technical support, or service inquiries, please contact your original point of purchase or the manufacturer directly. Keep your purchase receipt as proof of purchase.