1. Introducción
The PEAKMETER PM2016S is a compact and intelligent digital clamp meter designed for accurate electrical measurements. This instrument features a liquid crystal display with a maximum count value of 5999 and a backlight function for improved visibility in various environments. It offers a range of measurement functions with automatic range selection, making it suitable for both beginners and experienced users. The PM2016S can measure AC and DC voltage, AC current, resistance, frequency, and also includes continuity testing, Non-Contact Voltage (NCV) detection, and V/Ω/A auto-scan capabilities. Its portable design ensures ease of use and convenience.
2. Información de seguridad
WARNING: To avoid electric shock or personal injury, read and understand all instructions and safety information before using this instrument.
- Asegúrese siempre que el instrumento esté en buenas condiciones de funcionamiento antes de usarlo.
- No aplique más del volumen nominal.tage, as marked on the instrument, between the terminals or between any terminal and earth ground.
- Tenga cuidado al trabajar con vol.tages superior a 30 V CA RMS, 42 V pico o 60 V CC. Estos volúmenestagPueden suponer un riesgo de descarga eléctrica.
- No utilice el instrumento si parece dañado o si el aislamiento está comprometido.
- Ensure the test leads are in good condition, without any cracks or breaks in the insulation.
- Desconecte siempre los cables de prueba del circuito antes de cambiar de función.
- Reemplace las baterías inmediatamente cuando aparezca el indicador de batería baja para garantizar lecturas precisas.
- Respete los códigos de seguridad locales y nacionales.
This instrument complies with EN61010-1, EN61010-2-033, EN61326, CAT. III 600V safety ratings.
3. Características del producto
- High Quality Jaw Head: Durable and precise clamp mechanism for current measurement.
- Clear LCD Display and Backlight: Easy-to-read 6000-count display with backlight for visibility in various lighting conditions.
- Fácil operación: Simple, intuitive controls, often requiring just one click for common functions.
- Rango automático: Selecciona automáticamente el rango de medición apropiado, simplificando la operación.
- Retención de datos: Congela la lectura mostrada para una grabación conveniente.
- Vol sin contactotagDetección de e (NCV): Detecta de forma segura el volumen de CAtagy sin contacto directo.
- V/Ω/A Auto Scan: Automatically identifies and measures voltage, resistencia o corriente.
- Prueba de continuidad: Checks for electrical continuity with an audible buzzer.
- Medida de frecuencia: Measures frequency via clamp o voltage entrada.
- Compacto y ligero: Diseño portátil para portabilidad y facilidad de uso.
- Apagado automático: Se apaga automáticamente después de 10 minutos de inactividad para conservar la vida útil de la batería.
4. Contenido del paquete

El paquete normalmente incluye los siguientes elementos:
- Caja de color (embalaje)
- PEAKMETER PM2016S Digital Clamp Metro
- Cables de prueba (rojo y negro)
- AAA Batteries (2x 1.5V)
- Manual de usuario
Description: This image displays the complete contents of the PEAKMETER PM2016S Digital Clamp Multimeter package, including the device itself, test leads, batteries, and the user manual, all presented within its retail packaging.
5. Configuración
5.1 Instalación de la batería
The PM2016S requires two 1.5V AAA batteries. To install or replace batteries:
- Asegúrese de que el medidor esté apagado.
- Localice la tapa del compartimiento de la batería en la parte posterior del medidor.
- Use un destornillador para abrir el compartimiento de la batería.
- Inserte las dos pilas AAA, observando la polaridad correcta (+ y -).
- Vuelva a colocar la tapa del compartimiento de la batería y asegúrela con el tornillo.
5.2 Conexión de cables de prueba
Por voltage, resistance, frequency (voltage), and continuity measurements, connect the test leads:
- Inserte el cable de prueba negro en el conector de entrada “COM” (común).
- Inserte el cable de prueba rojo en el conector de entrada "VΩ".
6. Instrucciones de funcionamiento
The PM2016S features an auto-ranging function, simplifying most measurements. Press the red power button to turn the meter on or off. The meter will typically start in auto-scan mode (V/Ω/A Auto Scan).
6.1 Vol AC/DCtagMedición electrónica
- Conecte los cables de prueba como se describe en la Sección 5.2.
- Turn on the meter. It will automatically detect AC or DC voltage.
- Touch the red and black test probes to the points in the circuit where you want to measure voltage.
- Leer el vol.tage valor en la pantalla LCD.
Description: This video demonstrates the unboxing of the PEAKMETER PM2016S and its accessories, followed by a practical demonstration of measuring AC voltage using the test leads. The user connects the leads to a power outlet and the meter displays the voltage lectura.
6.2 Medición de corriente CA (Clamp Función)
- Ensure the meter is on.
- Presione la tecla clamp gatillo para abrir las mandíbulas.
- Enclose a single conductor (not a bundle of wires) within the jaws. Ensure the jaws are fully closed.
- The meter will display the AC current reading.
Description: This video demonstrates the AC current measurement function of the PEAKMETER PM2016S. The user clamps the meter around a power cable connected to an appliance (kettle), and the meter displays the current draw.
6.3 Medición de frecuencia
The PM2016S can measure frequency in two ways:
- Via Test Leads (Voltage Frequency): en vol.tage measurement mode, the meter can display frequency. Press the "Hz/NCV" button to toggle to frequency display.
- Vía Clamp (Current Frequency): Al medir corriente alterna con el clamp, the meter can also display the frequency of the current. Press the "Hz/NCV" button to toggle to frequency display.

Description: This image shows the clear LCD display of the PM2016S, highlighting its backlight feature and the various measurement indicators, including frequency (Hz).
6.4 vol. sin contactotagDetección de e (NCV)
- Press the "Hz/NCV" button to activate NCV mode. The display will show "NCV".
- Move the top end of the meter near a live AC voltagy fuente.
- The meter will beep and the NCV indicator will light up, with the frequency of beeps and light increasing a medida que se acerca al voltagy fuente.
Description: This video demonstrates the NCV (Non-Contact Voltage) function of the PEAKMETER PM2016S. The user activates NCV mode and brings the meter near a power outlet, showing the audible and visual alerts when voltagSe detecta e.
6.5 Prueba de continuidad
- Conecte los cables de prueba como se describe en la Sección 5.2.
- The meter will automatically enter continuity mode if resistance is low.
- Toque las sondas de prueba en los dos puntos donde desea comprobar la continuidad.
- If there is continuity (resistance less than 30Ω), the buzzer will sound.
6.6 Retención de datos y retroiluminación
- Retención de datos: Press the "HOLD" button (often combined with the backlight button) to freeze the current reading on the display. Press again to release.
- Iluminar desde el fondo: Press and hold the "HOLD" button (or a dedicated backlight button if present) to turn the backlight on or off.

Description: This image highlights the user-friendly design of the PM2016S, showing the main power button and other function buttons, emphasizing its easy operation.
7. Mantenimiento
7.1 Limpieza
Limpiar la carcasa con publicidadamp Paño y detergente suave. No utilice abrasivos ni disolventes. Mantenga los terminales de entrada limpios y sin suciedad ni humedad.
7.2 Reemplazo de batería
Cuando aparezca el indicador de batería baja en la pantalla, reemplace las baterías como se describe en la Sección 5.1. Retire las baterías si el medidor no se utiliza durante un período prolongado para evitar fugas.
8. Solución de problemas
- No hay pantalla/El medidor no se enciende: Verifique la instalación de las baterías y asegúrese de que no estén agotadas. Reemplácelas si es necesario.
- Lecturas inexactas: Ensure test leads are properly connected. Check for damaged leads. Verify the correct measurement function is selected (though auto-ranging minimizes this). Ensure the clamp Las mandíbulas están completamente cerradas para realizar mediciones de corriente.
- Indicación de "OL" o sobrecarga: The measured value exceeds the meter's range. Select a higher range if available, or ensure the input is within the meter's specifications.
- Sin detección de NCV: Ensure NCV mode is active. The NCV sensor is typically at the top of the clamp head; ensure it is close to the AC source.
9. Especificaciones
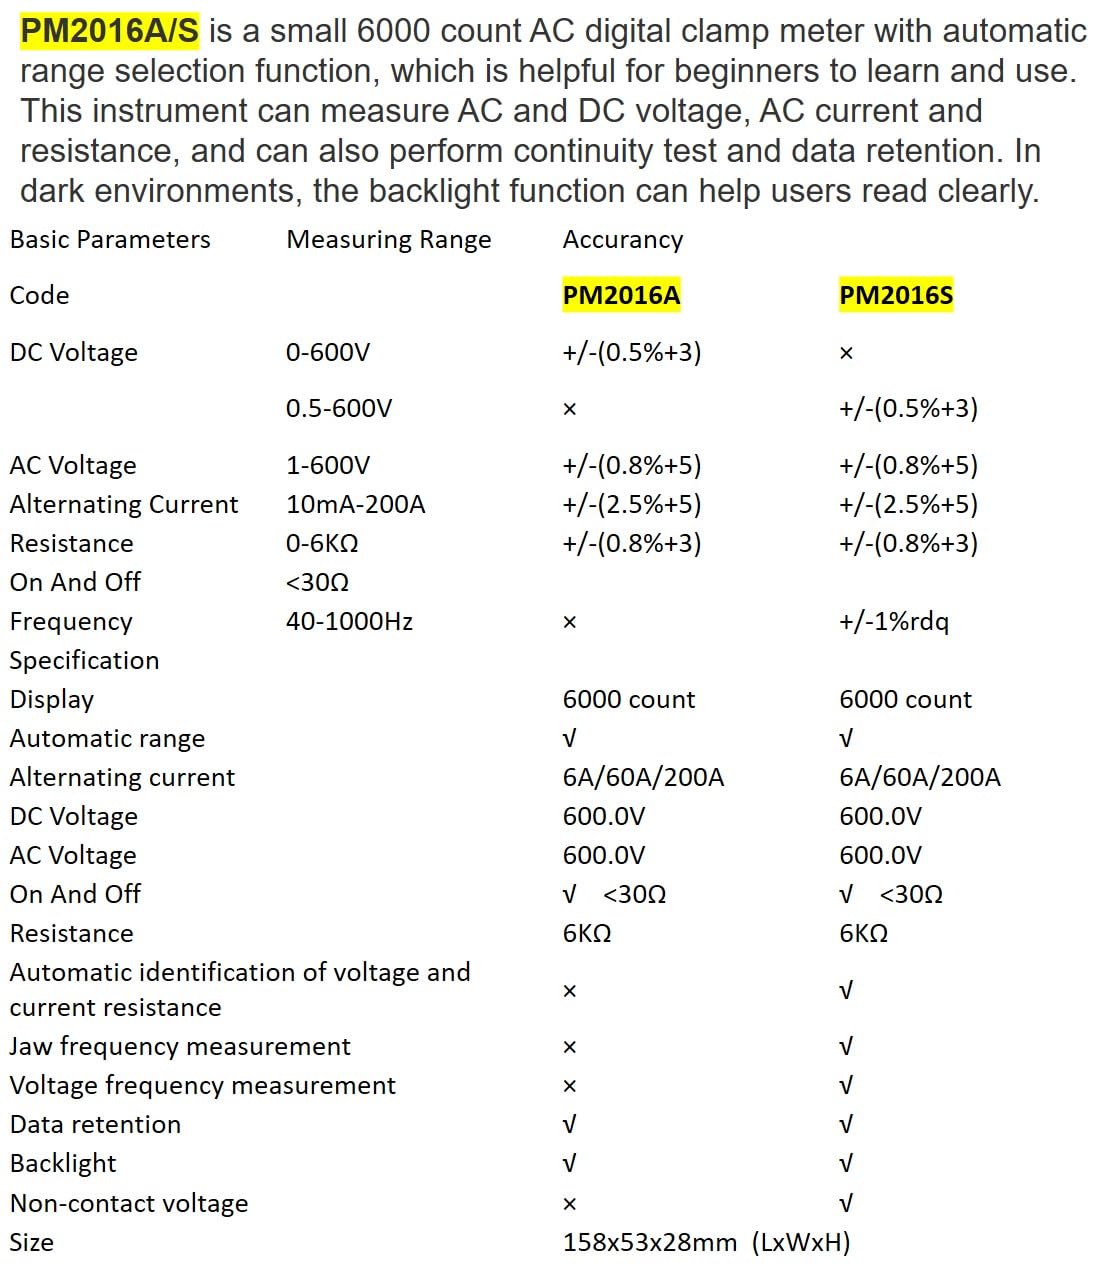
Description: This image presents a comprehensive table detailing the basic parameters, measuring ranges, and accuracy for both the PM2016A and PM2016S models, including features like display count, auto-ranging, and NCV.
| Parámetro | Range (PM2016S) | Accuracy (PM2016S) |
|---|---|---|
| Vol DCtage | 0.5 ~ 600 V | ±(0.5%+3) |
| Vol. CAtage | 1.0 ~ 600 V | ±(0.8%+5) |
| Corriente alterna | 6 A/60 A/200 A | ±(2.5%+8) |
| Resistencia | 0 ~ 6 kΩ | ±(0.8%+3) |
| Frecuencia | 60 Hz ~ 1000 Hz | ±(1.0%+5) |
| Mostrar | 6000 cuentas | |
| Alcance automático | Sí | |
| Continuidad | <30Ω | |
| V/Ω/A Auto Scan | Sí | |
| Frecuencia (Clamp) | Sí | |
| Frecuencia (Voltage) | Sí | |
| Retención de datos | Sí | |
| Iluminar desde el fondo | Sí | |
| SIN VALOR COMERCIAL | Sí | |
| Fuente de alimentación | 2 pilas AAA de 1.5 V | |
| Peso neto | 122.4g (sin pilas) | |
| Tamaño | 158 mm x 55 mm x 29 mm | |
| Tamaño de la mandíbula | Ø20mm | |
| Clasificación de seguridad | EN61010-1, EN61010-2-033, EN61326, CAT. III 600V | |

Description: This image provides a visual representation of the physical dimensions of the PEAKMETER PM2016S, including its length, width, and jaw opening size, along with its weight.
10. Garantía y soporte
The PEAKMETER PM2016S Digital Clamp Multimeter comes with a 1 año de garantía a partir de la fecha de compra. Esta garantía cubre defectos de materiales y mano de obra en condiciones normales de uso.
For technical support, warranty claims, or service inquiries, please contact your retailer or the manufacturer directly. Keep your purchase receipt as proof of purchase for warranty purposes.