
1. Introducción
The JoFomp Digital Wall Clock is designed to provide clear and comprehensive timekeeping, environmental monitoring, and alarm functions for various indoor settings. Its large 9-inch LED display ensures excellent visibility, day or night. This manual provides detailed instructions for setup, operation, and maintenance of your new digital clock.

Image: The digital clock shown with its dimensions (8.98" / 22.8cm length, 2.95" / 7.5cm height, 1.38" / 3.5cm depth) and icons representing its multiple functions: Dual Alarm, Temperature, Week, Brightness Control, Drowsiness (Snooze), Humidness, Memory Function, and Date.
2. Contenido del paquete
- JoFomp Digital Wall Clock (Model: 5503)
- Cable de alimentación USB
- Adaptador de corriente
- Mounting Nails (x2)
- Manual de usuario (este documento)
3. Información de seguridad
- Ensure the power adapter and cable are undamaged before use.
- No exponga el dispositivo a temperaturas extremas, luz solar directa o humedad alta.
- Mantener fuera del alcance de los niños.
- No intente desmontar ni reparar el reloj usted mismo. Solicite servicio técnico a personal cualificado.
- Use only the provided USB cable and adapter, or a compatible 5V/1A power source.
- Deseche las baterías de forma responsable de acuerdo con las regulaciones locales.
4. Configuración
4.1 Conexión de alimentación
- Connect the USB power cable to the clock's USB port (located on the back).
- Conecte el otro extremo del cable USB al adaptador de corriente proporcionado.
- Conecte el adaptador de corriente a una toma de corriente estándar. La pantalla del reloj se iluminará.
4.2 Instalación de la batería de memoria (opcional pero recomendada)
The clock requires a constant power supply to operate. A memory battery ensures that time data is retained during power outages, preventing the need to reset the time. Two 1.5V AAA batteries are required (not included).
- Localice el compartimento de la batería en la parte posterior del reloj.
- Abra la tapa del compartimiento de la batería.
- Inserte dos pilas AAA de 1.5 V, observando la polaridad correcta (+/-).
- Cierre bien la tapa del compartimento de la batería.
4.3 opciones de montaje
The JoFomp Digital Wall Clock can be placed on a desk or mounted on a wall.
- Colocación del escritorio: Simply place the clock on any flat, stable surface.
- Montaje en pared: Use the two provided mounting nails. Insert the nails into the wall at the desired location, ensuring they are level and spaced correctly to fit the hanging holes on the back of the clock. Carefully hang the clock onto the nails.

Image: The back panel of the clock, highlighting the "SET", "UP", and "DOWN" buttons, the memory battery storage compartment, the wall hanging hole, and the USB power outlet.

Image: Two illustrations demonstrating the clock's versatility: one showing it hung on a wall, and another showing it placed on a desktop.
5. Instrucciones de funcionamiento
5.1 Configuración de hora y fecha
- Mantenga presionada la tecla "COLOCAR" button on the back of the clock to enter time setting mode.
- Utilice el "UP" y "ABAJO" buttons to adjust the hour. Press "COLOCAR" to confirm and move to minutes.
- Repita el proceso para configurar los minutos, el año, el mes y el día.
- After setting the date, press "COLOCAR" to exit the setting mode.
5.2 Cambio de formato de 12/24 horas
In normal time display mode, short press the "UP" button to switch between 12-hour (with AM/PM indicator) and 24-hour formats.
Video: Demonstration of the JoFomp digital clock's features, including switching between 12-hour and 24-hour time formats, changing temperature units, and showing timer and countdown functions. This video highlights the clock's versatility and ease of use.
5.3 Función de horario de verano (DST)
To enable or disable DST, short press the "ABAJO" button in the time display state. The clock will automatically adjust the time by one hour forward or backward as appropriate.

Image: The clock display illustrating the Daylight Saving Time (DST) function, showing how the time shifts by one hour when DST is enabled or disabled, along with visual cues for "Spring Forward" and "Fall Back".
5.4 Control de brillo
The clock features automatic and manual brightness adjustment modes.
- Brillo automático: The built-in light sensor adjusts display brightness based on ambient light.
- Brillo manual: You can manually set the brightness level to your preference.
- Modo de sueño: A light-sensitive sleep mode is available for minimal disturbance during rest.

Image: The clock display showing different brightness settings: "L-AU" (Third Gear Auto-Brightness), "L-SL" (Fourth Gear Sleep Mode Auto-Brightness), "L-01" (Low light level), "L-02" (Medium brightness), and "L-03" (High brightness).

Image: A side-by-side comparison of the clock's display brightness during the day (bright) and at night (dimmed), demonstrating its automatic brightness adjustment feature for optimal visibility.
5.5 Función de alarma dual
El reloj admite dos alarmas independientes.
- Presione el botón "COLOCAR" button repeatedly until "AL1" or "AL2" appears on the display.
- Mantenga pulsado "COLOCAR" to enter alarm setting mode.
- Usar "UP" y "ABAJO" to set the alarm hour and minutes.
- Prensa "COLOCAR" to confirm each step.
- To activate/deactivate an alarm, short press the "UP" o "ABAJO" button when "AL1" or "AL2" is displayed. An alarm icon will appear when active.
- When an alarm sounds, press any button to activate snooze, or press and hold "COLOCAR" to turn off the alarm.

Image: The clock display showing two alarm icons, indicating the dual alarm function. The image also depicts scenarios like "Wake Up Time" and "Exercise Time" to illustrate practical uses of the dual alarms.

Image: A visual representation of the dual alarm feature, showing the clock in two different environments (a kitchen and a gym), suggesting its utility for setting multiple reminders for various daily activities.
5.6 Visualización de temperatura y humedad
The clock continuously displays temperature in Celsius (°C) or Fahrenheit (°F) and relative humidity (%).
- To switch between °C and °F, short press the "ABAJO" button when the temperature is displayed.
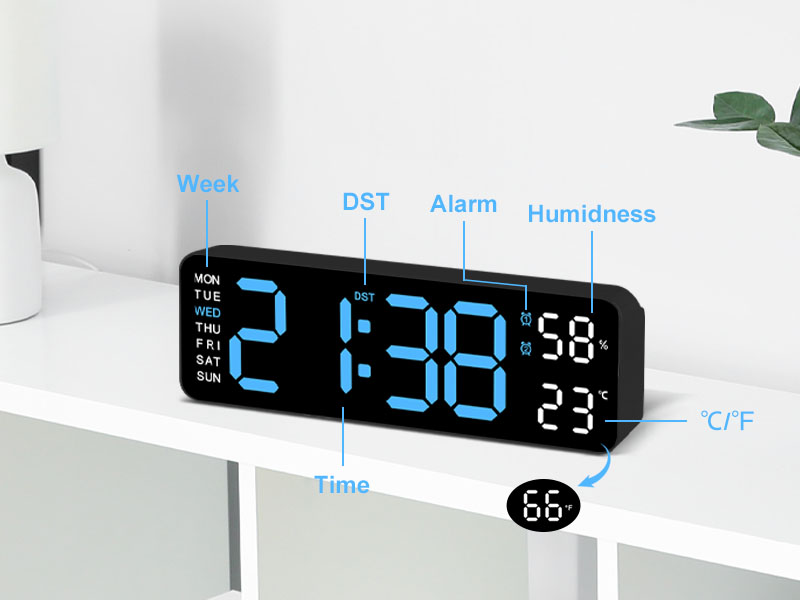
Imagen: Un detalle view of the clock's display, with labels pointing to the Week, DST, Alarm, Humidness, Temperature (°C/°F), and Time indicators, along with a small icon for the temperature sensor.
6. Mantenimiento
- Limpie el reloj con un paño suave y seco. No utilice limpiadores abrasivos ni disolventes.
- Avoid placing the clock in areas with excessive dust or moisture.
- If not in use for an extended period, disconnect the power and remove the memory batteries.
7. Solución de problemas
| Problema | Posible causa | Solución |
|---|---|---|
| La pantalla del reloj está apagada. | No hay suministro de energía. | Ensure USB cable is securely connected and power adapter is plugged into a working outlet. |
| La hora y la fecha se reinician después de un corte de energíatage. | Memory batteries not installed or depleted. | Install two new 1.5V AAA batteries in the memory compartment. |
| Temperature/Humidity reading seems inaccurate. | Reloj colocado cerca de una fuente de calor/frío o bajo la luz solar directa. | Traslade el reloj a un lugar con temperatura y humedad ambiente estables. Espere a que las lecturas se estabilicen. |
| La alarma no suena. | Alarm not activated or volume too low (if applicable). | Ensure the alarm is set and activated (alarm icon visible). Check if there's a volume setting (refer to specific alarm setting instructions). |
8. Especificaciones
| Característica | Detalle |
|---|---|
| Marca | jofomp |
| Número de modelo | 5503 |
| Tipo de pantalla | LED digitales |
| Tamaño de la pantalla | 9 pulgadas |
| Dimensiones del producto | 11.8" de ancho x 4" de alto (aprox. 22.8 cm x 7.5 cm x 3.5 cm) |
| Fuente de poder | Eléctrico con cable (USB 5 V/1 A) |
| Batería de memoria | 2 pilas AAA de 1.5 V (no incluidas) |
| Características especiales | Dual Alarm, Adjustable Brightness (Auto/Manual), Calendar, Large Display, Temperature (°C/°F), Humidity, DST, 12/24H Format, Snooze |
| Tipo de montaje | Wall Mount or Desk Placement |
| Material | Acrilonitrilo butadieno estireno (plástico) |
| Uso en interiores y exteriores | Solo en interiores |
9. Garantía y soporte
JoFomp products are manufactured with high-quality standards. For any issues or inquiries regarding your digital wall clock, please contact JoFomp customer support through the retailer's platform or the official JoFomp websitio.
Please retain your purchase receipt for warranty claims. Specific warranty terms and conditions may vary by region and retailer.
Para obtener más ayuda, visite el JoFomp Store on Amazon.