Introducción
Thank you for choosing the Bitvae Teeth Whitening Kit with LED Light. This manual provides essential information for the safe and effective use of your new teeth whitening system. Please read all instructions carefully before first use and retain this manual for future reference.
Contenido del paquete
Your Bitvae Teeth Whitening Kit includes the following items:
- 1 x LED Accelerator Light
- 1 x Mouth Tray
- 4 x 3ml Teeth Whitening Gel Syringes (22% dental-grade carbamide peroxide)
- 1 x Small Brush for Gel Application
- 1 x Shade Guide
- 1 x Manual de instrucciones
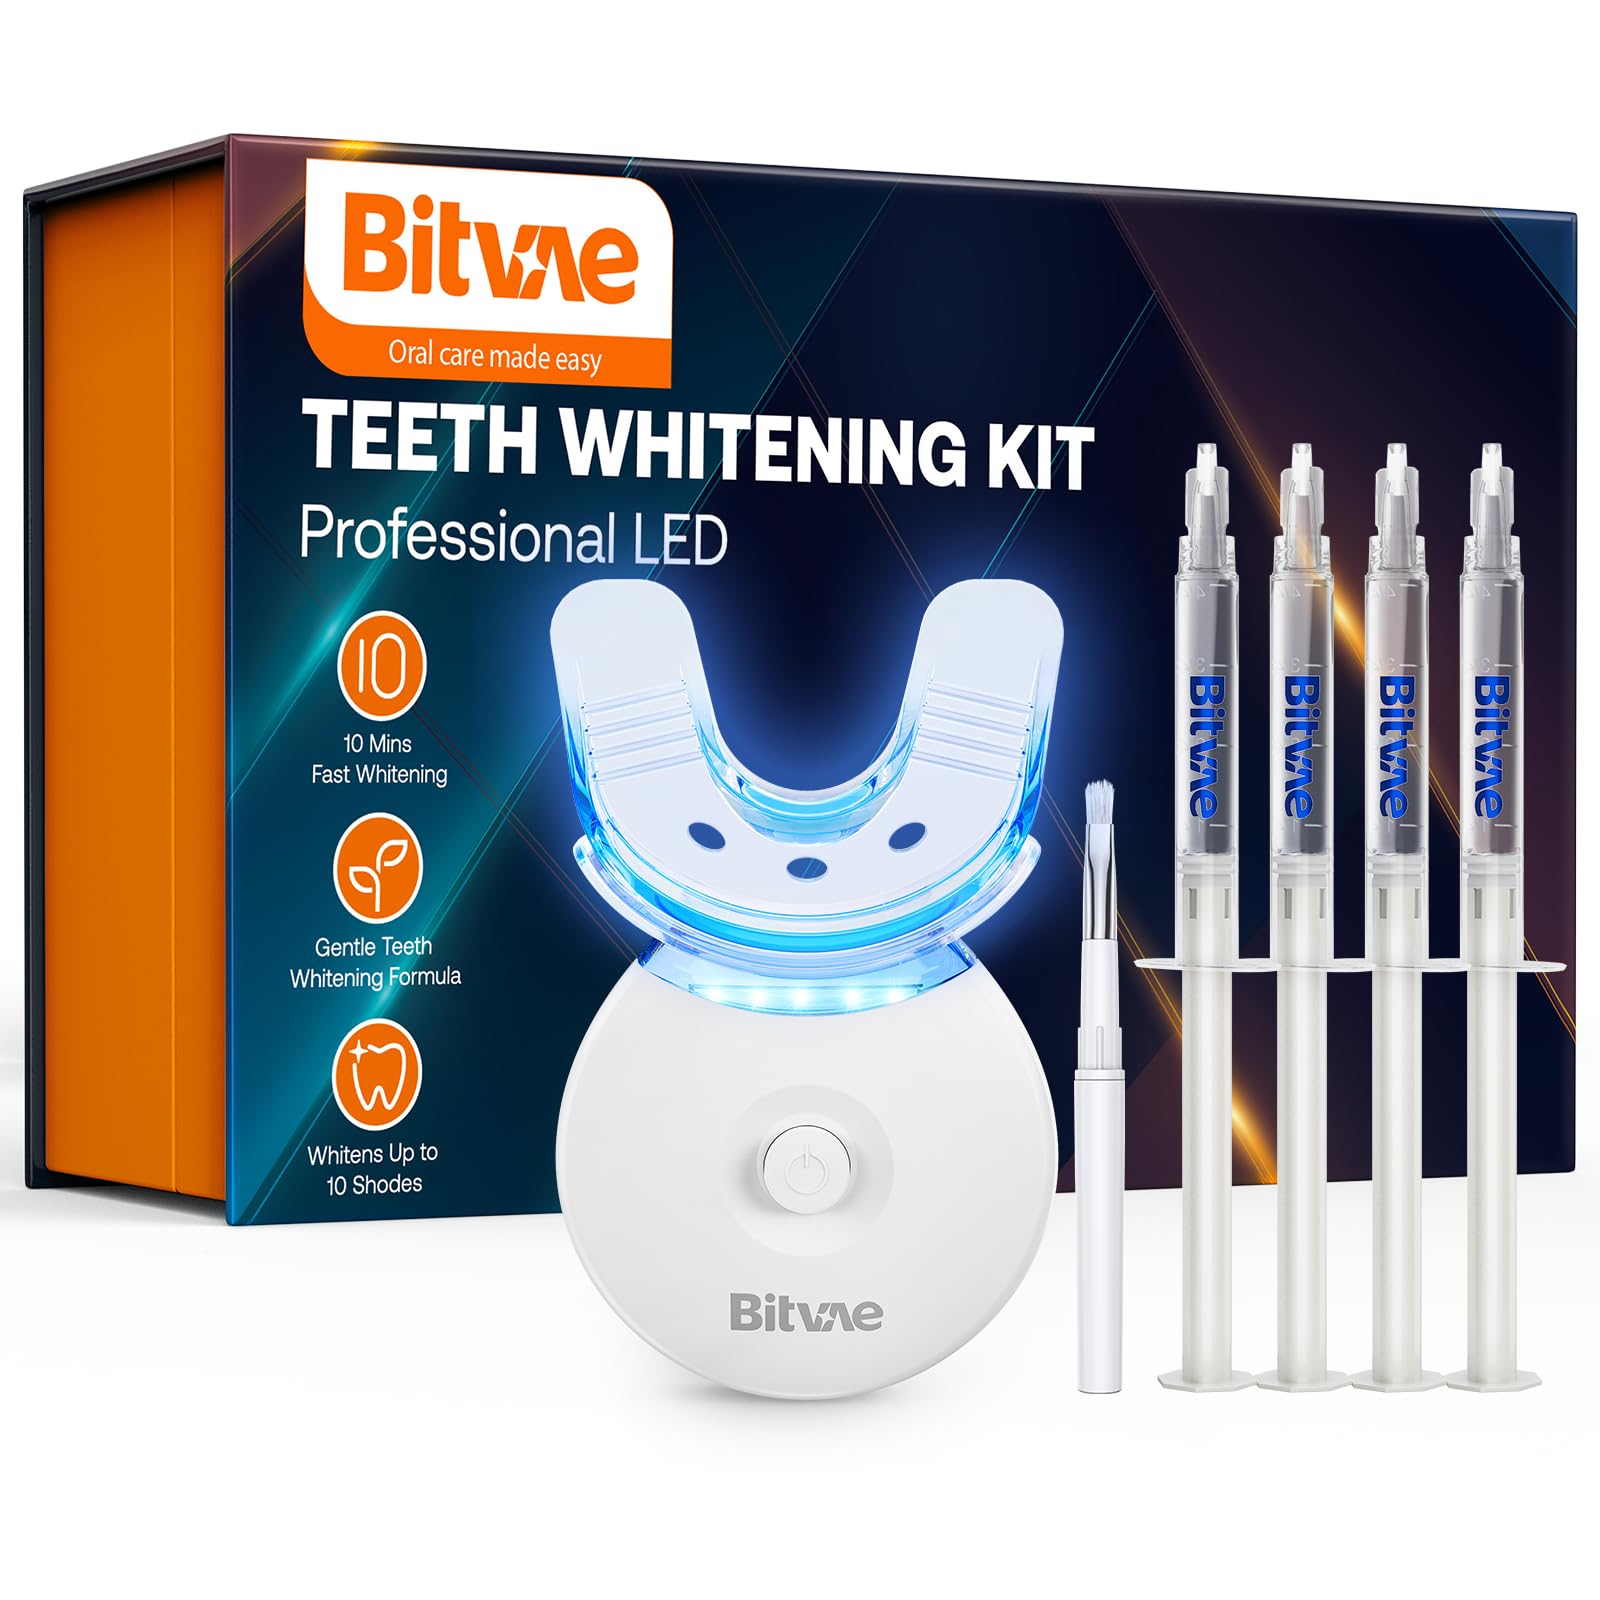
Image: The complete Bitvae Teeth Whitening Kit, showcasing the LED accelerator light, gel syringes, mouth tray, and application brush.
Configuración
1. Preparing the LED Light and Mouth Tray
- Open the battery compartment behind the LED accelerator light.
- Remove the insulation sheet from the battery to activate the device.
- Attach the clear mouth tray securely to the LED accelerator light. Ensure it clicks into place.
2. Preparing the Whitening Gel
- Remove the cap from one of the whitening gel syringes.
- Attach the small brush provided to the tip of the syringe.

Image: A visual representation of the setup process, including attaching the mouth tray to the LED light and preparing the gel for application.
Instrucciones de funcionamiento
1. Applying the Whitening Gel
- Brush your teeth thoroughly before starting the treatment. Wait at least one hour after brushing before applying the gel.
- Dispense approximately 1/4 of the gel from the syringe onto the small brush.
- Carefully apply a thin, even layer of gel to the front surfaces of your upper and lower teeth. Avoid direct contact with your gums and lips to prevent irritation.
2. Uso de la luz LED
- Place the mouth tray with the attached LED light into your mouth, ensuring your teeth are properly aligned within the tray.
- Press the power button on the LED accelerator light to turn it on. The blue LED lights will illuminate.
- The device features a 10-minute automatic timer. Wear the device for 10 minutes per session. The light will automatically turn off when the session is complete.
- For optimal results, it is recommended to use the kit for 15-30 minutes per session, which may require restarting the device after the initial 10-minute cycle.

Image: A user demonstrating the application of the LED teeth whitening device.

Imagen: Detallada view of the LED accelerator light and mouth tray, highlighting the cold blue light technology.
3. Cuidados posteriores al tratamiento
- After each session, remove the device and rinse your mouth thoroughly with water to remove any remaining gel.
- Avoid consuming any colored foods or drinks (e.g., coffee, tea, red wine, dark sodas) for at least 30 minutes after treatment to maximize whitening results.
Información importante de seguridad
- Este producto está destinado únicamente para uso en adultos.
- The whitening gel contains 22% carbamide peroxide, which is formulated to be gentle and non-irritating for sensitive teeth. However, if you experience any discomfort, reduce the amount of gel used or discontinue use.
- Avoid direct contact of the whitening gel with gums and lips. If contact occurs, rinse thoroughly with water.
- Do not swallow the whitening gel.
- Consult your dentist before use if you have any dental concerns, gum disease, or are pregnant/nursing.
- Las declaraciones sobre los suplementos dietéticos no han sido evaluadas por la FDA y no pretenden diagnosticar, tratar, curar o prevenir ninguna enfermedad o condición de salud.
Mantenimiento
Cleaning the Mouth Tray
- After each use, detach the mouth tray from the LED light.
- Rinse the mouth tray thoroughly with lukewarm water to remove any gel residue.
- Allow the mouth tray to air dry completely before storing.
Care for the LED Light
- Do not immerse the LED accelerator light in water. Wipe it clean with a damp Paño si es necesario.
- The LED light is powered by 1 Lithium Ion battery (included). If the light does not turn on, ensure the battery insulation sheet has been removed. If issues persist, the battery may need replacement.
Solución de problemas
| Problema | Posible causa | Solución |
|---|---|---|
| La luz LED no se enciende. | Battery insulation sheet not removed or battery depleted. | Ensure the battery insulation sheet is removed. Replace the Lithium Ion battery if necessary. |
| Gum or lip irritation. | Gel contact with gums/lips or too much gel applied. | Reduce the amount of gel applied. Ensure gel is only on tooth surfaces. Avoid contact with gums and lips. If irritation persists, discontinue use and consult a dentist. |
| No hay resultados de blanqueamiento visibles. | Inconsistent use or insufficient treatment time. | Ensure consistent daily use for the recommended duration (15-30 minutes). Results may vary per individual. |
Especificaciones del producto
- Dimensiones del producto: 7 x 4 x 2.64 pulgadas; 9.91 onzas
- Baterías: Se requiere 1 batería de iones de litio (incluida)
- Fabricante: Bitvae
- ASIN: B0CX4ZQL61
- Beneficios del producto: Easy and Effective Teeth Whitening
- Formulario del artículo: Gel
- Componentes incluidos: Syringe, Teeth Whitening Gel, LED Accelerator Light, Mouth Tray, Small Brush
- Descripción del rango de edad: Adulto
- Características materiales: Gentle and Effective
- Sabor: Sin sabor
Garantía y soporte
Bitvae is committed to customer satisfaction. Your kit includes a Satisfaction Warranty Card. For any questions, concerns, or support needs regarding your Bitvae Teeth Whitening Kit, please contact us:
- Correo electrónico: soporte@bitvae.com
- Teléfono: +1 872 679 8064
- Websitio: https://bitvae.com
Consulte la tarjeta de garantía incluida en su paquete para conocer los términos y condiciones de garantía específicos.