1. Introducción
This manual provides essential information for the safe and effective operation, maintenance, and troubleshooting of your Stanley SM18-B1 1800W Sliding Mitre Saw. Please read this manual thoroughly before using the tool and keep it for future reference.

Image 1.1: The Stanley SM18-B1 1800W Sliding Mitre Saw, showcasing sus principales componentes y diseño.
2. Instrucciones de seguridad
Siga siempre las precauciones básicas de seguridad para reducir el riesgo de incendio, descarga eléctrica y lesiones personales al utilizar herramientas eléctricas. Conserve este manual para futuras consultas.
- Seguridad en el área de trabajo: Mantenga el área de trabajo limpia y bien iluminada. No utilice herramientas eléctricas en atmósferas explosivas, como en presencia de líquidos, gases o polvo inflamables.
- Seguridad eléctrica: Los enchufes de las herramientas eléctricas deben coincidir con la toma de corriente. Nunca modifique el enchufe. Evite el contacto del cuerpo con superficies conectadas a tierra. No exponga las herramientas eléctricas a la lluvia ni a la humedad.
- Seguridad personal: Always wear eye protection, hearing protection, and a dust mask. Dress properly; avoid loose clothing or jewelry. Secure long hair. Do not overreach. Stay alert and use common sense.
- Uso y cuidado de herramientas: No fuerce la herramienta eléctrica. Utilice la herramienta eléctrica correcta para su aplicación. Desconecte el enchufe de la fuente de alimentación antes de realizar cualquier ajuste, cambiar accesorios o guardar la herramienta eléctrica.
- Specific Mitre Saw Safety: Ensure the blade is sharp and correctly installed. Never remove the blade guard. Keep hands clear of the cutting area. Support workpieces properly.
3. Producto terminadoview y componentes
The Stanley SM18-B1 is an 1800W sliding mitre saw designed for precise cutting of wood. Key features include:
- Mango ergonómico: Designed for comfortable and easy operation with a lock-off trigger switch.
- LED Shadow Cut Line: Provides a clear and accurate cut line for precise results and improved illumination.
- Anti-Rust Plated Sliding Rod: Ensures durability and smooth operation of the sliding mechanism.
- Repetitive Cut Feature: Allows for consistent cut lengths for repetitive tasks.
- Robust Base and Fence: Provides enhanced stability and accuracy during cutting operations.
- Double Bevel Head: Offers the ability to cut bevels by simply flipping the saw head.

Image 3.1: The mitre saw shown with its included accessories: a dust collection bag, a material clamp, and a blade wrench.
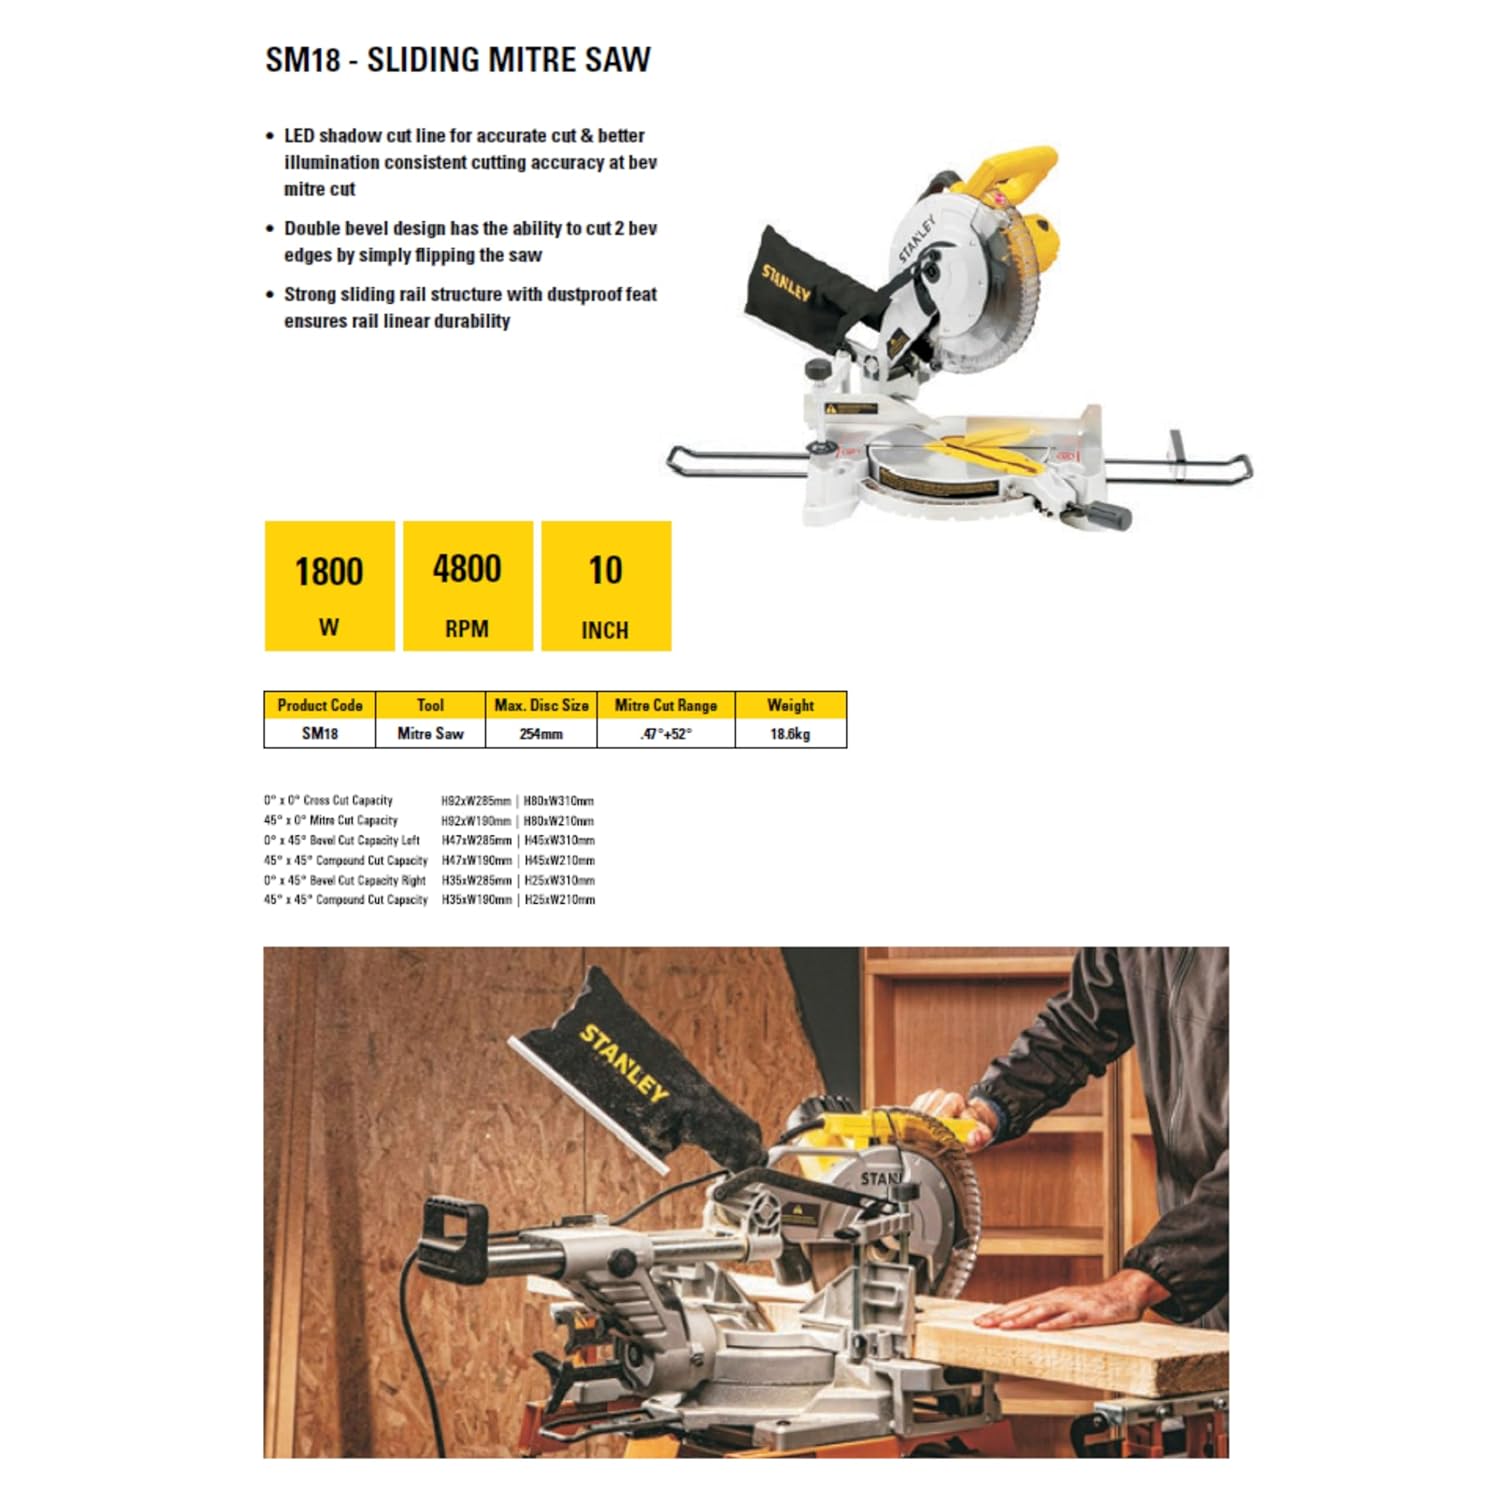
Image 3.2: A diagram illustrating key features such as the LED shadow line, double bevel capability, and strong sliding rail structure.

Image 3.3: The mitre saw head shown adjusting for double bevel cuts, indicating its flexibility for various cutting angles.
4. Configuración
Antes de utilizar la sierra, asegúrese de que esté correctamente instalada y asegurada.
- Desembalaje: Carefully remove the saw and all accessories from the packaging. Inspect for any damage.
- Montaje: Securely mount the mitre saw to a stable workbench or a dedicated mitre saw stand using appropriate fasteners.
- Instalación de la hoja: Ensure the blade is correctly installed and tightened. Refer to the blade change instructions if necessary.
- Accesorio para bolsa de polvo: Attach the dust collection bag to the dust port to help manage sawdust.
- Ajuste de la valla: Adjust the fence to ensure it is square to the blade for accurate cuts.

Image 4.1: A user adjusting the fence of the mitre saw to ensure proper alignment for cutting.

Imagen 4.2: Un primer plano view of the bevel angle adjustment mechanism, showing the scale for precise angle settings.
5. Instrucciones de funcionamiento
Follow these steps for safe and effective operation of your mitre saw.
- Prepare la pieza de trabajo: Ensure the material is free of nails, screws, or other foreign objects. Support long workpieces adequately.
- Establecer el ángulo: Adjust the mitre and/or bevel angle as required for your cut. The saw supports up to 45-degree bevel cuts.
- Posicionar la pieza de trabajo: Coloque la pieza de trabajo firmemente contra la guía y la mesa de la sierra. Utilice el material clamp to secure it if necessary.
- Activate LED Shadow Line: Engage the LED shadow line feature to project an accurate cut line onto your workpiece.
- Encienda la sierra: Hold the handle firmly and press the trigger switch to start the motor. Allow the blade to reach full speed before beginning the cut.
- Realizar el corte:
- Para realizar cortes transversales, baje lentamente la hoja a través de la pieza de trabajo.
- For sliding cuts, push the saw head forward, lower the blade, then pull the saw head back through the material.
- Completar el corte: Una vez completado el corte, suelte el gatillo y deje que la hoja se detenga por completo antes de levantar el cabezal de la sierra.

Image 5.1: The LED shadow line clearly indicating the precise cutting path on a wooden workpiece.

Image 5.2: A user demonstrating the operation of the mitre saw, making a precise cut on a wooden board.

Image 5.3: A hand guiding the saw blade down towards a workpiece, illustrating the cutting motion.
6. Mantenimiento
El mantenimiento regular garantiza un rendimiento óptimo y prolonga la vida útil de su herramienta.
- Limpieza: After each use, disconnect the saw from power and clean off sawdust and debris. Use a soft brush or compressed air.
- Recolección de polvo: Regularly empty the dust collection bag. For improved dust extraction, connect a shop vacuum to the dust port.
- Inspección de la hoja: Periodically inspect the saw blade for sharpness and damage. Replace dull or damaged blades promptly.
- Sliding Rods: Keep the anti-rust plated sliding rods clean and free of debris to ensure smooth operation.
- Inspección general: Check all screws and fasteners for tightness. Inspect the power cord for damage.

Image 6.1: A user connecting a dust extraction hose to the saw's dust port for efficient sawdust removal.
7. Solución de problemas
Esta sección aborda problemas comunes que podrías encontrar. Si tienes problemas que no aparecen aquí, contacta con atención al cliente.
| Problema | Posible causa | Solución |
|---|---|---|
| La sierra no arranca | Sin fuente de alimentación; interruptor defectuoso; sobrecarga del motor. | Check power connection and circuit breaker. Ensure trigger switch is fully engaged. Allow motor to cool if overloaded. |
| cortes imprecisos | Dull blade; incorrect fence/angle setting; workpiece not secured. | Replace blade. Verify fence and angle settings. Secure workpiece with clamp. |
| Vibración / ruido excesivo | Hoja suelta; hoja dañada; cojinetes desgastados. | Check blade tightness. Replace damaged blade. Contact service for bearing issues. |
| Sawdust buildup | Bolsa de polvo llena; puerto de polvo obstruido. | Empty dust bag. Clear dust port. Consider connecting a vacuum. |
8. Especificaciones
Detailed technical specifications for the Stanley SM18-B1 Sliding Mitre Saw.
| Especificación | Valor |
|---|---|
| Marca | Stanley |
| Número de modelo | SM18-B1 |
| Quétage | 1800 vatios |
| Volumentage | 220 voltios |
| Velocidad | 4800 RPM |
| Longitud de la hoja | 10 pulgadas (254 mm) |
| Número de dientes | 80 |
| Cutting Angle (Max) | 45 grados (bisel) |
| Material de la hoja | Acero aleado |
| Recomendación de superficie | Madera |
| Dimensiones del producto | 79L x 60W x 40H Centímetros |
| Peso del artículo | 18.6 kilogramos |
| Componentes incluidos | Mitre Saw, Dust Bag, Material Clamp, Blade Wrench |
9. Garantía y soporte
STANLEY provides comprehensive customer support and warranty services for its products.

Image 9.1: Stanley Total Care contact details for sales, after-sales support, warranty, and original parts.
Contacto de atención al cliente:
- Teléfono: 1800-203-0644
- Correo electrónico: SBD-CUSTOMERCOMMUNICATIONS@SBDINC.COM
- WhatsApp: +91 96060 55835 (Escanee el código QR en la imagen para acceder directamente)
- Horario de atención: Lunes a sábado, de 09:00 a. m. a 06:00 p. m. IST (excepto días festivos gubernamentales)
- Red de servicios: Más de 500 centros de servicio autorizados.
For warranty claims or service, please have your product model number (SM18-B1) and purchase details ready when contacting support.


