1. Introducción
Thank you for choosing the Braun Texstyle 7 Pro Steam Iron SI 7160 BL. This manual provides essential information for the safe and efficient use, maintenance, and troubleshooting of your new appliance. Please read these instructions carefully before first use and keep them for future reference.
2. Instrucciones de seguridad
- Asegúrese siempre del volumentagEl indicado en la placa de características corresponde al volumen de red.tage.
- No sumerja la plancha, el cable de alimentación ni el enchufe en agua ni en otros líquidos.
- Nunca deje la plancha desatendida mientras esté encendida o conectada a la red eléctrica.
- Keep the iron out of reach of children and persons with reduced physical, sensory, or mental capabilities.
- Coloque la plancha sobre una superficie estable y resistente al calor cuando no esté en uso.
- No toque la suela caliente. Utilice siempre el asa.
- Desenchufe la plancha de la toma de corriente antes de llenarla de agua, vaciarla o limpiarla.
- Si el cable de alimentación está dañado, debe ser reemplazado por el fabricante, su agente de servicio o personas igualmente calificadas para evitar un peligro.
- Only use tap water for filling the water tank. Do not use perfumed water, water from tumble dryers, or chemically descaled water.
3. Producto terminadoview
Familiarize yourself with the components of your Braun Texstyle 7 Pro Steam Iron.
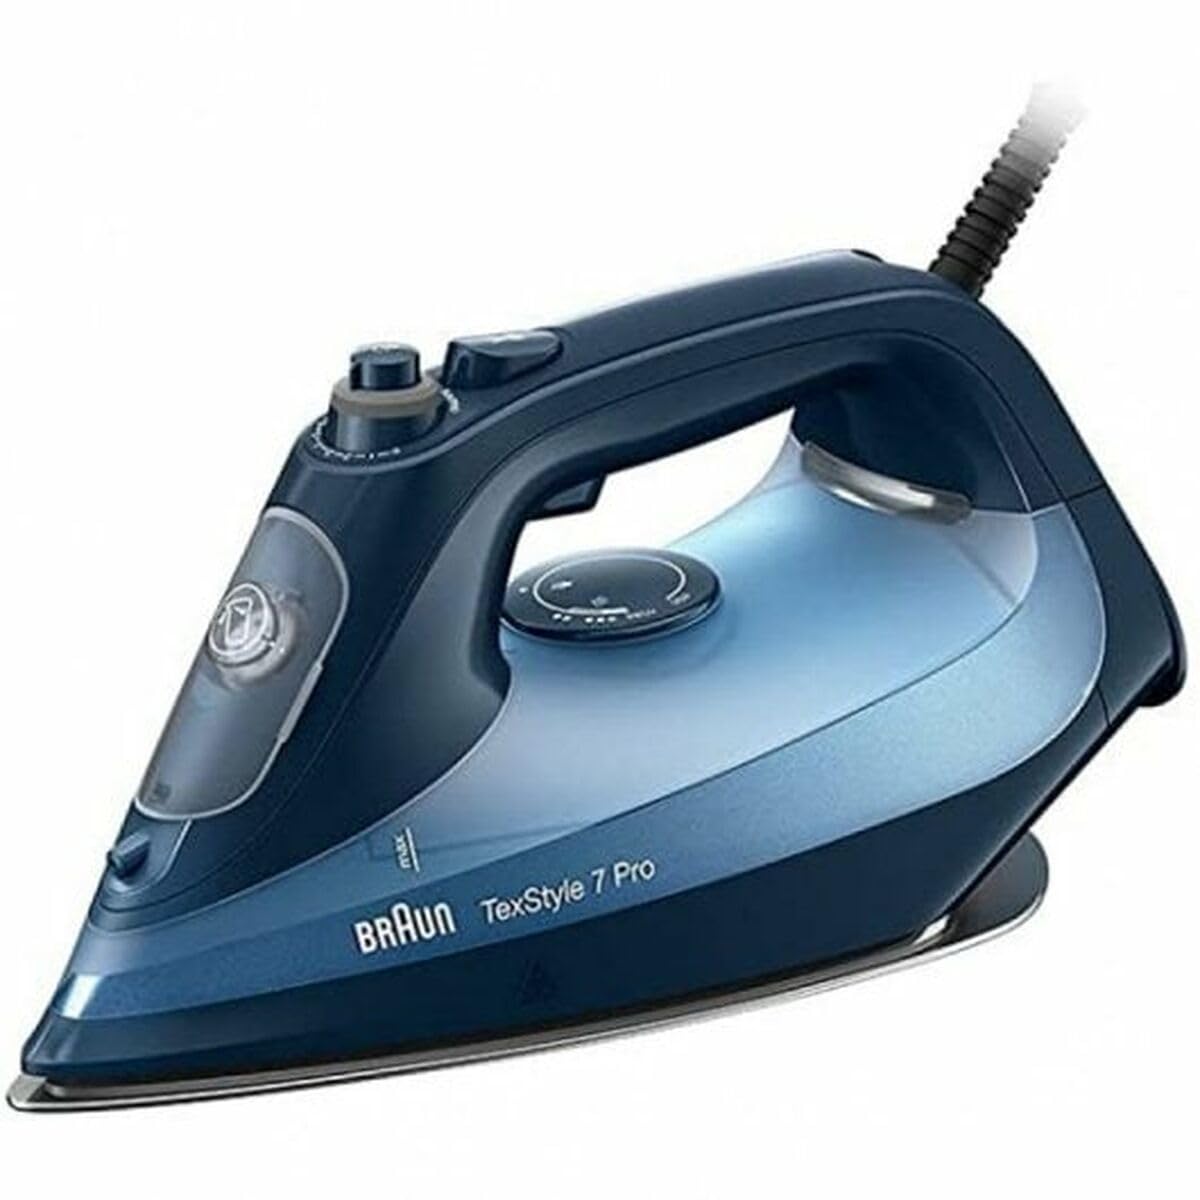

Componentes clave:
- Entrada del tanque de agua: Para llenar de agua.
- Boquilla de pulverización: Para humedecer las arrugas rebeldes.
- Botón de disparo de vapor: Para una explosión extra de vapor.
- Botón de pulverización: To activate the spray function.
- Steam Regulator: To adjust steam output.
- Dial de temperatura: Para seleccionar la temperatura adecuada para diferentes tejidos.
- Luz piloto: Indicates heating status.
- Freeglide 3D Soleplate: Unique curved soleplate for effortless gliding.
- Cable de alimentación: Conecta la plancha a la toma eléctrica.
4. Configuración
4.1 Desembalaje
- Retire con cuidado la plancha y todos los accesorios del embalaje.
- Remove any protective films or stickers from the soleplate.
- Conserve el embalaje para futuro almacenamiento o transporte.
4.2 Llenado del depósito de agua
- Asegúrese de que la plancha esté desenchufada de la red eléctrica.
- Abra la tapa de entrada del tanque de agua.
- Hold the iron in a slightly tilted position and fill the water tank with tap water up to the 'MAX' mark. Do not overfill.
- Cierre bien la tapa de entrada del tanque de agua.
4.3 Preparación para el primer uso
Before ironing clothes for the first time, it is recommended to iron an old piece of fabric to remove any manufacturing residues from the soleplate.
- Llene el tanque de agua como se describe arriba.
- Conecte la plancha a una toma de corriente adecuada.
- Coloque el dial de temperatura en la posición máxima.
- Allow the iron to heat up until the pilot light turns off, indicating it has reached the set temperature.
- Iron an old cloth for a few minutes, using steam if desired.
5. Instrucciones de funcionamiento
5.1 Selección de temperatura
Always check the fabric care label before ironing. Sort clothes according to ironing temperature requirements.
- Baja temperatura (•): Sintéticos, Seda
- Temperatura media (••): Lana
- Alta temperatura (•••): Algodón, lino
Turn the temperature dial to the desired setting. The pilot light will illuminate and turn off when the selected temperature is reached.
5.2 Planchado con vapor
Steam ironing is suitable for fabrics that can withstand high temperatures (•••). Ensure the water tank is filled.
- Set the temperature dial to the steam zone (•••).
- Once the pilot light indicates the iron is ready, adjust the steam regulator to the desired steam output.
- Iron your garments.
Disparo de vapor
For stubborn creases, press the steam shot button. Wait a few seconds between shots to allow the steam to regenerate.
Vapor vertical
La función de vapor vertical le permite eliminar las arrugas de prendas colgadas, cortinas o tapices.
- Cuelga la prenda en una percha.
- Hold the iron vertically, close to the fabric, but not touching it.
- Press the steam shot button repeatedly to release bursts of steam.
5.3 Planchado en seco
Para tejidos delicados o cuando no se desea vapor:
- Ensure the water tank is empty or the steam regulator is set to '0' (no steam).
- Ajuste el dial de temperatura al valor apropiado para su tela.
- Wait for the pilot light to indicate the iron is ready.
- Iron your garments without steam.
5.4 Función de pulverización
The spray function helps to moisten fabrics and ease out stubborn creases.
- Asegúrese de que el tanque de agua esté lleno.
- Presione el botón de pulverización para liberar una fina niebla de agua sobre la tela.
6. Mantenimiento y limpieza
6.1 Después de cada uso
- Unplug the iron from the mains socket.
- Deje que la plancha se enfríe por completo.
- Vacíe el agua restante del tanque.
6.2 Limpieza de la suela
- Para limpiar la suela, límpiela con un paño húmedo.amp cloth and a non-abrasive cleaner once it has cooled down.
- Do not use abrasive scouring pads or chemical cleaners, as these can damage the soleplate.
- If synthetic fibers have melted onto the soleplate, gently remove them with a plastic scraper while the iron is still warm (but unplugged).
6.3 Descalcificar
Regular descaling helps maintain optimal steam performance, especially in hard water areas. Refer to the specific descaling instructions provided in a separate leaflet or on the manufacturer's website if available for your model. Generally, this involves filling the tank with a descaling solution or a water-vinegar mixture, heating the iron, and then flushing it out.
6.4 Almacenamiento
- Guarde la plancha enfriada en posición vertical para evitar dañar la suela.
- Ensure the power cord is neatly wrapped around the cord storage area (if available) or secured to prevent tangling.
7. Solución de problemas
| Problema | Posible causa | Solución |
|---|---|---|
| El hierro no se calienta. | Not plugged in; power outlet faulty; temperature dial set to 'OFF'. | Check power connection; try another outlet; set temperature dial to a fabric setting. |
| Falta de vapor o vapor insuficiente. | Water tank empty; temperature too low; steam regulator set to '0'. | Fill water tank; set temperature to steam zone (•••); adjust steam regulator. |
| Fuga de agua por la suela. | Temperatura demasiado baja para el vapor; tanque de agua demasiado lleno. | Aumente la temperatura en la zona de vapor; no llene demasiado el tanque de agua. |
| Manchas marrones en la tela. | Impurities in water; soleplate dirty; iron needs descaling. | Use fresh tap water; clean soleplate; perform descaling procedure. |
8. Especificaciones
- Modelo: SI 7160 BL
- Fuerza: 3100 vatios
- Dimensiones (L x An x Al): 16 x 13 x 17 cm
- Peso: 2 kilogramos
- Suela: Freeglide 3D Technology
- Características: Vertical Steam, Steam Shot, Spray Function
- Internal Reference Number: 127403109
9. Garantía y soporte
9.1 Garantía
This Braun Texstyle 7 Pro Steam Iron SI 7160 BL comes with a 2 año de garantía A partir de la fecha de compra, cubre defectos de fabricación y mal funcionamiento en condiciones normales de uso. Conserve el comprobante de compra para reclamaciones de garantía.
9.2 Atención al cliente
For further assistance, spare parts, or service, please refer to the contact information provided on the Braun official website or your local authorized service center. Do not attempt to repair the appliance yourself.