YESWELDER FLUX-135PRO
YESWELDER FLUX-135 PRO 3-in-1 Welding Machine User Manual
Comprehensive guide for setup, operation, and maintenance of your YESWELDER FLUX-135 PRO.
Producto terminadoview
The YESWELDER FLUX-135 PRO is a versatile 3-in-1 welding machine designed for Gasless Flux Core MIG, Stick, and Lift TIG welding. This compact and portable unit is suitable for a wide range of welding applications, offering both ease of use for beginners and advanced features for experienced users.

Figure 1: YESWELDER FLUX-135 PRO Welding Machine with included accessories.
Características principales
- Capacidad multiproceso: Supports Gasless Flux Core MIG, Stick, and Lift TIG welding.
- Alto rendimiento: 135 Amp output capable of welding mild steel up to 2/5 inches thick.
- Control sinérgico: Vol automáticotage matching with adjustable wire feeding speed for optimized welding.
- Pantalla digital: Advanced interface for clear monitoring of real-time current and settings.
- Diseño portátil: Weighs just 11.4 lbs, making it easy to transport with its integrated carrying handle.
- Características de seguridad: Incluye compensación automática de volumen.tage fluctuation, robust protections against over-current, over-load, and over-heating.
Configuración e instalación
Desembalaje e inspección
Carefully unpack all components from the packaging. Verify that all items listed in the accessories section are present and undamaged. If any items are missing or damaged, contact customer support immediately.
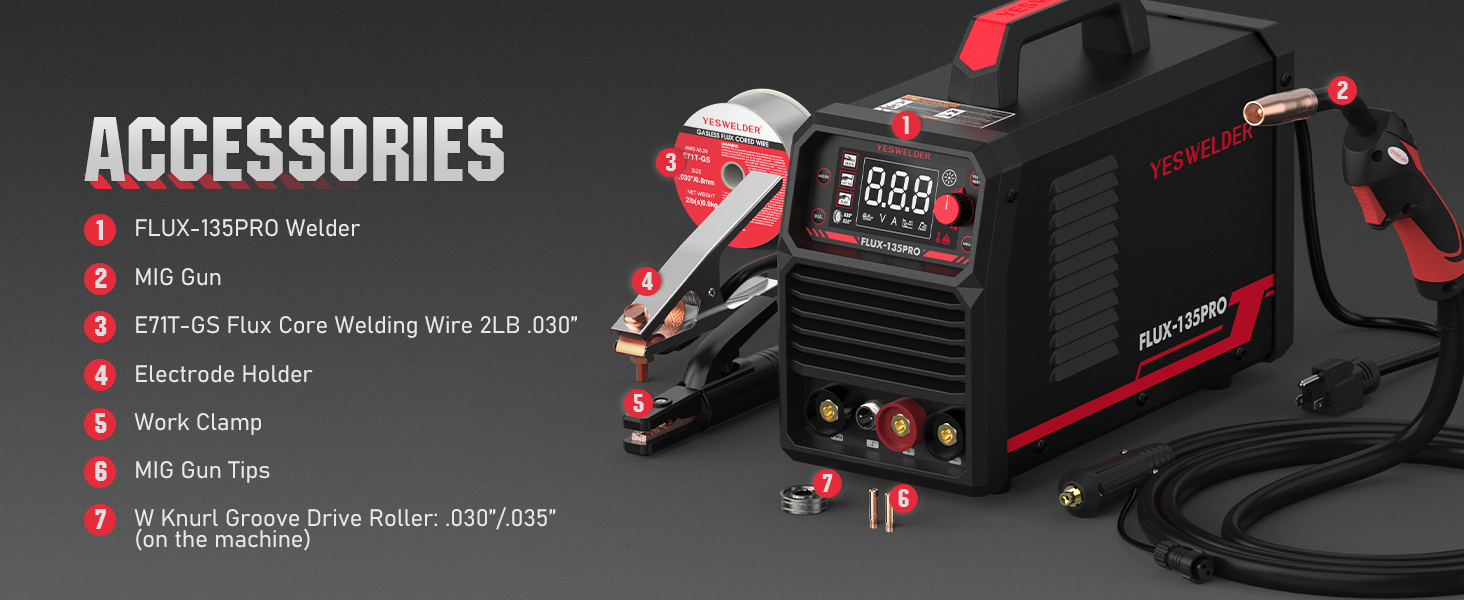
Figure 2: Included accessories for the FLUX-135 PRO. These typically include the welder unit, MIG gun, flux core welding wire, electrode holder, work clamp, and MIG gun tips.
Conexión de la máquina
- Conexión de energía: Ensure the welder is connected to a stable 110V power source.
- Clase de trabajoamp Conexión: Conecte el trabajo clamp cable to the appropriate output terminal on the front panel. For Flux Core MIG and Stick welding, connect the work clamp to the negative (-) terminal. For Lift TIG, connect to the positive (+) terminal.
- MIG Gun/Electrode Holder Connection:
- For Flux Core MIG, connect the MIG gun to the MIG gun socket.
- For Stick welding, connect the electrode holder cable to the positive (+) output terminal.
- For Lift TIG, connect the TIG torch (not included) to the negative (-) output terminal and the control switch socket.
- Wire Spool Installation (for Flux Core MIG): Open the wire feeder compartment. Install the 2LB flux core welding wire spool onto the spindle. Ensure the wire feeds smoothly through the drive roller and liner to the MIG gun.
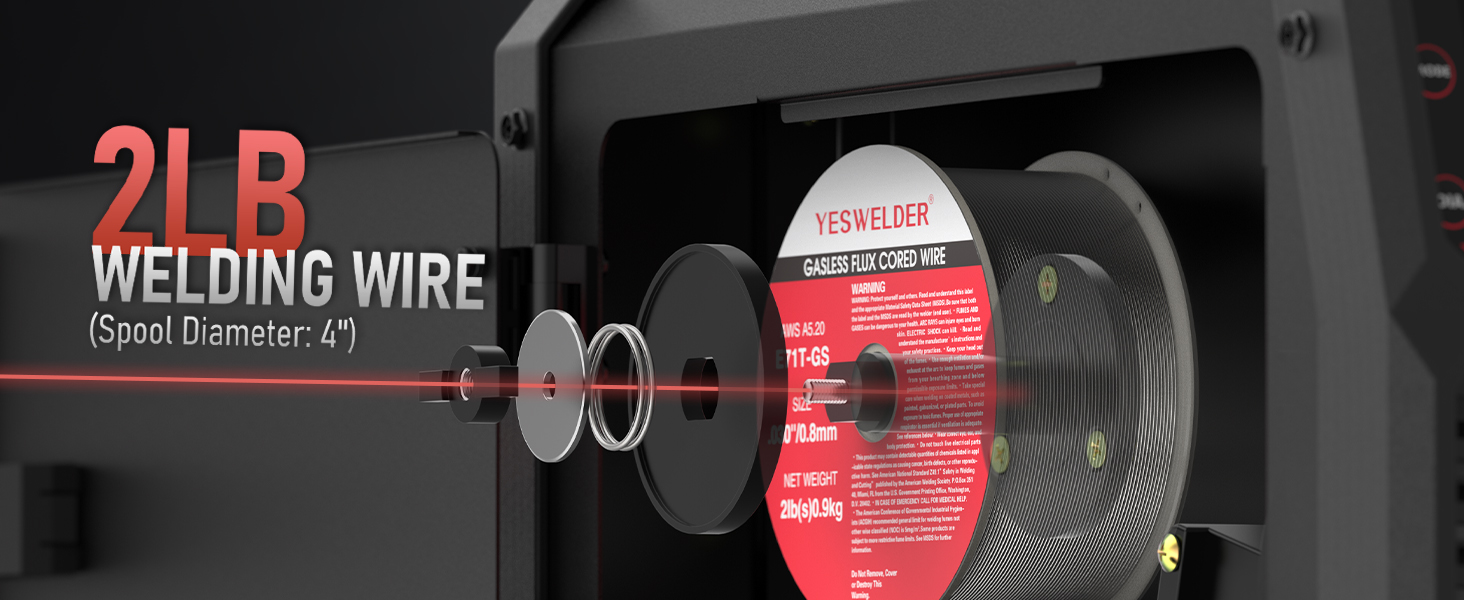
Figure 3: Proper installation of the 2LB welding wire spool within the machine's wire feeder compartment.
Instrucciones de funcionamiento
Panel de control sobreview

Figure 4: Front panel controls and digital display of the FLUX-135 PRO.
- Cambio de modo: Selects welding process (Stick, Lift TIG, Flux Core).
- Wire Diameter Switch: Sets wire diameter for Flux Core mode (.030" or .035").
- Botón de alimentación de cable: Manually feeds welding wire without activating the arc.
- Perilla de valor: Ajusta la corriente de soldadura (Amps) or wire feeding speed.
- Parameter Switch: Toggles between adjustable parameters like Hot Start and Arc Force in Stick mode, or fine-tuning voltage in Synergic MIG mode.
- Pantalla digital: Shows selected mode, current settings, and real-time welding parameters.
Modos de soldadura

Figure 5: The FLUX-135 PRO supports Stick, Lift TIG, and Flux Cored welding processes.
Flux Core MIG Welding
- Select "FLUX" mode using the Mode Switch.
- Set the correct wire diameter (.030" or .035") using the Wire Diameter Switch.
- Adjust the wire feeding speed using the Value Knob. The voltage will automatically adjust in synergic control. Fine-tune voltage if necessary using the Parameter Switch.
- Ensure proper polarity: Work clamp to negative (-), MIG gun to positive (+).
Soldadura con electrodo revestido (SMAW)
- Select "STICK" mode using the Mode Switch.
- Connect the electrode holder to the positive (+) terminal and the work clamp al terminal negativo (-).
- Ajuste la corriente de soldadura (Amps) using the Value Knob.
- Adjust Hot Start and Arc Force parameters as needed via the Parameter Switch for improved arc ignition and stability.
Lift TIG Welding (GTAW)
- Select "LIFT TIG" mode using the Mode Switch.
- Connect the TIG torch (not included) to the negative (-) terminal and the work clamp al terminal positivo (+).
- Ajuste la corriente de soldadura (Amps) using the Value Knob.
- Note: An additional Lift TIG torch (e.g., B08BXGGNFL) is required for this process.
Welding Parameters Guide
Refer to the following table for recommended welding parameters based on workpiece thickness and welding process. These are starting points and may require fine-tuning based on material, joint type, and operator skill.
| Proceso | Diámetro del alambre | Espesor de la pieza de trabajo | Wire Feeding Speed (in/min) | Vol. De soldaduratagmi (V) | Corriente de soldadura (A) |
|---|---|---|---|---|---|
| Flux MIG | 030" (0.8 mm) | 040" (1.0 mm) | 196 | 14.5 | 63 |
| 059" (1.5 mm) | 292 | 15.3 | 94 | ||
| 5/64" (2.0 mm) | 358 | 16.3 | 115 | ||
| 3/32" (2.5 mm) | 420 | 16.5 | 135 | ||
| Flux MIG | 035" (0.9 mm) | 040" (1.0 mm) | 144 | 14 | 63 |
| 059" (1.5 mm) | 216 | 15.6 | 94 | ||
| 5/64" (2.0 mm) | 262 | 16.6 | 115 | ||
| 3/32" (2.5 mm) | 308 | 16.9 | 135 | ||
| TIG | Tungsten Needle | 040" (1.0 mm) | N / A | N / A | 20-40 |
| 1/16" (1.6 mm) | N / A | N / A | 50-80 | ||
| 5/64" (2.0 mm) | N / A | N / A | 90-135 | ||
| PALO | Varilla de soldadura | 059" (1.5 mm) | N / A | N / A | 60 |
| 3/16" (3.2 mm) | N / A | N / A | 100-135 |
Mantenimiento
Regular maintenance ensures the longevity and optimal performance of your YESWELDER FLUX-135 PRO. Always disconnect the welder from the power supply before performing any maintenance.
Mantenimiento diario
- Limpie el exterior de la máquina con un paño suave y seco.
- Inspect all cables and connections for wear, damage, or loose fittings. Replace or tighten as necessary.
- Check the MIG gun nozzle and contact tip for spatter buildup and wear. Clean or replace as needed.
Mantenimiento mensual
- Utilice aire comprimido para eliminar el polvo y los residuos de las rejillas de ventilación y los componentes internos. Asegúrese de que el aire esté seco y sin aceite.
- Inspect the wire feeder mechanism for proper tension and cleanliness. Clean any debris from the drive rollers.
- Verifique el estado de la conexión a tierra.amp y portaelectrodos.
Solución de problemas
This section provides solutions to common issues you might encounter with your welding machine. For problems not listed here, contact customer support.
| Problema | Posible causa | Solución |
|---|---|---|
| No hay energía para la máquina | Interruptor de encendido apagado, cable de alimentación suelto, disyuntor disparado | Encienda el interruptor de encendido, verifique la conexión del cable de alimentación, reinicie el disyuntor |
| No arc when welding | Incorrect welding mode, poor work clamp connection, worn contact tip, incorrect polarity | Verify mode selection, ensure good work clamp contact, replace contact tip, check polarity settings |
| El alambre no se alimenta con suavidad (MIG) | Wire spool tangled, incorrect drive roller tension, clogged liner, wrong drive roller size | Untangle wire, adjust drive roller tension, clean or replace liner, ensure correct drive roller for wire diameter |
| Overheat warning light on | Ciclo de trabajo excedido, rejillas de ventilación bloqueadas, temperatura ambiente alta | Deje que la máquina se enfríe, limpie las rejillas de ventilación y opere en un entorno más fresco. |
Presupuesto
Detailed technical specifications for the YESWELDER FLUX-135 PRO welding machine.
- Modelo: FLUX-135PRO
- Vol de entradatage: 110 V
- Fuente de energía: DC
- Corriente de salida: 135 Amps (máx.)
- Procesos de soldadura: Flux Core MIG, Lift TIG, Stick
- Capacidad de soldadura (acero dulce): Up to 2/5 inches thick
- Compatible Wire: 2LB .030'' and .035'' flux core welding wire
- Peso del artículo: Aproximadamente 11.4 libras (5.17 kg)
- Dimensiones del paquete: 45.2 x 34.29 x 19.4 cm
- Modo de enfriamiento: Refrigeración por ventilador
- Grado de aislamiento: F
- Protection Standard: IP21S
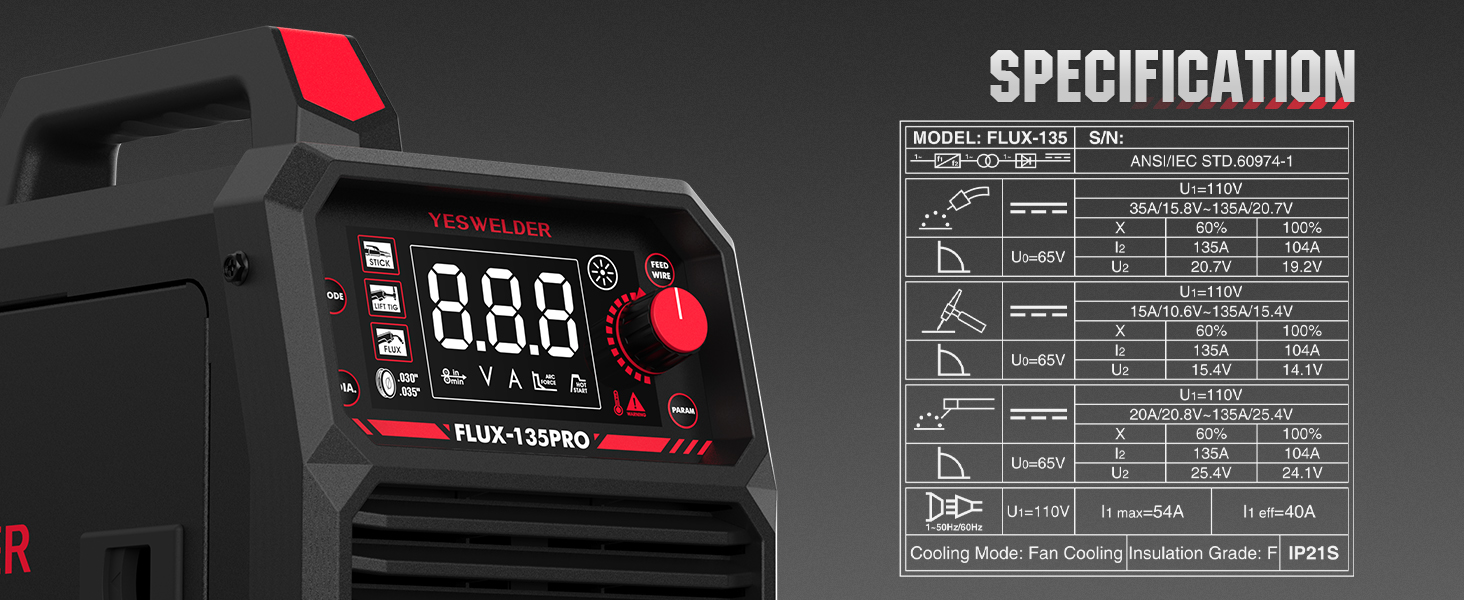
Figure 6: Detailed electrical specifications and duty cycle information for the FLUX-135 PRO.
Garantía y soporte
Política de devoluciones
This product is subject to a 30-day return policy for refund or replacement. Please refer to the retailer's specific return guidelines for full details.
Atención al cliente
For technical assistance, warranty claims, or any questions regarding your YESWELDER FLUX-135 PRO, please contact YESWELDER customer service. Contact information can typically be found on the manufacturer's official websitio o a través de su plataforma de compra.
Visit the official YESWELDER Store for more information: Tienda YESWELDER