Clarion MCD360V
Manual del usuario del crossover electrónico Clarion MCD360V
3-Way 6 Channel RCA Inputs Electronic Crossover with Remote Subwoofer Level Control
1. Introducción
Thank you for choosing the Clarion MCD360V Electronic Crossover. This versatile 3-Way Electronic Crossover is designed to enhance your car audio system by providing precise control over audio frequencies, allowing for optimal sound staging and clarity. It supports two- or three-way system setups with rear fader control and includes a wired remote subwoofer level control for convenient bass adjustment.
This manual provides detailed instructions for the proper installation, operation, and maintenance of your MCD360V unit. Please read this manual thoroughly before using the product to ensure correct usage and to prevent damage.
2. Información de seguridad
To ensure safe operation and prevent damage to the unit or your vehicle, please observe the following precautions:
- Instalación profesional recomendada: Installation of this product requires technical expertise. It is highly recommended to have the unit installed by a qualified professional.
- Fuente de alimentación: Conecte la unidad únicamente a una fuente de alimentación con conexión a tierra negativa de 12 V CC.
- Alambrado: Asegúrese de que todo el cableado esté bien conectado y debidamente aislado para evitar cortocircuitos. Utilice cables de calibre adecuado para las conexiones de alimentación y tierra.
- Montaje: Mount the unit securely in a location that does not obstruct driving, interfere with vehicle safety systems, or expose it to excessive heat, moisture, or vibration.
- Niveles de volumen: Evite utilizar su sistema de audio a niveles de volumen excesivamente altos durante períodos prolongados, ya que esto puede provocar daños auditivos.
- Ground Loop Isolation: The unit features a ground loop isolation circuit to minimize noise, but proper grounding is still crucial.
3. Producto terminadoview
The Clarion MCD360V is a full-featured three-way electronic crossover designed for precise audio control. It allows you to select from a wide range of crossover points for front, rear, and subwoofer outputs.
Características principales:
- Entradas RCA de 6/4/2 canales
- 6 Channel /5 Volt RCA Outputs
- Adjustable Level Output for Front, Rear, & Subwoofer
- Adjustable High & Low Pass Crossover w/Frequency Multiplier
- Non Fade Low Pass Output
- Subwoofer Equalizer Bass Boost Control
- Control remoto de nivel de subwoofer
- Ground Loop Isolation Circuit
- Gold Plated RCA & Power Connections
Identificación de componentes:
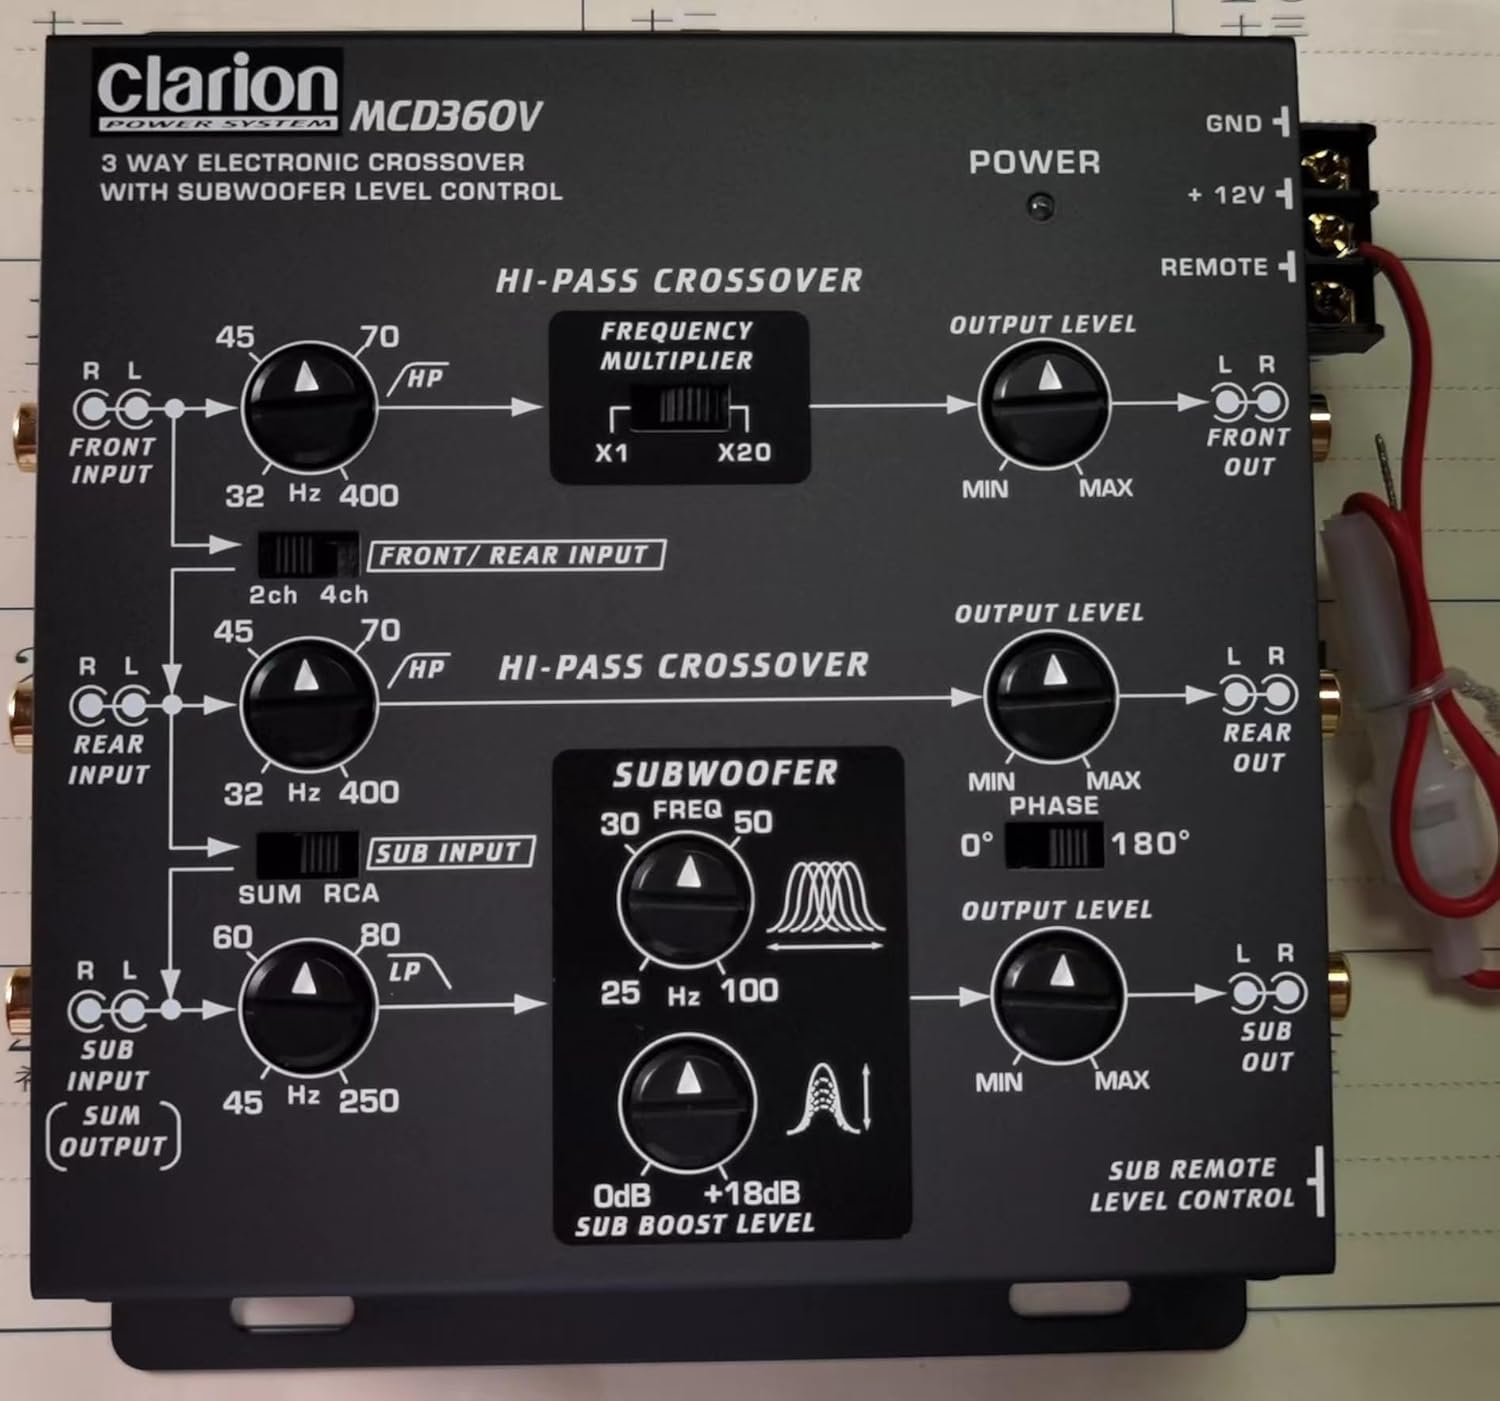
Figura 3.1: Controles del panel superior
This image displays the top panel of the MCD360V, highlighting the various control knobs for high-pass crossover, frequency multiplier, output levels, subwoofer frequency, bass boost, and phase adjustment. It also shows the input and output labels for easy identification.

Figure 3.2: Remote Subwoofer Level Control
This image shows the wired remote control unit for the subwoofer level, along with the screws and faceplates for mounting. This remote allows for convenient adjustment of the subwoofer output from the driver's seat.
4. Configuración e instalación
Una instalación correcta es crucial para un rendimiento óptimo. Siga estos pasos cuidadosamente:
4.1 Montaje de la unidad:
- Choose a dry, well-ventilated location away from direct sunlight, heat sources, and moisture.
- Ensure sufficient space around the unit for proper ventilation and cable routing.
- Secure the unit using appropriate screws to a solid surface in your vehicle.
4.2 Conexiones de cableado:
All connections should be made with the vehicle's battery disconnected to prevent short circuits.
- Conexión de alimentación (+12V): Connect the +12V terminal of the crossover to the positive terminal of the vehicle's battery via a fused power cable. The fuse should be located as close to the battery as possible.
- Conexión a tierra (GND): Connect the GND terminal to a clean, unpainted metal part of the vehicle chassis. Ensure a good electrical contact.
- Encendido remoto (REMOTO): Connect the REMOTE terminal to the remote turn-on output of your head unit or amplifier. This will turn the crossover on and off with your audio system.
- Entradas RCA: Connect the RCA outputs from your head unit to the corresponding RCA inputs on the MCD360V (FRONT INPUT, REAR INPUT, SUB INPUT). The unit supports 6/4/2 channel RCA inputs.
- Salidas RCA: Connect the RCA outputs from the MCD360V (FRONT OUT, REAR OUT, SUB OUT) to the RCA inputs of your ampsalvavidas.
- Control remoto del nivel del subwoofer: Connect the remote control cable to the dedicated port on the MCD360V and mount the remote control unit in a convenient location within reach of the driver.
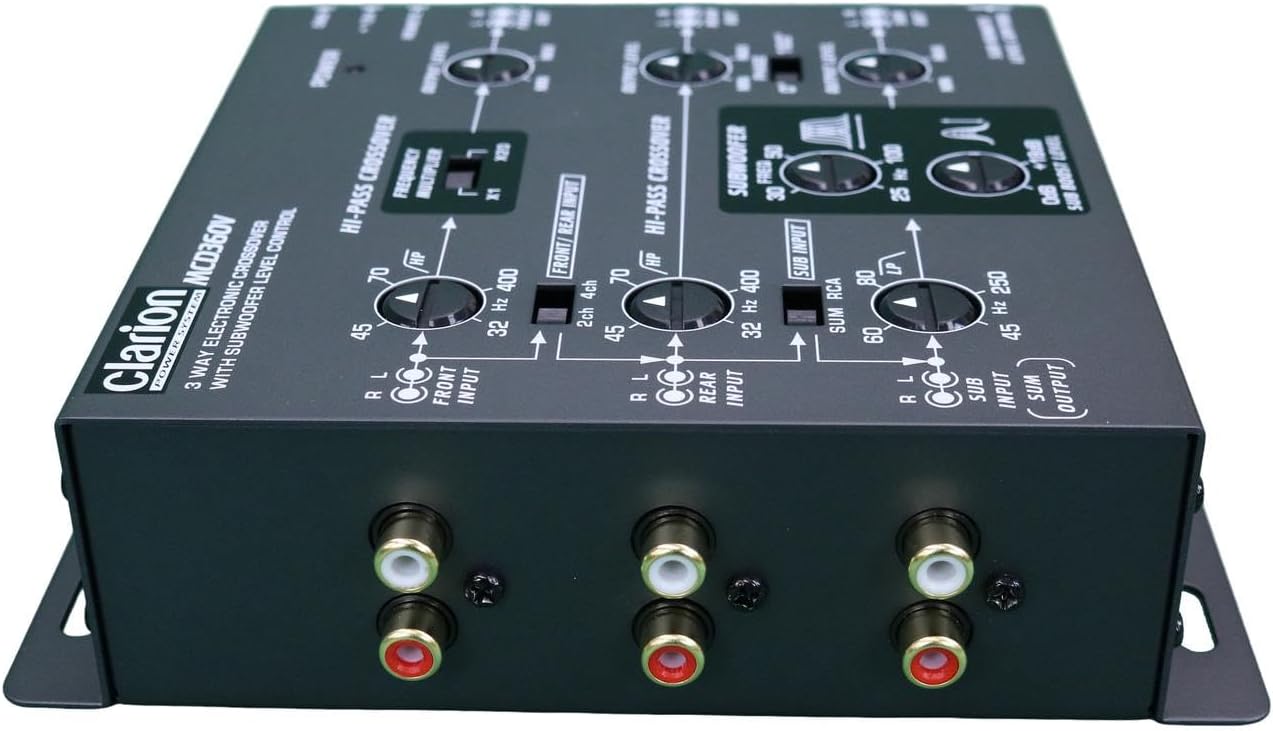
Figure 4.1: RCA Connections
Esta imagen proporciona una visión clara view of the RCA input and output jacks on the MCD360V, illustrating where to connect your head unit and amplifiers for a complete audio system setup.
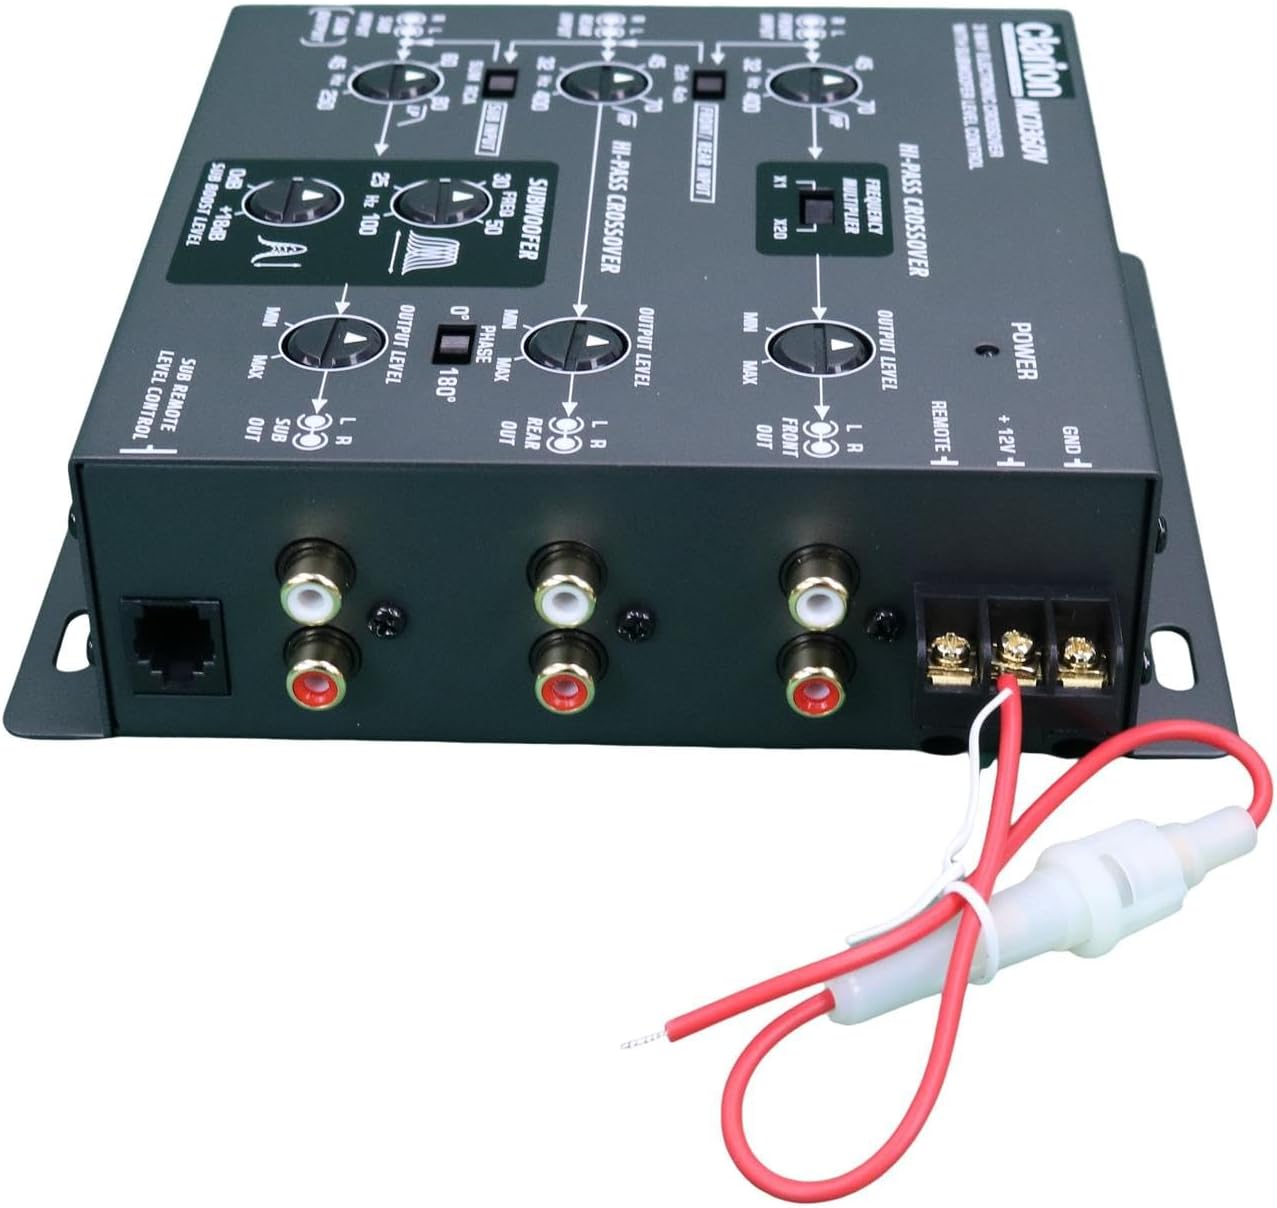
Figure 4.2: Power and Remote Wiring
This image shows the power and remote turn-on wiring harness connected to the MCD360V, demonstrating the proper connection points for the vehicle's electrical system.
5. Instrucciones de funcionamiento
Once installed, the MCD360V allows for fine-tuning of your audio system. Familiarize yourself with the controls:
5.1 High-Pass Crossover (FRONT/REAR):
- HP (High Pass) Frequency Knobs: Adjust the cutoff frequency for your front and rear speakers. Frequencies below this setting will be attenuated.
- Frequency Multiplier (x1 / x20): Use this switch to multiply the selected HP frequency by 1 or 20, allowing for a wider range of adjustment.
5.2 Subwoofer Crossover:
- LP (Low Pass) Frequency Knob: Adjust the cutoff frequency for the subwoofer output. Frequencies above this setting will be attenuated.
- Subwoofer Equalizer Bass Boost Control (0dB to +18dB): Adjust the level of bass boost at the selected center frequency.
- Phase Control (0° / 180°): Adjust the phase of the subwoofer output to match the phase of your main speakers, ensuring optimal bass response and integration.
5.3 Output Level Controls:
- Output Level Knobs (FRONT, REAR, SUB): Independently adjust the output level for the front, rear, and subwoofer channels to balance the sound stage.
5.4 Remote Subwoofer Level Control:
- The wired remote allows for convenient, real-time adjustment of the subwoofer output level from your listening position.
6. Mantenimiento
The Clarion MCD360V is designed for reliable operation with minimal maintenance. Follow these guidelines to ensure longevity:
- Limpieza: Utilice un paño suave y seco para limpiar la unidad. No utilice productos químicos agresivos, disolventes ni limpiadores abrasivos.
- Conexiones: Periodically check all power, ground, and RCA connections to ensure they are secure and free from corrosion.
- Ventilación: Ensure that the unit's mounting location allows for adequate airflow to prevent overheating.
- Reemplazo de fusibles: If the fuse blows, replace it only with a fuse of the same type and rating. Refer to the installation section for fuse specifications.
7. Solución de problemas
If you experience issues with your MCD360V, refer to the following common problems and solutions:
| Problema | Posible causa | Solución |
|---|---|---|
| Sin energía / La unidad no se enciende |
|
|
| No hay salida de sonido |
|
|
| Sonido distorsionado |
|
|
| Engine noise / Whining sound |
|
|
| Subwoofer not playing or weak bass |
|
|
If the problem persists after attempting these solutions, please contact Clarion customer support or a qualified car audio technician.
8. Especificaciones
| Característica | Especificación |
|---|---|
| Los canales de entrada | Entradas RCA de 6/4/2 canales |
| Canales de salida | 6 Channel /5 Volt RCA Outputs |
| Respuesta de frecuencia | De 10 a 50,000 Hz |
| Relación señal/ruido | 100 dB |
| High Pass Frequencies (Front) | De 32 a 8,000 Hz |
| High Pass Frequencies (Rear) | De 32 a 400 Hz |
| Salida de línea del subwoofer | 0 a 18 dB |
| Center Equalizing Frequencies | 25 a 100 Hz |
| Dimensiones (An × Al × Pr) | 5 1/2-in × 1 3/4-in × 5 1/2-in (approx. 14cm x 4.4cm x 14cm) |
| Peso del artículo | 544 g (1.2 libras) |
| Tipo de fuente de poder | Eléctrico con cable (12 V CC) |
| Tecnología de conectividad | RCA |
9. Garantía y soporte
Clarion products are manufactured to the highest quality standards. For information regarding warranty coverage, please refer to the warranty card included with your product or visit the official Clarion webSitio. Conserve su recibo de compra como comprobante para reclamaciones de garantía.
For technical support, troubleshooting assistance, or service inquiries, please contact Clarion customer service through their official channels. Contact information can typically be found on the Clarion websitio o en el embalaje del producto.
Clarion Oficial Websitio: www.clarion.com (Por favor, consulte la normativa regional) websites for specific support details)
Ask a question about this manual
Ask about setup, troubleshooting, compatibility, parts, safety, or missing instructions. Manuals+ will review the question and use this page’s manual context to help answer it.