1. Producto terminadoview
The GONLEN KL-942WPIR-DB is a versatile outdoor PIR (Passive Infrared) motion sensor designed for security and convenience. It integrates WiFi connectivity, allowing for remote alerts via a smartphone application. The device features a built-in strobe light and siren for local alarms, and can also function as a doorbell chime. Its robust design is suitable for outdoor environments, providing reliable motion detection.

Imagen 1.1: Frente view of the GONLEN Tuya WiFi PIR Motion Sensor.

Image 1.2: The motion sensor detecting movement and sending an app alert, alongside a local chime.
2. Contenido del paquete
Verifique que todos los artículos enumerados a continuación estén incluidos en su paquete:
- One (1) GONLEN WiFi Outdoor PIR Detector
- One (1) Type-C USB Cable
- Un (1) Manual de Instrucciones
- Tornillos de montaje y tacos de pared

Image 2.1: The motion sensor, Type-C USB cable, instruction manual, and mounting hardware.
3. Especificaciones
| Característica | Especificación |
|---|---|
| Marca | GONLEN |
| Número de modelo | KL-942WPIR-DB |
| Color | Blanco |
| Fuente de poder | Funciona con pilas (polímero de litio recargable) |
| Duración de la batería | Aproximadamente 120 días |
| Rango de detección máximo | 8 metros |
| Tipo de montaje | Montaje en pared |
| Temperatura de funcionamiento | Hasta 50 grados centígrados |
| Dispositivos compatibles | Smartphone (via Tuya Smart Life App) |
| Dimensiones del producto | 2.36 x 2.68 x 5.12 pulgadas (60 x 68 x 130 mm) |
| Peso del artículo | 9.1 onzas |
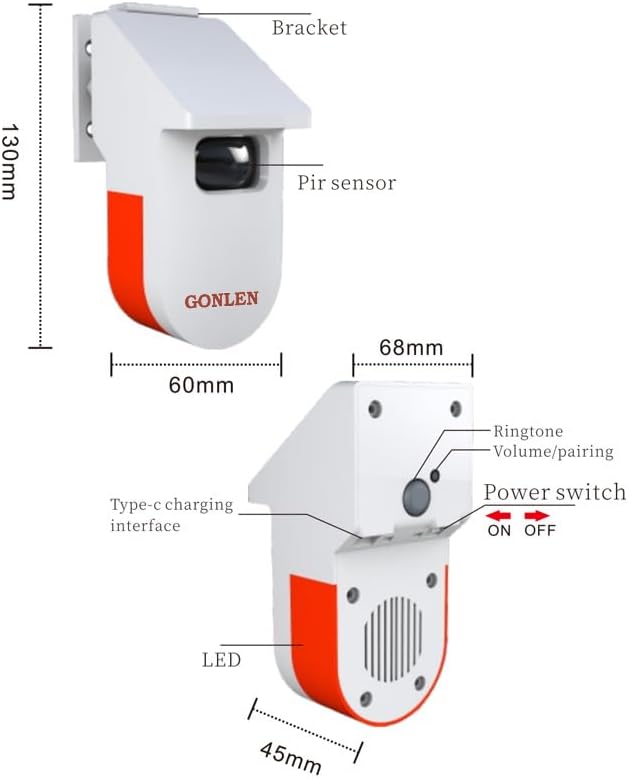
Imagen 3.1: Detallada view of the sensor with dimensions and component labels (Bracket, PIR sensor, Type-C charging interface, LED, Ringtone/Volume/Pairing button, Power switch, Siren/Speaker).

Imagen 3.2: Otra view of the sensor with dimensions and component labels.
4. Configuración
4.1 Instalación física
- Elija una ubicación: Select an outdoor location where the sensor can effectively detect motion within its 8-meter range. Ensure it is protected from direct heavy rain if possible, although it is designed for outdoor use.
- Coloque el soporte: Use the provided screws and wall plugs to securely mount the installation bracket to a wall or suitable surface.
- Monte el sensor: Slide the PIR motion sensor onto the installed bracket until it clicks into place. Adjust the angle of the sensor to cover the desired detection area.
Video 4.1: This video demonstrates the physical installation of the sensor, including attaching the bracket and mounting the device. It also shows the location of the Type-C power interface, ON/OFF switch, and ringtone selection button.
4.2 Instalación y emparejamiento de la aplicación
- Descargar la aplicación: Descarga la aplicación "Tuya Smart" o "Smart Life" desde la tienda de aplicaciones de tu teléfono inteligente (disponible en iOS y Android).
- Registrarse/Iniciar sesión: Abra la aplicación y regístrese para obtener una nueva cuenta o inicie sesión con una existente.
- Agregar dispositivo: Turn on the PIR motion sensor using the ON/OFF switch. In the app, tap the "+" icon to add a new device. Select "Security & Video Surveillance" > "PIR Detector" or search for "PIR Motion Sensor".
- Conéctese a Wi-Fi: Follow the on-screen instructions to connect the sensor to your 2.4GHz WiFi network. You may need to put the device into pairing mode (refer to the app's instructions or the device's LED indicator for specific pairing steps).
- Nombra el dispositivo: Once successfully paired, you can rename the device for easy identification (e.g., "Front Yard Sensor").
5. Instrucciones de funcionamiento
5.1 Modos de funcionamiento
The sensor can operate in various modes, providing alerts for different scenarios:
- Alarma anti-robo: When motion is detected, the sensor will activate its loud siren and strobe light, and send an immediate push notification to your smartphone. This mode is ideal for securing restricted areas or detecting intruders.
- Dangerous Area Alarm: Similar to the anti-theft alarm, this mode triggers a siren and notification when motion is detected in a designated dangerous zone, such as near flammable materials or machinery.
- Visitor Chime/Doorbell: In this mode, when motion is detected, the sensor plays a selected chime sound (like a doorbell) and sends a notification, indicating a visitor's arrival. This is suitable for entrances to homes or shops.

Image 5.1: Illustration of the 8-meter motion detection range, showing how the sensor triggers an alarm upon detecting an intruder.

Image 5.2: The sensor triggering a siren and sending an app reminder when motion is detected in an outdoor area.

Image 5.3: The sensor acting as a doorbell or chime for a shop, playing a "Ding Dong" sound upon detecting a customer.
Video 5.4: This video demonstrates the sensor's functionality in different scenarios: anti-theft alarm, dangerous area alarm, and visitor chime, including app push notifications.
5.2 Adjusting Settings (Ringtones, Volume)
The sensor offers customizable ringtones and volume levels:
- Selección de tono de llamada: Press the "Ringtones switchable key" (Set Button) on the back of the device to cycle through the available 30 ringtones.
- Ajuste de volumen: The device supports 4 levels of volume. Adjust this via the app settings or by pressing the volume button on the device if available.

Image 5.5: Information on the sensor's 30 ringtones, 4 volume levels, low power consumption, and large capacity rechargeable battery.
Video 5.6: This video demonstrates how to select different ringtones using the switchable key on the device.
6. Mantenimiento
- Carga de la batería: The sensor is equipped with a rechargeable Lithium Polymer battery. When the battery level is low, connect the device to a power source using the provided Type-C USB cable.
- Limpieza: Periodically clean the PIR sensor lens with a soft, dry cloth to ensure optimal detection performance. Avoid using abrasive cleaners or solvents.
- Actualizaciones de firmware: Check the Tuya Smart Life app regularly for any available firmware updates for your device. Updates can improve performance and add new features.
7. Solución de problemas
- Dispositivo no emparejado:
- Asegúrese de que su red WiFi sea de 2.4 GHz. El sensor no admite redes de 5 GHz.
- Verify the device is in pairing mode (usually indicated by a blinking LED).
- Move the sensor closer to your WiFi router during the pairing process.
- Restart your router and the sensor, then try pairing again.
- Sin detección de movimiento:
- Check if the sensor lens is clean and unobstructed.
- Ensure the sensor is powered on and the battery is charged.
- Verify the detection range and angle are appropriate for the area you wish to monitor.
- Avoid placing the sensor near heat sources or direct sunlight, which can cause false triggers or reduce sensitivity.
- Sin notificaciones de aplicaciones:
- Check your smartphone's notification settings to ensure the Tuya Smart Life app has permission to send notifications.
- Verifique que su teléfono tenga una conexión a Internet activa.
- Ensure the sensor is connected to WiFi and online in the app.
8. Garantía y soporte
For warranty information or technical support, please refer to the contact details provided with your purchase or visit the official GONLEN webSitio. Conserve su recibo de compra como comprobante para reclamaciones de garantía.