1. Introducción
This manual provides essential information for the installation, operation, and maintenance of your DEUSES replacement carburetor. This carburetor is designed for specific Robin 49CC brush cutter and trimmer models, including NB411, CG411, BG411, and EC04, serving as a direct replacement for part number 5416040000. Please read this manual thoroughly before attempting any installation or maintenance to ensure proper function and safety.
2. Información de seguridad
ADVERTENCIA:
- Always wear appropriate personal protective equipment (PPE), such as gloves and eye protection, when working with fuel systems and engine components.
- Ensure the engine is turned off and cooled down before performing any installation, maintenance, or inspection.
- Trabaje en un área bien ventilada para evitar inhalar vapores de combustible.
- Mantenga las llamas abiertas, chispas y otras fuentes de ignición alejadas del combustible y de los componentes del sistema de combustible.
- Handle fuel with extreme care. Fuel is highly flammable and can cause serious injury or death.
- Si no está seguro de algún paso, consulte con un técnico calificado.
3. Contenido del paquete
Verifique que todos los artículos estén presentes y sin daños al abrir el paquete.
- 1 x DEUSES Carburetor (Replacement for Robin NB411, CG411, BG411, EC04)

Imagen 3.1: Lado view of the DEUSES Carburetor, showing the main body and throttle linkage.
4. Configuración e instalación
This carburetor is a direct replacement part. Installation typically involves removing the old carburetor and installing the new one. Refer to your specific brush cutter or trimmer's service manual for detailed instructions on removing and installing engine components.
Herramientas necesarias (no incluidas):
- Destornilladores (Phillips y de punta plana)
- Wrenches or sockets (appropriate sizes for your engine)
- Alicates
- Línea de combustible clamps or plugs
- Trapos limpios
Pasos de instalación:
- Prepare el motor: Asegúrese de que el motor esté apagado y frío. Desconecte el cable de la bujía para evitar un arranque accidental.
- Drenar combustible: If necessary, drain the fuel tank or clamp the fuel lines to prevent fuel leakage during removal.
- Retire el conjunto del filtro de aire: Retire con cuidado la carcasa del filtro de aire y el filtro de aire para acceder al carburador.
- Disconnect Linkages and Lines:
- Disconnect the throttle cable from the carburetor.
- Disconnect the choke linkage (if applicable).
- Carefully detach all fuel lines (inlet and return) from the carburetor. Note their positions for reinstallation.
- Retire el carburador viejo: Unscrew the mounting bolts or nuts that secure the carburetor to the engine intake manifold. Carefully remove the old carburetor, ensuring any gaskets are also removed.
- Inspeccionar y limpiar: Inspect the intake manifold and surrounding areas for debris. Clean as necessary. Ensure new gaskets (if required and not included with the carburetor) are ready.
- Instalar carburador nuevo:
- Place new gaskets (if applicable) onto the intake manifold.
- Position the new DEUSES carburetor onto the mounting studs/bolts.
- Secure the carburetor with the mounting bolts/nuts. Tighten evenly to prevent air leaks, but do not overtighten.
- Reconnect Linkages and Lines:
- Reconnect the fuel lines to their correct ports on the new carburetor. Ensure connections are secure.
- Reconnect the throttle cable and choke linkage. Verify smooth operation of both.
- Reinstalar el conjunto del filtro de aire: Vuelva a colocar el filtro de aire y su alojamiento.
- Vuelva a conectar la bujía: Vuelva a conectar el cable de la bujía.
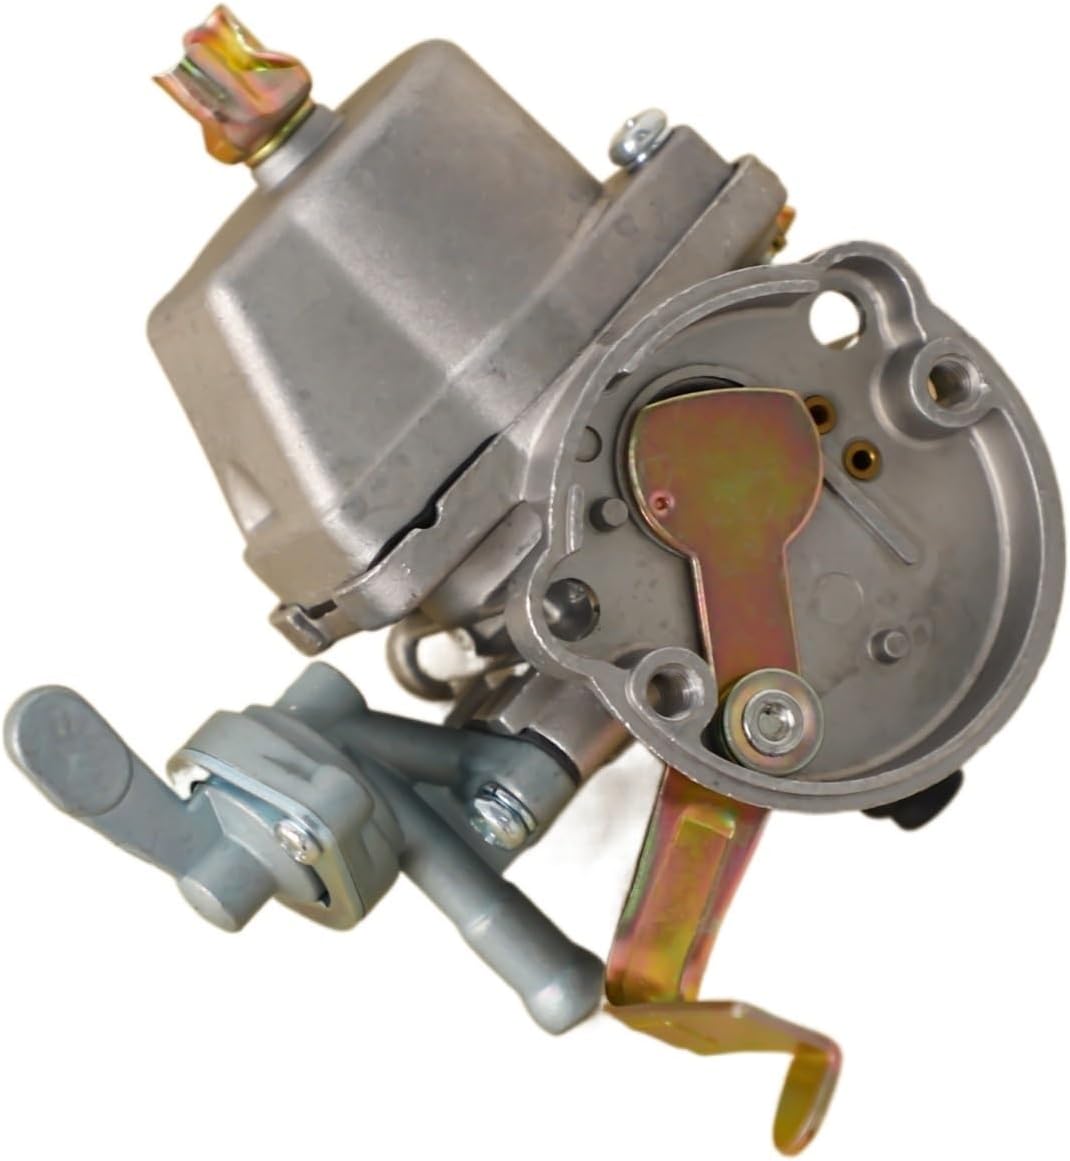
Imagen 4.1: Angular view of the carburetor, highlighting the fuel inlet and adjustment screws (if present).

Imagen 4.2: Arriba view of the carburetor, showing the choke lever and air intake.
5. Instrucciones de funcionamiento (posteriores a la instalación)
After installing the new carburetor, perform the following checks before starting the engine:
- Revisión de combustible: Ensure the fuel tank contains the correct fuel/oil mixture as specified by your engine manufacturer. Check for any fuel leaks around the carburetor and fuel lines.
- Throttle and Choke: Verify that the throttle and choke levers move freely and return to their proper positions.
- Puesta en marcha inicial:
- Set the choke to the "START" or "CLOSED" position.
- Prime the carburetor if your engine has a primer bulb, until fuel is visible.
- Pull the starter cord according to your engine's starting procedure.
- Once the engine fires or attempts to start, move the choke to the "RUN" or "OPEN" position.
- Continue pulling the starter cord until the engine runs smoothly.
- Ajuste de ralentí: Allow the engine to warm up for a few minutes. If the idle speed is too high or too low, locate the idle adjustment screw on the carburetor (refer to your engine's manual for exact location) and adjust it until the engine idles smoothly without stalling.
- Comprobación del rendimiento: Test the engine under light load to ensure proper acceleration and power delivery.
6. Mantenimiento
Regular maintenance of your carburetor and associated fuel system components will ensure optimal engine performance and longevity.
- Filtro de aire: Regularly inspect and clean or replace the air filter. A clogged air filter can restrict airflow to the carburetor, leading to poor engine performance.
- Filtro de combustible: Check and replace the in-tank fuel filter periodically. A dirty fuel filter can restrict fuel flow and cause carburetor issues.
- Líneas de combustible: Inspect fuel lines for cracks, leaks, or hardening. Replace damaged fuel lines immediately.
- Limpieza del carburador: If the engine experiences performance issues due to fuel contamination, the carburetor may need cleaning. This typically involves disassembling the carburetor, cleaning jets and passages with carburetor cleaner, and replacing gaskets. This procedure should only be performed by individuals with mechanical experience.
- Calidad del combustible: Always use fresh, clean fuel mixed with the correct ratio of 2-stroke oil (if applicable to your engine). Stale or contaminated fuel is a common cause of carburetor problems.
7. Solución de problemas
Si encuentra problemas después de instalar el nuevo carburador, considere los siguientes problemas y soluciones comunes:
| Problema | Posible causa | Solución |
|---|---|---|
| El motor no arranca | No llega combustible al carburador; filtro de combustible obstruido; ajuste incorrecto del estrangulador; problema con la bujía. | Check fuel lines and filter for blockages. Ensure choke is set correctly. Verify spark plug is clean and firing. |
| El motor arranca pero se cala | Idle speed too low; air leak around carburetor; fuel delivery issue. | Adjust idle screw. Check carburetor mounting bolts for tightness. Inspect fuel lines. |
| El motor funciona mal o le falta potencia | Clogged air filter; dirty carburetor jets; incorrect fuel mixture; exhaust blockage. | Clean or replace air filter. Clean carburetor jets (professional service recommended). Ensure correct fuel/oil mix. Check exhaust for blockages. |
| Fugas de combustible | Loose fuel line connections; damaged fuel lines; faulty carburetor gasket. | Apriete la línea de combustible clamps. Replace damaged fuel lines. Inspect and replace carburetor gaskets if necessary. |
Si los pasos de solución de problemas no resuelven el problema, se recomienda consultar a un mecánico de motores pequeños calificado.
8. Especificaciones
- Tipo de producto: Carburador de repuesto
- Marca: DEUSES
- Compatibilidad del modelo: Robin NB411, CG411, BG411, EC04
- Cilindrada del motor: 49CC
- Reemplaza el número de pieza: 5416040000
- Material: Metal
- Color: Plata
- Peso del artículo: 1 gramos
- Cantidad de unidades: 1.0 Conteo
9. Garantía y soporte
For information regarding warranty coverage and customer support, please refer to the seller or manufacturer's official documentation provided at the time of purchase. Keep your proof of purchase for any warranty claims.