1. Introducción
This manual provides essential information for the proper setup, operation, and maintenance of your SAMSUNG 57" Odyssey Neo G9 (G95NC) Series Dual 4K UHD 1000R Curved Gaming Monitor. This monitor features a 57-inch Dual UHD resolution display, a 1000R curvature, a 240Hz refresh rate, and a 1ms response time, enhanced by Quantum Mini-LED technology and DisplayHDR 1000. It also supports AMD FreeSync Premium Pro for a smooth visual experience.

Imagen: Frente view of the Samsung 57-inch Odyssey Neo G9 curved monitor, showcasing its wide display and sleek design.
2. Información de seguridad
Please read and follow these safety precautions to prevent damage to your monitor and ensure your personal safety.
- Fuente de energía: Utilice únicamente el cable de alimentación y el adaptador incluidos con el monitor. Asegúrese de que la toma de corriente esté correctamente conectada a tierra.
- Ventilación: No bloquee las aberturas de ventilación. Deje suficiente espacio alrededor del monitor para una ventilación adecuada.
- Exposición a líquidos: Mantenga el monitor alejado del agua y otros líquidos. No lo utilice con las manos mojadas.
- Limpieza: Desconecte el cable de alimentación antes de limpiarlo. Utilice un paño suave y seco. Evite los limpiadores líquidos o en aerosol.
- Colocación: Coloque el monitor sobre una superficie estable y nivelada. Evite la luz solar directa, las fuentes de calor y el exceso de polvo.
- Servicio: No intente reparar el monitor usted mismo. Encargue cualquier reparación a personal técnico cualificado.
3. Contenido del paquete
Verifique que todos los artículos estén presentes en el paquete de su producto:
- SAMSUNG 57" Odyssey Neo G9 Monitor
- Cable de alimentación
- Cable HDMI
- Cable USB
- Cable DisplayPort
- Guía de configuración rápida
4. Configuración
4.1. Montaje del soporte
- Retire con cuidado el monitor de su embalaje, manteniéndolo protegido.
- Coloque el soporte en el panel del monitor. Asegúrese de que encaje firmemente en su lugar.
- Attach the stand base to the stand neck and tighten the screw(s) as indicated in the quick setup guide.
- Place the assembled monitor on a stable and level desk surface.
4.2. Conexión a dispositivos
The monitor provides various input options. Refer to the diagram below for port locations.
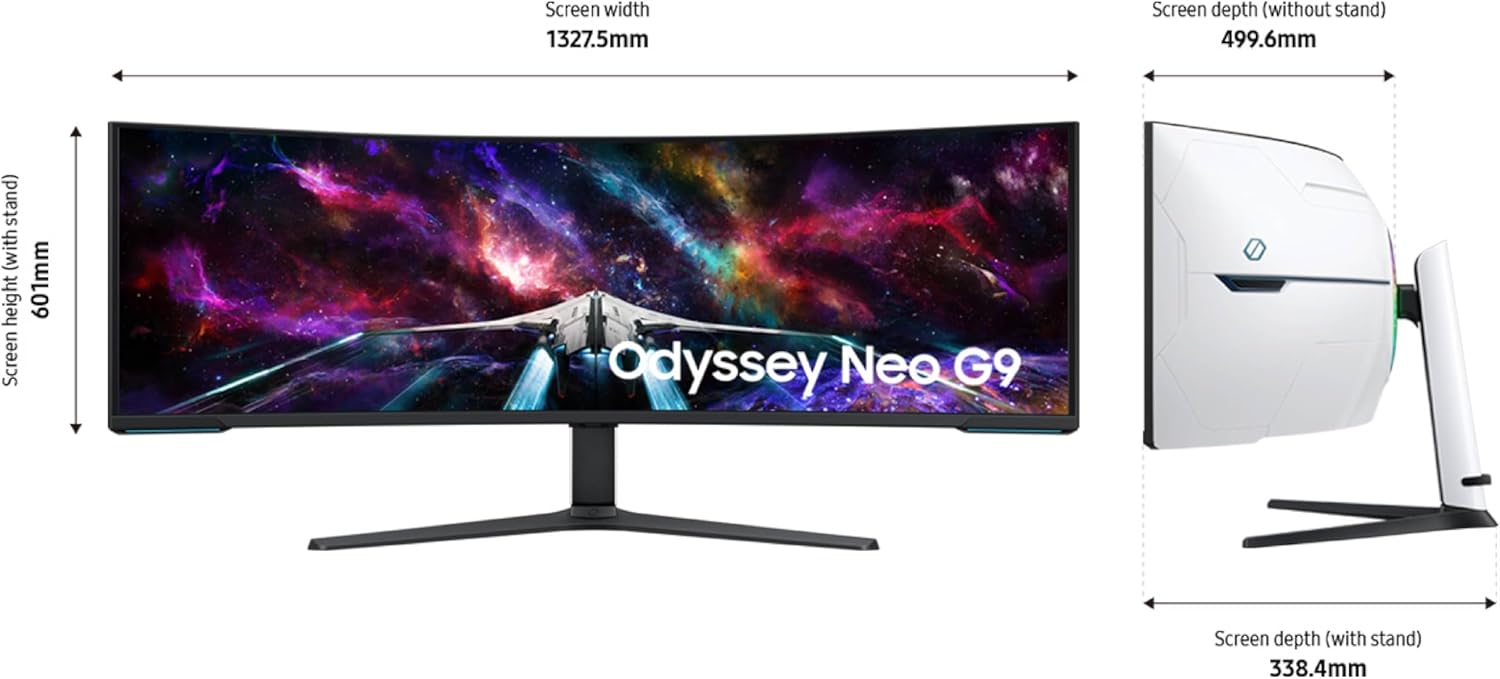
Imagen: Trasera view of the monitor with labeled input ports including DC 20V, HDMI IN (120Hz), HDMI IN, DisplayPort IN, USB 3.0 X2, and PC IN X2.
- Conexión de energía: Conecte el cable de alimentación al puerto DC 20 V del monitor y luego a una toma de corriente.
- Conexión DisplayPort: For optimal performance, especially at 240Hz and Dual UHD resolution, connect your PC using the supplied DisplayPort 2.1 cable to the DisplayPort IN on the monitor. Ensure your graphics card supports DP 2.1 (UHBR 13.5 and above).
- Conexión HDMI: Connect devices using HDMI cables to the HDMI IN ports. Note that HDMI 2.1 (FRL 12Gbps) is required for full DUHD and 240Hz support.
- Concentrador USB: Connect the supplied USB cable from your PC to the monitor's USB upstream port (PC IN) to enable the USB 3.0 ports on the monitor for peripherals.
4.3. Encendido inicial
After connecting all necessary cables, press the power button located on the bottom center of the monitor to turn it on. The monitor will automatically detect the input source.
5. Instrucciones de funcionamiento
5.1. Navegación por el menú de visualización en pantalla (OSD)
The OSD menu is controlled via a joystick button located on the bottom center of the monitor. Press the joystick to access the main menu, then move it up/down/left/right to navigate and select options.
5.2. Imagen por imagen (PBP) e imagen en imagen (PIP)
The monitor supports displaying content from multiple sources simultaneously.
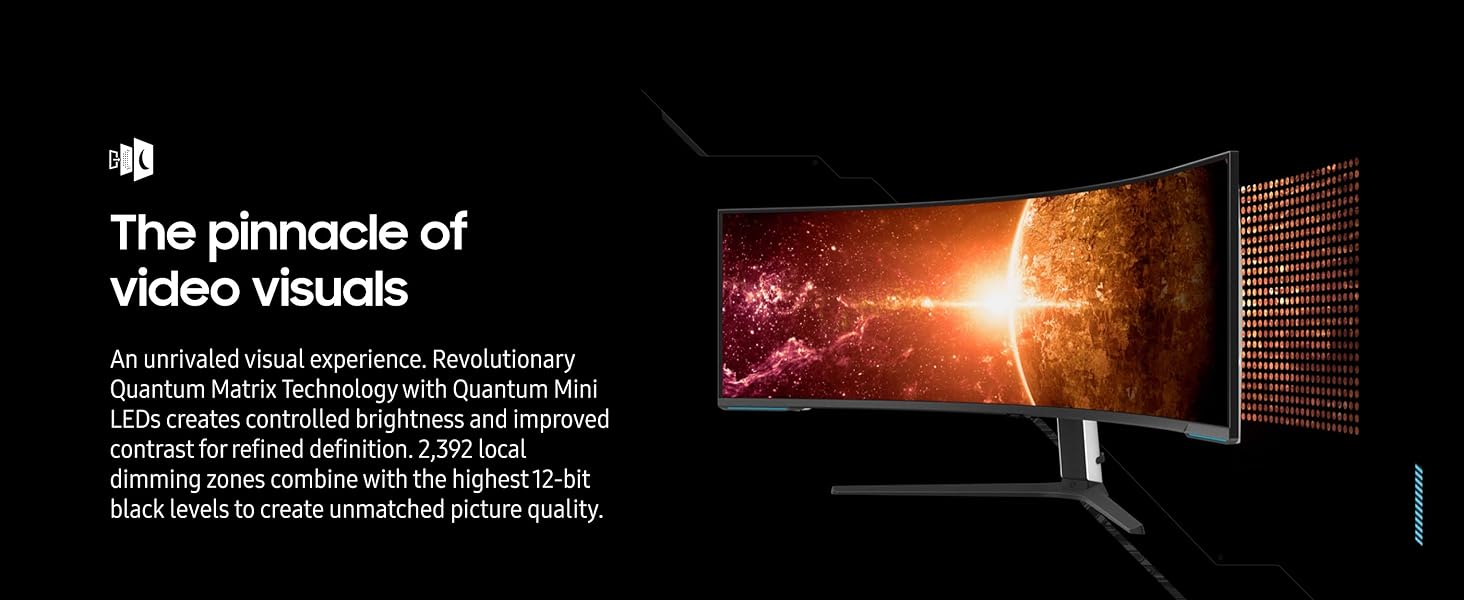
Image: The monitor in Picture-by-Picture mode, showing three distinct PC inputs simultaneously for enhanced multitasking.
- PBP: Le permite view video from two or more sources side-by-side in their native resolution. Access this feature through the OSD menu.
- PEPITA: Displays a secondary source in a smaller window on top of the main display. The size and position of the PIP window can be adjusted.
5.3. Auto Source Switch+
This feature automatically detects when a connected device is turned on and switches the monitor's input to that new source signal. This streamlines the process of switching between multiple connected devices.
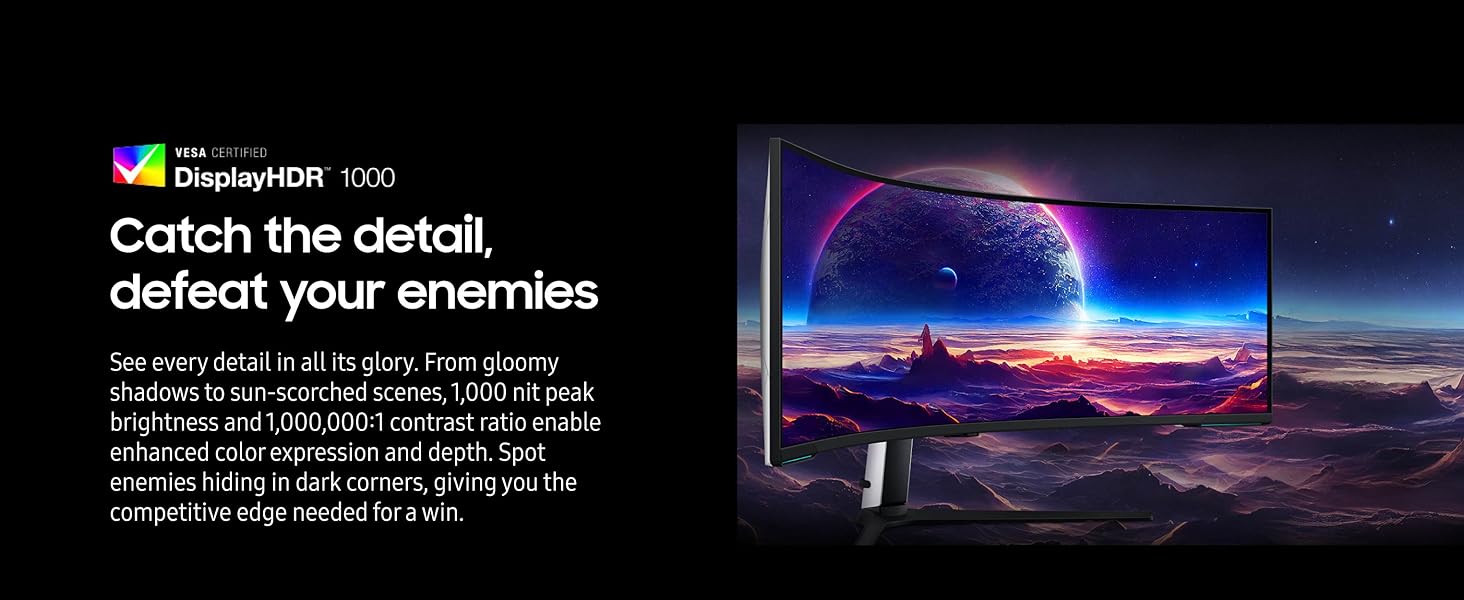
Image: A diagram demonstrating Auto Source Switch+, where the monitor automatically detects and switches to a newly activated input source.
5.4. CoreSync & Core Lighting+
The monitor features customizable rear lighting. CoreSync technology projects the on-screen colors into your real-world environment, enhancing immersion. Core Lighting+ adds ambient lighting to your setup.
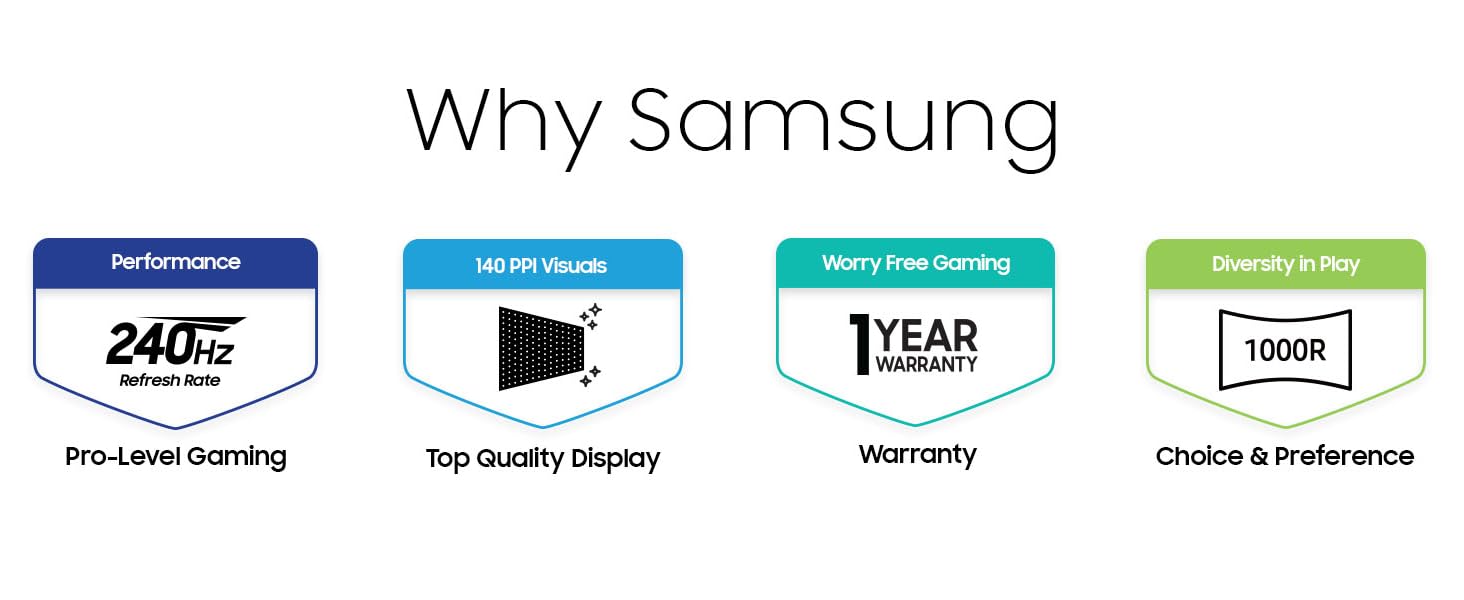
Image: The rear of the monitor showcasing the Core Lighting+ feature, which casts ambient light onto the wall behind the display.
6. Características de la pantalla
6.1. Dual UHD Resolution (7680x2160)
The 57-inch display offers a Dual UHD resolution, equivalent to two 32-inch 4K UHD monitors side-by-side, providing an expansive and detailed visual workspace.

Image: A visual comparison demonstrating the vast screen real estate of the 57-inch Dual UHD monitor, equivalent to two 32-inch UHD displays.
6.2. 1000R Curved Screen
La curvatura de 1000R coincide con el campo de visión del ojo humano. view, aiming to reduce eye strain and enhance immersion.
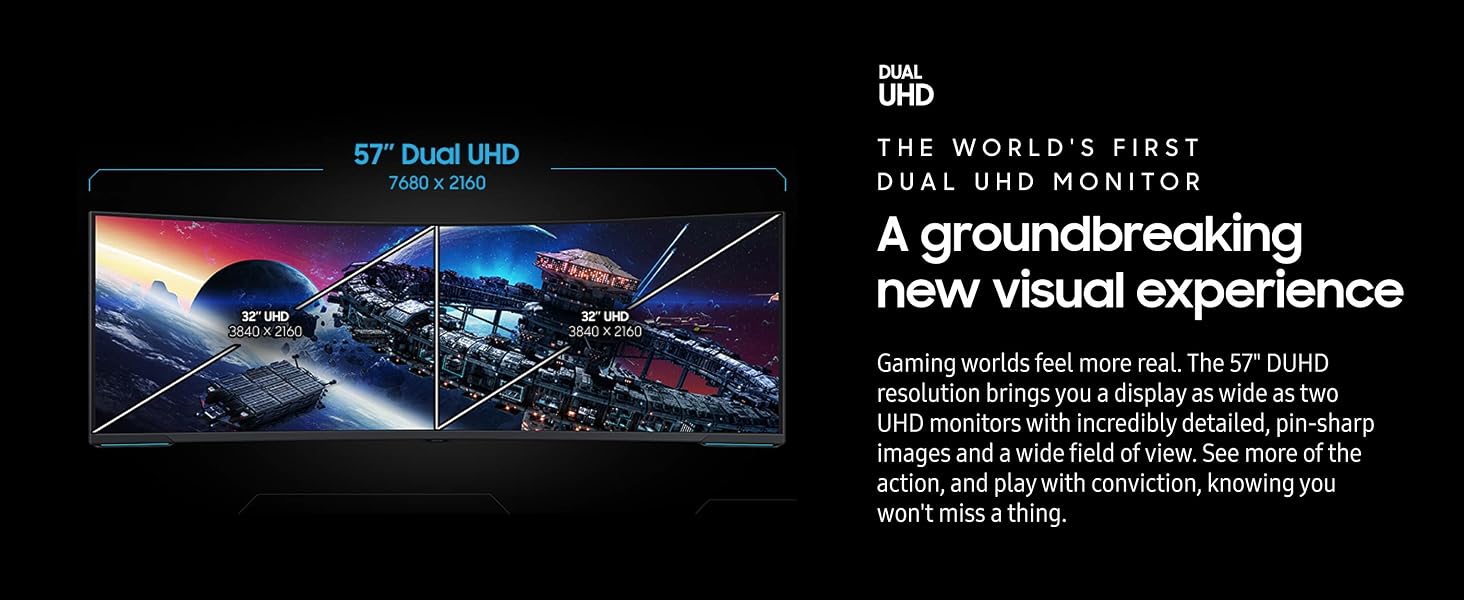
Image: A user engaged in gaming on the 1000R curved screen, illustrating the immersive experience.
6.3. 240Hz Refresh Rate & 1ms (GTG) Response Time
The monitor features a 240Hz refresh rate for smooth motion and a 1ms Gray-to-Gray (GTG) response time to minimize ghosting, crucial for fast-paced content.
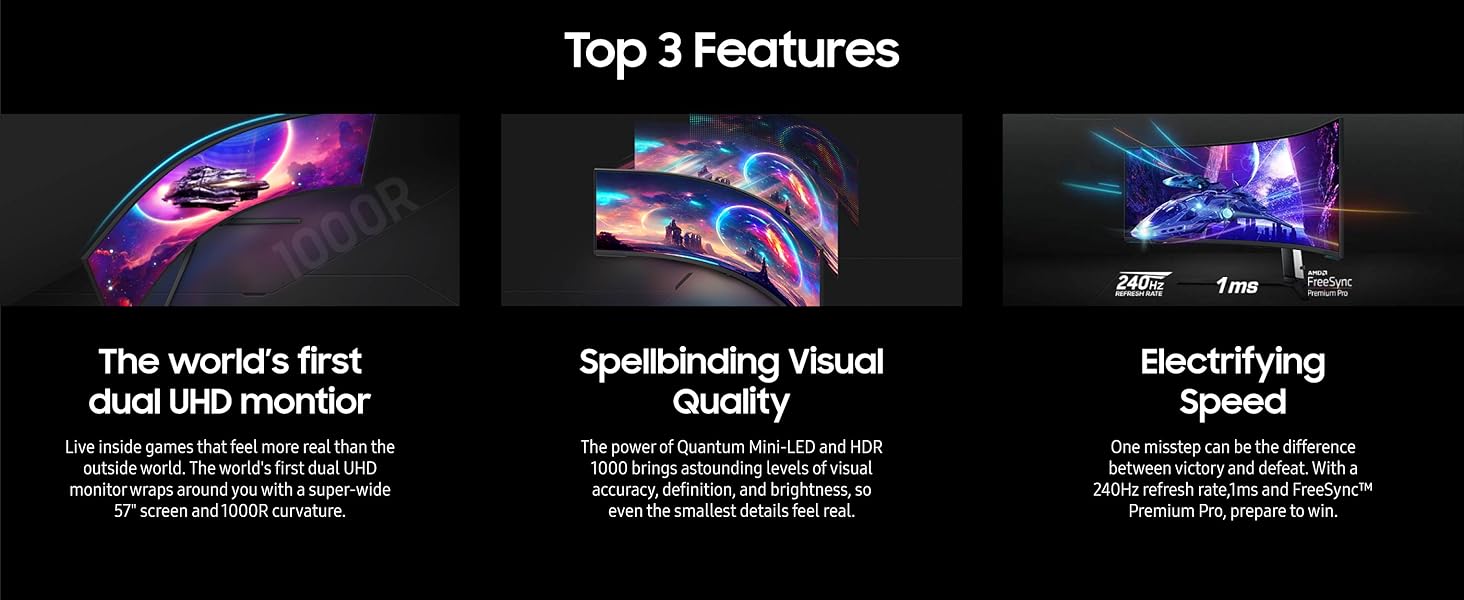
Image: A dynamic scene from a racing game on the monitor, highlighting its 240Hz refresh rate and 1ms response time capabilities.
6.4. Quantum Matrix Technology
Utilizing Quantum Mini-LEDs, this technology provides precise control over brightness and contrast. With 2,392 local dimming zones and 12-bit black levels, it delivers enhanced picture quality.
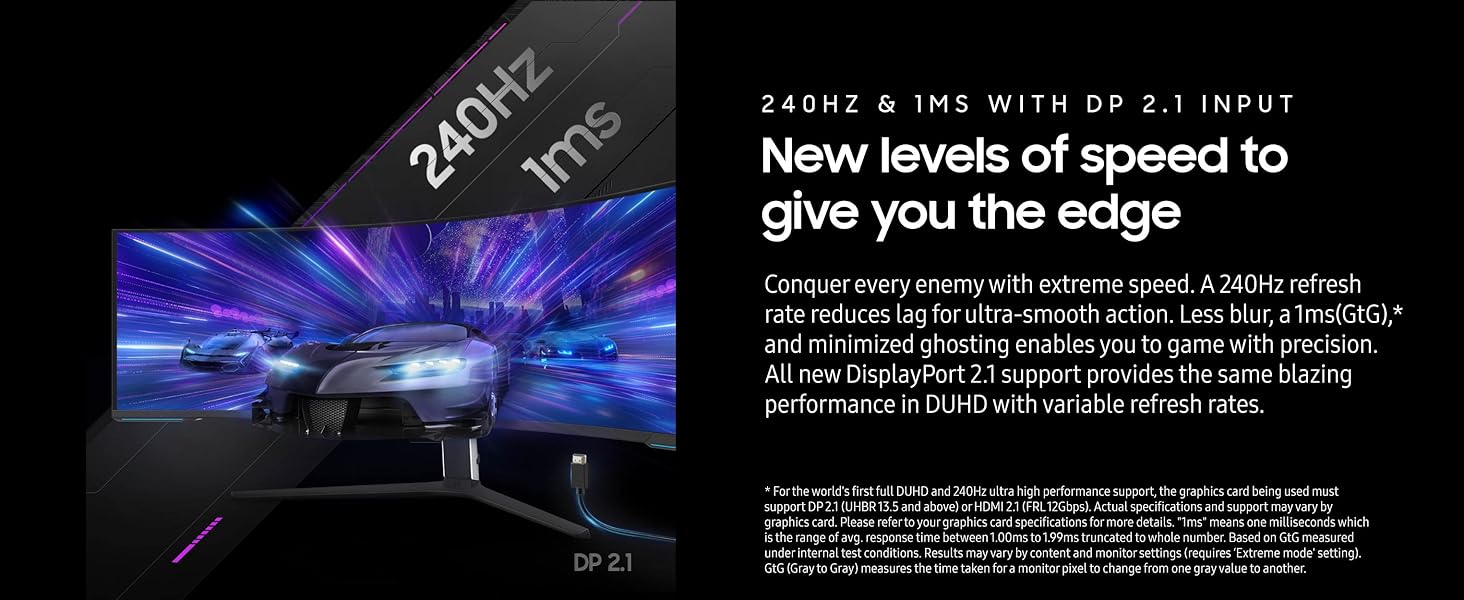
Image: A visual representation of Quantum Matrix Technology, showing the precise control offered by Quantum Mini-LED backlighting.
6.5. VESA DisplayHDR 1000
With a 1,000 nit peak brightness and a 1,000,000:1 contrast ratio, DisplayHDR 1000 ensures vibrant colors and deep blacks, revealing details in both bright and dark scenes.

Image: A landscape scene on the monitor demonstrating the enhanced color and contrast provided by VESA DisplayHDR 1000.
6.6. AMD FreeSync Premium Pro
This technology synchronizes the monitor's refresh rate with your graphics card's frame rate, eliminating screen tearing and stuttering for a smoother gaming experience.
Image: A visual comparison showing the difference between a display with screen tearing (FreeSync OFF) and a smooth display (FreeSync ON).
7. Ergonomía
El soporte del monitor permite varios ajustes para optimizar su viewcomodidad:

Image: A diagram illustrating the monitor's ergonomic stand capabilities, including tilt, swivel, and height adjustments.
- Ajuste de altura: Suba o baje el monitor hasta el nivel de los ojos.
- Inclinación: Ajuste el ángulo vertical de la pantalla (hacia adelante o hacia atrás).
- Girar: Girar la pantalla horizontalmente hacia la izquierda o hacia la derecha.
The monitor is also compatible with VESA-standard monitor arms for alternative mounting solutions.
8. Mantenimiento
8.1. Limpieza de la pantalla
Para limpiar la pantalla, límpiela suavemente con un paño suave que no deje pelusa. Para manchas difíciles, frote ligeramenteampEnjuague el paño con agua o un limpiador de pantallas especializado. Nunca rocíe líquido directamente sobre la pantalla.
8.2. Cuidados generales
- Evite colocar objetos pesados sobre el monitor o sus cables.
- No exponga el monitor a temperaturas o humedad extremas.
- Mantenga el monitor alejado de campos magnéticos fuertes.
9. Solución de problemas
Si tiene problemas con su monitor, consulte las siguientes soluciones comunes:
| Problema | Posible solución |
|---|---|
| Sin energía / El monitor no enciende | Ensure the power cable is securely connected to both the monitor and a working power outlet. Check if the power adapter is functioning. Try unplugging and replugging the power cable. |
| Sin señal / Pantalla en blanco | Verify that the video cable (DisplayPort or HDMI) is securely connected to both the monitor and your computer. Ensure the correct input source is selected via the OSD menu. Check if your graphics card drivers are up to date. |
| Parpadeo o distorsión de la imagen | Check the video cable for damage or loose connections. Ensure your graphics card supports the selected resolution and refresh rate. Update graphics drivers. |
| OSD menu unresponsive or buggy | Unplug the monitor's power cable, wait 30 seconds, then plug it back in. This can reset the internal controls. Ensure the joystick button is clean and free of obstructions. |
| Cannot access BIOS during PC startup | Some users report the monitor going to sleep during BIOS POST. Try connecting a secondary, smaller monitor to access BIOS settings if this issue persists. |
10. Especificaciones
| Característica | Detalle |
|---|---|
| Tamaño de pantalla | 57 pulgadas |
| Resolución de pantalla | 7680 x 2160 Pixels (Dual 4K UHD) |
| Relación de aspecto | 32:9 |
| Curvatura | 1000R |
| Frecuencia de actualización | 240 Hz |
| Tiempo de respuesta | 1ms (GTG) |
| Tecnologia de panel | Mini-LED cuántico |
| Compatibilidad con HDR | Pantalla VESA HDR 1000 |
| Brillo máximo | 1,000 nits |
| Relación de contraste | 1,000,000:1 |
| Sincronización adaptativa | AMD FreeSync Premium Pro |
| Conectividad | DisplayPort 2.1, HDMI 2.1, USB 3.0 Hub (2 ports) |
| Ergonomía | Height Adjustable, Tilt, Swivel, VESA Mount Compatible |
| Dimensiones (LxAnxAl) | 19.7 x 52.3 x 24 pulgadas |
| Peso del artículo | 41.9 libras |
| Número de modelo | LS57CG952NNXZA / FBASAMLS57CG952 |
11. Garantía y soporte
Your SAMSUNG 57" Odyssey Neo G9 monitor is covered by a manufacturer's warranty. For specific warranty terms and conditions, please refer to the warranty card included in your product packaging or visit the official SAMSUNG support website. For technical assistance, troubleshooting beyond this manual, or to inquire about repairs, please contact SAMSUNG customer support.


