1. Introducción
This manual provides detailed instructions for the safe and effective use of your Orion Motor Tech Brake Bleeder Kit. This kit is designed to assist in bleeding brake systems, clutch systems, and other hydraulic systems, as well as for testing vacuum systems and other applications. Please read this manual thoroughly before operation to ensure proper use and to prevent damage to the tool or injury.
2. Producto terminadoview y componentes
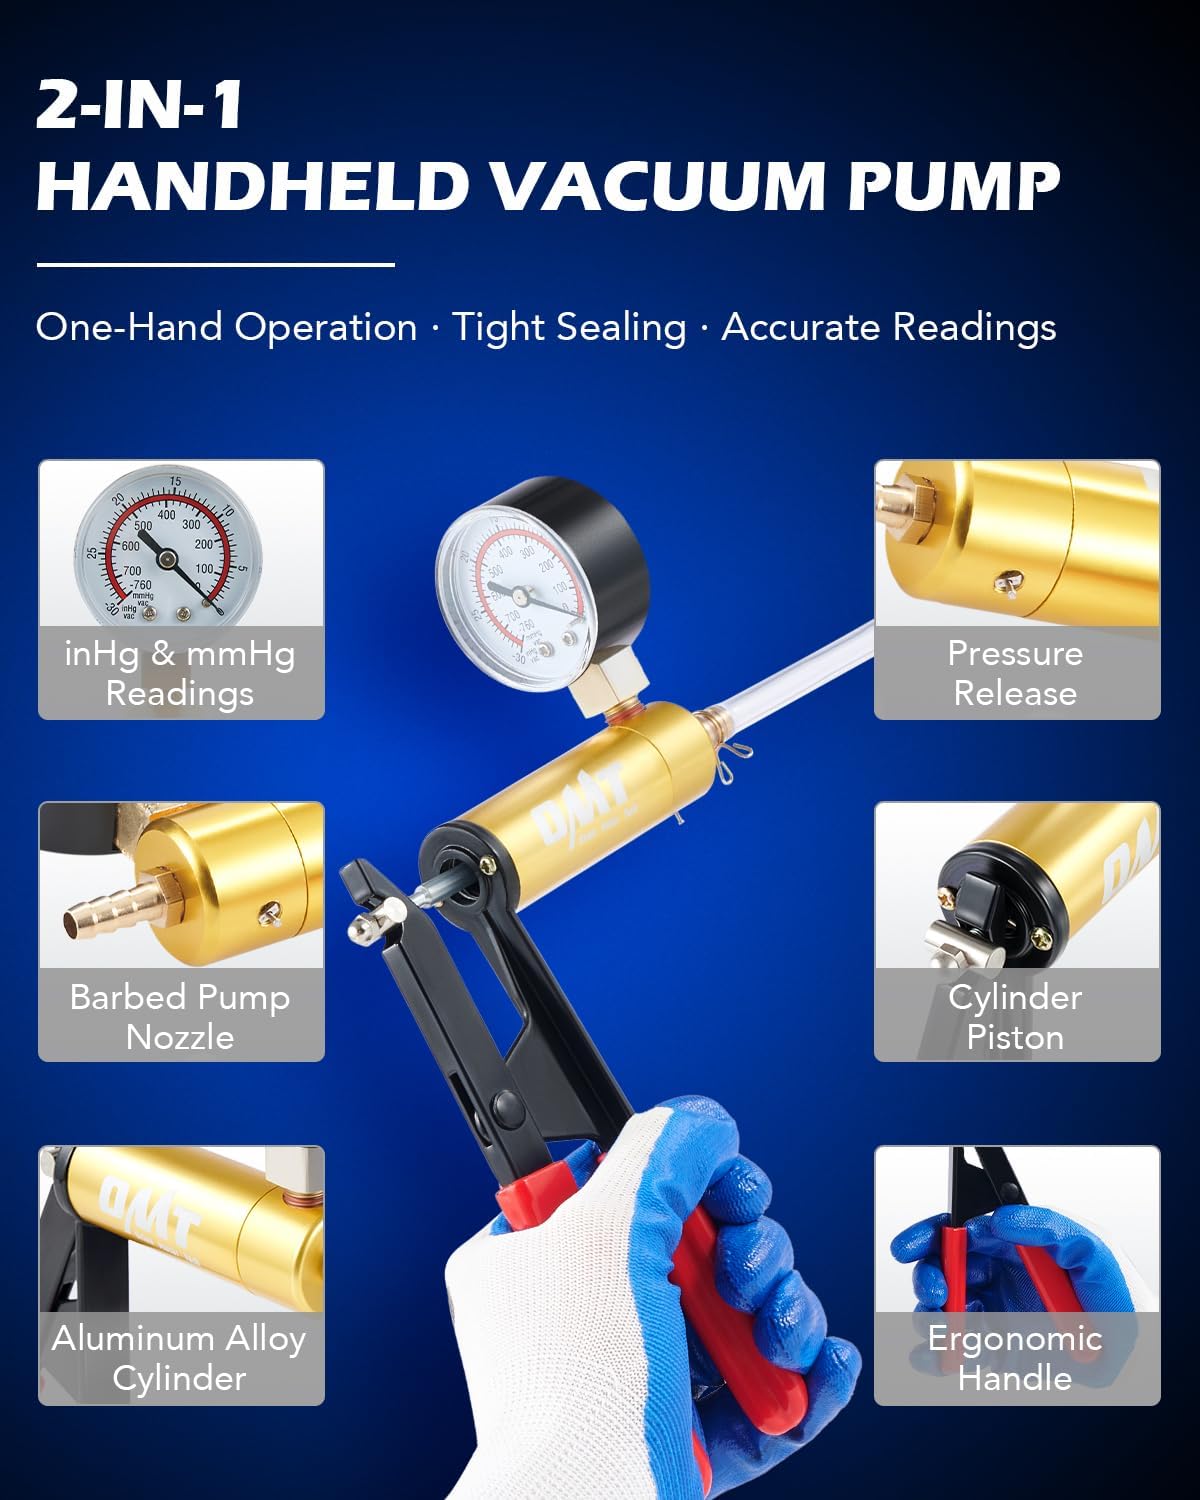
The Orion Motor Tech Brake Bleeder Kit is a versatile tool for automotive maintenance. It features a durable hand vacuum pump with a pressure gauge, designed for single-person operation.
2.1 Contenido del kit
- 1 x Vacuum Pump with Pressure Gauge
- 3 x Vacuum Hoses (various lengths)
- 1 x Suction Lid
- 1 x Transport Lid
- 3 x L-Shaped Bleeder Adapters
- 2 x Tapered Hose Adapters
- 1 x Straight Hose Connector
- 1 x T Hose Connector
- 1 x Brake Bleeder Bottle
- 1 x junta tórica
- 1 x Universal Cap Adapter
- 4xClamps
- 1 x guantes

3. Información de seguridad
Always prioritize safety when working with automotive fluids and tools. Failure to follow safety precautions can result in serious injury or damage.
- Wear appropriate personal protective equipment (PPE), including safety glasses and gloves, when handling brake fluid or other automotive fluids.
- Brake fluid is corrosive and can damage paint and other surfaces. Clean up spills immediately.
- Asegúrese de que el vehículo esté firmemente apoyado sobre soportes de gato antes de trabajar debajo. No dependa únicamente del gato.
- Mantenga a los niños y las mascotas alejados del área de trabajo.
- Dispose of used brake fluid and other automotive fluids according to local regulations.
- No utilice la herramienta para fines distintos a los previstos.
- Inspect all components for damage before each use. Do not use damaged equipment.
4. Configuración
Proper setup is crucial for effective and leak-free operation.
4.1 Assembling the Bleeder Kit
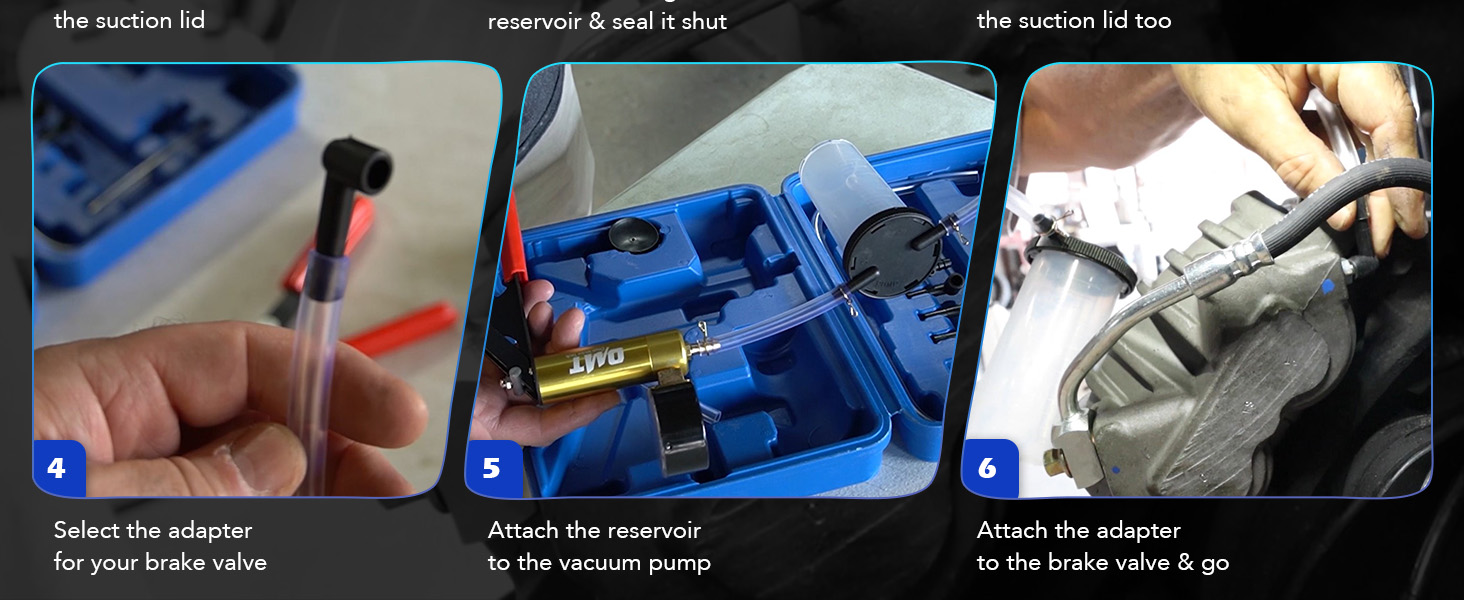
- Prepare the Collection Bottle: Attach the suction lid to the brake bleeder bottle. Ensure it is securely fastened to prevent leaks.
- Connect to Vacuum Pump: Connect one end of a vacuum hose to the barbed nozzle of the vacuum pump. Connect the other end of the hose to one of the ports on the suction lid of the collection bottle. Use the provided clamps to secure connections for a hermetic seal.
- Seleccionar adaptador: Choose the appropriate L-shaped or tapered adapter that fits snugly over the bleeder screw of your vehicle's brake caliper or cylinder.
- Connect to Bleeder Screw: Attach the selected adapter to the remaining port on the suction lid. Then, connect a vacuum hose from this adapter to the bleeder screw. Again, use clamps para garantizar un sellado hermético.
4.2 Preparing the Vehicle
- Ensure the vehicle is on a level surface and safely secured.
- Locate the brake fluid reservoir and ensure it is filled to the MAX line with the correct type of brake fluid specified by your vehicle manufacturer.
- Identify the bleeder screws on the brake calipers/cylinders. It is generally recommended to start with the wheel furthest from the master cylinder and work your way closer.
5. Instrucciones de funcionamiento
Follow these steps for effective brake bleeding or fluid extraction.
5.1 Brake Bleeding Procedure
- With the kit assembled and connected to the bleeder screw (as per Section 4.1), slightly loosen the bleeder screw using an appropriate wrench.
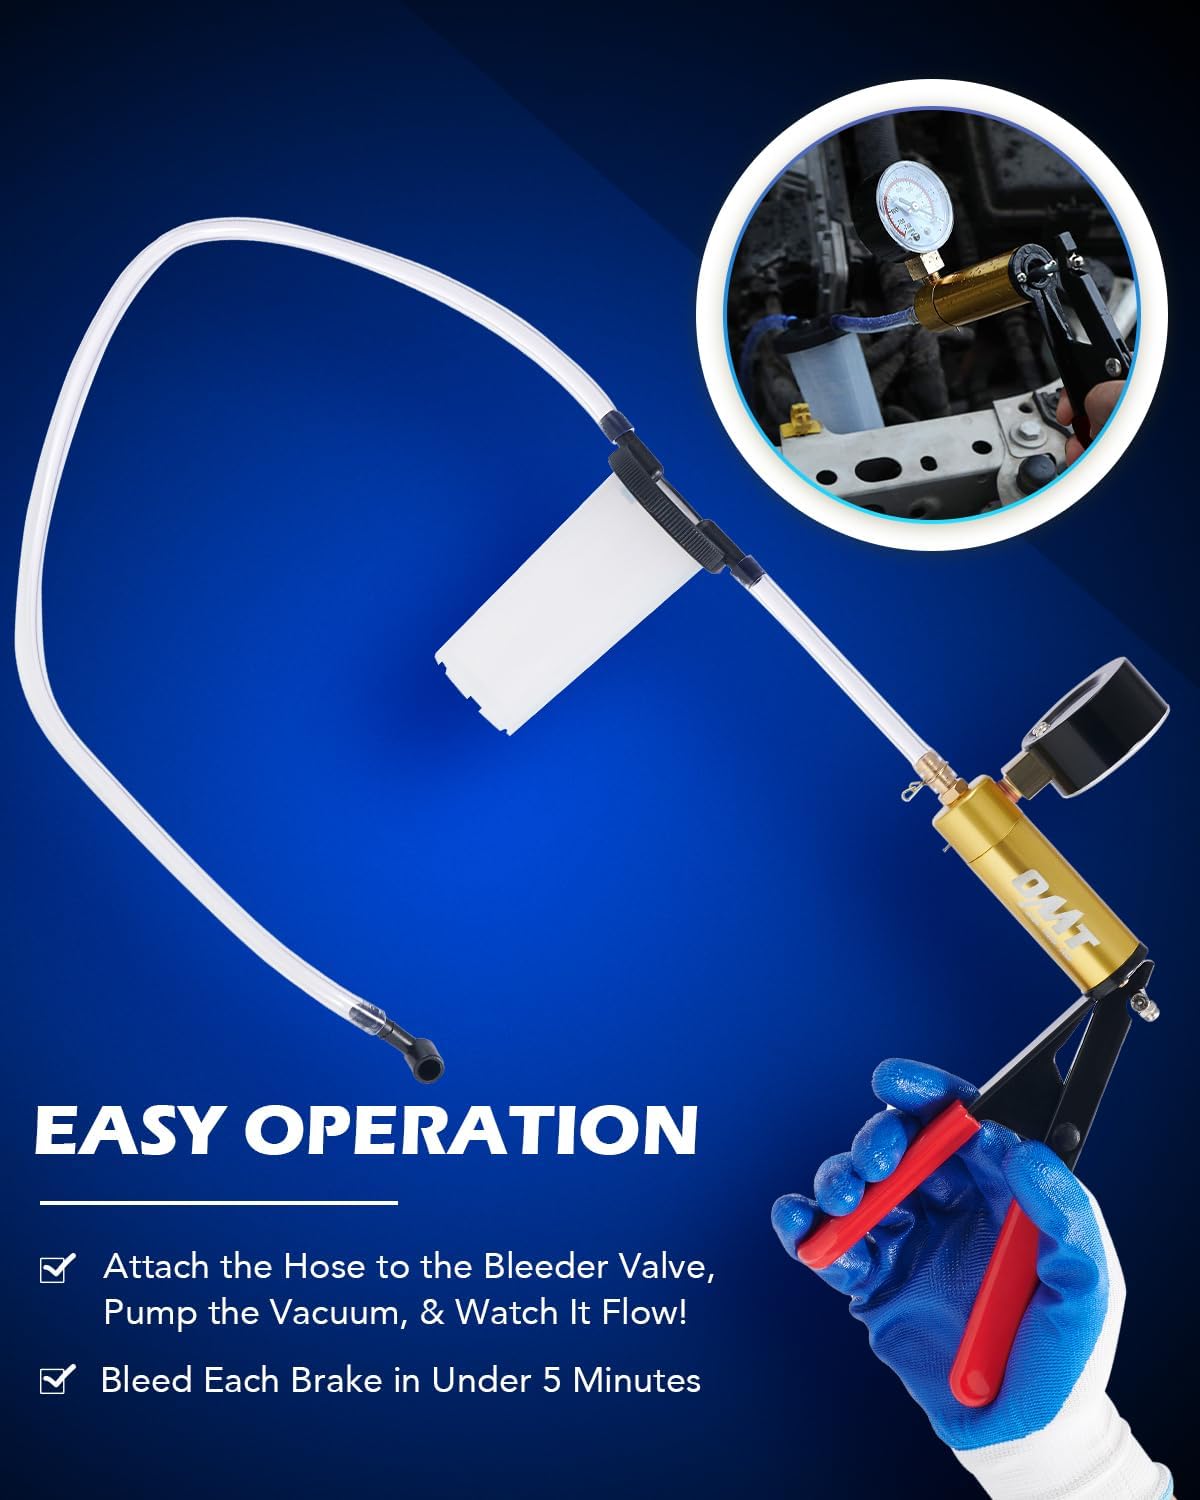
- Begin pumping the hand vacuum pump. Observe the pressure gauge; a vacuum of 10-15 inHg (inches of mercury) is typically sufficient for bleeding.
- Watch the fluid flowing into the collection bottle. Air bubbles will indicate air in the system. Continue pumping until a steady stream of bubble-free fluid is observed.
- While maintaining vacuum with the pump, tighten the bleeder screw. Then, release the vacuum on the pump using the pressure release valve.
- Check the brake fluid reservoir level frequently and refill as necessary to prevent air from entering the system.
- Repeat the process for each wheel, following the manufacturer's recommended bleeding sequence (usually furthest to closest from the master cylinder).
- After bleeding all wheels, pump the brake pedal several times to ensure a firm pedal feel. Test the brakes in a safe area before driving.
5.2 Otras aplicaciones
This kit can also be used for:
- Power Steering Fluid Bleeding: Connect to the power steering reservoir return line or use the pump to extract old fluid.
- Vacuum System Testing: Connect the pump directly to vacuum lines or components to test for leaks or proper operation.
- Fluid Transfer/Extraction: Use the pump and collection bottle to extract various automotive fluids from reservoirs.
- Sellado al vacío: With compatible containers, the pump can be used for vacuum sealing applications.

6. Mantenimiento
Regular maintenance ensures the longevity and reliability of your brake bleeder kit.
- Limpieza: After each use, thoroughly clean the collection bottle, hoses, and adapters with an appropriate cleaner, especially after contact with brake fluid. Rinse with water and allow to air dry completely.
- Inspección: Periodically inspect hoses for cracks, kinks, or hardening. Check adapters for wear or damage. Replace any worn or damaged components.
- Almacenamiento: Store the kit in its blow-molded case in a clean, dry place, away from direct sunlight and extreme temperatures.
- Juntas tóricas: Inspect the O-ring on the vacuum pump for wear. A small amount of silicone grease can be applied to maintain its sealing properties.
7. Solución de problemas
Problemas comunes y sus soluciones.
| Problema | Posible causa | Solución |
|---|---|---|
| No vacuum or low vacuum | Loose connections, damaged hose, worn O-ring, bleeder screw not fully open. | Compruebe todas las conexiones de las mangueras yamps for tightness. Inspect hoses for damage and replace if necessary. Inspect and lubricate/replace O-ring. Ensure bleeder screw is adequately loosened. |
| Air bubbles continue to appear in fluid | Air entering through bleeder screw threads, air in the system, low fluid reservoir. | Apply thread sealant or grease around bleeder screw threads to prevent air ingress. Continue bleeding until no bubbles appear. Refill brake fluid reservoir to prevent air from being drawn in. |
| Fluid not flowing | Bleeder screw closed, clogged hose/adapter, insufficient vacuum. | Ensure bleeder screw is open. Check hoses and adapters for blockages. Increase vacuum pressure if safe to do so, or check for leaks in the system. |
8. Especificaciones
- Modelo: FBA_BBTA001
- Fabricante: Tecnología de motores Orion
- Peso del artículo: 2.12 libras
- Dimensiones del paquete: 10.55 x 9.29 x 3.74 pulgadas
- Características especiales: Durable, Efficient, Leakproof, Wide Application, Wide Compatibility
- Material de la bomba: High-grade Anodized Aluminum Alloy
- Material de la manguera: Silicona de primera calidad
- Material del yacimiento: Polietileno

9. Garantía y soporte
Specific warranty details for the Orion Motor Tech Brake Bleeder Kit (Model FBA_BBTA001) are not available in the provided product information. For warranty claims, technical support, or replacement parts, please contact Orion Motor Tech directly through their official websitio o el minorista donde se compró el producto.