Nexillumi 30M_Nex_ZTL_LX_DE
Manual de usuario de las tiras de luces LED Nexillumi
Model: 30M_Nex_ZTL_LX_DE
Introducción
This manual provides detailed instructions for the installation, operation, and maintenance of your Nexillumi LED Strip Lights. Please read this manual thoroughly before use to ensure proper functionality and safety.
The Nexillumi LED Strip Lights are designed to provide versatile and dynamic lighting for various indoor environments. Featuring music synchronization, color changing capabilities, and control via both remote and a dedicated mobile application, these lights offer a customizable lighting experience.
¿Qué hay en la caja?
Verifique que todos los componentes estén presentes antes de comenzar la instalación:
- UL listed fireproof power adapter
- LED light strip with high-bond double-sided adhesive
- Remote Control (New or Old Type, shipped randomly)
- Controller Box (for app and music sync)

Image: Contents of the Nexillumi LED Strip Lights package, including the 100ft LED strip, remote, and controller.
Presupuesto
| Característica | Detalle |
|---|---|
| Marca | Nexillumi |
| Número de modelo | 30M_Nex_ZTL_LX_DE |
| Color | Multicolor |
| Uso en interiores y exteriores | Interior |
| Tipo de fuente de luz | CONDUJO |
| Fuente de poder | Eléctrico con cable |
| Volumentage | 120 voltios |
| Quétage | 5 vatios |
| Método de control | Aplicación, control remoto |
| Características especiales | Color Changing, Dimmable, Linkable, Remote Controlled, Timer, Music Sync |
| Material | Plástico |
| Peso del artículo | 8.78 onzas |
| Nivel de resistencia al agua | No resistente al agua |
Configuración e instalación
Siga estos pasos para una instalación exitosa:
- Preparación: Asegúrese de que la superficie de instalación esté limpia, seca y lisa.
- Unspool the Strips: Before powering on, completely unspool the LED strips from the reel. This prevents overheating and potential damage to the strips.
- Aplicación del adhesivo: The LED strips come with upgraded high-adhesive double-sided tape. Peel off the protective backing and firmly press the strip onto the desired surface.
- Componentes de conexión: Connect the LED strip to the controller box, ensuring the arrows on the connectors are pointed to each other. This ensures proper electrical connection. Then, connect the power adapter to the controller box and plug it into a power outlet.
- Cutting the Strips (Optional): The LED strips are customizable and can be cut at designated cut marks. Note that 4-pin LED strip connectors are not included for extending length.
- Nota importante: Do not fold the LED strips to make contact with each other while the lights are on, as this can cause a short circuit and damage the lights.

Image: Illustration emphasizing the importance of unspooling the LED strips before use to prevent damage.

Image: Close-up of the LED strip showing the ultra-strong 3M adhesive backing.
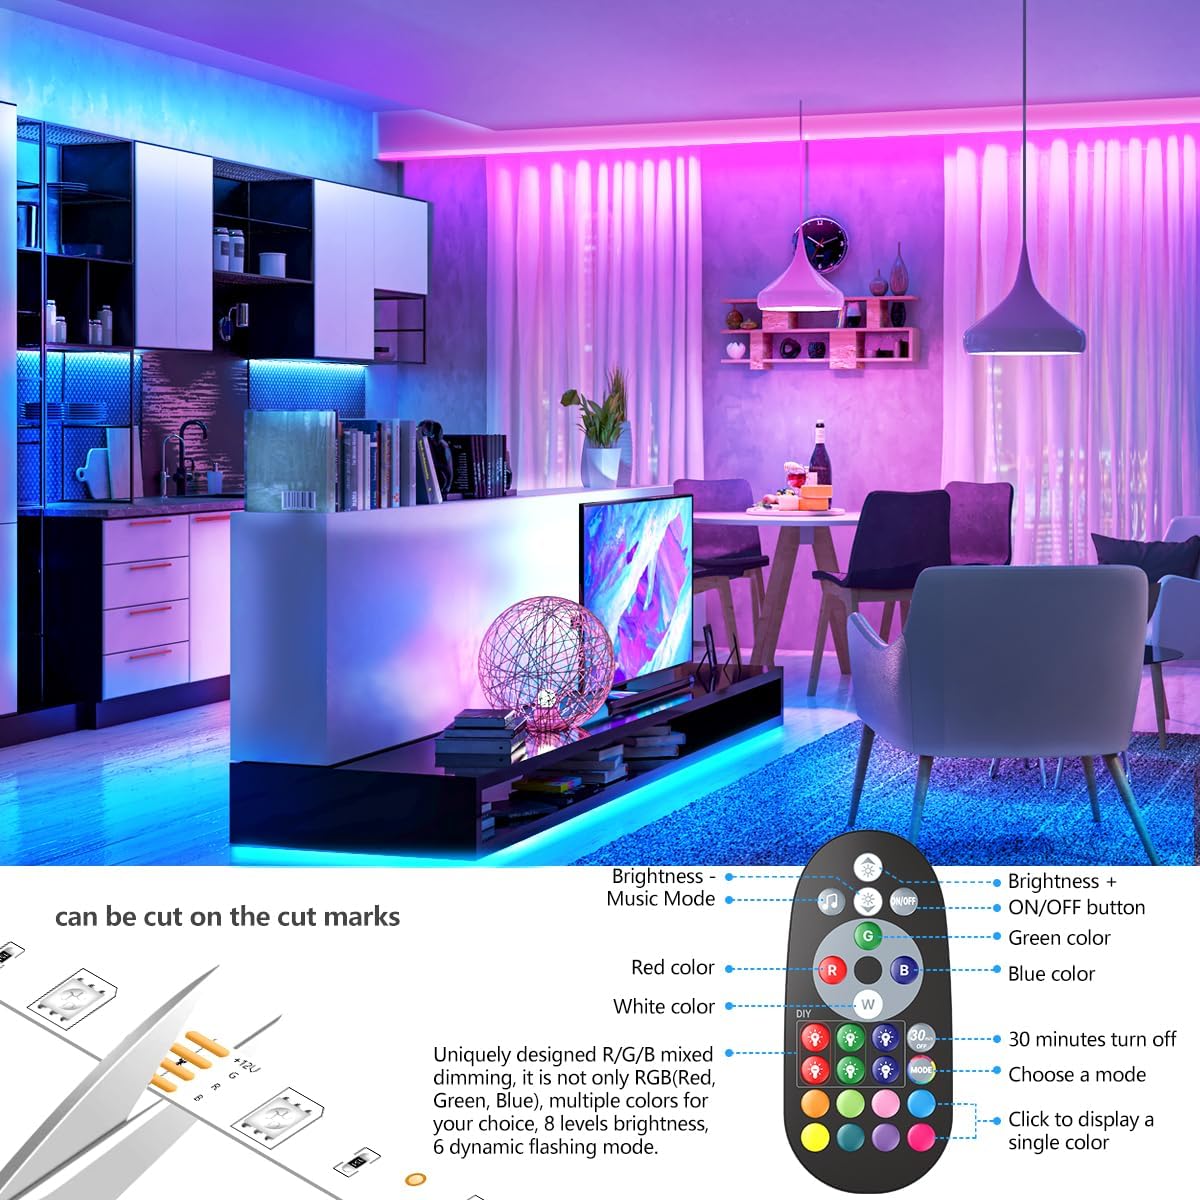
Image: Detailed diagram illustrating the "Arrow To Arrow" connection method for the LED strip and controller.

Image: Illustration of the LED strip's cut marks for customization.
Instrucciones de funcionamiento
Your Nexillumi LED Strip Lights can be controlled via the included remote control or a mobile application.
Operación por control remoto
The remote control allows for quick adjustments to your lighting. Functions include:
- Ajuste de brillo: Aumentar o disminuir la intensidad de la luz.
- Selección de colores: Choose from a wide range of preset colors (Red, Green, Blue, White, etc.).
- Colores DIY: Crea y guarda colores personalizados.
- Selección de modo: Switch between various dynamic lighting modes (e.g., flash, fade, jump).
- Minutero: Set a 30-minute turn-off timer.
- Botón de encendido/apagado: Encender o apagar las luces.

Imagen: Detallada view of the remote control, highlighting its various functions for color, brightness, and mode selection.
Note: New and old remote control models may be shipped randomly. Both provide similar functionality.

Image: Comparison of the two remote control designs that may be included with the product.
Control de aplicaciones móviles
For advanced control and features, download the "illumi Home" app from the Google Play Store or iOS App Store. The app allows for:
- Iluminación ajustable: Fine-tune brightness and change colors.
- Modo de sincronización de música: Utilize the built-in microphone in the controller or your phone's microphone to synchronize light changes with music.
- Scenes Modes: Apply pre-programmed lighting scenes.
- Función de temporización: Programe las luces para que se enciendan y apaguen en horarios específicos.
- Personalización DIY: Crea y guarda efectos de iluminación personalizados.

Image: The illumi app interface for iOS and Android devices, demonstrating color and music control features. Download the app from lxillumi.com/manuals/download.html.

Image: The illumi app's comprehensive control panel, offering scenes, music mode, timing, color modes, microphone control, and brightness adjustment. Download the app from lxillumi.com/manuals/download.html.
Mantenimiento
To ensure the longevity and optimal performance of your Nexillumi LED Strip Lights, follow these maintenance guidelines:
- Limpieza: Limpie suavemente las tiras LED con un paño seco y suave para eliminar el polvo. No utilice limpiadores líquidos ni productos abrasivos.
- Adaptador de corriente: Ensure the power adapter is kept in a dry environment and away from direct heat sources. The fireproof power adapter meets UL standards and has a built-in protective circuit to prevent overload or short circuit.
- Conexiones: Revise periódicamente todas las conexiones para asegurarse de que estén seguras y libres de daños.
- Almacenamiento: If storing the lights for an extended period, ensure they are clean, dry, and coiled loosely to prevent damage to the strip or adhesive.
Solución de problemas
If you encounter issues with your Nexillumi LED Strip Lights, refer to the following common problems and solutions:
| Problema | Posible causa | Solución |
|---|---|---|
| Las luces no se encienden. | No power, loose connection, or faulty power adapter. | Check if the power adapter is securely plugged into the outlet and the controller. Ensure the "Arrow To Arrow" connection between the strip and controller is correct. Test the outlet with another device. |
| Las luces están tenues o parpadean. | Low power, incorrect brightness setting, or damaged strip section. | Increase brightness via remote or app. Ensure the power adapter is sufficient. Inspect the strip for physical damage. |
| El control remoto no funciona. | Battery depleted, remote not pointed at receiver, or interference. | Replace the remote battery. Ensure the remote is pointed directly at the IR receiver on the controller box. Remove any obstructions. |
| El control de la aplicación no se conecta. | Bluetooth/Wi-Fi issue, app not updated, or incorrect pairing. | Ensure Bluetooth is enabled on your device and the app has necessary permissions. Restart the app and the LED lights. Re-pair the device within the app if necessary. |
| La sincronización de música no funciona. | Microphone not enabled, low volume, or incorrect mode. | Ensure the microphone mode is activated in the app. Increase music volume. Check app permissions for microphone access. |
Garantía y soporte
Nexillumi products are designed for reliability and performance. For specific warranty details, please refer to the product packaging or contact Nexillumi customer support.
For further assistance, technical support, or to download the latest version of the "illumi Home" app, please visit the official Nexillumi websitio o póngase en contacto con su servicio de atención al cliente:
- Oficial Websitio: Nexillumi Store on Amazon
- Descarga de la aplicación: lxillumi.com/manuals/download.html
- Servicio al cliente: Refer to contact information provided on product packaging or the official websitio.