
1. Información de seguridad
Please read this safety information carefully before using the camera. Keep this manual for future reference.
- This product contains small parts and is not suitable for children under 3 years of age. Adult supervision is recommended during use.
- No exponga la cámara al agua, la humedad o temperaturas extremas.
- Use only the provided USB charging cable to charge the camera.
- Evite dejar caer la cámara o someterla a impactos fuertes.
- No intente desmontar ni modificar la cámara.
2. ¿Qué hay en la caja?
Verifique que todos los artículos estén presentes en el paquete:
- Rohs Blue Kids Digital Camera
- Tarjeta de memoria Micro SD de 32 GB
- Cable de carga USB
- Acollador

Image: Included accessories - 32GB Micro SD card, USB charging cable, and lanyard.
3. Cámara sobreview
Familiarícese con los componentes y controles de la cámara.
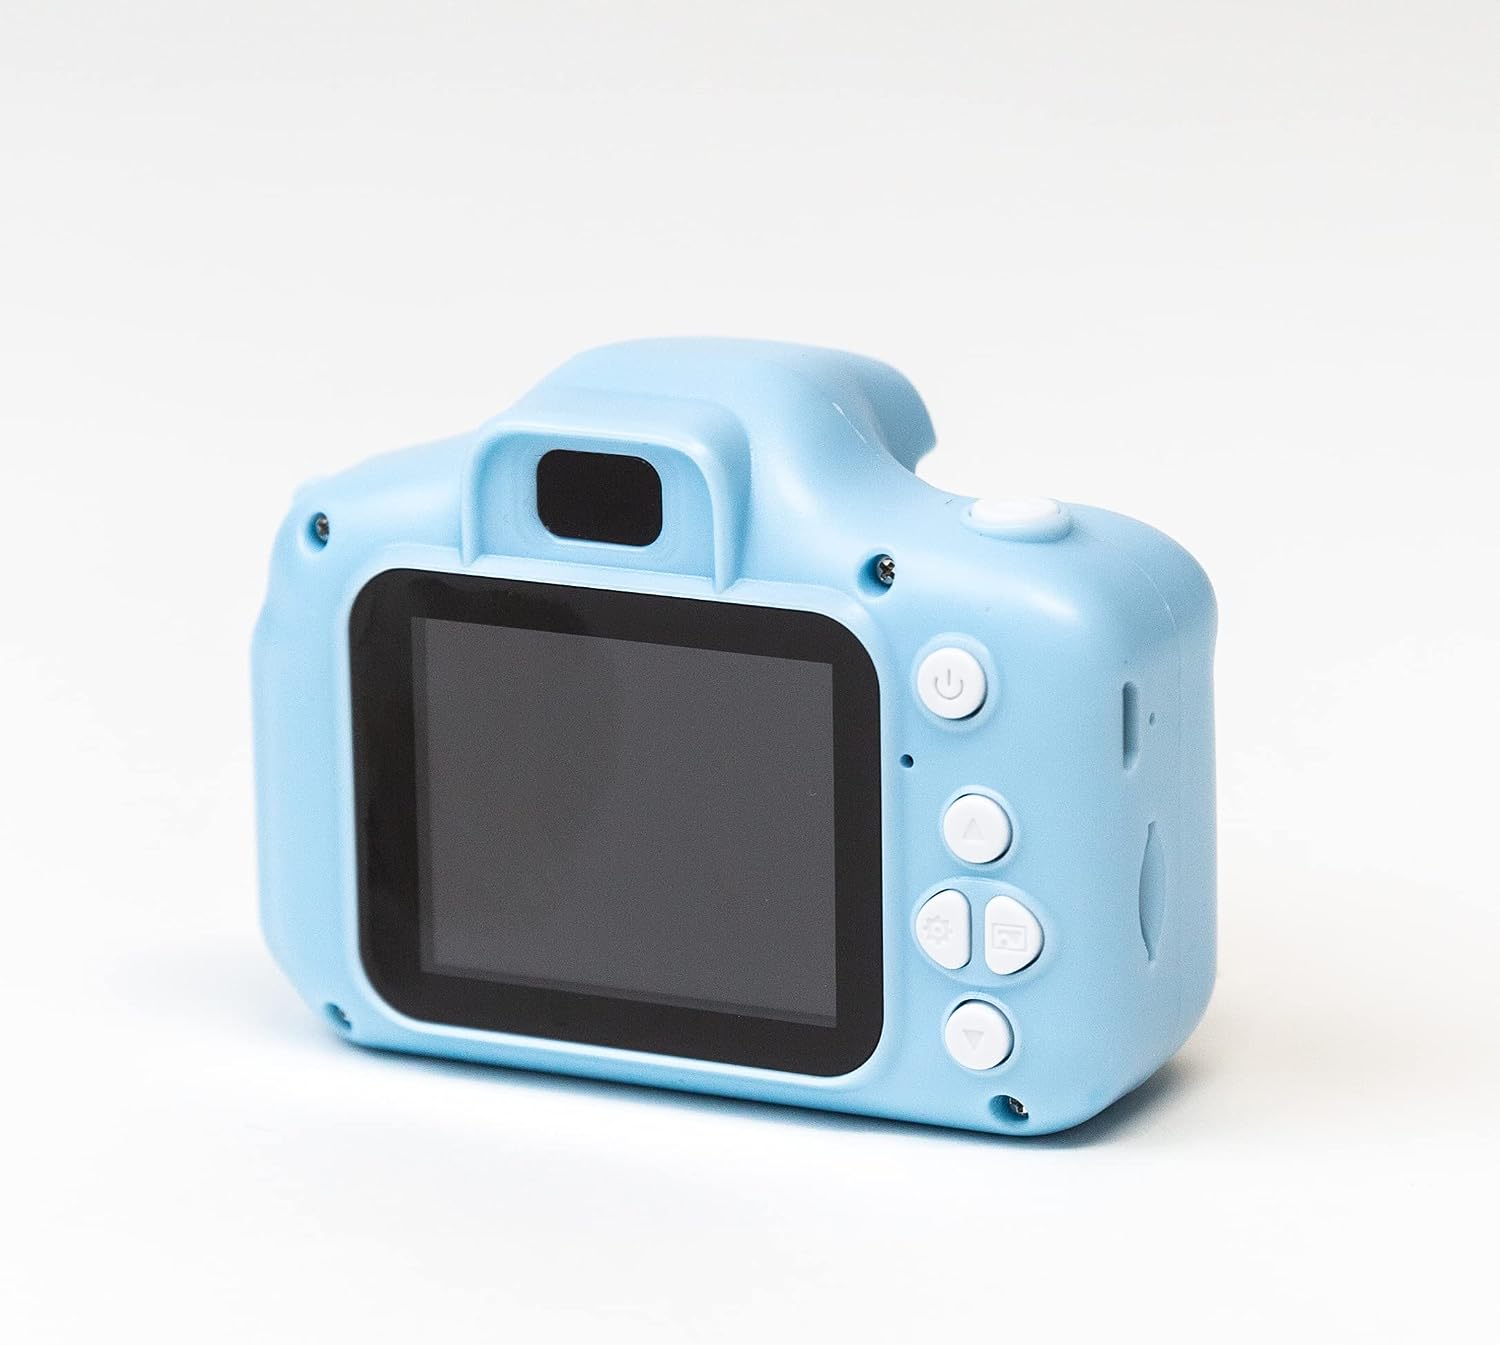
Imagen: Trasera view of the Rohs Blue Kids Digital Camera.
Botones y puertos
- Botón de encendido: Mantenga presionado para encender o apagar la cámara.
- Botón del obturador: Presione para tomar una fotografía o iniciar/detener la grabación de un video.
- Botones de navegación (arriba/abajo/izquierda/derecha): Used to navigate menus and browse photos/videos.
- Botón de menú: Accede al menú de configuración de la cámara.
- Botón de reproducción: Cambia al modo de reproducción para view medios capturados
- Botón OK: Confirma selecciones en los menús.
- Puerto USB: Para cargar la cámara y transferir files a una computadora.
- Ranura para tarjeta micro SD: Insert the memory card here.
4. Configuración
4.1. Carga de la batería
Before first use, fully charge the camera's built-in lithium-ion battery.
- Conecte el extremo pequeño del cable de carga USB al puerto USB de la cámara.
- Conecte el extremo más grande del cable USB a un adaptador de corriente USB (no incluido) o al puerto USB de una computadora.
- La luz indicadora de carga se iluminará. Se apagará o cambiará de color cuando la carga esté completa.
4.2. Insertar la tarjeta de memoria
The camera requires a Micro SD card to store photos and videos. A 32GB card is included.
- Localice la ranura para tarjeta Micro SD en el costado de la cámara.
- Gently insert the 32GB Micro SD card into the slot with the gold contacts facing the front of the camera, until it clicks into place.
- To remove the card, push it in gently until it clicks again, and it will spring out.
4.3. Colocación del cordón
Attach the included lanyard to prevent accidental drops.
- Thread the thin loop of the lanyard through the designated lanyard hole on the camera body.
- Pass the larger part of the lanyard through the thin loop and pull to secure.
5. Instrucciones de funcionamiento
5.1. Encendido / apagado
Mantenga pulsado el Botón de encendido for a few seconds to turn the camera on. Repeat the action to turn it off.
5.2. Tomar fotografías
- Ensure the camera is in photo mode (usually the default when powered on). If not, use the Botón de modo (if available) or navigate through the menu to select photo mode.
- Encuadre su toma usando la pantalla.
- Presione el Botón del obturador firmly to take a picture. The camera will save the image to the Micro SD card.
5.3. Grabación de vídeos
- Switch to video recording mode. This may involve pressing a dedicated Botón de modo or selecting 'Video' from the menu.
- Presione el Botón del obturador once to start recording. A timer or indicator will show that recording is in progress.
- Presione el Botón del obturador again to stop recording. The video will be saved to the Micro SD card.
5.4. Modo de reproducción
A view tus fotos y vídeos:
- Presione el Botón de reproducción.
- Utilice el Botones de navegación (Left/Right) to scroll through your captured media.
- Presione el Botón OK a view un vídeo o una versión más grande de una foto.
- Presione el Botón de reproducción de nuevo para salir del modo de reproducción.
5.5. Configuración del menú
Presione el Botón de menú to access various camera settings, such as:
- Resolución: Ajustar la calidad de las fotos y los vídeos.
- Fecha/Hora: Establezca la fecha y hora actuales.
- Idioma: Cambiar el idioma de la pantalla.
- Formatear tarjeta SD: Borrar todos los datos de la tarjeta de memoria. (Caution: This will delete all photos and videos.)
Utilice el Botones de navegación to select options and the Botón OK Para confirmar.
5.6. Transferencia Files a una computadora
- Asegúrese de que la cámara esté encendida.
- Connect the camera to your computer using the USB charging cable.
- The camera should appear as a removable disk or mass storage device on your computer.
- Abra la carpeta de la cámara para acceder y copiar sus fotos y vídeos.
6. Mantenimiento
- Limpieza: Use a soft, dry cloth to clean the camera body and screen. For the lens, use a specialized lens cleaning cloth. Do not use liquid cleaners.
- Almacenamiento: Guarde la cámara en un lugar fresco y seco, lejos de la luz solar directa y de temperaturas extremas cuando no esté en uso.
- Cuidado de la batería: Cargue la batería regularmente, incluso si no usa la cámara con frecuencia, para mantenerla en buen estado. Evite descargarla completamente durante periodos prolongados.
- Tarjeta de memoria: Periodically back up your photos and videos to a computer and format the Micro SD card in the camera's menu to ensure optimal performance.
7. Solución de problemas
| Asunto | Posible solución |
|---|---|
| La cámara no se enciende. | Asegúrese de que la batería esté cargada. Conecte la cámara a una fuente de alimentación mediante el cable USB. |
| No se pueden tomar fotografías ni grabar vídeos. | Check if the Micro SD card is inserted correctly and has sufficient free space. Format the card if necessary (after backing up data). |
| Images or videos are blurry. | Ensure the camera lens is clean. Take photos in good lighting conditions. Hold the camera steady. |
| La cámara se congela o no responde. | Mantenga presionado el botón de encendido durante 10 a 15 segundos para forzar el reinicio. |
| La computadora no reconoce la cámara. | Ensure the camera is powered on and connected with the original USB cable. Try a different USB port or computer. |
8. Especificaciones
| Característica | Detalle |
|---|---|
| Número de modelo | R-1092 |
| Marca | rohs |
| Color | Azul |
| Resolución de vídeo | 1080p |
| Apoyado File Formato | JPEG (imagen), AVI (vídeo) |
| Capacidad de almacenamiento de memoria | 32 GB (tarjeta Micro SD incluida) |
| Tipo de memoria flash | Micro SD |
| Tipo de batería | Iones de litio (recargables) |
| Tecnología de conectividad | USB |
| Estabilización de imagen | Digital |
| Característica especial | Lapso de tiempo |
| Nivel de habilidad | Principiante |
| Nivel de resistencia al agua | No resistente al agua |
9. Garantía y soporte
For warranty information or technical support, please refer to the contact details provided with your purchase or visit the official Rohs webSitio. Conserve su comprobante de compra para reclamaciones de garantía.