Introducción
The MSI A520M PRO VH ProSeries Motherboard is designed to provide an efficient and productive computing experience. This motherboard offers stable functionality and high-quality assembly, ensuring optimized professional workflows, reduced troubleshooting, and enhanced longevity for your system. This manual provides essential information for setting up, operating, and maintaining your motherboard.
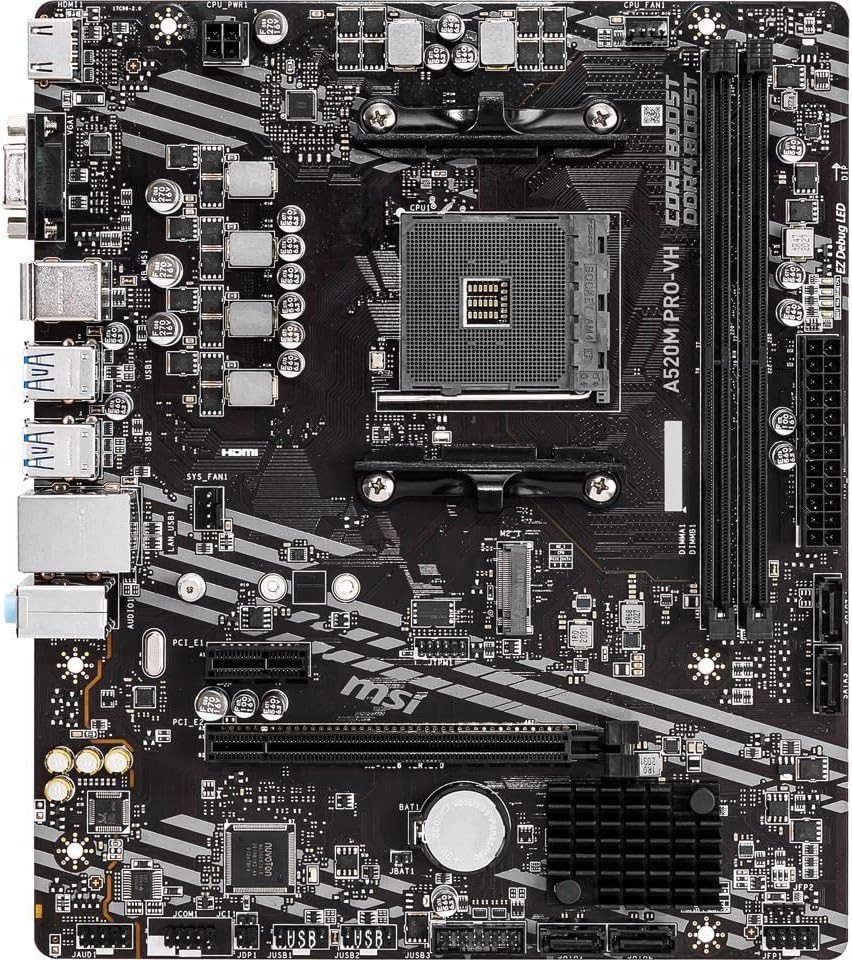
Figura 1: De arriba hacia abajo view of the MSI A520M PRO VH Motherboard, showcasing su disposición y componentes.
Características principales
- Supports AMD Ryzen 5000 & 3000 Series desktop processors and AMD Ryzen 4000 G-Series desktop processors.
- Supports DDR4 Memory, with speeds up to 4600(OC) MHz for high-performance computing.
- Features Turbo M.2 slot, running at PCI-E Gen3 x4, to maximize performance for NVMe based SSDs.
- Equipped with Core Boost technology, featuring a premium layout and digital power design to support more cores and provide better overall performance.
- Utilizes DDR4 Boost, an advanced technology designed to deliver pure data signals, ensuring the best performance and stability for your memory modules.
Guía de configuración
This section provides a step-by-step guide for installing your MSI A520M PRO VH motherboard and its primary components. Always ensure your system is powered off and unplugged before handling internal components.
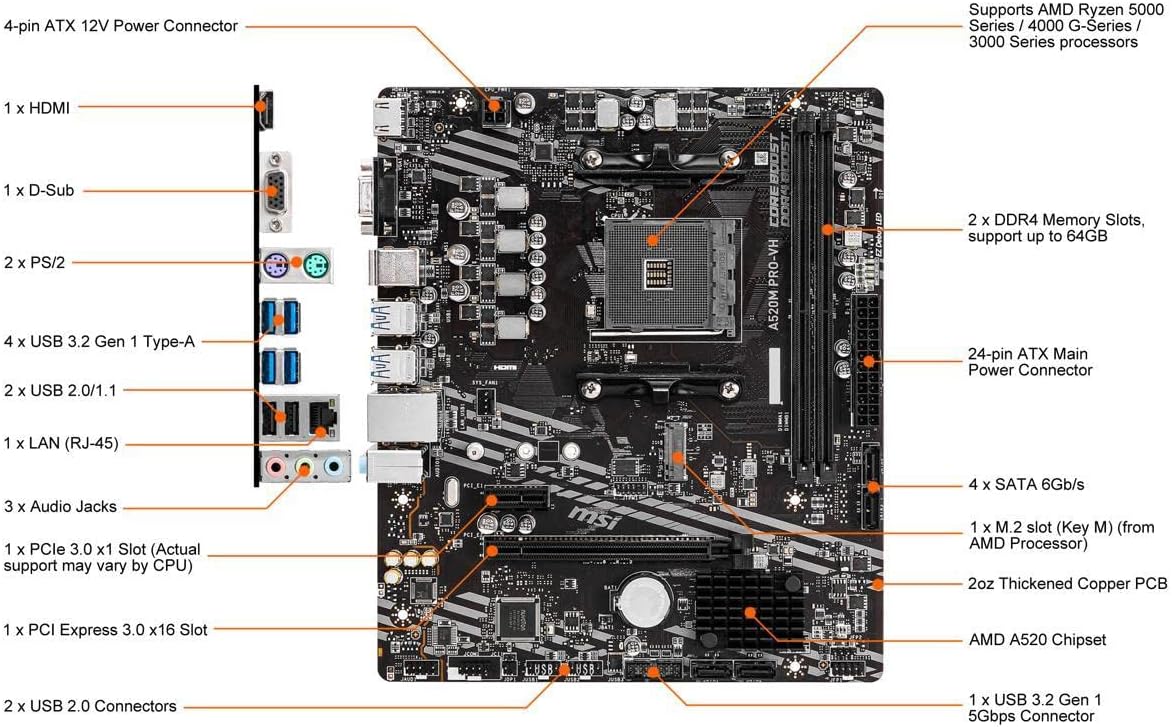
Figure 2: Detailed diagram of the MSI A520M PRO VH Motherboard with key components and connectors labeled for easy identification.
1. Instalación de la CPU
Carefully open the CPU socket lever. Align the triangular mark on your AMD Ryzen processor with the corresponding mark on the motherboard's AM4 socket (refer to Figure 2 for socket location). Gently place the CPU into the socket without forcing it. Once seated, close the lever to secure the CPU.
2. Instalación de RAM (memoria DDR4)
Locate the DDR4 Memory Slots (refer to Figure 2). Open the clips on both ends of the DIMM slot. Align the notch on the memory module with the key in the slot. Press down firmly on both ends of the memory module until the clips snap into place. This motherboard supports up to 64GB of DDR4 memory across its two slots.
3. Instalación de SSD M.2
Identify the M.2 slot (Key M) on the motherboard (refer to Figure 2). Insert your NVMe M.2 SSD into the slot at an angle. Gently push down the SSD and secure it with the provided screw. The Turbo M.2 slot maximizes performance for NVMe based SSDs.
4. Conexiones de energía
- 24-pin ATX Main Power Connector: Connect your power supply's 24-pin cable to this connector (refer to Figure 2).
- Conector de alimentación ATX de 12 V y 4 pines: Connect your power supply's 4-pin CPU power cable to this connector, typically located near the CPU socket (refer to Figure 2).
5. Dispositivos SATA
Connect your SATA hard drives or SSDs to the SATA 6Gb/s ports (refer to Figure 2). Ensure proper power and data cable connections.
6. Conectores del panel frontal
Connect your PC case's front panel cables (power button, reset button, HDD LED, power LED, USB, audio) to the corresponding headers on the motherboard. Consult your PC case manual for specific pin assignments and refer to the motherboard's detailed manual for header locations.
Operación de su placa base
After successful installation, connect your display to the HDMI or D-Sub port on the motherboard's rear I/O panel. Power on your system. The motherboard will initiate the boot process. You may need to install an operating system if it's a new build.
Configuración de BIOS/UEFI
Para acceder a la utilidad de configuración BIOS/UEFI, presione el botón Borrar key repeatedly during the initial boot sequence. From here, you can configure boot order, system settings, and monitor hardware status.
Instalación del controlador
For optimal performance and stability, install the latest drivers for your motherboard's chipset, audio, LAN, and other integrated components. These drivers are typically available on the MSI official website or included on a driver CD/USB with your motherboard.
Mantenimiento y cuidado
Un mantenimiento adecuado garantiza la longevidad y el funcionamiento estable de su placa base.
- Eliminación de polvo: Limpie regularmente el polvo de la carcasa de su PC y los componentes de la placa base con aire comprimido. Asegúrese de que el sistema esté apagado y desenchufado antes de limpiarlo.
- Flujo de aire: Ensure proper airflow within your PC case to prevent overheating. Keep cables tidy and ensure case fans are functioning correctly.
- Actualizaciones de BIOS/UEFI: Revise periódicamente el MSI website for BIOS/UEFI updates. Updates can improve compatibility, stability, and performance. Follow MSI's official instructions carefully when performing a BIOS update.
- Comprobaciones de componentes: Occasionally check all connected cables and components to ensure they are securely seated.
Solución de problemas comunes
This section addresses common issues you might encounter. For more detailed troubleshooting, refer to the comprehensive motherboard manual available on the MSI websitio.
- Sin energía/sin arranque:
- Verify all power cables (24-pin ATX, 4-pin ATX 12V) are securely connected to the motherboard and power supply.
- Asegúrese de que el interruptor de alimentación esté en la posición ON.
- Verifique la conexión del botón de encendido del panel frontal a la placa base.
- Sin pantalla:
- Ensure your monitor is connected to the correct video output (HDMI or D-Sub on the motherboard, or your discrete graphics card).
- Reseat your RAM modules. Try booting with only one RAM stick if you have multiple.
- If using a discrete graphics card, ensure it is properly seated in the PCIe slot and has adequate power.
- Inestabilidad/fallos del sistema:
- Verifique las temperaturas de la CPU y la GPU para asegurarse de que estén dentro de los límites de funcionamiento seguros.
- Verifique la estabilidad de la RAM utilizando herramientas de diagnóstico de memoria.
- Asegúrese de que todos los controladores estén actualizados.
- LED de depuración fácil: The motherboard features EZ Debug LEDs (CPU, DRAM, VGA, BOOT) that light up to indicate the source of a problem during startup. If a specific LED stays lit, it points to an issue with that component. Consult the full manual for specific LED codes.
Especificaciones técnicas
| Característica | Especificación |
|---|---|
| Marca | MSI |
| Nombre del modelo | A520M PRO VH |
| Zócalo de CPU | Zócalo AM4 |
| Procesadores compatibles | AMD Ryzen 5000, 3000, and 4000 G-Series Desktop Processors |
| Tipo de chipset | Procesador AMD A520M |
| Tecnología de memoria RAM | DDR4 |
| Velocidad de la memoria | Up to 4600(OC) MHz |
| Capacidad máxima de almacenamiento de memoria | 64 GB |
| Dimensiones del producto (LxAnxAl) | 9.6 x 9.6 x 2.5 pulgadas |
| Peso del artículo | 1.62 libras |
| Puertos USB 2.0 | 2 (rear I/O) |
| Compatibilidad de plataformas | Ventanas 10 |
Garantía y soporte
For detailed warranty information regarding your MSI A520M PRO VH motherboard, please refer to the warranty card included with your product packaging or visit the official MSI webSitio. Los términos y condiciones de la garantía pueden variar según la región.
For technical support, driver downloads, and the latest BIOS updates, please visit the official MSI support page:
It is recommended to register your product on the MSI website to receive timely updates and support.