RECOIL RCK4
RECOIL True 4 Gauge Completo CCA AmpKits de cableado de amplificadores con cable RCA OFC - Manual de instrucciones
Model: RCK4
Introducción
This instruction manual provides detailed information for the installation and proper use of your RECOIL True 4 Gauge Complete CCA Amplifier Wiring Kit. This kit is designed to provide optimal power transfer and signal clarity for your car audio amplifier system. Please read all instructions carefully before beginning installation.

Image: RECOIL Amplifier Wiring Kits are comprehensive, providing all necessary components for car audio system wiring.
Contenido del paquete
Your RECOIL True 4 Gauge Complete CCA Amplifier Wiring Kit includes the following components:
- 17ft (5.5 meters) Oxygen Free Copper (OFC) 2-Channel Helical twisted construction RCA interconnect cable.
- 17ft (5.5 meters) Premium Frosted Blue 4 Gauge power wire with pre-attached ring terminal.
- 3ft (0.95 meters) Premium Frosted Black 4 Gauge ground wire with pre-attached ring terminal.
- 17ft (5.5 meters) Blue 18 Gauge remote turn-on lead wire.
- 25ft (8.0 meters) Premium Frosted Blue/Black 16 Gauge speaker wire.
- One RECOIL ANL/Mini-ANL Fuse-holder with a 120A ANL fuse.
- One Black rubber firewall grommet.
- Four 4 Gauge Nickel Plated Ring terminals with blue/black boots.
- Five 18 Gauge Spade terminals with blue/black boots.
- One Red 18 Gauge butt connector.
- Ten 6-inch Black zip ties.

Imagen: Una completa view of all components included in the RECOIL ampKit de cableado del elevador.
Presupuesto
| Característica | Detalle |
|---|---|
| Marca | RETROCESO |
| Número de modelo | RCK4 |
| Calibre del cable de alimentación | 4 Gauge (CCA) |
| Longitud del cable de alimentación | 17 pies (5.5 m) |
| Calibre del cable de tierra | 4 Calibre |
| Longitud del cable de tierra | 3 pies (0.95 m) |
| RCA Cable Type | 2-Channel OFC Helical Twisted |
| Longitud del cable RCA | 17 pies (5.5 m) |
| Calibre de cable remoto | 18 Calibre |
| Longitud del cable remoto | 17 pies (5.5 m) |
| Calibre del cable del altavoz | 16 Calibre |
| Longitud del cable del altavoz | 25 pies (8.0 m) |
| Fuse Holder Type | ANL/Mini-ANL |
| Evaluacion del fusible | 120A ANL |
| Característica especial | Resistente al calor |
| Vol máximotage | 24 voltios (CC) |

Imagen: Primer plano view of the 4AWG wire, detailing its construction and specifications.
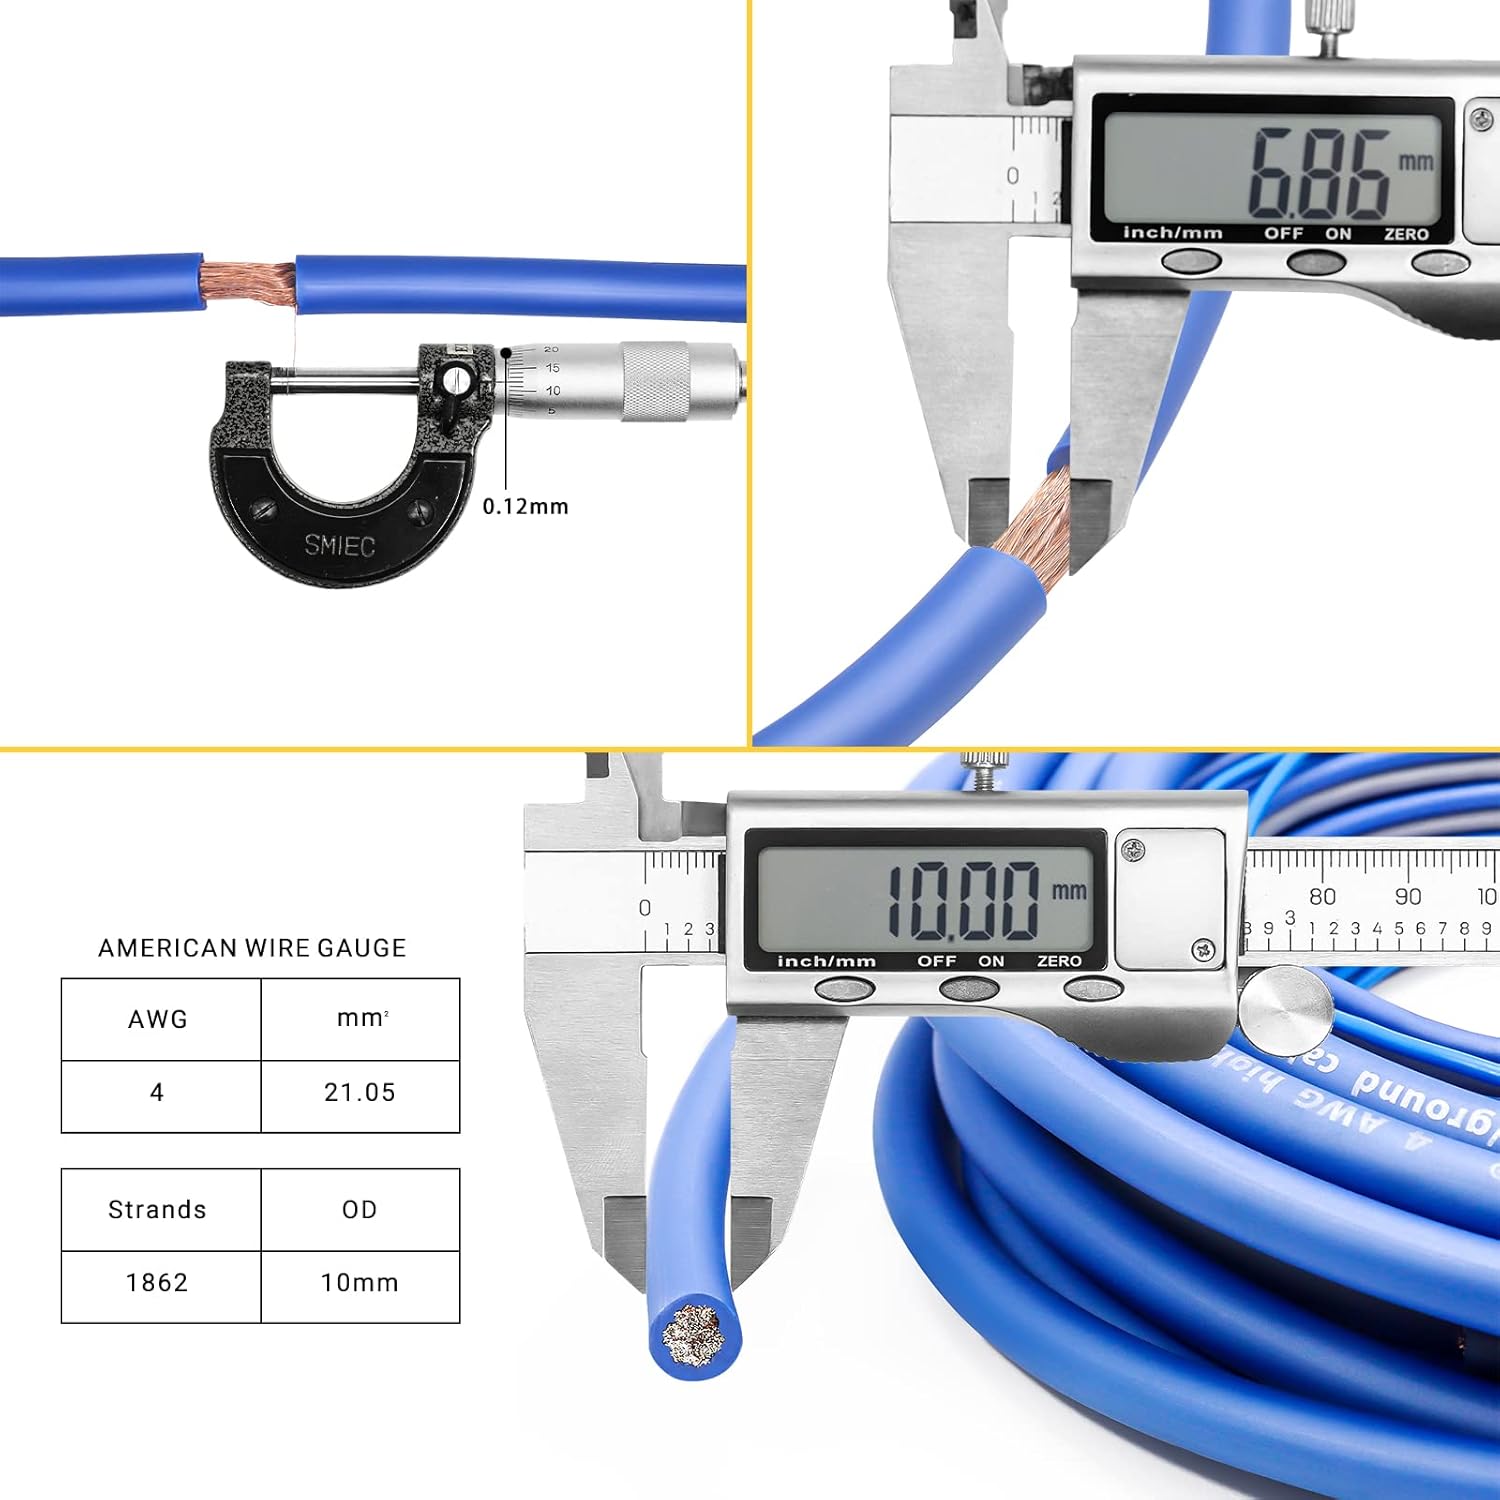
Image: Visual confirmation of wire gauge and strand measurements for the 4AWG cable.
Configuración e instalación
Precauciones de seguridad
- Desconecte siempre el terminal negativo de la batería del vehículo antes de iniciar cualquier trabajo eléctrico.
- Use equipo de seguridad adecuado, incluida protección para los ojos.
- Asegúrese de que todas las conexiones estén seguras y adecuadamente aisladas para evitar cortocircuitos.
- Route wires away from moving parts, sharp edges, and heat sources.
- Consulte con un profesional si no está seguro acerca de alguna parte del proceso de instalación.
Pasos de instalación
- Instalación del cable de alimentación:
Route the 17ft (5.5m) blue 4 Gauge power wire from the vehicle's battery to the amplifier location. Use the included firewall grommet when passing the wire through the firewall to protect it from sharp edges. Connect the pre-attached ring terminal to the positive (+) terminal of the battery. Do not connect the other end to the amplificador todavía.

Image: High quality CCA wire ensures maximum and reliable power transfer.

Imagen: Detallada view of the Recoil power wire, highlighting its quality construction.
- Fuse Holder Installation:
Install the ANL/Mini-ANL fuse holder within 18 inches (45 cm) of the battery on the power wire. Cut the power wire and strip the ends. Securely connect the power wire to both sides of the fuse holder. Insert the 120A ANL fuse into the holder. This provides critical protection for your system.

Image: The fuse holder provides essential protection for your ampsistema elevador.
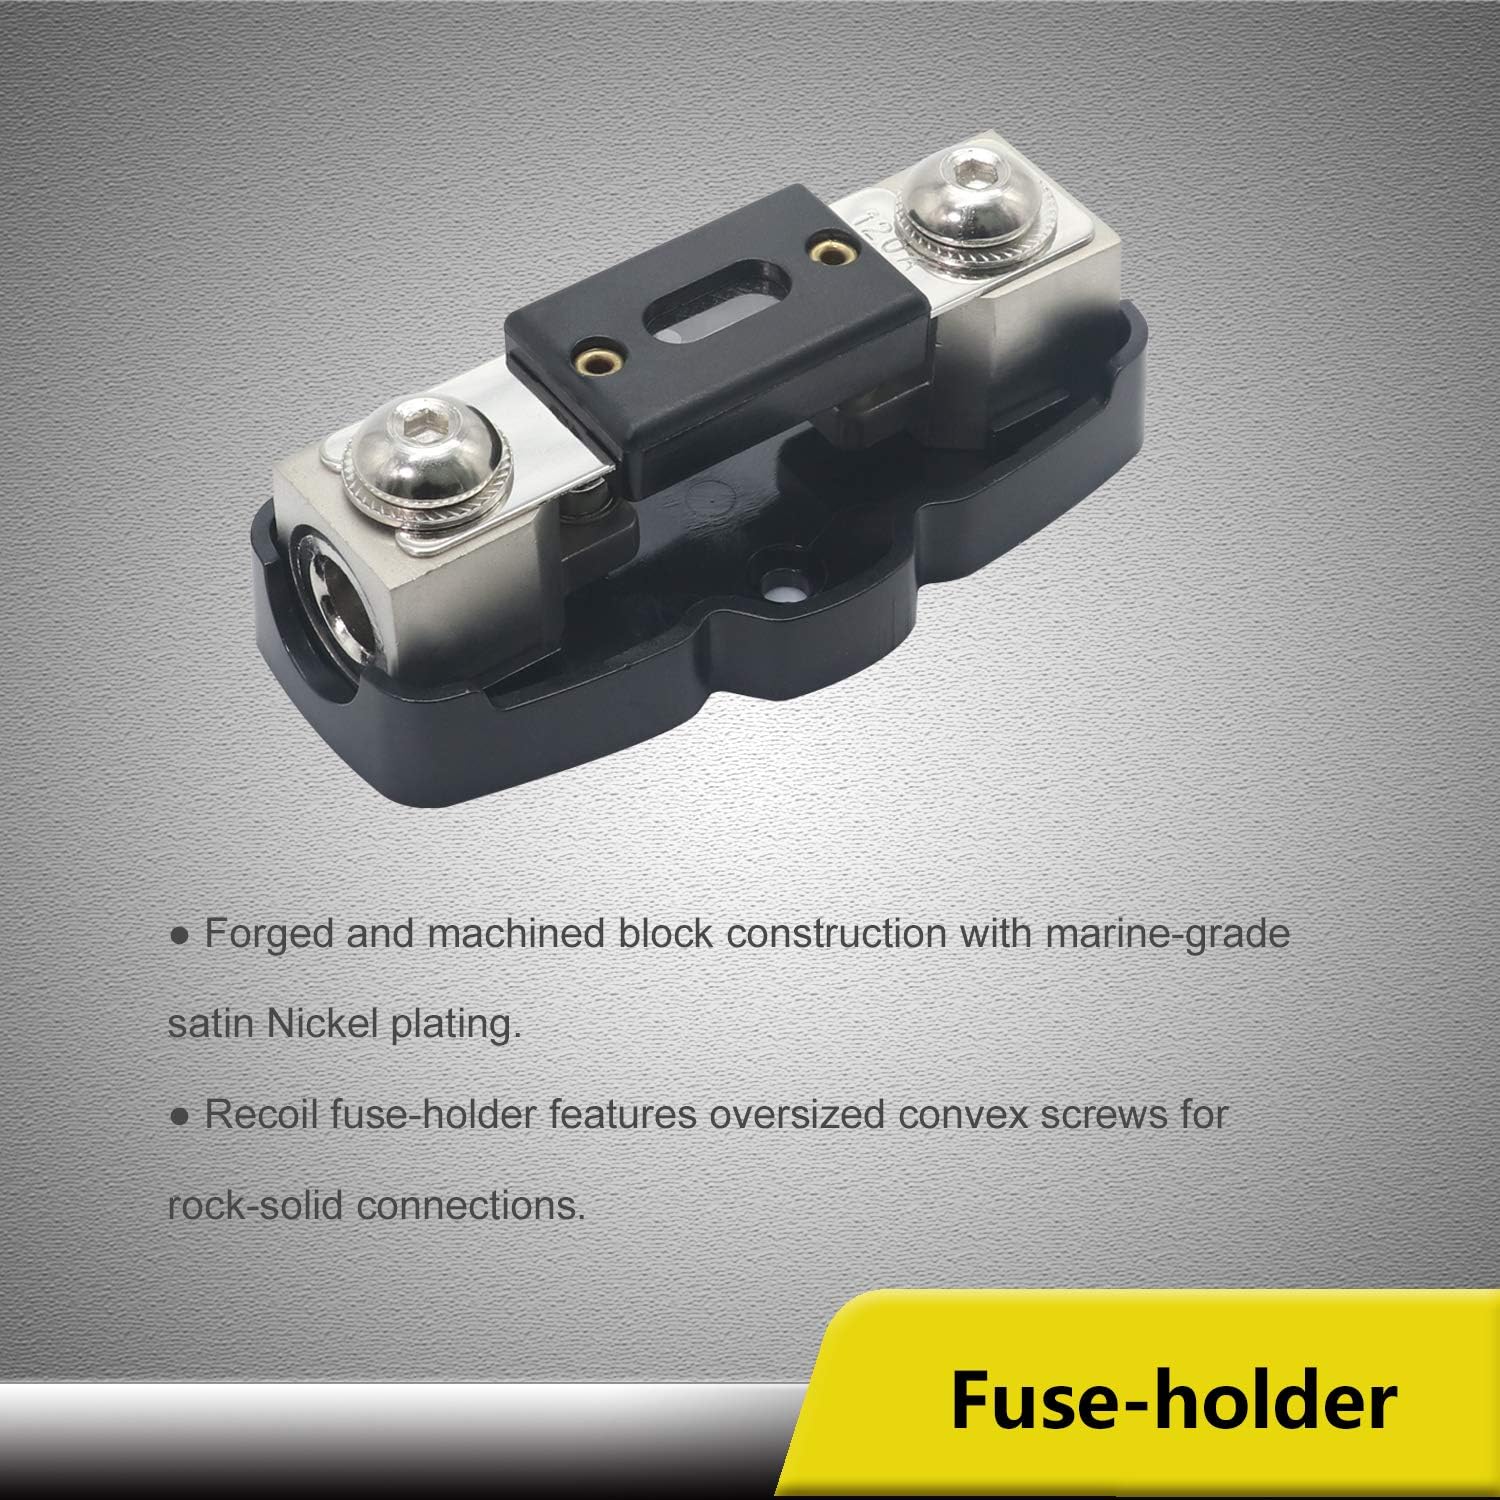
Imagen: Detallada view of the Recoil fuse holder, emphasizing its robust construction.
- Instalación del cable de tierra:
Route the 3ft (0.95m) black 4 Gauge ground wire from the amplifier location to a clean, unpainted metal surface on the vehicle's chassis. Ensure the contact point is free of paint, rust, or dirt for optimal conductivity. Connect the pre-attached ring terminal to this ground point. Connect the other end to the ground terminal of your ampmás duradero.

Imagen: Detallada view of the Recoil ground wire, highlighting its quality construction.
- RCA Cable Installation:
Route the 17ft (5.5m) 2-channel OFC RCA interconnect cable from your head unit (source unit) to the amplifier. It is recommended to route RCA cables on the opposite side of the vehicle from power wires to minimize noise interference. Connect the RCA plugs to the corresponding input jacks on your amplifier and output jacks on your head unit.

Image: OFC RCA cables deliver superior signal clarity for an optimal listening experience.

Imagen: Detallada view of the Recoil RCA cables, emphasizing their OFC construction.
- Remote Turn-On Wire Installation:
Route the 17ft (5.5m) blue 18 Gauge remote turn-on lead wire from your head unit's remote output to the remote input terminal on your amplifier. This wire tells the amplifier when to turn on and off with your head unit.
- Instalación del cable del altavoz:
Route the 25ft (8.0m) blue/black 16 Gauge speaker wire from the amplifier's speaker output terminals to your speakers. Ensure correct polarity (+ to + and - to -) for each speaker. Use the included spade terminals and butt connector as needed for secure connections.

Imagen: Detallada view of the Recoil speaker wire, designed for optimal audio performance.
- Conexiones finales:
Once all wires are routed and prepared, connect the power wire to the amplifier's positive (+) terminal. Double-check all connections for tightness and proper insulation. Reconnect the vehicle's negative battery terminal.
Operante
Once the RECOIL amplifier wiring kit is correctly installed, the amplifier will power on automatically when your vehicle's head unit is turned on, thanks to the remote turn-on wire. The kit itself does not require specific "operation" beyond proper installation. Ensure your amplifier settings (gain, crossover, etc.) are adjusted according to your audio system's requirements and ampmanual del elevador.
Mantenimiento
The RECOIL amplifier wiring kit is designed for durability and requires minimal maintenance. Periodically inspect all connections for corrosion or looseness. Ensure wires are not pinched or exposed to excessive heat. If the fuse blows, replace it only with a fuse of the same type and rating (120A ANL) to prevent damage to your system.
Solución de problemas
| Problema | Posible causa | Solución |
|---|---|---|
| Amplificador no se enciende. | Fusible quemado en el portafusibles. Conexión de alimentación o tierra suelta. El cable de encendido remoto no está conectado o está defectuoso. | Verifique y reemplace el fusible si es necesario. Verifique que todas las conexiones de alimentación y tierra estén seguras. Asegúrese de que el cable remoto esté conectado a la salida remota de la unidad principal y ampEntrada remota del lificador. |
| No hay sonido de los altavoces. | Cables RCA no conectados o defectuosos. Los cables del altavoz no están conectados o tienen polaridad incorrecta. AmpConfiguración del ificador incorrecta. | Verifique las conexiones RCA en la unidad principal y ampmás duradero. Verifique las conexiones y la polaridad de los cables del altavoz. Referirse a amplifier manual for correct settings. |
| Engine noise or whine through speakers. | Mala conexión a tierra. RCA cables routed too close to power wires. Cables RCA defectuosos. | Ensure ground point is clean and secure. Redireccione los cables RCA lejos de los cables de alimentación. Test with different RCA cables if possible. |
Garantía y soporte
For warranty information and technical support, please refer to the RECOIL official website or contact RECOIL customer service directly. Keep your proof of purchase for warranty claims.
RECOIL Audio was founded in 2004 with the goal of providing great, affordable products. They are vertically integrated with Engineering, Sales, and Marketing teams located in Phoenix, Arizona, USA.
You can visit the RECOIL Store on Amazon for more products and information: RECOIL Amazon Store
Ask a question about this manual
Ask about setup, troubleshooting, compatibility, parts, safety, or missing instructions. Manuals+ will review the question and use this page’s manual context to help answer it.