1. Introducción
Thank you for choosing the Maxcio Smart Wi-Fi Wall Switch. This device allows you to control your lights remotely via Wi-Fi, voice commands, or touch, enhancing your home automation experience. Please read this manual carefully before installation and use to ensure proper function and safety.
2. Información de seguridad
- Cable neutro requerido: This smart switch requires a neutral wire for installation. If your existing wiring does not include a neutral wire, consult a qualified electrician.
- Peligro eléctrico: Installation should only be performed by a qualified electrician or a person with a thorough understanding of electrical wiring. Always turn off power at the circuit breaker before installation.
- Uso exclusivo en interiores: Este dispositivo está diseñado para uso en interiores en lugares secos.
- Vol de funcionamientotage: Asegúrese del volumentage in your home matches the specifications of the switch (typically 100-240V AC).
- Carga máxima: Do not exceed the maximum load capacity of 400 Watts.
- Seguridad de los niños: Mantenga el dispositivo fuera del alcance de los niños.
3. Contenido del paquete
- Maxcio Smart Wi-Fi Wall Switch (1 unit)
- Tornillos para la instalación
- Manual de usuario (este documento)
4. Características del producto
- Control de voz: Compatible con Amazon Alexa y Google Home para funcionamiento manos libres.
- Mando a distancia: Control your lights from anywhere using the Maxcio mobile application (available on Google Store). Supports 2.4 GHz Wi-Fi (IEEE 802.11b/g/n).
- Funcionalidad del interruptor de 2 vías: Can replace one or two traditional 2-way switches to control a single light from multiple locations.
- Función de temporizador: Schedule lights to turn on or off automatically at set times.
- Panel de pantalla táctil: Features a responsive touch screen and a durable tempered glass panel.
- Compartir en familia: Comparte el control del interruptor con miembros de la familia a través de la aplicación.
- Protección contra sobrecarga: Built-in safety features to prevent damage from electrical overloads.
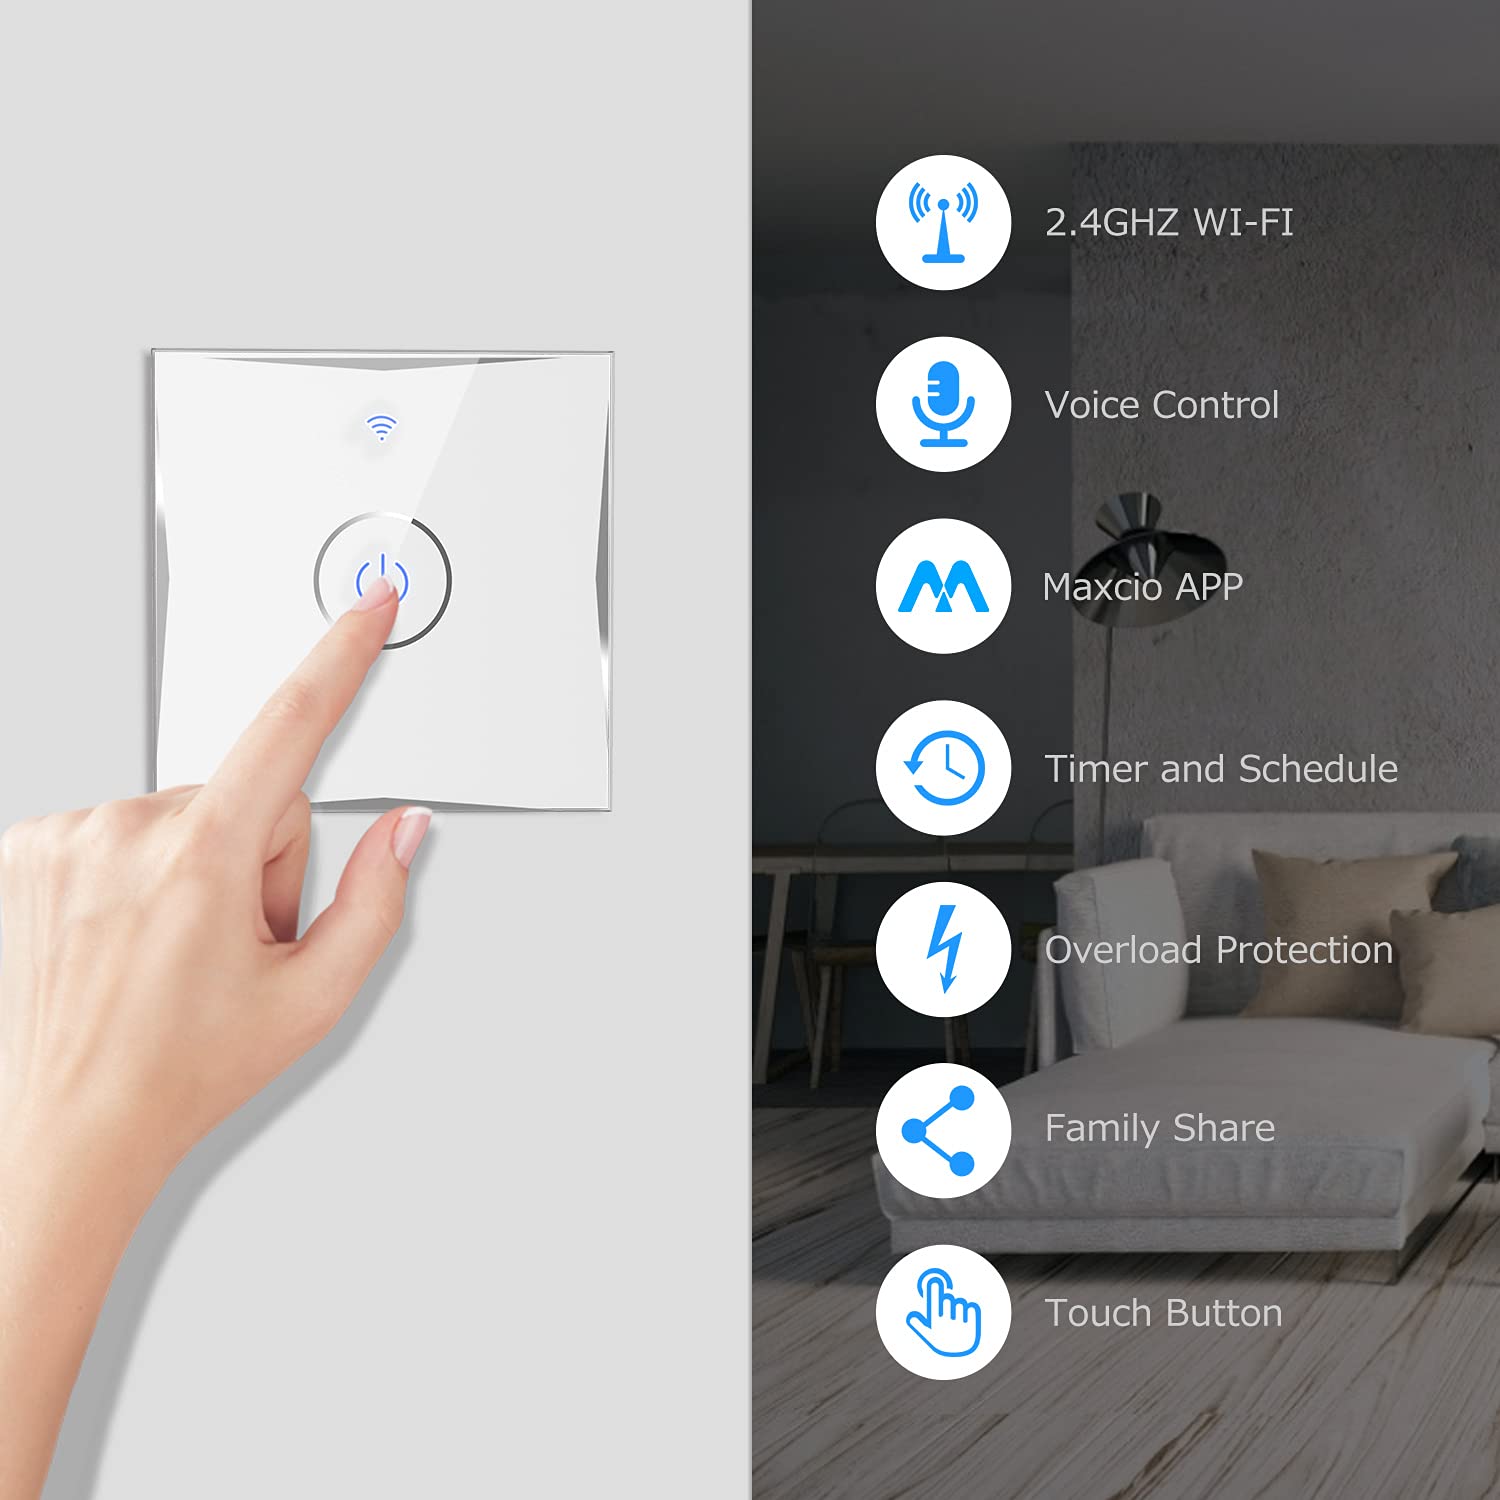
Imagen: Más alláview of Maxcio Smart Wi-Fi Wall Switch features including 2.4GHz Wi-Fi, Voice Control, Maxcio APP, Timer and Schedule, Overload Protection, Family Share, and Touch Button.
5. Instalación (Configuración)
5.1 antes de la instalación
- Asegúrese de que la energía esté apagada en el disyuntor.
- Confirm that a neutral wire is present in your wall box. A neutral wire is essential for the smart switch to function.
- Prepare las herramientas necesarias: destornillador, pelacables, vol.tage probador.
5.2 Diagrama de cableado
Refer to the wiring diagram below for correct installation. The switch uses screw terminals for connections.
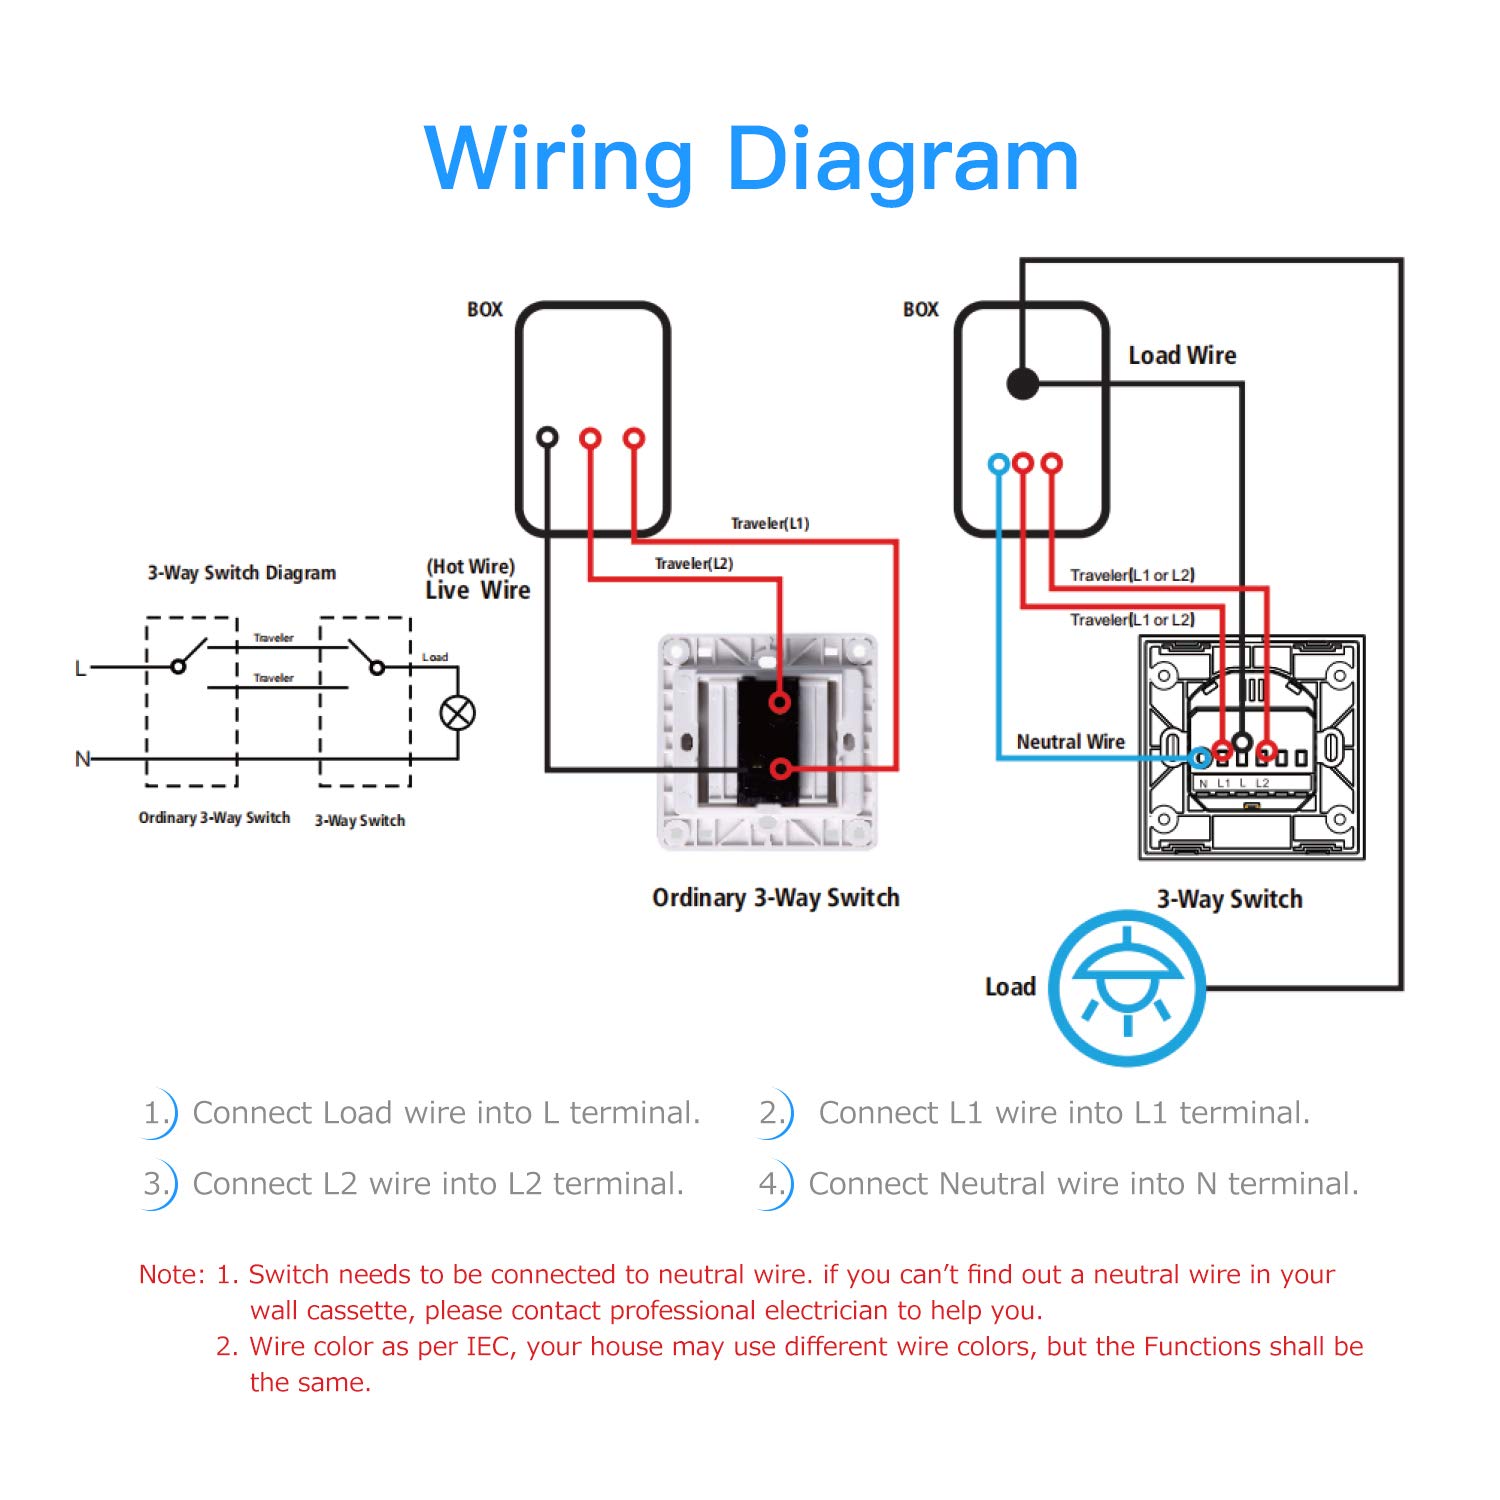
Image: Detailed wiring diagram showing connections for Live Wire (L), Load Wire (L1), and Neutral Wire (N) for both 1-way and 2-way switch configurations.
- Connect the Load Wire into the L terminal.
- Connect the L1 wire into the L1 terminal (for 2-way switching, connect traveler wires here).
- Connect the L2 wire into the L2 terminal (for 2-way switching, connect traveler wires here).
- Connect the Neutral Wire into the N terminal.
Nota: Wire colors may vary by region. Always ensure correct wire identification before connecting. If you are unsure, consult a professional electrician.
5.3 Instalación física
- Después del cableado, empuje con cuidado el interruptor en la caja de pared.
- Fije el interruptor a la caja de pared utilizando los tornillos provistos.
- Coloque el panel de vidrio en el interruptor.
- Restablezca la energía en el disyuntor.
5.4 Emparejamiento de aplicaciones
- Download the "Maxcio" app from the Google Store or Apple App Store.
- Regístrese o inicie sesión en su cuenta Maxcio.
- Ensure your smartphone is connected to a 2.4 GHz Wi-Fi network. The switch only supports 2.4 GHz Wi-Fi.
- In the app, tap "+" to add a device. Follow the on-screen instructions to put the switch into pairing mode (usually by pressing and holding the touch button until the Wi-Fi indicator blinks rapidly).
- Once paired, you can rename the switch and access its features.
6. Operación
6.1 controles manuales
Simply touch the ON/OFF button on the switch panel to toggle the connected lights.

Image: Illustration of the Maxcio Smart Wi-Fi Wall Switch demonstrating its use as a 1-way switch and its ability to replace one or two traditional 2-way switches for controlling a single light from multiple points.
6.2 Remote Control via Maxcio App
Open the Maxcio app on your smartphone. You can turn lights on/off, set timers, and manage other settings from anywhere with an internet connection.

Image: A hand interacting with the Maxcio app on a smartphone, demonstrating remote control functionality for the smart switch. The Maxcio logo is visible.
6.3 Control de voz
Integrate your Maxcio switch with Amazon Alexa or Google Home. Enable the "Maxcio" skill in your voice assistant app. Then, use voice commands such as:
- "Alexa, enciende la luz de la sala".
- "Ok Google, apaga la luz de la cocina".

Image: A living room setting where a user is using voice commands with Alexa to control the Maxcio Smart Wi-Fi Wall Switch. A speech bubble shows "Alexa, turn on the light." and "Okay!".
6.4 Configuración del temporizador y la programación
Use the Maxcio app to set up schedules and timers for your lights. This feature helps save energy and automate your home lighting.

Image: A smartphone screen displaying the Maxcio app's timer setting interface, showing options to add a schedule for the smart switch.
7. Mantenimiento
- Limpieza: Wipe the glass panel with a soft, dry cloth. Do not use abrasive cleaners or solvents.
- Actualizaciones de firmware: Periodically check the Maxcio app for available firmware updates to ensure optimal performance and security.
- Poder Outages: En caso de un corte de energíatage, the switch will retain its last state. However, some users have reported needing to re-pair the switch with the app after extended power interruptions.
8. Solución de problemas
| Problema | Posible causa | Solución |
|---|---|---|
| El interruptor no responde al tacto. | Sin energía; cableado suelto; mal funcionamiento del interruptor. | Check circuit breaker. Verify wiring connections (ensure neutral wire is connected). If problem persists, contact support. |
| No se puede conectar al wifi. | Banda de Wi-Fi incorrecta (5 GHz); señal débil; contraseña incorrecta; modo de emparejamiento no activo. | Ensure your router is broadcasting a 2.4 GHz Wi-Fi network. Move closer to the router. Re-enter Wi-Fi password carefully. Put the switch into pairing mode (refer to section 5.4). |
| El control de voz no funciona. | Maxcio skill not enabled; incorrect device name; no internet connection. | Enable the "Maxcio" skill in your Alexa/Google Home app. Ensure the device name in the app matches what you're saying. Check your internet connection. |
| Switch loses pairing after power outage. | Known behavior for some smart switches. | Re-pair the switch with the Maxcio app. If standard pairing fails, try Wi-Fi mode pairing. |
9. Especificaciones
| Número de modelo | AK3-AT1-GL-MX |
| Marca | Máximo |
| Número de pieza del fabricante | KS601 |
| Protocolo de conectividad | Wi-Fi (2.4 GHz, IEEE 802.11b/g/n) |
| Modo de operación | ENCENDIDO APAGADO |
| Tipo de controlador | Tocar |
| Máxima potencia | 400 vatios |
| Material | Vidrio templado + PC |
| Tipo de montaje | Montaje empotrado |
| Dispositivos compatibles | Alexa, Google Home, Smart Life, Tuya Smart |
| Componentes incluidos | Tornillos |

Image: Technical drawing showing the dimensions of the Maxcio Smart Wi-Fi Wall Switch, indicating a width and height of 86mm (3.38 inches) and a depth of 30.7mm (1.2 inches) with a mounting depth of 39.4mm (1.55 inches).
10. Garantía y soporte
Maxcio products are designed for quality and reliability. For warranty information, please refer to the documentation provided with your purchase or contact Maxcio customer support.
If you have any questions, require technical assistance, or need a French version of the manual, please contact the seller or Maxcio customer service directly via email. Contact information is typically available on the product packaging or the official Maxcio websitio.
- Fabricante: Máximo
- ASIN: B08534WVRG
- GTIN/UPC: 760354659186