1. Introducción
This manual provides detailed instructions for the safe and effective operation, setup, and maintenance of your Reboot RBM-1450 4-in-1 Multiprocess Welder. This versatile machine supports MIG (Gas/Gasless), Stick (MMA), and Lift TIG welding processes, making it suitable for a wide range of applications from home DIY projects to general repair work. It features IGBT inverter technology for stable arc performance and energy efficiency.

Figure 1.1: The Reboot RBM-1450 4-in-1 Multiprocess Welder, showcasing its compact design and integrated welding torch.
2. Información de seguridad
Welding can be dangerous. Always follow safety precautions to prevent injury or damage. Read and understand all safety warnings before operating the welder.
2.1 Precauciones generales de seguridad
- La descarga eléctrica puede matar: Ensure proper grounding. Do not touch live electrical parts. Wear dry insulating gloves and protective clothing.
- Los humos y gases pueden ser peligrosos: Mantenga la cabeza alejada de los vapores. Utilice ventilación o extractor para eliminar los vapores de la zona de respiración.
- Los rayos del arco pueden quemar los ojos y la piel: Use un casco de soldadura con un filtro de sombra adecuado. Use ropa protectora para proteger la piel.
- Peligro de incendio y explosión: Retire todos los materiales inflamables del área de soldadura. Tenga a mano un extintor.
- Las piezas calientes pueden provocar quemaduras graves: Allow hot parts to cool before handling. Use insulated gloves and tongs.
- Desconecte siempre la alimentación: Before servicing or moving the unit, disconnect the input power.
- Usar en un área bien ventilada: Ensure adequate airflow to prevent overheating and fume buildup.
3. ¿Qué hay en la caja?
Upon unpacking, please verify that all components listed below are present and undamaged. If any items are missing or damaged, contact customer support immediately.

Figure 3.1: Diagram showing the contents included with the Reboot RBM-1450 welder, including the main unit, cables, and accessories.
- Reboot RBM-1450 Multiprocess Welder Unit
- MIG Torch (integrated)
- Cl de tierraamp con cable (2M)
- Electrode Holder with Cable (2M)
- Manual de usuario
- Flux Core Wire Spool (1KG)
- Gas Hose (3M)
- Manguera Clamps
- Consejos de contacto
- Ceramic Nozzles
- Brush with Chipping Hammer
4. Producto terminadoview and Control Panel Introduction
Familiarize yourself with the main components and controls of the RBM-1450 welder.
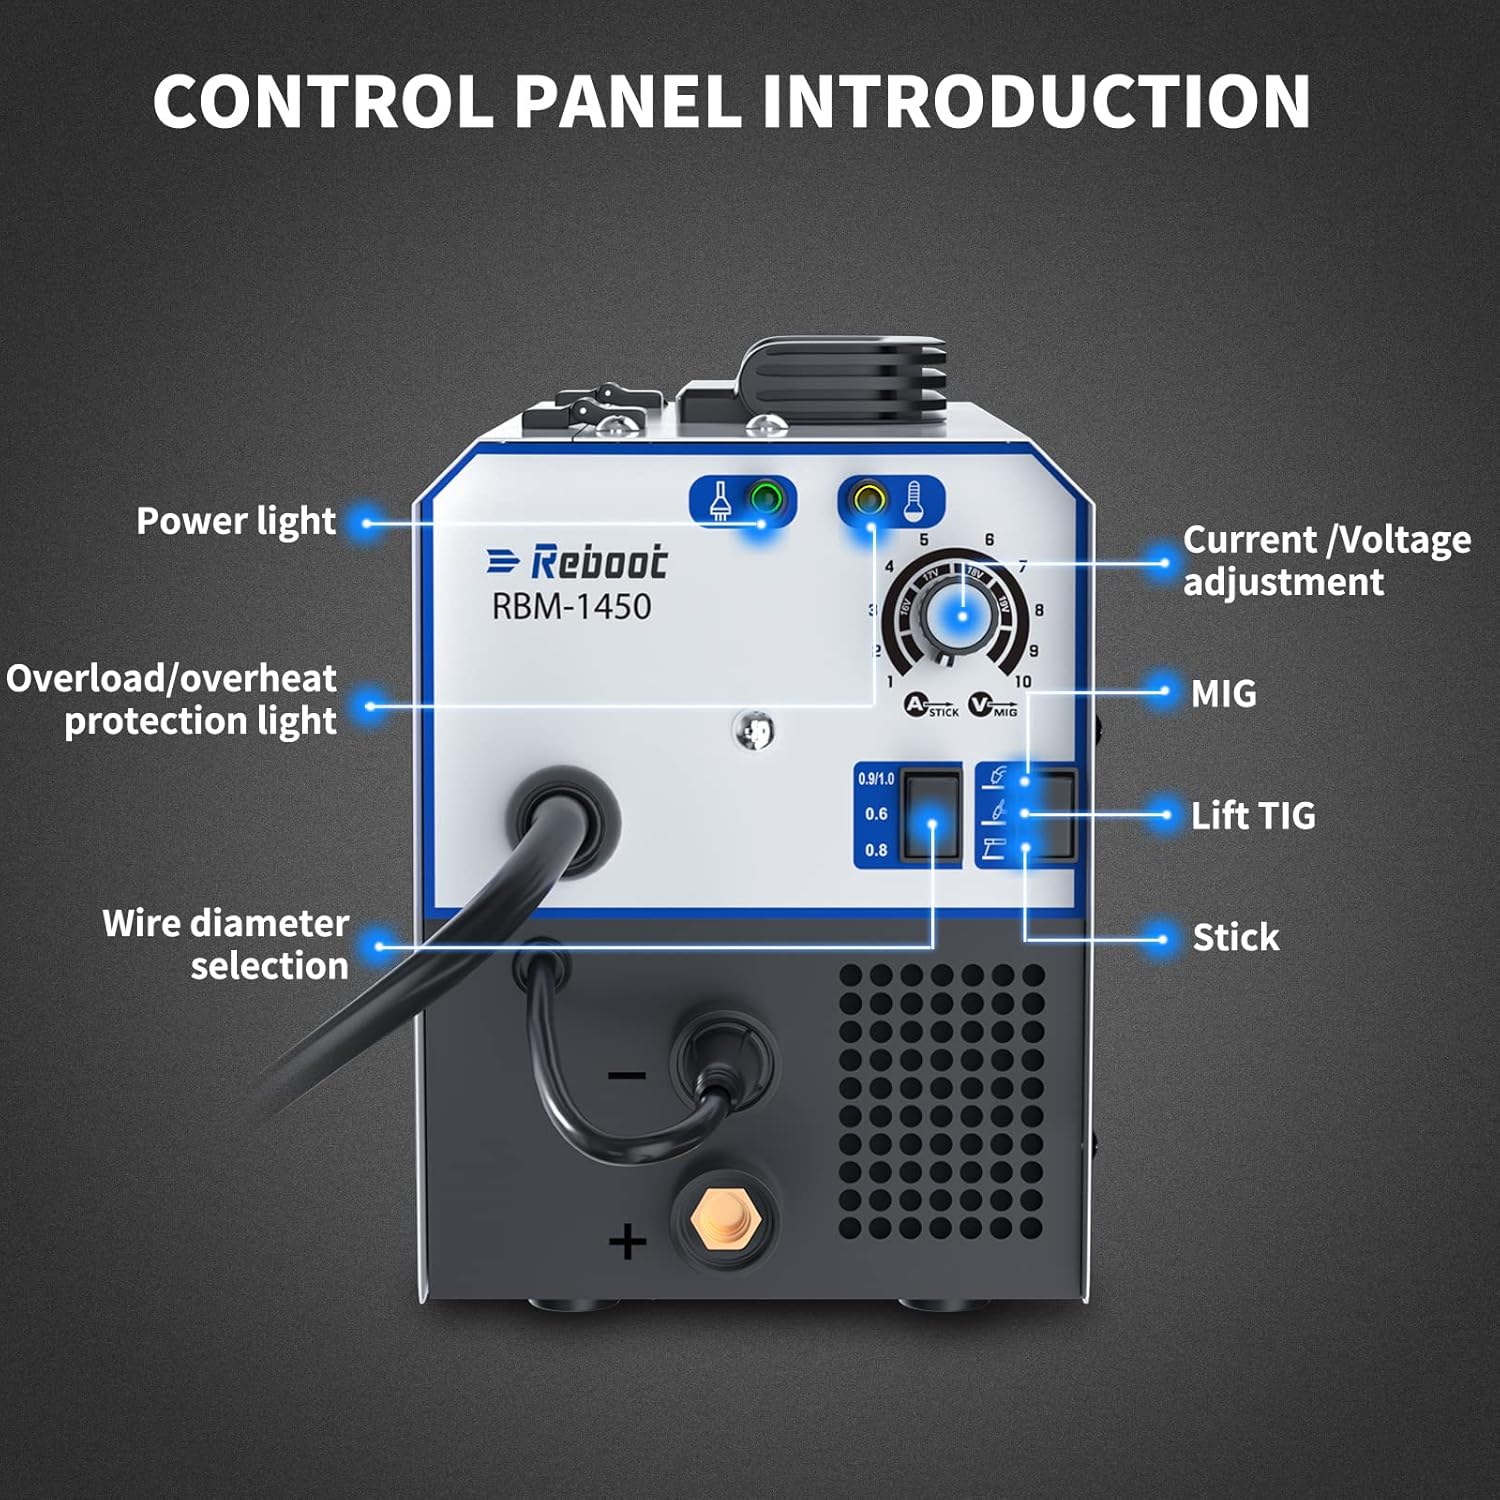
Figura 4.1: detallada view of the control panel, indicating the function of each light, knob, and switch.
4.1 Controles del panel frontal
- Luz de encendido: Indica cuando la máquina está encendida.
- Overload/Overheat Protection Light: Illuminates if the machine is overloaded or overheats, indicating a temporary shutdown for protection.
- Corriente / VoltagPerilla de ajuste: Used to set the welding current (for Stick/TIG) or voltage (for MIG).
- Interruptor de selección de proceso: Allows selection between MIG, Lift TIG, and Stick welding modes.
- Wire Diameter Selection Switch: For MIG mode, select the appropriate wire diameter (0.6mm, 0.8mm, 0.9/1.0mm).
- Terminales positivos (+) y negativos (-): Para conectar cables de soldadura.
4.2 Características del panel trasero

Figura 4.2: Posterior view of the welder, showing the main power switch, gas input, and power cord connection.
- Interruptor principal: Enciende o apaga la soldadora.
- Entrada de gases: Connection point for the shielding gas hose (for MIG Gas welding).
- Cable de alimentación: Integrated 220V power cord with US standard plug (NEMA 6-50P).
- Ventilador de enfriamiento: Garantiza una ventilación adecuada y evita el sobrecalentamiento.
5. Configuración
5.1 Conexión de alimentación
The Reboot RBM-1450 operates on a 220V AC power supply. Ensure your power source meets these requirements and that a 30A breaker is suggested for 220V operation.
- Connect the welder's power cord (220V 50A 6-50P plug) to a suitable 220V outlet.
- Ensure the main power switch on the rear of the unit is in the "OFF" position before connecting to power.
5.2 Wire Spool Installation (MIG Welding)

Figure 5.1: Illustration of how to install the wire spool inside the welder's wire feed compartment.
- Abra la tapa del compartimiento de alimentación de alambre.
- Coloque el carrete de alambre en el portacarrete, asegurándose de que gire libremente.
- Pase el alambre de soldadura a través del tubo guía hasta los rodillos impulsores.
- Close the drive roller tension arm and adjust the tension appropriately. The wire should feed smoothly without slipping or deforming.
- Cierre la tapa del compartimiento de alimentación de alambre.
5.3 Conexión de cables de soldadura
- Para soldadura con electrodo revestido (MMA):
- Conecte el cable del portaelectrodos al terminal positivo (+).
- Conecte el cable de tierraamp cable al terminal negativo (-).
- Adjuntar el suelo clamp de forma segura a la pieza de trabajo o a la mesa de soldadura.
- Para soldadura TIG por elevación:
- Connect the TIG torch (if not integrated) to the negative (-) terminal.
- Conecte el cable de tierraamp cable al terminal positivo (+).
- Adjuntar el suelo clamp de forma segura a la pieza de trabajo o a la mesa de soldadura.
- Connect the gas hose from the TIG torch to the gas input on the rear panel, and then to your argon gas cylinder.
- For MIG Welding (Gas/Gasless):
- The MIG torch is integrated.
- For Gas MIG, connect the gas hose from the rear panel to your shielding gas cylinder (e.g., CO2 or Argon/CO2 mix).
- Conecte el cable de tierraamp cable to the appropriate terminal based on your wire type (check manual for specific polarity for flux core vs. solid wire). Typically, for flux core, the ground clamp connects to the positive (+) terminal, and for solid wire with gas, it connects to the negative (-) terminal.
- Adjuntar el suelo clamp de forma segura a la pieza de trabajo o a la mesa de soldadura.
6. Operación
The RBM-1450 offers multiple welding processes. Select the appropriate mode and settings for your application.
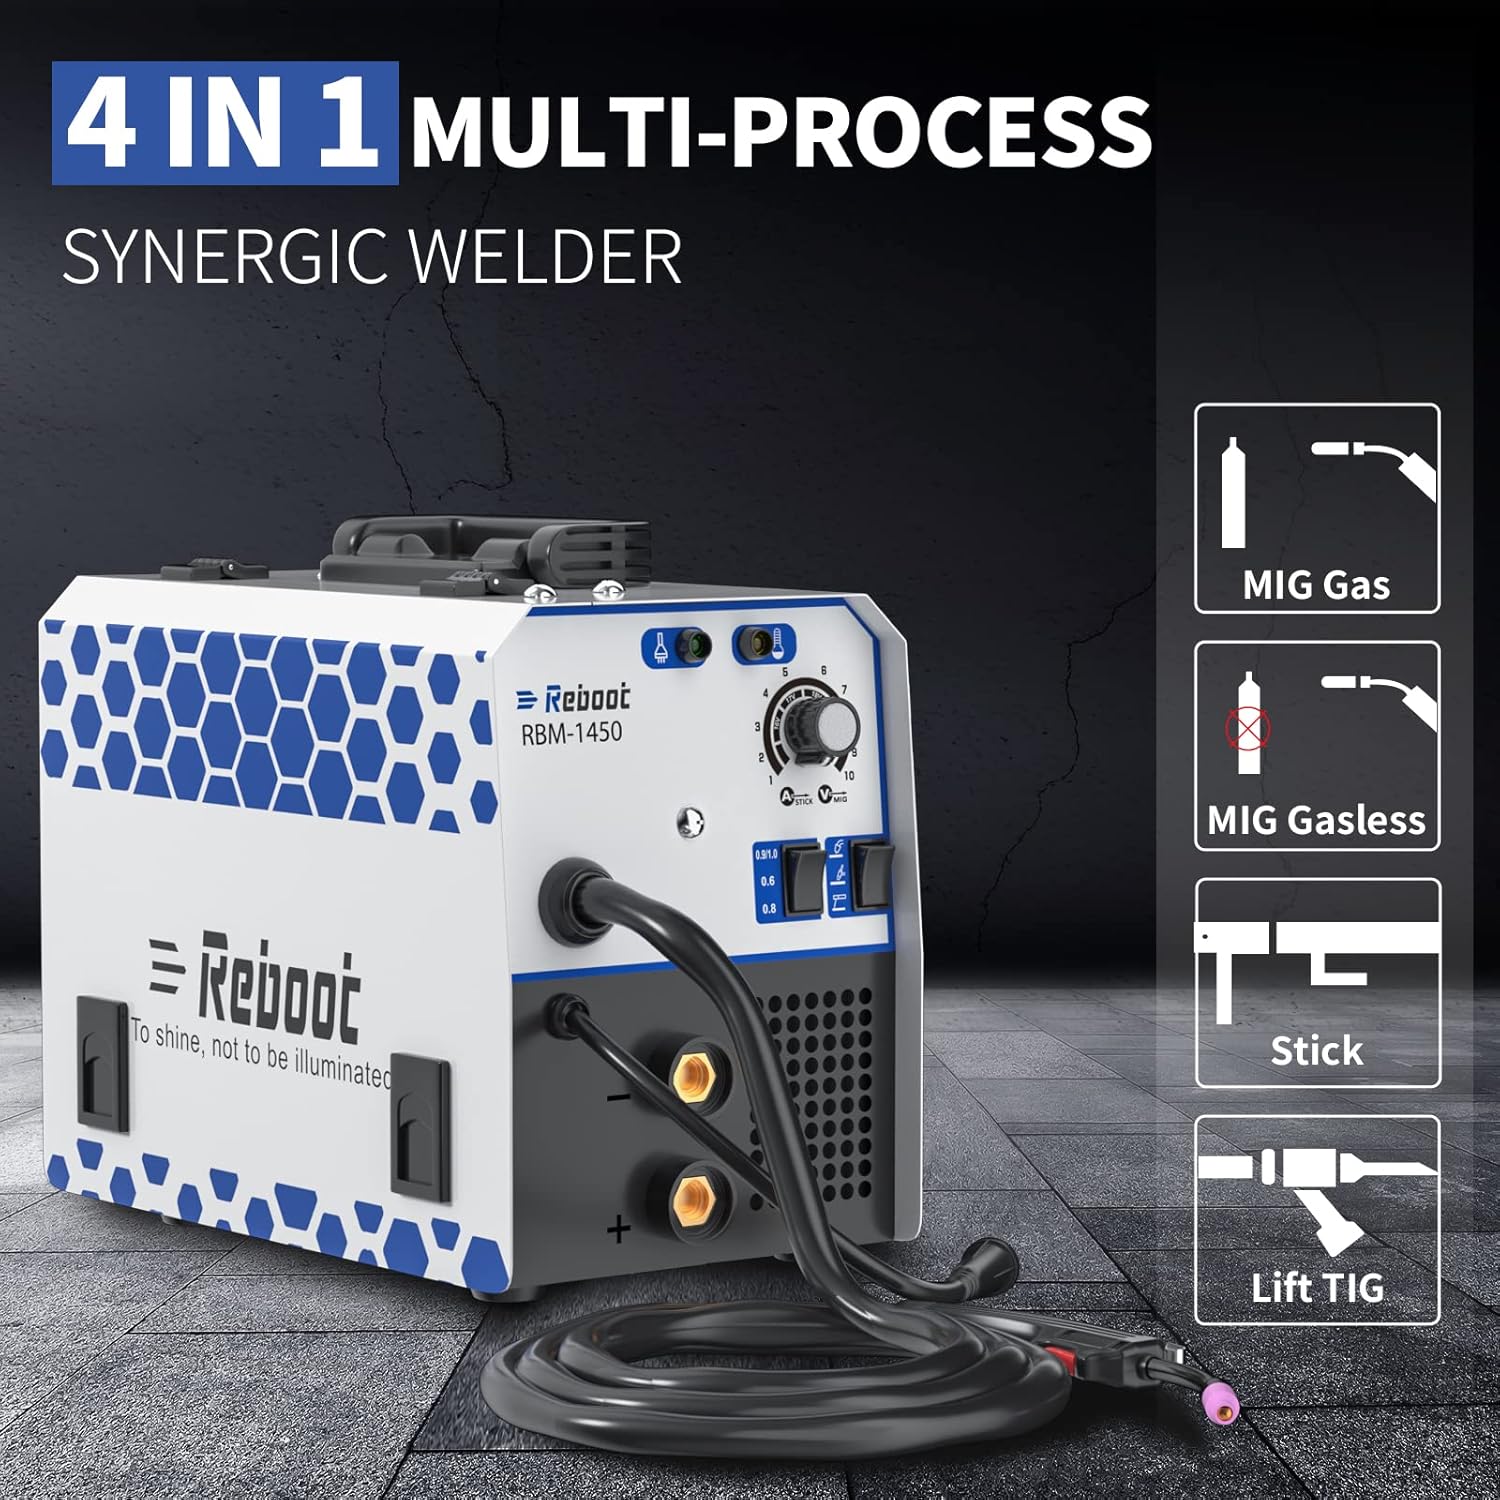
Figure 6.1: Visual representation of the four welding processes supported: MIG Gas, MIG Gasless, Stick, and Lift TIG.
6.1 Selecting Welding Process
Use the process selection switch on the front panel to choose between MIG, Lift TIG, or Stick welding.

Figure 6.2: Close-up of the control panel highlighting the current/voltage adjustment knob and wire diameter selection switch.
6.2 Ajuste de los parámetros de soldadura
- Corriente / VoltagPerilla electrónica: Rotate this knob to adjust the welding output. Higher numbers typically mean higher current/voltage.
- Wire Diameter Switch (MIG only): Select the setting that matches the diameter of the welding wire you are using (0.6mm, 0.8mm, or 0.9/1.0mm).
6.3 Welding Process Specifics
- Soldadura con electrodo revestido (MMA):
- Suitable for 2.5mm (3/32") 6013 and 7018 rods. Can also handle 3.2mm (1/8") 7018 rods on 220V.
- Set the current based on the electrode type and thickness of the material.
- Soldadura MIG (con/sin gas):
- For Gas MIG, ensure gas flow is set correctly at the regulator.
- For Gasless MIG, use flux-cored wire and ensure correct polarity.
- Ajustar voltage and wire feed speed (controlled synergically by the machine) for optimal arc.
- Soldadura TIG por elevación:
- Requires a TIG torch and pure argon shielding gas.
- To initiate arc, touch the tungsten electrode to the workpiece and then lift slightly.
6.4 Materiales compatibles

Figura 6.3: Examples of metal types suitable for welding with this machine, including mild steel, cast iron, sheet metal, stainless steel, square pipe, and metal cage.
The RBM-1450 is designed to weld various materials, including stainless steel, alloy steel, carbon steel, copper, and copper alloy. It is not recommended for aluminum without specific accessories and settings not covered in this manual.
7. Mantenimiento
El mantenimiento regular garantiza la longevidad y el rendimiento óptimo de su soldadora. Desconecte siempre la alimentación antes de realizar cualquier mantenimiento.
- Limpieza: Periodically clean the inside of the machine using dry, compressed air to remove dust and metal particles. Ensure the air is dry to prevent moisture damage.
- Mecanismo de alimentación de alambre: Inspect the wire feed rollers for wear and cleanliness. Clean any debris from the grooves.
- Cables y Conexiones: Check all welding cables, torch, and ground clamp for damage, fraying, or loose connections. Replace damaged parts immediately.
- Ventilador de enfriamiento: Asegúrese de que el ventilador de enfriamiento esté libre de obstrucciones y funcione correctamente.
- Puntas de contacto y boquillas: Reemplace las puntas de contacto desgastadas y limpie o reemplace las boquillas obstruidas en la antorcha MIG.
8. Solución de problemas
Esta sección ofrece soluciones a problemas comunes que podrías encontrar. Si tienes problemas que no aparecen aquí, contacta con atención al cliente.
| Problema | Posible causa | Solución |
|---|---|---|
| El soldador no se enciende. | No power supply; main switch off; faulty power cord. | Check power outlet and circuit breaker. Ensure main switch is ON. Inspect power cord for damage. |
| Sin arco o arco débil. | Poor ground connection; incorrect settings; worn consumables; wrong polarity. | Asegúrese de que el suelo esté limpioamp is clean and securely attached. Adjust current/voltage. Replace contact tip/electrode. Verify correct polarity for welding process. |
| Overload/Overheat light is on. | Exceeded duty cycle; insufficient ventilation. | Allow machine to cool down. Ensure cooling fan is clear and operating. Improve ventilation in welding area. |
| Problemas de alimentación de alambre (MIG). | Incorrect wire tension; clogged liner; wrong drive rollers; tangled wire. | Adjust wire tension. Clean or replace torch liner. Ensure correct drive rollers for wire size. Untangle wire spool. |
| Poor weld quality (porosity, spatter). | Incorrect gas flow (MIG); contaminated workpiece; wrong settings; improper technique. | Check gas cylinder and flow rate. Clean workpiece thoroughly. Adjust settings. Practice welding technique. |
9. Especificaciones
Key technical specifications for the Reboot RBM-1450 Multiprocess Welder.
| Característica | Detalle |
|---|---|
| Número de modelo | ARC1450D |
| Fabricante | Reiniciar-EE. UU. |
| Vol de entradatage | 220 Voltios AC |
| Fuente de poder | AC |
| Procesos de soldadura | MIG (Gas/Gasless), Stick (MMA), Lift TIG |
| Ciclo de trabajo (220 V) | 140A al 60% |
| Peso del artículo | 18.08 libras (aprox. 8.2 kg) |
| Dimensiones del producto | 16 x 10 x 8.5 pulgadas (aprox. 40.6 x 25.4 x 21.6 cm) |
| Material | Acero inoxidable (cuerpo) |
| Longitud del cable | 5 pies |
| Formato de enchufe | B - US style with ground plug (NEMA 6-50P) |
| Suggested Breaker (220V) | 30A |
10. Garantía y soporte
Reboot provides comprehensive support for your product.
10.1 Información de garantía
Reboot supplies a 1 AÑO DE GARANTÍA from the date of purchase. Faulty arc welders can be replaced within 30 days of purchase. This warranty covers manufacturing defects and workmanship under normal use.
10.2 Atención al cliente
For any questions, technical assistance, or warranty claims, please contact Reboot customer service. We offer 7*24 hours online after-sales service. If you're not satisfied with your purchase, we'll refund you - no questions asked.
For the most up-to-date contact information, please visit the official Reboot websitio o consulte los datos de contacto proporcionados con la documentación de compra.


