1. Introducción
Thank you for choosing the Thermex HIT 10-U Pro Under-Sink Water Heater. This compact and efficient 10-liter, 1500W electric water heater is designed for reliable hot water supply in your kitchen or similar applications. It features a pressure-resistant boiler and an integrated inlet combination valve for safety and ease of installation. Please read this manual carefully before installation and operation to ensure proper use and longevity of your appliance.

Figura 1: Frente view of the Thermex HIT 10-U Pro water heater, showing the control dial and indicator lights.
2. Instrucciones de seguridad
Observe siempre las siguientes precauciones de seguridad para reducir el riesgo de incendio, descarga eléctrica, lesiones o daños al aparato.
- Lea todas las instrucciones antes de utilizar el aparato.
- Este aparato debe ser instalado por un profesional calificado de acuerdo con las regulaciones locales.
- Asegúrese de que la fuente de alimentación voltage coincide con la etiqueta de clasificación del aparato (230 V).
- No opere el calentador de agua si el cable de alimentación o el enchufe están dañados.
- No bloquee la válvula de alivio de presión.
- Asegúrese de que el aparato esté correctamente conectado a tierra.
- No sumerja el aparato en agua ni en otros líquidos.
- Mantenga a los niños y a las personas no autorizadas lejos del aparato durante su funcionamiento.
- Desconecte la fuente de alimentación antes de realizar cualquier mantenimiento o limpieza.
- The water heater is designed for indoor use only.
3. Contenido del paquete
Verifique que todos los componentes estén presentes y sin daños al desembalarlo.
- Thermex HIT 10-U Pro Water Heater unit
- Inlet combination valve (pressure limiting valve and non-return valve)
- Soporte de montaje
- Tornillos y tacos de pared
- Manual de usuario (este documento)
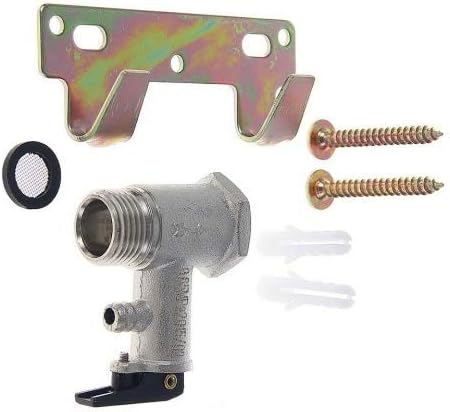
Figura 2: Included installation components: mounting bracket, screws, and the inlet combination valve.
4. Instalación
The Thermex HIT 10-U Pro is designed for under-sink installation with connections facing upwards. Installation should be performed by a qualified professional.
4.1 Montaje de la unidad
- Choose a suitable location under the sink, ensuring sufficient space for maintenance and connections.
- Mark the drilling points for the mounting bracket on the wall.
- Taladre agujeros e inserte tacos de pared.
- Fije firmemente el soporte de montaje a la pared utilizando los tornillos proporcionados.
- Carefully hang the water heater unit onto the mounting bracket.
4.2 Conexiones de agua
- Connect the cold water inlet (blue marking) to the domestic cold water supply using 1/2" fittings.
- Install the provided inlet combination valve on the cold water inlet. This valve acts as both a pressure limiting valve and a non-return valve, essential for safe operation.
- Connect the hot water outlet (red marking) to the hot water tap using 1/2" fittings.
- Asegúrese de que todas las conexiones estén bien ajustadas y sin fugas.
- Fill the water heater with water by opening the hot water tap until water flows freely, indicating the tank is full.
4.3 Conexión eléctrica
- The appliance comes with a 1.5m power cable.
- Connect the power plug to a grounded 230V electrical outlet.
- Ensure the electrical circuit is protected by a residual current device (RCD).

Figura 3: Lado view of the water heater, illustrating the compact design and connection points.
5. Operación
5.1 Puesta en marcha inicial
- After installation and filling the tank with water, plug the appliance into the power outlet.
- The "Heating" indicator light on the front panel will illuminate, indicating that the water heater is active and heating the water.
5.2 Control de temperatura
- The water heater features a control dial on the front panel.
- Rotate the dial to adjust the desired water temperature. The "ECO" setting provides an energy-efficient temperature.
- The "Heating" indicator light will turn off once the set temperature is reached and will cycle on and off to maintain the temperature.
5.3 Tiempo de calentamiento
The approximate preheating time for the 10-liter tank is 25 minutes to reach the set temperature from cold.
6. Mantenimiento
Regular maintenance ensures optimal performance and extends the lifespan of your water heater. Always disconnect the power supply before any maintenance.
- Descalcificar: Depending on water hardness, periodic descaling of the heating element may be necessary. This should be performed by a qualified technician.
- Inlet Valve Check: Periodically check the inlet combination valve for any blockages or leaks. Ensure the pressure relief function is not obstructed.
- Limpieza: Limpie el exterior de la unidad con un paño suave yamp Paño. No utilice limpiadores abrasivos ni disolventes.
- Inspección de fugas: Regularly inspect all water connections for any signs of leaks.
7. Solución de problemas
Antes de contactar con el servicio de atención al cliente, consulte los siguientes problemas y soluciones comunes.
| Problema | Posible causa | Solución |
|---|---|---|
| No hay agua caliente | No power supply; Thermostat set too low; Heating element failure. | Check power connection and circuit breaker; Adjust thermostat setting; Contact a qualified technician. |
| El agua no está lo suficientemente caliente | Thermostat set too low; High hot water demand; Sediment buildup. | Increase thermostat setting; Allow more time for reheating; Consider descaling (professional service). |
| Fuga de agua | Loose connections; Faulty inlet valve; Tank damage. | Tighten connections; Inspect and replace inlet valve if necessary; Contact a qualified technician for tank inspection. |
| Loud noises from unit | Acumulación de sedimentos en el tanque. | Professional descaling recommended. |
8. Especificaciones técnicas
| Característica | Detalle |
|---|---|
| Modelo | HIT 10-U Pro |
| Capacidad | 10 litros |
| Fuerza | 1500 vatios |
| Volumentage | 230 voltios |
| Dimensiones (L x An x Al) | 40 x 36.6 x 30.4 cm |
| Peso (vacío) | 7 kilogramos |
| Preheating Time (approx.) | 25 minutos |
| Protección eléctrica | IPX4 |
| Presión máxima | 6 kilopascales |
| Tipo de conexión | 1/2" fittings |
| Clase de eficiencia energética | B |
| Consumo Anual de Electricidad | 559 kWh / año |
| Nivel de potencia acústica (en interiores) | 15 dB |

Figura 4: Energy label for the Thermex HIT 10-U Pro, showing efficiency class B and annual consumption.

Figura 5: Product Fiche providing detailed technical information and compliance data. For more details, refer to the EPREL database (ID 1023329).
9. Garantía y soporte
Thermex provides a warranty for this product:
- Aparato: 2 años de garantía
- Caldera 5 años de garantía
For technical support, service, or warranty claims, please contact Thermex customer service:
- Websitio: thermex.lv
- Correo electrónico: ankir@thermex.com
- Teléfono: +371 29165629
- DIRECCIÓN: Krustpils str. 31, 1073 Riga, Lettland
Please have your model number (HIT 10-U Pro) and purchase date available when contacting support.