1. Introducción
Thank you for choosing the XTUGA BK510 Single Channel Wireless In-Ear Monitor System. This system is designed to provide professional-grade audio monitoring for musicians, performers, and presenters. It features UHF wireless technology with 100 selectable channels, ensuring clear and reliable sound transmission. This manual will guide you through the setup, operation, and maintenance of your new in-ear monitor system.
2. Información de seguridad
Lea y comprenda todas las instrucciones de seguridad antes de utilizar este dispositivo. Conserve este manual para futuras consultas.
- Cumplimiento de la FCC: Most users do not need a license to operate this wireless microphone system. However, operation is subject to certain restrictions: the system must not cause harmful interference, must operate at a low power level (not exceeding 50 milliwatts), and has no protection from interference received from any other device.
- Regulaciones de la FCC: Purchasers should be aware that the FCC is currently evaluating the use of wireless microphone systems, and these rules are subject to change. For more information, contact the FCC at 1-888-CALL-FCC (TTY: 1-888-TELL-FCC) or visit the FCC's wireless microphone websitio: fcc.gov/cgb/microfonosinalámbricos.
- Seguridad eléctrica: To prevent electric shock, do not open the device casing. Deje todo servicio a personal cualificado.
- Fuente de energía: Utilice únicamente el adaptador de corriente proporcionado. Asegúrese de que el voltage coincide con los requisitos del dispositivo.
- Agua y humedad: No exponga el dispositivo al agua, a la lluvia o a la humedad excesiva.
- Calor: Mantenga el dispositivo alejado de fuentes de calor como radiadores, rejillas de calefacción, estufas u otros aparatos que produzcan calor.
- Ventilación: Ensure proper ventilation around the transmitter unit. Do not block any ventilation openings.
- Volumen de los auriculares: Evite escuchar a niveles de volumen altos durante períodos prolongados para evitar daños auditivos.
3. Contenido del paquete
Verifique que todos los artículos enumerados a continuación estén incluidos en su paquete. Si falta algún artículo o está dañado, comuníquese con su vendedor.
- 1x XTUGA BK510 Transmitter Unit
- 1x XTUGA BK510 Bodypack Receiver
- 1x Detachable Antenna
- 1x Power Adapter (DC 12V-18V)
- 2x Audio Cables (1/4" TS to 1/4" TS)
- 1x Pair of Earbud Headphones (White)

Imagen: XTUGA BK510 Single Channel Wireless In-Ear Monitor System package contents, showing the transmitter, bodypack receiver, antenna, power adapter, two audio cables, and white earbud headphones.
4. Producto terminadoview
4.1 Unidad transmisora
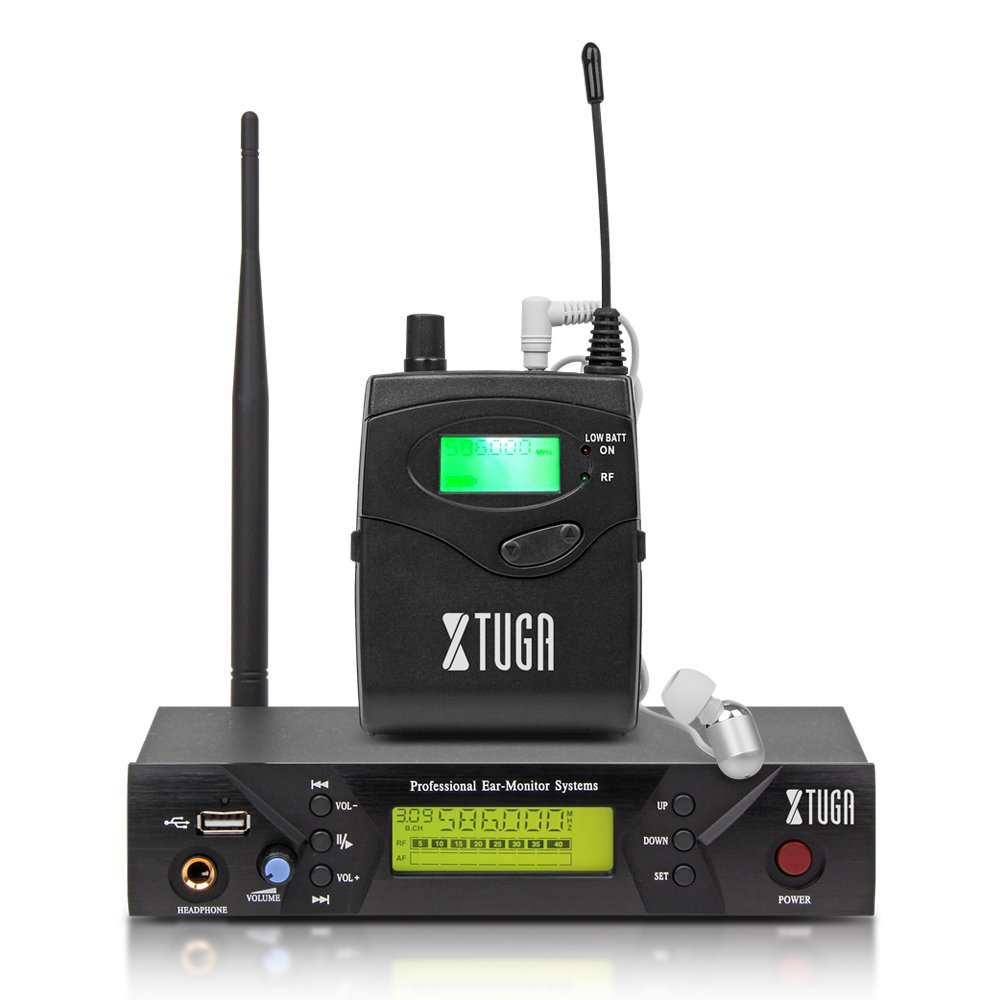
Imagen: Front panel of the XTUGA BK510 transmitter unit, featuring a USB port, headphone output, volume control, channel selection buttons (UP/DOWN), SET button, power button, and an LCD display.
- Puerto USB: For connecting USB devices (e.g., for playback or recording, specific functionality may vary).
- Salida de AURICULARES: 3.5mm jack for wired headphone monitoring directly from the transmitter.
- Perilla de VOLUMEN: Adjusts the output volume for the HEADPHONE output.
- Botones ARRIBA/ABAJO: Used to navigate and select channels or frequencies.
- Botón de ajuste: Confirma selecciones o ingresa a los menús de configuración.
- Botón de encendido: Turns the transmitter unit on or off.
- Pantalla LCD: Shows current channel, frequency, and other operational information.

Imagen: Rear panel of the XTUGA BK510 transmitter unit, showing the DC IN power input, AF IN (L) and AF IN (R) combo XLR/TRS inputs, AF LEVEL (Left/Right) adjustment knobs, and the ANTENNA connector.
- ENTRADA DE CC (12 V-18 V): Entrada de alimentación para el adaptador de corriente incluido.
- AF IN (L)/(R): Combo XLR/TRS inputs for connecting audio sources (e.g., mixer output).
- AF LEVEL (Left/Right): Rotary knobs to adjust the input audio level for each channel.
- ANTENNA Connector: Para fijar la antena desmontable.
4.2 Receptor de bolsillo

Imagen: Frente view of the XTUGA BK510 bodypack receiver, showing the LCD display, LOW BATT indicator, RF indicator, and control buttons.
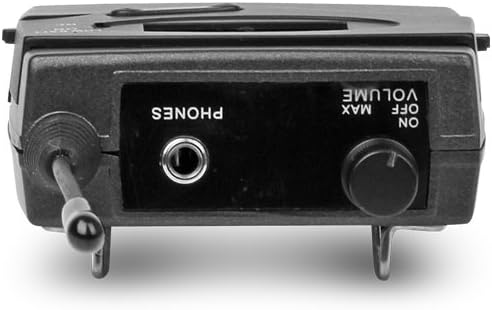
Imagen: Arriba view of the XTUGA BK510 bodypack receiver, showing the PHONES output jack and the ON/OFF/VOLUME knob.

Imagen: XTUGA BK510 bodypack receiver with the battery compartment open, showing slots for two AA batteries and the belt clip on the back.
- Pantalla LCD: Muestra el canal actual, la frecuencia y el estado de la batería.
- Indicador de batería baja: Se ilumina cuando la batería está baja.
- Indicador RF: Illuminates when receiving a radio frequency signal from the transmitter.
- ON/OFF/VOLUME Knob: Turns the receiver on/off and adjusts the headphone volume.
- Salida de TELÉFONOS: 3.5mm jack for connecting in-ear headphones.
- Compartimento de la batería: Tiene capacidad para dos pilas AA.
- Pinza de cinturón: For attaching the bodypack to clothing or a belt.
5. Guía de configuración
- Conectar la antena del transmisor: Screw the detachable antenna onto the ANTENNA connector on the rear panel of the transmitter unit. Ensure it is securely fastened.
- Encienda el transmisor: Connect the provided power adapter to the DC IN (12V-18V) port on the rear of the transmitter, then plug the adapter into a suitable power outlet.
- Conectar fuente de audio: Use the included 1/4" TS cables (or XLR cables, not included) to connect your audio source (e.g., mixer's auxiliary output, monitor send) to the AF IN (L) and/or AF IN (R) inputs on the transmitter's rear panel. For mono operation, typically use AF IN (L).
- Instalar las baterías del receptor: Open the battery compartment on the bodypack receiver and insert two AA batteries, observing correct polarity (+/-). Close the compartment securely.
- Conecte los auriculares al receptor: Plug your in-ear headphones into the PHONES output jack on the bodypack receiver.
6. Instrucciones de funcionamiento
- Encender el transmisor: Press the POWER button on the transmitter's front panel. The LCD display will illuminate.
- Encendido del receptor: Rotate the ON/OFF/VOLUME knob on the bodypack receiver clockwise until it clicks and the LCD display illuminates.
- Select Channel/Frequency (Transmitter):
- Use the UP/DOWN buttons on the transmitter to browse through the available 100 UHF channels.
- Press the SET button to confirm your desired channel. The display will show the selected frequency.
- Choose a channel that is clear of interference in your operating environment.
- Sync Receiver to Transmitter: The bodypack receiver should automatically sync to the transmitter's frequency. If not, consult the receiver's specific instructions (often involves holding a SET or SYNC button on the receiver while the transmitter is broadcasting). Ensure the RF indicator on the receiver is lit, indicating a successful connection.
- Adjust Audio Input Level (Transmitter): Play audio through your connected source. Adjust the AF LEVEL (Left/Right) knobs on the rear of the transmitter until the audio level is appropriate without clipping (distortion). Monitor the audio through the transmitter's HEADPHONE output if desired.
- Adjust Monitoring Volume (Receiver): Put on your in-ear headphones. Slowly rotate the ON/OFF/VOLUME knob on the bodypack receiver to adjust the listening volume to a comfortable level. Avoid excessively high volumes to protect your hearing.
- Comenzar a monitorear: Your XTUGA BK510 system is now ready for use.
7. Mantenimiento
- Limpieza: Limpie las unidades con un paño suave y seco. No utilice limpiadores líquidos ni disolventes.
- Reemplazo de batería: When the LOW BATT indicator on the bodypack receiver illuminates, replace both AA batteries with fresh ones. Remove batteries if the receiver will not be used for an extended period.
- Almacenamiento: Guarde el sistema en un lugar fresco y seco, alejado de la luz solar directa y de temperaturas extremas.
- Cuidado de la antena: Manipule la antena con cuidado para evitar doblarla o romperla.
8. Solución de problemas
| Problema | Posible causa | Solución |
|---|---|---|
| No hay sonido desde el receptor. |
|
|
| Interferencia o estática. |
|
|
| Low audio quality (e.g., lack of bass). |
|
|
| LOW BATT indicator on receiver is lit. | Las baterías están bajas. | Reemplace ambas baterías AA inmediatamente. |
9. Especificaciones
| Característica | Detalle |
|---|---|
| Modelo | BK510 |
| Marca | XTUGA |
| Tecnología de conectividad | Con cable, inalámbrico (RF) |
| Comunicación inalámbrica | UHF (100 Channels) |
| Transmitter Material | Metal |
| Bodypack Receiver Batteries | 2 pilas AA (requeridas) |
| Entrada de alimentación del transmisor | CC 12 V-18 V |
| Dimensiones del transmisor | 17.72 x 11.81 x 4.72 pulgadas |
| Peso del artículo (aprox.) | 3.34 libras (paquete total) |
| Características especiales | Lightweight (receiver), Volume Control |
| Fabricante | Hecho en china |
10. Garantía y soporte
Garantía: No specific warranty information is provided within this user manual. For details regarding warranty coverage, terms, and conditions, please refer to the product packaging, the purchase receipt, or contact the manufacturer directly.
Apoyo: For technical assistance, troubleshooting beyond this guide, or inquiries about your XTUGA BK510 system, please contact XTUGA customer support. You may find contact information on the official XTUGA websitio o a través de su punto de compra original.
Información de la FCC: For regulatory questions concerning wireless microphone systems, you can contact the FCC at 1-888-CALL-FCC (TTY: 1-888-TELL-FCC) or visit fcc.gov/cgb/microfonosinalámbricos.