1. Producto terminadoview
The Excelvan Wireless Weather Station (Model AOK-5061A) is designed to provide accurate indoor and outdoor temperature and humidity readings, along with weather forecasts and an alarm clock function. It features a large, colorful LCD display with LED backlight for easy readability.
Características principales:
- Medición de temperatura y humedad en interiores y exteriores
- Weather Forecast with 5 Icons (Sunny, Partially Sunny, Cloudy, Rain, Heavy Rain)
- DCF Radio-Controlled Clock with Manual Setting
- Alarm with Snooze Function
- Large Color LCD Display with LED Backlight
- DST (Daylight Saving Time) Automatic Update
- Wireless Outdoor Sensor with up to 50m range

Figura 1: Frente view of the Excelvan Wireless Weather Station main unit, displaying weather forecast, outdoor/indoor temperature and humidity, and time.
2. Guía de configuración
2.1 Contenido del paquete
Antes de continuar con la instalación, asegúrese de que todos los elementos estén presentes en el paquete:
- 1 unidad principal de estación meteorológica.
- 1 x sensor remoto inalámbrico
- Adaptador de corriente 1 x AC
- 1 x Manual de usuario

Figure 2: The complete package contents, including the main weather station unit, wireless remote sensor, power adapter, and user manual.
2.2 Alimentación de la unidad principal
- Instalación de la batería (opcional): Open the battery compartment on the back of the main unit. Insert 3 x 1.5V AA batteries (not included), ensuring correct polarity. The LED backlight will stay on for 5 minutes when powered by batteries.
- Adaptador de corriente CA (recomendado): For continuous backlight, connect the provided AC power adapter (4.5V, 150mA) to the main unit's power input and then plug it into a wall outlet.

Figura 3: Posterior view of the main unit showing the battery compartment with the cover removed, ready for battery insertion.

Figura 4: Posterior view of the main unit with the AC power adapter connected, illustrating the power input port.
2.3 Powering the Wireless Remote Sensor
- Open the battery compartment of the wireless remote sensor.
- Inserte 2 pilas AAA de 1.5 V (no incluidas), asegurándose de la polaridad correcta.
- Cierre bien el compartimento de la batería.

Figure 5: The wireless remote sensor, showing its display and the battery compartment on the back.
2.4 Colocación de sensores
- The main unit is intended for indoor use only.
- Place the wireless remote sensor outdoors in a sheltered area, away from direct sunlight and rain, to ensure accurate readings.
- Ensure the sensor is within 50 meters (open space) of the main unit for optimal signal reception.
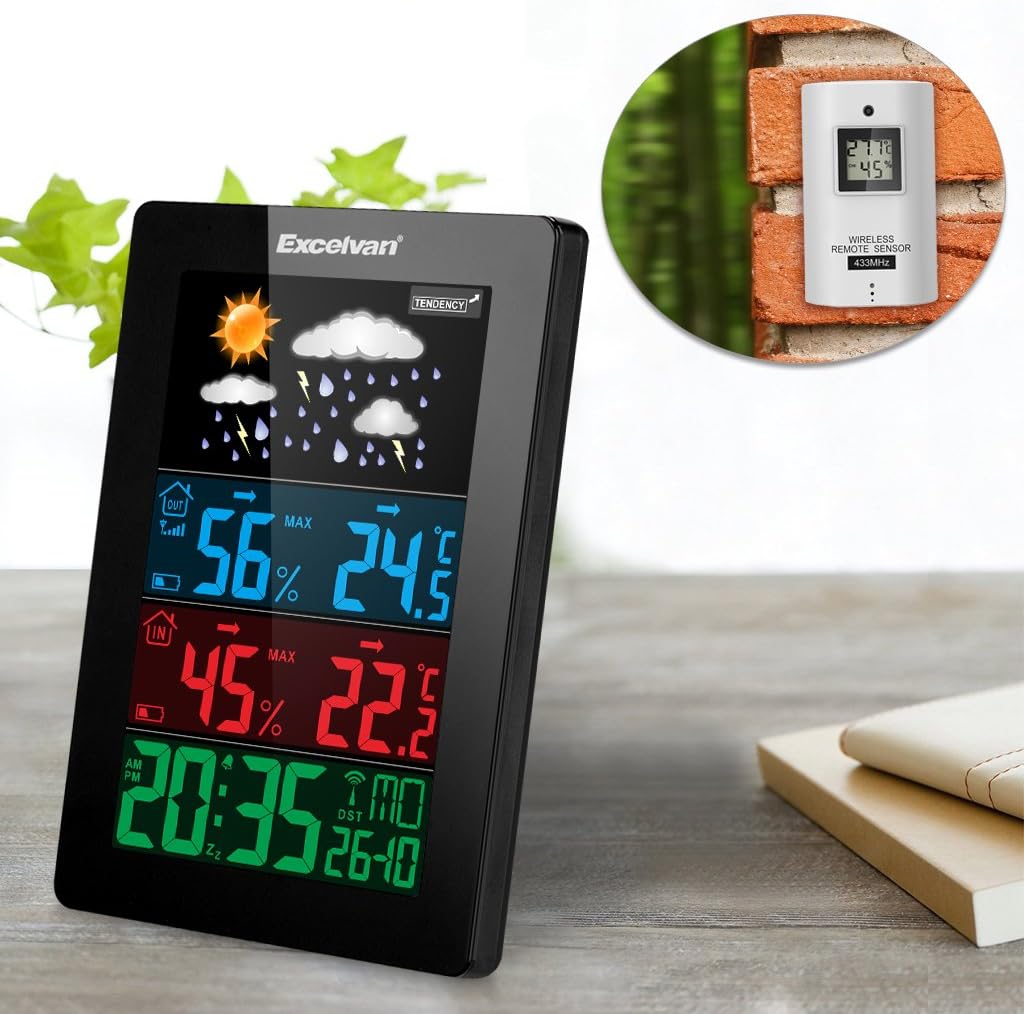
Figure 6: An illustration showing the main weather station unit indoors and the wireless remote sensor mounted on an outdoor wall.

Figure 7: A diagram highlighting the effective wireless transmission distance of 50 meters between the main unit and the remote sensor.
3. Instrucciones de funcionamiento
3.1 Sincronización inicial
After powering both units, the main unit will automatically attempt to synchronize with the remote sensor and receive the DCF radio-controlled time signal. This process may take a few minutes.
3.2 Visualización sobreview
La gran pantalla LCD muestra diversa información:
- Sección superior: Weather forecast icons (sunny, cloudy, rainy, etc.) and weather tendency indicator.
- Middle-Top Section (Blue): Outdoor humidity and temperature.
- Middle-Bottom Section (Red): Indoor humidity and temperature.
- Bottom Section (Green): Current time (12/24 hour format), day of the week, and date.
Figure 8: Close-up of the main unit's display, illustrating the different data sections for weather, outdoor/indoor conditions, and time.
3.3 Configuración manual de la hora y la fecha
While the unit is radio-controlled, manual adjustments can be made:
- Presione el MODO button to cycle through display modes.
- Sostener el MODO Botón durante unos segundos para ingresar al modo de configuración de la hora.
- Utilice el + y - Botones para ajustar los valores.
- Prensa MODO again to confirm and move to the next setting (e.g., hour, minute, year, month, day, language for day of week).
3.4 Función de alarma y repetición
- Presione el ALARMA botón para view or set the alarm time.
- Sostener el ALARMA Botón para entrar en el modo de configuración de alarma. Utilice + y - Para ajustar.
- Para activar/desactivar la alarma, presione el botón ALARMA Botón brevemente. Un icono de alarma aparecerá/desaparecerá en la pantalla.
- Cuando suene la alarma, toque el DORMITOR / LUZ button on top of the unit to activate the snooze function. The alarm will sound again after a few minutes.
- To stop the alarm completely, press any other button.

Figure 9: Top edge of the main unit, highlighting the "SNOOZE/LIGHT" touch-sensitive button for alarm snooze and backlight activation.
3.5 Selección de la unidad de temperatura
Presione el - Botón para cambiar entre unidades de temperatura Celsius (°C) y Fahrenheit (°F).
3.6 Pronóstico del tiempo
The weather station predicts weather conditions based on atmospheric pressure changes. The icons (sunny, partially sunny, cloudy, rain, heavy rain) indicate the forecast for the next 12-24 hours, not the current weather.
4. Mantenimiento
- Limpieza: Limpie la unidad principal y el sensor con un paño suave.amp Paño. No utilice limpiadores abrasivos ni disolventes.
- Reemplazo de batería: Replace batteries in both the main unit and the remote sensor when the low battery indicator appears on the display. Ensure correct polarity.
- Colocación de sensores: Periodically check the outdoor sensor's placement to ensure it remains sheltered and within range.
- Almacenamiento: Si va a almacenar la unidad durante un período prolongado, retire todas las baterías para evitar fugas.
5. Solución de problemas
| Problema | Posible causa | Solución |
|---|---|---|
| No hay lectura de temperatura/humedad exterior. |
|
|
| Visualización de hora incorrecta. |
|
|
| La pantalla está tenue o en blanco. |
|
|
6. Especificaciones
| Característica | Detalle |
|---|---|
| Reloj controlado por radio | DCF77 |
| Rango de temperatura interior | 0 ° C a +50 ° C (32 ° F a 122 ° F) |
| Rango de temperatura exterior | De -20 °C a +60 °C (de -4 °F a 140 °F) |
| Precisión de la medición de temperatura | ±2 °C |
| Rango de humedad interior/exterior | 20-90% de humedad relativa |
| Resolución de humedad | 1 % |
| Frecuencia del sensor inalámbrico | 433 MHz |
| Rango de señal inalámbrica | Hasta 50 metros (espacio abierto) |
| Probe Cable Length (for external probe, if applicable) | 1 metros |
| Waterproof Level of Sensor | IPX3 |
| Main Station Power | 3 x 1.5V AA batteries (not included) or 4.5V, 150mA AC adapter (included) |
| Alimentación del sensor remoto | 2 pilas AAA de 1.5 V (no incluidas) |
| Main Station Dimensions | 148 × 110 × 30 mm |
| Main Station Weight (without batteries) | 242 gramos |
| Dimensiones del sensor remoto | 60 × 100 × 20 mm |
| Remote Sensor Weight (without batteries) | 50 gramos |
| Idiomas del día de la semana | German, English, Italian, French, Dutch, Spanish, Danish |
7. Garantía y soporte
For warranty information or technical support, please refer to the documentation provided with your purchase or contact Excelvan customer service through their official websitio o su distribuidor.
Nota: Este manual es solo para fines informativos. Las especificaciones están sujetas a cambios sin previo aviso.