Introducción
This manual provides detailed instructions for the safe and efficient operation, setup, and maintenance of your KRUPS EC314 12-Cup Programmable Digital Coffee Maker. Please read all instructions carefully before first use and retain this manual for future reference.

Imagen: Frente view of the KRUPS EC314 12-Cup Programmable Digital Coffee Maker, showcasing its stainless steel and black design with the glass carafe in place.
Instrucciones de seguridad importantes
- Lea todas las instrucciones antes de utilizar el aparato.
- No toque superficies calientes. Utilice asas o perillas.
- Para protegerse contra incendios, descargas eléctricas y lesiones personales, no sumerja el cable, los enchufes ni la cafetera en agua ni en ningún otro líquido.
- Es necesaria una estrecha supervisión cuando cualquier aparato sea utilizado por niños o cerca de ellos.
- Desenchufe el aparato del tomacorriente cuando no lo utilice y antes de limpiarlo. Deje que se enfríe antes de colocar o quitar piezas y antes de limpiarlo.
- No utilice ningún aparato que tenga un cable o enchufe dañados o que presente algún tipo de avería o daño. Devuelva el aparato al centro de servicio autorizado más cercano para que lo examinen, lo reparen o lo ajusten.
- El uso de accesorios no recomendados por el fabricante del aparato puede provocar incendios, descargas eléctricas o lesiones a las personas.
- No utilizar en exteriores.
- No deje que el cable cuelgue del borde de la mesa o mostrador, ni que toque superficies calientes.
- No lo coloque sobre o cerca de un quemador de gas o eléctrico caliente, ni dentro de un horno caliente.
- Siempre conecte primero el enchufe al aparato y luego el cable a la toma de corriente. Para desconectarlo, apague cualquier control y desenchúfelo de la toma de corriente.
- No utilice el aparato para ningún fin distinto del previsto.
- La jarra está diseñada para usarse con este aparato. Nunca debe usarse sobre una estufa.
- No coloque una jarra caliente sobre una superficie húmeda o fría.
- No utilice una jarra agrietada o que tenga el asa suelta o debilitada.
- No limpie la jarra con limpiadores, estropajos de acero ni otros materiales abrasivos.
- Se pueden producir quemaduras si se quita la tapa durante los ciclos de preparación.
Componentes del producto
Familiarícese con las partes de su cafetera:
- Depósito de agua con indicador de nivel
- Control Panel with LCD Screen and Rotating Knob
- Canasta de preparación
- Filtro permanente dorado
- Glass Carafe with Stay-Cool Handle
- Plato calentador
- Tapa

Image: Close-up of the coffee maker's control panel, showing the digital display, rotating brew knob, and water level indicator on the side.
Configuración
- Desembalaje: Retire con cuidado todos los materiales y componentes del embalaje.
- Limpieza inicial: Before first use, wash the carafe, lid, and permanent filter in warm, soapy water. Rinse thoroughly. Wipe the exterior of the coffee maker with a damp paño.
- Primer ciclo de preparación (limpieza):
- Llene el depósito de agua con agua fresca y fría hasta la marca de 12 tazas.
- Place the permanent filter into the brew basket. Do not add coffee grounds for this cycle.
- Coloque la jarra con su tapa sobre la placa calentadora.
- Conecte la cafetera a una toma eléctrica estándar.
- Presione el ELABORAR CERVEZA button to start a full brewing cycle with only water.
- Una vez finalizado el ciclo, deseche el agua de la jarra. Su cafetera ya está lista para usar.
- Ajuste del reloj:
- Ensure the coffee maker is plugged in.
- Mantenga pulsado el RELOJ botón (normalmente situado cerca de la pantalla).
- Utilice el + y - buttons or the rotating knob to set the current time. Pay attention to AM/PM indication.
- Liberar el RELOJ Botón para guardar el tiempo.
Instrucciones de funcionamiento
Elaboración básica de cerveza
- Llenar el depósito de agua: Open the lid and pour fresh, cold water into the water reservoir. Use the water level indicator on the side to fill to your desired number of cups (up to 12 MAX).

Image: A hand holding the glass carafe, pouring water into the coffee maker's open water reservoir.
- Agregar café molido: Place the gold-tone permanent filter into the brew basket. Add the desired amount of ground coffee. A general guideline is one tablespoon of ground coffee per cup, but adjust to your taste.

Imagen: Un primer plano view of the gold-tone permanent filter filled with ground coffee, placed inside the brew basket.
- Posición de la jarra: Asegúrese de que la jarra de vidrio con su tapa esté colocada correctamente sobre la placa calentadora.
- Comience a preparar: Presione el ELABORAR CERVEZA button. The brewing indicator will illuminate, and the brewing process will begin.
- Pausa y sirve: You can temporarily remove the carafe during brewing to pour a cup. The drip stop feature will prevent coffee from dripping for a short period. Return the carafe to the warming plate within 20 seconds to prevent overflow.
- Mantener caliente: After brewing, the coffee maker will automatically enter the "Keep Warm" mode, maintaining the coffee's temperature for up to four hours. The display will show the remaining keep-warm time.
Funciones de programación
- Temporizador de encendido automático:
- Prepare the coffee maker for brewing (water and coffee grounds added).
- Presione el AUTO ON 1/2 button. The display will show "AUTO ON 1" or "AUTO ON 2".
- Utilice el + y - buttons or the rotating knob to set the desired brew start time.
- Presione el AUTO ON 1/2 button again to confirm the time. The indicator light will illuminate, signifying the timer is set.
- The coffee maker features dual program settings, allowing for separate weekday and weekend auto-on times.
- Brew Strength (REG/BOLD):
- Antes de preparar el café, presione el botón REG/BOLD button to toggle between regular and bold coffee strength. The selected strength will be indicated on the display.
- Small Batch (1-4 Cups):
- When brewing 1 to 4 cups, press the 1-4 button before starting the brew cycle. This optimizes the brewing process for smaller quantities to ensure full flavor.
- Keep Warm Temperature and Time:
- Presione el TEMPERATURA button to cycle through three preset warming plate temperatures.
- Presione el TIEMPO button to adjust the keep-warm duration up to four hours.

Imagen: Detallada view of the coffee maker's control panel, highlighting the digital display, brew strength, and keep warm settings.
Mantenimiento
Limpieza diaria
- Desenchufe siempre la cafetera antes de limpiarla.
- Wash the carafe, carafe lid, and permanent filter in warm, soapy water after each use. These parts are not dishwasher safe.
- Limpie el exterior de la cafetera con un paño suave yamp tela. No utilice limpiadores abrasivos ni estropajos.
- No sumerja la cafetera en agua ni en ningún otro líquido.
Descalcificación
Mineral deposits (limescale) can build up in your coffee maker over time, affecting performance and coffee taste. The LIMPIO indicator on the display will illuminate to remind you when descaling is recommended.

Image: Two cups of coffee with coffee beans, emphasizing the importance of descaling for optimal performance.
- Prepare la solución descalcificadora: Mix 1 part white vinegar with 2 parts cold water, or use a commercial descaling solution designed for coffee makers. Fill the water reservoir with this solution up to the 12-cup mark.
- Iniciar ciclo de descalcificación: Place the empty carafe with its lid on the warming plate. Press the LIMPIO button. The coffee maker will perform a descaling cycle.
- Ciclos de enjuague: After the descaling cycle is complete, discard the solution. Fill the water reservoir with fresh, cold water and run two full brewing cycles with only water to rinse the system thoroughly.
- El LIMPIO indicator will turn off after the descaling process is complete.
Solución de problemas
| Problema | Posible causa | Solución |
|---|---|---|
| El café no sale. |
|
|
| El café tiene un sabor débil. |
|
|
| El café se desborda de la canasta de preparación. |
|
|
| "CLEAN" indicator remains on after descaling. | Descaling cycle not fully completed or not enough rinse cycles. | Run additional rinse cycles with fresh water until the indicator turns off. |
Presupuesto
- Modelo: EC314
- Capacidad: 12 tazas (60 oz)
- Fuerza: 110 voltios, 1300 vatios
- Dimensiones (profundidad x anchura x altura): 9.6" x 9.6" x 15.9"
- Peso: 9.9 libras
- Material: Acero inoxidable, plástico
- Tipo de filtro: Reusable Gold-Tone Filter
- Características especiales: Programmable, Auto-On, Brew Strength Control, 1-4 Cup Setting, Adjustable Keep Warm Temperature & Time, Pause & Serve, Descale Reminder.
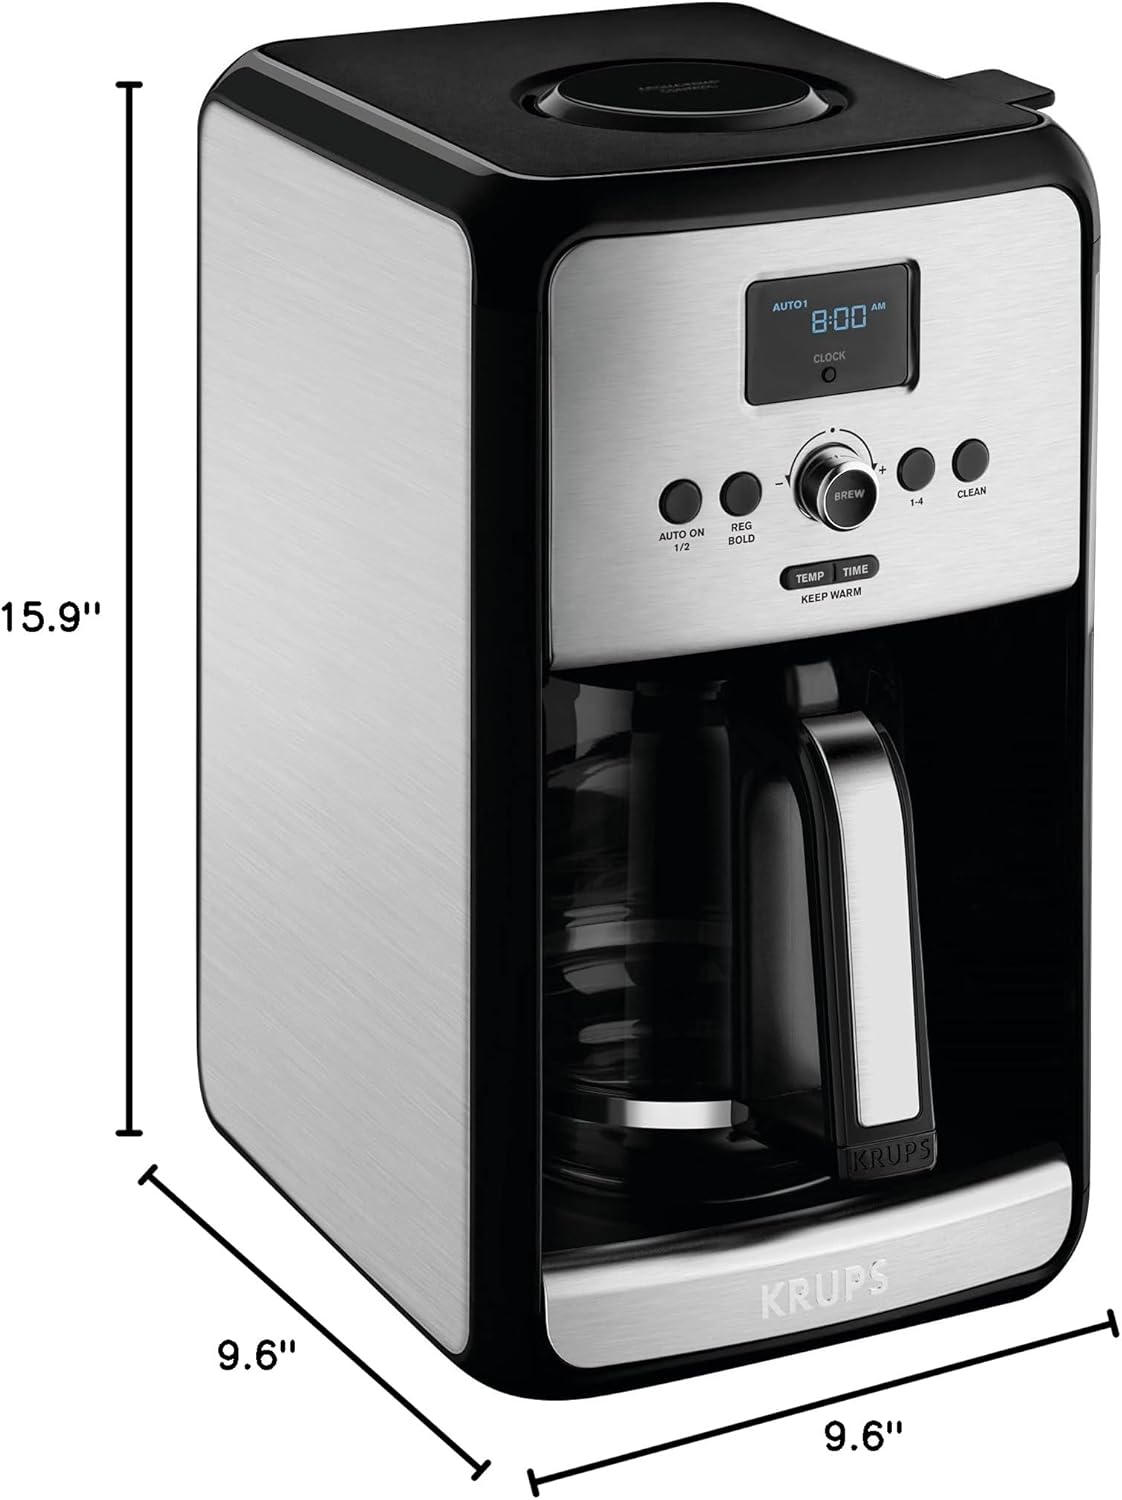
Image: Diagram showing the dimensions (depth, width, height) of the KRUPS EC314 coffee maker.
Garantía y soporte
For warranty information, product registration, or technical support, please refer to the official KRUPS website or contact KRUPS customer service. Keep your proof of purchase for warranty claims.
Soporte en línea: Visita www.krups.com for FAQs, product information, and service center locations.
Servicio al cliente: Contact information can typically be found on the KRUPS websitio o en los materiales de embalaje.