
Manual del usuario del sistema de subwoofer 5.1 de cine en casa Sunstech XD TH-35
Modelo: TH-XD 35
1. Introducción
This manual provides essential information for the safe and efficient operation of your Sunstech XD TH-35 Home Cinema 5.1 Subwoofer System. Please read this manual thoroughly before using the product and retain it for future reference.
The Sunstech XD TH-35 is a 5.1 channel home cinema system designed to deliver an immersive audio experience for movies, music, and games. It includes a main unit (DVD/CD/DivX player), a subwoofer, and five satellite speakers.
2. Información de seguridad
ADVERTENCIA: Para reducir el riesgo de descarga eléctrica, no retire la cubierta (ni la parte trasera). En el interior no hay piezas que el usuario pueda reparar. Consulte el servicio a personal de servicio calificado.
- Fuente de energía: Asegúrese de que la fuente de alimentación voltage coincide con la etiqueta de clasificación de la unidad.
- Ventilación: No obstruya las aberturas de ventilación. Instale el producto según las instrucciones del fabricante.
- Agua y humedad: No exponga este aparato a la lluvia ni a la humedad. No coloque objetos con líquido, como jarrones, sobre él.
- Calor: No lo instale cerca de fuentes de calor como radiadores, rejillas de calefacción, estufas u otros aparatos (incluidos ampificadores) que producen calor.
- Limpieza: Desenchufe este aparato durante tormentas eléctricas o si no lo va a utilizar durante un tiempo prolongado. Límpielo únicamente con un paño seco.
- Servicio: Encargue todas las tareas de mantenimiento a personal técnico cualificado. Se requiere realizar el mantenimiento cuando el aparato haya sufrido algún daño, como por ejemplo si el cable de alimentación o el enchufe están dañados, si se ha derramado líquido o han caído objetos en el interior del aparato, si el aparato ha estado expuesto a la lluvia o la humedad, si no funciona con normalidad o si se ha caído.
3. Contenido del paquete
Compruebe que todos los artículos enumerados a continuación estén incluidos en su paquete:
- Main Unit (DVD/CD/DivX Player)
- Altavoz de subgraves
- Front Left Satellite Speaker
- Front Right Satellite Speaker
- Center Satellite Speaker
- Rear Left Satellite Speaker
- Rear Right Satellite Speaker
- Mando a distancia
- Cables de audio y vídeo
- Manual de usuario (este documento)
4. Producto terminadoview
The Sunstech XD TH-35 system comprises a central player unit, a powerful subwoofer, and five compact satellite speakers, along with a remote control for convenient operation.
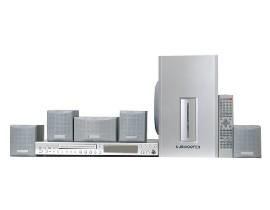
Figura 4.1: Encimaview of the Sunstech XD TH-35 Home Cinema 5.1 Subwoofer System, showing the main unit, subwoofer, five satellite speakers, and remote control.
4.1 Main Unit (DVD/CD/DivX Player)
This unit serves as the central control hub, featuring disc playback capabilities for CD, DVD, and DivX formats. It includes various input/output ports for connecting to your television and other audio sources.
4.2 altavoz de subgraves
The subwoofer is responsible for reproducing low-frequency sounds, adding depth and impact to your audio experience. It connects directly to the main unit.
4.3 altavoces satélite
Five satellite speakers (Front Left, Front Right, Center, Rear Left, Rear Right) provide the surround sound experience, distributing audio across your listening area for immersive soundscapes.
4.4 control remoto
The included remote control allows for convenient adjustment of volume, input selection, playback controls, and other system settings from a distance.
5. Configuración
5.1 Ubicación de los altavoces
Optimal speaker placement is crucial for achieving the best 5.1 surround sound experience.
- Altavoz central: Place directly above or below your television, centered.
- Altavoces delanteros izquierdo/derecho: Position these speakers equidistant from the television, forming an equilateral triangle with your primary listening position.
- Altavoces traseros izquierdo/derecho: Place these speakers to the sides or slightly behind your primary listening position, at ear level or slightly above.
- Subwoofer: The subwoofer can be placed anywhere in the room, but typically performs well in a corner or near a wall to enhance bass response. Experiment with placement for best results.
5.2 Conexión de los altavoces
- Identify the speaker output terminals on the main unit and the corresponding input terminals on each speaker.
- Connect the Front Left speaker to the "FL" terminal, Front Right to "FR", Center to "CEN", Rear Left to "RL", and Rear Right to "RR".
- Connect the subwoofer to the dedicated "SUBWOOFER OUT" port on the main unit.
- Ensure all connections are secure and the correct polarity (+ to + and - to -) is observed for each speaker wire.
5.3 Connecting to a Television/Display
Use the provided audio/video cables to connect the main unit to your television. Common connection types include:
- Video compuesto: Connect the yellow video output from the main unit to the yellow video input on your TV.
- Audio estéreo: Connect the red and white audio outputs from the main unit to the corresponding red and white audio inputs on your TV.
- (Note: Depending on your TV and the system's capabilities, other connections like S-Video or Component Video might be available for better picture quality. Refer to your TV's manual for input options.)
5.4 Conexión de alimentación
- Once all audio/video and speaker connections are made, plug the main unit's power cord into a wall outlet.
- Turn on the main unit using the power button on the front panel or the remote control.
6. Instrucciones de funcionamiento
6.1 Reproducción básica
- Encendido: Presione el FUERZA Botón en la unidad principal o en el control remoto.
- Insertar disco: Gently insert a CD, DVD, or DivX disc into the disc tray. The tray will automatically close, and playback should begin.
- Seleccionar entrada: If the system does not automatically switch to disc playback, press the APORTE or FUENTE Botón en el control remoto para seleccionar la entrada correcta.
- Control de volumen: Utilice el VOL+ y VOLUMEN - buttons on the remote to adjust the master volume.
- Controles de reproducción: Usar JUGAR, PAUSA, DETENER, SALTAR, y AVANCE / REBOBINADO RÁPIDO buttons for disc navigation.
6.2 Configuración de audio
Access the system's on-screen menu (usually by pressing CONFIGURACIÓN or MENÚ on the remote) to adjust audio settings such as:
- Speaker Levels: Adjust the individual volume levels for each speaker (Front, Center, Rear, Subwoofer) to balance the sound.
- Configuración de retraso: Compensate for different distances of speakers from the listening position.
- Modos de sonido: Select from various preset sound modes (e.g., Movie, Music, Game) or customize equalizer settings.
6.3 Funciones de control remoto
The remote control provides full functionality for the system. Familiarize yourself with the button layout for easy operation.
(Note: A detailed diagram of the remote control with button descriptions would typically be included here in a physical manual.)
7. Mantenimiento
7.1 Limpieza de la unidad
Para mantener la apariencia y el rendimiento de su sistema:
- Exterior: Limpie las superficies exteriores con un paño suave y seco. No utilice limpiadores abrasivos, ceras ni disolventes.
- Bandeja de disco: Mantenga la bandeja de discos limpia y sin polvo. Evite tocar la lente del interior.
- Ventilación: Asegúrese de que las aberturas de ventilación estén libres de polvo y residuos para evitar el sobrecalentamiento.
7.2 Cuidado del disco
Handle discs by their edges. Store discs in their cases when not in use to prevent scratches and dust accumulation. Clean discs with a soft, lint-free cloth, wiping from the center outwards.
7.3 Pilas del control remoto
If the remote control's range decreases or it becomes unresponsive, replace the batteries with new ones of the specified type (e.g., AAA). Ensure correct polarity when inserting new batteries.
8. Solución de problemas
If you encounter problems with your system, refer to the following table for common issues and solutions.
| Problema | Posible causa | Solución |
|---|---|---|
| Sin poder | Cable de alimentación no conectado; toma de corriente defectuosa | Verifique la conexión del cable de alimentación; Pruebe con una toma de corriente diferente |
| Sin sonido | Volume too low; Incorrect input selected; Speaker wires loose/incorrectly connected | Increase volume; Select correct input; Check all speaker connections and polarity |
| Sin imagen | Video cable loose/incorrectly connected; Incorrect TV input selected | Check video cable connections; Select correct input on TV |
| Disco que no se reproduce | Disco insertado incorrectamente; El disco está sucio o rayado; Formato de disco no compatible | Re-insert disc correctly; Clean or replace disc; Check disc compatibility (CD, DVD, DivX) |
| El control remoto no funciona | Pilas agotadas o insertadas incorrectamente; Obstrucción entre el control remoto y la unidad | Replace batteries, check polarity; Remove obstructions; Ensure remote is pointed at the unit's sensor |
If the problem persists after trying these solutions, please contact Sunstech customer support or a qualified service technician.
9. Especificaciones
| Característica | Detalle |
|---|---|
| Nombre del modelo | TH-XD 35 |
| Marca | Tecnología solar |
| Configuración de sonido envolvente | 5.1 (5 Speakers + 1 Subwoofer) |
| Quétage | 170 vatios |
| Tipos de medios admitidos | CD, DVD, DivX |
| ASIN | B0044ALAEM |
| Primera fecha disponible | 21 de febrero de 2020 |
10. Garantía y soporte
For warranty information and customer support, please refer to the warranty card included with your product or visit the official Sunstech webSitio. Conserve su comprobante de compra para reclamaciones de garantía.
Soporte en línea: www.sunstech.com/support (This is a placeholder link, please replace with the actual support URL si está disponible)
Contacto: Refer to your regional Sunstech contact information for service inquiries.