
1. Enkonduko
This manual provides essential instructions for the safe and efficient operation of your Saooer Solar Charge Controller. This device is designed to manage the power flow from your solar panel to your battery, ensuring optimal charging and protecting your battery from overcharge and over-discharge. It is compatible with both 12V and 24V solar systems and features a 30A discharge current capacity.
2. Sekurecaj Instrukcioj
Please read all safety instructions carefully before installation and operation. Failure to follow these instructions may result in damage to the controller, battery, or other components, and may cause personal injury.
- Certigu, ke la kuirilaro voltage is sufficient for the controller to recognize the battery type before the first installation.
- The charge controller is suitable for lead-acid batteries (OPEN, AGM, GEL) and lithium-ion batteries. Do not use it for other battery types.
- Install the charge controller indoors, away from direct sunlight, high temperatures, and humid environments.
- The controller will heat up during operation; ensure good ventilation.
- The controller's positive and negative terminals should be connected correctly. Reverse connection may damage the device.
- Ĉiam konektu la baterion unue, poste la sunpanelon, kaj fine la ŝarĝilon. Malkonektu en inversa ordo: ŝarĝilo, poste la sunpanelo, poste la baterio.
3. Produktaj Trajtoj
- Sistemo Voltage Kongrueco: Automatically detects 12V or 24V systems.
- Malŝarĝa Kurento: 30A kapablo.
- Integrated Micro Controller: Manages solar panel and battery operation efficiently.
- Duoblaj USB-Havenoj: Supports mobile phone charging (5V/2A output).
- Ampleksa Protekto: Includes short-circuit protection, open-circuit protection, reverse polarity protection, and over-load protection to enhance system efficiency and battery lifespan.
- LCD-ekrano: Provides clear indication of status and data, allowing for convenient mode switching and parameter configuration.
- Alĝustigeblaj Parametroj: User-configurable settings for various battery types and operational needs.
- Enkorpigita Tempigilo: For load control.
4. Pako Enhavo
- 1x Saooer Solar Charge Controller (30A)
5. Instalado kaj Instalado
Follow these steps for proper installation of the solar charge controller. Incorrect connection order can damage the controller.
- Konektu la Baterion: Connect the battery to the charge regulator first. Ensure correct polarity (positive to positive, negative to negative). This allows the controller to recognize the battery voltage.
- Konektu la Sunan Panelon: Connect the solar panel to the solar charge controller. Ensure correct polarity.
- Konekti la Ŝarĝon: Connect the consumer or load to the charge controller regulator. Ensure correct polarity.
Important Disconnection Note:
When disconnecting the system, always remove the solar panel connection first, then the load connection, and finally the battery connection. This prevents potential damage to the controller.

6. Funkciaj Instrukcioj
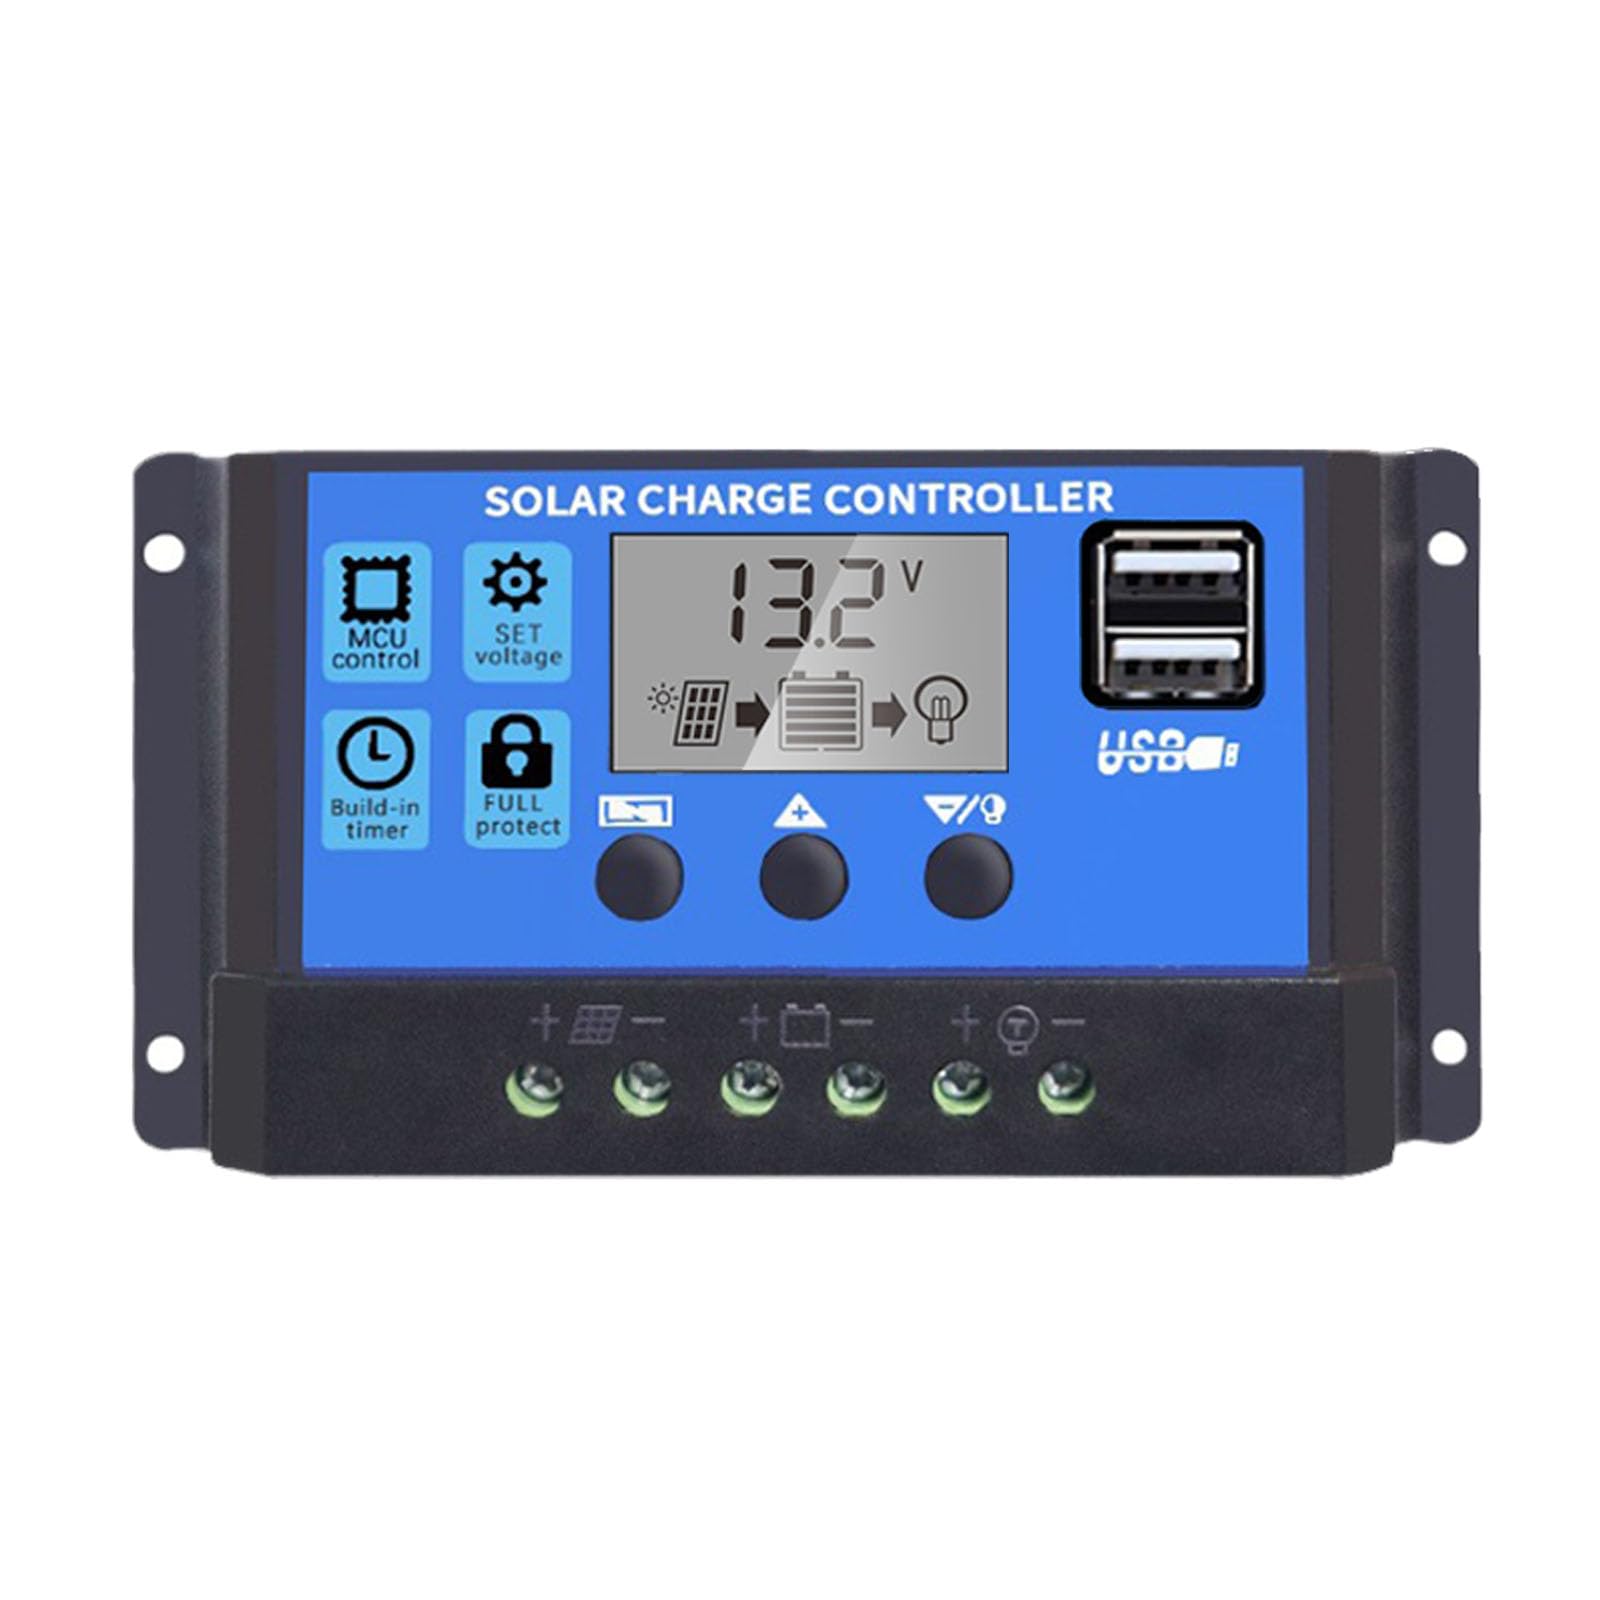
The controller features an LCD display and three buttons for operation: MENUO, UP, kaj SUBEN.
6.1. Display LCD
The LCD display shows real-time system status and data, including battery voltage, charging current, discharging current, and various parameter settings.
6.2. Butonaj Funkcioj
- Butono MENU: Press to cycle through different display modes and enter parameter setting mode. Long press to exit setting mode.
- UP Butono: In setting mode, press to increase the parameter value.
- Malsupren Butono: In setting mode, press to decrease the parameter value.
6.3. Parametraj Agordoj
To adjust parameters (e.g., battery type, charge/discharge voltage limits, load timer settings):
- Premu la MENUO button until the desired parameter display appears.
- Longe premu la MENUO button until the displayed value starts flashing.
- Uzu la UP kaj SUBEN butonoj por ĝustigi la valoron.
- Once the desired value is set, long press the MENUO button again to save the setting and exit the flashing state.
Refer to the specific icons on the LCD for detailed parameter identification.

7. Prizorgado
Regular maintenance ensures the longevity and optimal performance of your solar charge controller.
- Pureco: Tenu la regilon pura kaj libera de polvo kaj rubo. Uzu sekan tukon por purigi.
- Konektoj: Periodically check all wiring connections to ensure they are tight and free from corrosion. Loose connections can cause power loss and overheating.
- Ventolado: Ensure the installation area has adequate ventilation to prevent overheating of the controller.
- Inspektado: Inspect the controller for any signs of physical damage or unusual operation.
8. Respondecaj problemoj
If you encounter issues with your solar charge controller, consider the following common troubleshooting steps:
- Neniu Ekrano/Neniu Energio: Kontrolu la konektojn de la baterio kaj certigu, ke la baterio havas sufiĉan tensioŝarĝontage. Verify all wiring is correct and secure.
- Baterio Ne Ŝarĝanta: Check solar panel connections and ensure the panel is receiving adequate sunlight. Verify solar panel voltage and current. Ensure the controller's charging parameters are correctly set for your battery type.
- Ŝarĝo ne funkcias: Check load connections. Ensure the load is not exceeding the controller's rated current. Check the load timer settings if applicable. The controller may have entered protection mode due to over-discharge or over-load; check the display for error codes or indicators.
- Super-Voltage/Sub-Voltage Alarms: Kontrolu la voltage. Ensure solar panel open-circuit voltage does not exceed the controller's maximum input voltage.
If the problem persists after performing these checks, please contact customer support.
9. Specifoj
| Karakterizaĵo | Specifo |
|---|---|
| Marko | Saooer |
| Modelo | 30A Suna Ŝarĝregilo |
| Sistemo Voltage | 12V / 24V Aŭtomata sensado |
| Malŝarĝa Kurento | 30A |
| Materialo | Metalo, Plasto |
| Montra Tipo | LCD |
| USB-Eligo | Dual USB, 5V/2A |
| Inkluditaj Komponantoj | 1x Solar Charge Controller |

10. Garantio kaj Subteno
For warranty information, please refer to the documentation provided with your purchase or contact your retailer. For technical support or inquiries, please contact Saooer customer service through their official channels.